deactivate GMC SIERRA DENALI 2024 Owners Manual
[x] Cancel search | Manufacturer: GMC, Model Year: 2024, Model line: SIERRA DENALI, Model: GMC SIERRA DENALI 2024Pages: 440, PDF Size: 9.21 MB
Page 29 of 440
GMC Sierra/Sierra Denali 2500 HD/3500 HD Owner Manual (GMNA-
Localizing-U.S./Canada-16908340) - 2024 - CRC - 12/7/22
Keys, Doors, and Windows 27
completion. If the vehicle is accelerated
while the tailgate is still closing, the tailgate
may stop and reverse direction. Make sure
the tailgate is closed and latched before
driving.
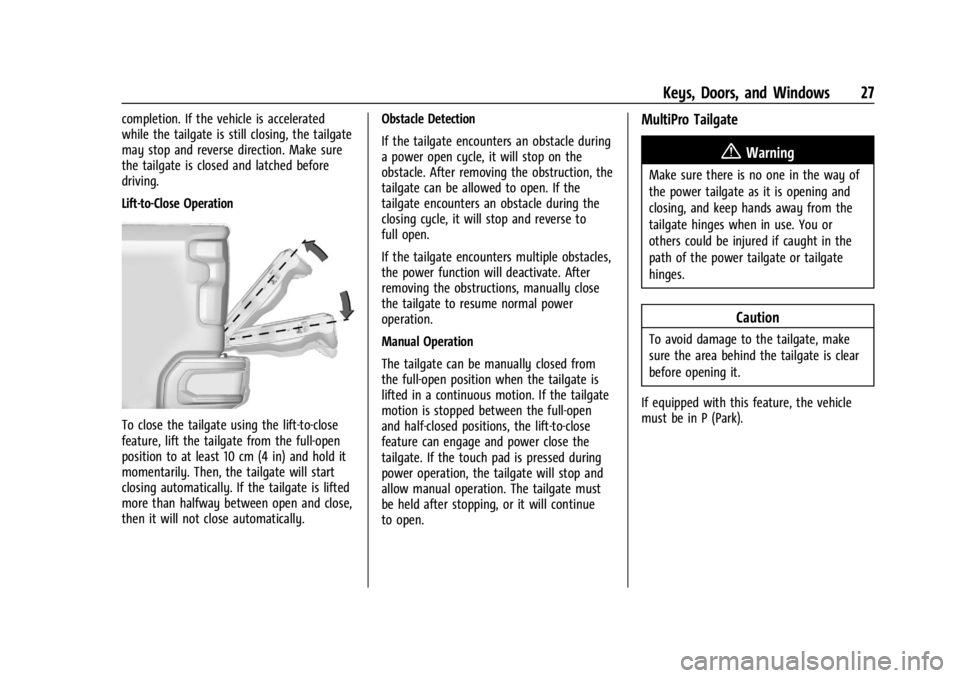
Lift-to-Close Operation
To close the tailgate using the lift-to-close
feature, lift the tailgate from the full-open
position to at least 10 cm (4 in) and hold it
momentarily. Then, the tailgate will start
closing automatically. If the tailgate is lifted
more than halfway between open and close,
then it will not close automatically.Obstacle Detection
If the tailgate encounters an obstacle during
a power open cycle, it will stop on the
obstacle. After removing the obstruction, the
tailgate can be allowed to open. If the
tailgate encounters an obstacle during the
closing cycle, it will stop and reverse to
full open.
If the tailgate encounters multiple obstacles,
the power function will deactivate. After
removing the obstructions, manually close
the tailgate to resume normal power
operation.
Manual Operation
The tailgate can be manually closed from
the full-open position when the tailgate is
lifted in a continuous motion. If the tailgate
motion is stopped between the full-open
and half-closed positions, the lift-to-close
feature can engage and power close the
tailgate. If the touch pad is pressed during
power operation, the tailgate will stop and
allow manual operation. The tailgate must
be held after stopping, or it will continue
to open.
MultiPro Tailgate
{Warning
Make sure there is no one in the way of
the power tailgate as it is opening and
closing, and keep hands away from the
tailgate hinges when in use. You or
others could be injured if caught in the
path of the power tailgate or tailgate
hinges.
Caution
To avoid damage to the tailgate, make
sure the area behind the tailgate is clear
before opening it.
If equipped with this feature, the vehicle
must be in P (Park).
Page 36 of 440

GMC Sierra/Sierra Denali 2500 HD/3500 HD Owner Manual (GMNA-
Localizing-U.S./Canada-16908340) - 2024 - CRC - 12/7/22
34 Keys, Doors, and Windows
The security light, in the instrument cluster,
comes on if there is a problem with arming
or disarming the theft-deterrent system.
The system has one or more remote keys
matched to an immobilizer control unit in
your vehicle. Only a correctly matched
remote key will start the vehicle. If the
remote key is ever damaged, you may not
be able to start your vehicle.
When trying to start the vehicle, the
security light may come on briefly when the
ignition is turned on. If the engine does not
start and the security light stays on, there is
a problem with the system. Turn the
ignition off and try again.
If the vehicle will not change ignition modes
(accessory mode, on, off), and the remote
key appears to be undamaged, try another
remote key. Or, you may try placing the
remote key in the remote key pocket
located in the center console. SeeRemote
Key Operation 015.
If the ignition mode will not change with
the other remote key or with the remote
key in the remote key pocket, your vehicle
needs service. If the ignition does change
modes, the first remote key may be faulty. See your dealer who can service the
theft-deterrent system and have a new
remote key programmed to the vehicle.
It is possible for the immobilizer system to
learn new or replacement remote keys. Up
to eight remote keys can be programmed
for the vehicle. To program additional
remote keys, see "Programming Remote
Keys to the Vehicle" under
Remote Key
Operation 015.
Do not leave the remote key or device that
disarms or deactivates the vehicle theft
system in the vehicle.
Exterior Mirrors
Convex Mirrors
{Warning
A convex mirror can make things, like
other vehicles, look farther away than
they really are. If you cut too sharply
into the right lane, you could hit a
vehicle on the right. Check the inside
mirror or glance over your shoulder
before changing lanes. Standard Mirrors
If equipped, the passenger side mirror is
convex shaped. A convex mirror surface is
curved so more can be seen from the
driver seat.
Trailer-Tow Mirrors
The upper portion of both the driver and
passenger mirrors is flat.
The lower portion of both the driver and
passenger mirrors is convex. A convex mirror
surface is curved so more can be seen from
the driver seat. The lower portion is
adjusted manually.
Manual Mirrors
If equipped, adjust manual mirrors by
moving the mirror up and down or left to
right to see a little of the side of the vehicle
and to have a clear view behind the vehicle.
Using hood-mounted air deflectors and
add-on convex mirror attachments could
decrease mirror performance.
Page 43 of 440
GMC Sierra/Sierra Denali 2500 HD/3500 HD Owner Manual (GMNA-
Localizing-U.S./Canada-16908340) - 2024 - CRC - 12/7/22
Keys, Doors, and Windows 41
Truck Bed Camera Rearview
Mirror
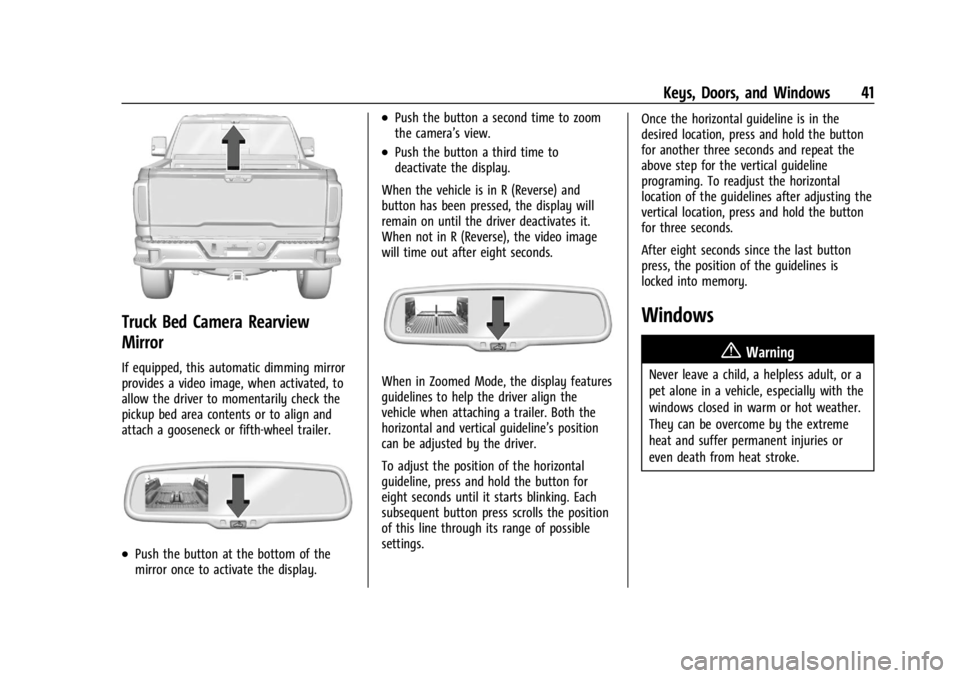
If equipped, this automatic dimming mirror
provides a video image, when activated, to
allow the driver to momentarily check the
pickup bed area contents or to align and
attach a gooseneck or fifth-wheel trailer.
.Push the button at the bottom of the
mirror once to activate the display.
.Push the button a second time to zoom
the camera’s view.
.Push the button a third time to
deactivate the display.
When the vehicle is in R (Reverse) and
button has been pressed, the display will
remain on until the driver deactivates it.
When not in R (Reverse), the video image
will time out after eight seconds.
When in Zoomed Mode, the display features
guidelines to help the driver align the
vehicle when attaching a trailer. Both the
horizontal and vertical guideline’s position
can be adjusted by the driver.
To adjust the position of the horizontal
guideline, press and hold the button for
eight seconds until it starts blinking. Each
subsequent button press scrolls the position
of this line through its range of possible
settings. Once the horizontal guideline is in the
desired location, press and hold the button
for another three seconds and repeat the
above step for the vertical guideline
programing. To readjust the horizontal
location of the guidelines after adjusting the
vertical location, press and hold the button
for three seconds.
After eight seconds since the last button
press, the position of the guidelines is
locked into memory.
Windows
{
Warning
Never leave a child, a helpless adult, or a
pet alone in a vehicle, especially with the
windows closed in warm or hot weather.
They can be overcome by the extreme
heat and suffer permanent injuries or
even death from heat stroke.
Page 152 of 440
GMC Sierra/Sierra Denali 2500 HD/3500 HD Owner Manual (GMNA-
Localizing-U.S./Canada-16908340) - 2024 - CRC - 12/7/22
150 Lighting
Become familiar with and follow all state
and local laws that apply to cargo lamp
operation.
Interior Lighting
Instrument Panel Illumination
Control
Work Truck and Custom
Base Level Shown, Uplevel Similar
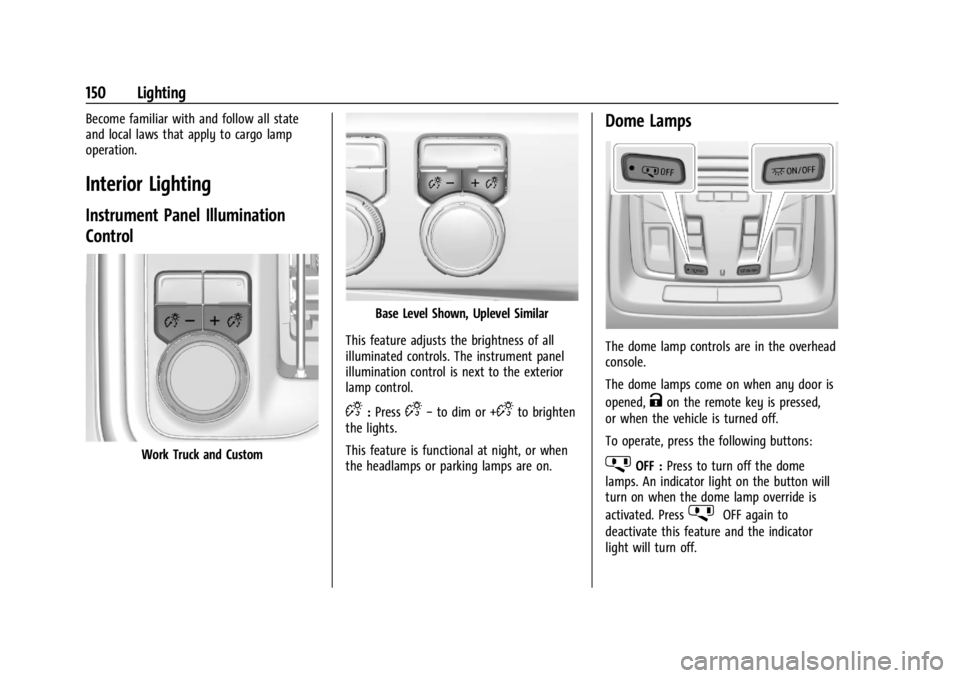
This feature adjusts the brightness of all
illuminated controls. The instrument panel
illumination control is next to the exterior
lamp control.
D: PressD− to dim or +Dto brighten
the lights.
This feature is functional at night, or when
the headlamps or parking lamps are on.
Dome Lamps
The dome lamp controls are in the overhead
console.
The dome lamps come on when any door is
opened,
Kon the remote key is pressed,
or when the vehicle is turned off.
To operate, press the following buttons:
jOFF : Press to turn off the dome
lamps. An indicator light on the button will
turn on when the dome lamp override is
activated. Press
jOFF again to
deactivate this feature and the indicator
light will turn off.
Page 241 of 440
GMC Sierra/Sierra Denali 2500 HD/3500 HD Owner Manual (GMNA-
Localizing-U.S./Canada-16908340) - 2024 - CRC - 12/13/22
Driving and Operating 239
standard/default mode. There is no
persistent indicator in the instrument cluster
for this mode.
6Snow/Ice Mode :Snow/Ice Mode
improves vehicle acceleration on snow and
ice covered roads. When active, Snow/Ice
Mode will adjust acceleration to optimize
traction on slippery surfaces. This can
compromise the acceleration on dry asphalt.
This feature is not intended for use when
the vehicle is stuck in sand, mud, ice, snow,
or gravel. If the vehicle becomes stuck, see If
the Vehicle Is Stuck 0209.
7Off-Road Mode : Use this mode for
off-road recreational driving. Off-Road Mode
should be used to improve driving at
moderate speeds, on grass, gravel, dirt,
unpaved roads, or snow-covered roads. The
accelerator pedal is tuned for off-road use.
This mode modifies pedal mapping,
transmission shift pattern, Antilock Brake
System (ABS), StabiliTrak/Electronic Stability
Control (ESC), and Traction Control System
(TCS) performance.
For more information on off-road driving see
Off-Road Driving 0203.
_Tow/Haul Mode : Use this mode
when hauling heavy loads to provide
increased performance and vehicle control.
Tow/Haul Mode adjusts the transmission
shift pattern, trailer sway, and steering.
If the vehicle is turned off with Tow/Haul
Mode active and then restarted within four
hours or less, Tow/Haul will remain active.
Otherwise, the vehicle will start in
Normal Mode.
If the vehicle has a diesel engine, exhaust
braking is automatically activated when
Tow/Haul Mode is selected. It maintains
vehicle speed by automatically
implementing a shift pattern that uses the
engine and the transmission to slow the
vehicle. The system will command
downshifts and use the turbocharger on the
engine to reduce vehicle speed when the
brake is applied. The normal tow/haul shift
pattern will return once the vehicle is on a
low grade or when the accelerator pedal is
pressed.
While in the Electronic Range Select (ERS)
Mode, grade breaking is deactivated,
allowing the driver to select a range and
limiting the highest gear available. See
Manual Mode 0226. For more information on trailer weight
specifications, see
Towing Equipment 0284.
Locking Rear Axle
Vehicles with a locking rear axle can give
more traction on snow, mud, ice, sand,
or gravel. It works like a standard axle most
of the time, but when traction is low, this
feature will allow the rear wheel with the
most traction to move the vehicle.
Cruise Control
If equipped, cruise control allows the vehicle
to maintain a set speed of 40 km/h
(25 mph) or more without active
acceleration. Cruise control does not work at
speeds below about 40 km/h (25 mph).
{Warning
Cruise control can be dangerous where
you cannot drive safely at a steady
speed. Do not use cruise control on
winding roads or in heavy traffic.
Cruise control can be dangerous on
slippery roads. On such roads, fast
changes in tire traction can cause
(Continued)
Page 298 of 440
GMC Sierra/Sierra Denali 2500 HD/3500 HD Owner Manual (GMNA-
Localizing-U.S./Canada-16908340) - 2024 - CRC - 12/13/22
296 Driving and Operating
Warning (Continued)
.If the trailer brakes are not operating
properly at any time, or if a DIC
message indicates problems with the
trailer connections or trailer brakes,
carefully pull the vehicle over to the
side of the road when traffic
conditions allow.
Trailer Tires
Special Trailer (ST) tires differ from vehicle
tires. Trailer tires are designed with stiff
sidewalls to help prevent sway and to
support heavy loads. These features can
make it difficult to determine if the trailer
tire pressures are low only based on a visual
inspection.
Always check all trailer tire pressures before
each trip when the tires are cool. Low trailer
tire pressure is a leading cause of trailer tire
blow-outs.
If the vehicle is equipped with a trailer tire
pressure monitoring system, see the trailer
tire pressure monitoring system description
and the trailering app.Trailer tires deteriorate over time. The trailer
tire sidewall will show the week and year
the tire was manufactured. Many trailer tire
manufacturers recommend replacing tires
more than six years old.
Overloading is another leading cause of
trailer tire blow-outs. Never load your trailer
with more weight than the tires are
designed to support. The load rating is
located on the trailer tire sidewall.
Always know the maximum speed rating for
the trailer tires before driving. This may be
significantly lower than the vehicle tire
speed rating. The speed rating may be on
the trailer tire sidewall. If the speed rating is
not shown, the default trailer tire speed
rating is 105 km/h (65 mph).
Trailering App
Trailer Lights App
If equipped, the Trailer Lights App is on the
infotainment home screen.
Touch Start to cycle the trailer lamps on and
off to determine if they are working. The
test follows this sequence:
1. The running lights turn on first and remain on throughout the sequence. 2. The brake lights turn on for about
two seconds.
3. The left turn signal light flashes three times.
4. The right turn signal light flashes three times.
5. The reverse lights turn on for about two seconds.
6. Steps 2–5 repeat for approximately one minute and 45 seconds, or until the
test deactivates.
Touch Stop to stop the test. The test
automatically ends after one minute and
45 seconds.
The sequence also deactivates when any of
the following occur:
.The vehicle is turned off.
.The transmission is shifted out of P (Park).
.The brake pedal is pressed.
.The turn signal is activated.
.The hazard warning lights are activated.
Trailering App
If equipped, the Trailering App is on the
infotainment home screen.
Page 303 of 440
GMC Sierra/Sierra Denali 2500 HD/3500 HD Owner Manual (GMNA-
Localizing-U.S./Canada-16908340) - 2024 - CRC - 12/13/22
Driving and Operating 301
next time the vehicle is turned on (if trailer
was disconnected while vehicle is off). Check
your trailer connection if needed.
Connection Problem
If any of the trailer connections are lost, a
message about the connection issue appears
on the DIC. The infotainment screen will also
show the connection issue in the Lights
Status view.
Connection Trailer Lighting Faults Detected
The Trailering App monitors for electrical
faults on the trailer lights. A message about
the lighting issue appears on the DIC. The
infotainment screen will also show the
lighting issue in the Lights Status view.
Repair your trailer lights if needed. A trailer
lighting issue is not covered by your GM
warranty.
The Running Lights connection may not
detect partial outages. Activate the light test
to check all trailer lamps. See“Light Test”
following. Light Test
Touch Start Light Test to cycle the trailer
lights on and off to determine if they are
working. The test follows this sequence:
1. The running lights turn on first and remain on throughout the sequence.
2. The brake lights turn on for about two seconds.
3. The left turn signal light flashes three times.
4. The right turn signal light flashes three times.
5. The reverse lights turn on for about two seconds.
6. Steps 2-5 repeat for approximately one minute and 45 seconds, or until the
test deactivates.
Touch Stop to stop the test. The test will
automatically end after one minute and
45 seconds.
The sequence also deactivates when any of
the following occur:
.The vehicle is turned off.
.The transmission is shifted out of
P (Park).
.The brake pedal is pressed.
.The turn signal is activated.
.The hazard warning lights are activated.
Tires
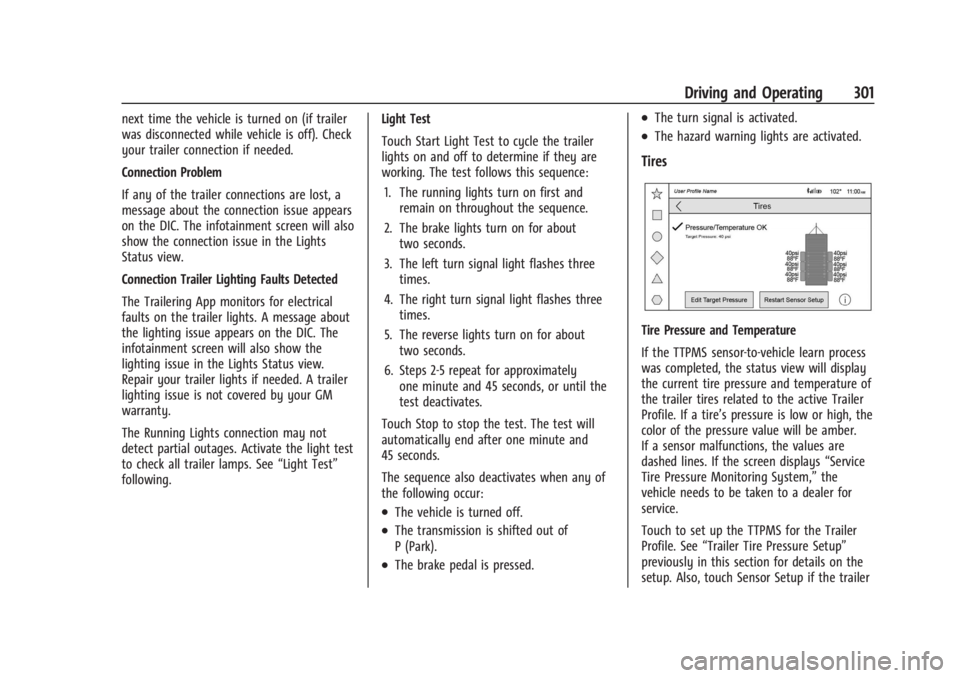
Tire Pressure and Temperature
If the TTPMS sensor-to-vehicle learn process
was completed, the status view will display
the current tire pressure and temperature of
the trailer tires related to the active Trailer
Profile. If a tire’s pressure is low or high, the
color of the pressure value will be amber.
If a sensor malfunctions, the values are
dashed lines. If the screen displays “Service
Tire Pressure Monitoring System,” the
vehicle needs to be taken to a dealer for
service.
Touch to set up the TTPMS for the Trailer
Profile. See “Trailer Tire Pressure Setup”
previously in this section for details on the
setup. Also, touch Sensor Setup if the trailer