temperature door GMC SIERRA DENALI 2024 Owners Manual
[x] Cancel search | Manufacturer: GMC, Model Year: 2024, Model line: SIERRA DENALI, Model: GMC SIERRA DENALI 2024Pages: 440, PDF Size: 9.21 MB
Page 21 of 440
GMC Sierra/Sierra Denali 2500 HD/3500 HD Owner Manual (GMNA-
Localizing-U.S./Canada-16908340) - 2024 - CRC - 12/7/22
Keys, Doors, and Windows 19
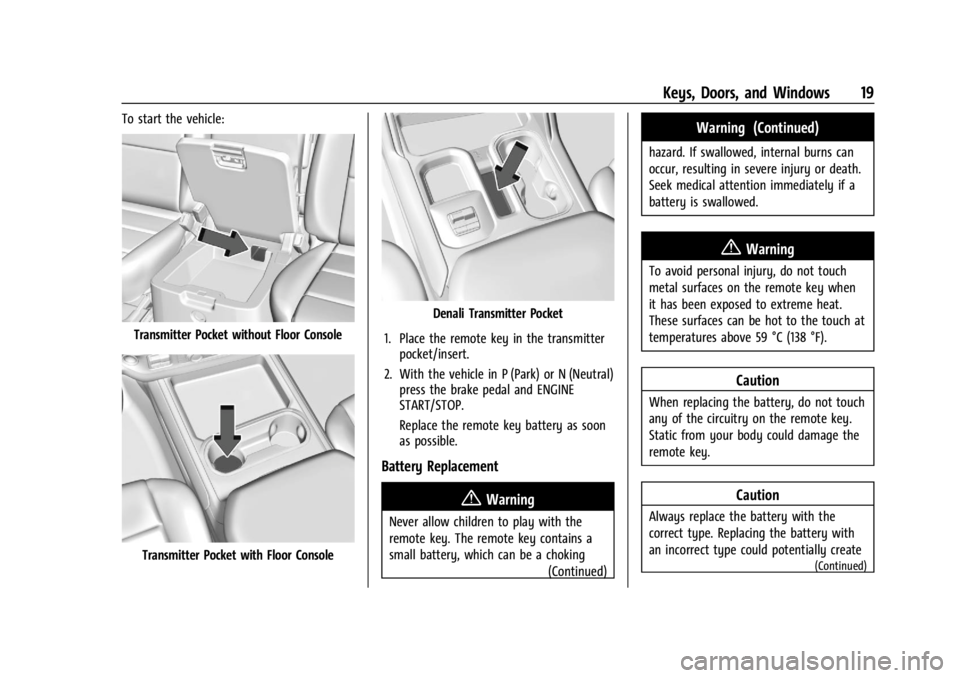
To start the vehicle:
Transmitter Pocket without Floor Console
Transmitter Pocket with Floor Console
Denali Transmitter Pocket
1. Place the remote key in the transmitter pocket/insert.
2. With the vehicle in P (Park) or N (Neutral) press the brake pedal and ENGINE
START/STOP.
Replace the remote key battery as soon
as possible.
Battery Replacement
{Warning
Never allow children to play with the
remote key. The remote key contains a
small battery, which can be a choking
(Continued)
Warning (Continued)
hazard. If swallowed, internal burns can
occur, resulting in severe injury or death.
Seek medical attention immediately if a
battery is swallowed.
{Warning
To avoid personal injury, do not touch
metal surfaces on the remote key when
it has been exposed to extreme heat.
These surfaces can be hot to the touch at
temperatures above 59 °C (138 °F).
Caution
When replacing the battery, do not touch
any of the circuitry on the remote key.
Static from your body could damage the
remote key.
Caution
Always replace the battery with the
correct type. Replacing the battery with
an incorrect type could potentially create
(Continued)
Page 22 of 440
GMC Sierra/Sierra Denali 2500 HD/3500 HD Owner Manual (GMNA-
Localizing-U.S./Canada-16908340) - 2024 - CRC - 12/7/22
20 Keys, Doors, and Windows
Caution (Continued)
a risk of battery explosion. Dispose of
used batteries according to instructions
and local laws. Do not attempt to burn,
crush, or cut the used battery, and avoid
exposing the battery to environments
with extremely low air pressures or high
temperatures.
Caution
If the remote key is not reassembled
properly, liquids could enter the housing
and damage the circuitry, resulting in a
remote key malfunction and/or failure. To
prevent damage, always follow the steps
for remote key reassembly in this manual
to ensure the remote key is sealed
properly whenever the remote key is
opened.
Replace the battery in the remote key soon
if the DIC displays REPLACE BATTERY IN
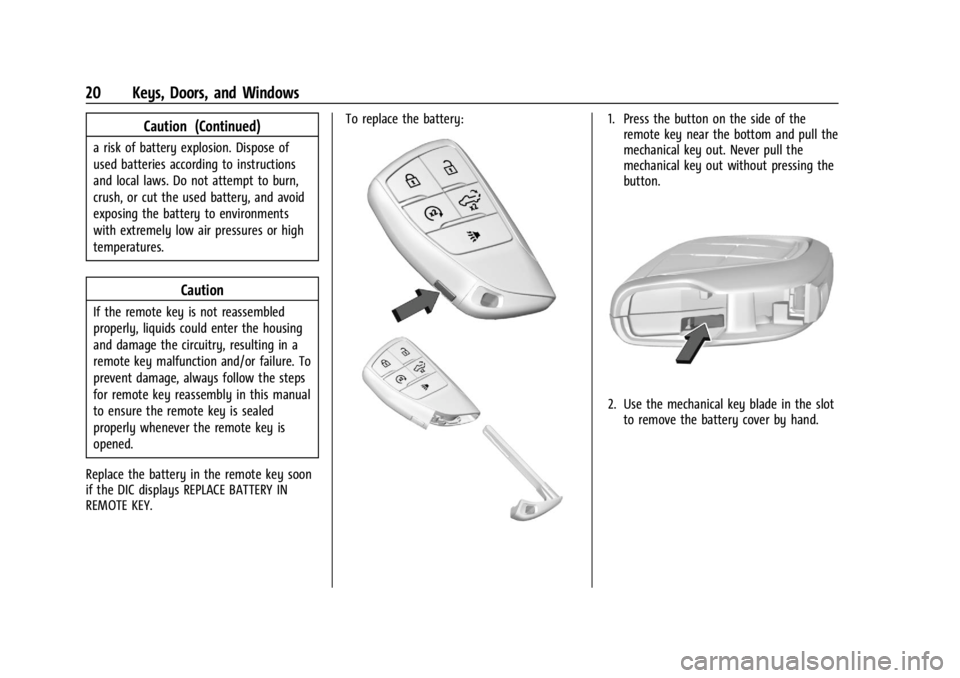
REMOTE KEY. To replace the battery:
1. Press the button on the side of the
remote key near the bottom and pull the
mechanical key out. Never pull the
mechanical key out without pressing the
button.
2. Use the mechanical key blade in the slotto remove the battery cover by hand.
Page 23 of 440
GMC Sierra/Sierra Denali 2500 HD/3500 HD Owner Manual (GMNA-
Localizing-U.S./Canada-16908340) - 2024 - CRC - 12/7/22
Keys, Doors, and Windows 21
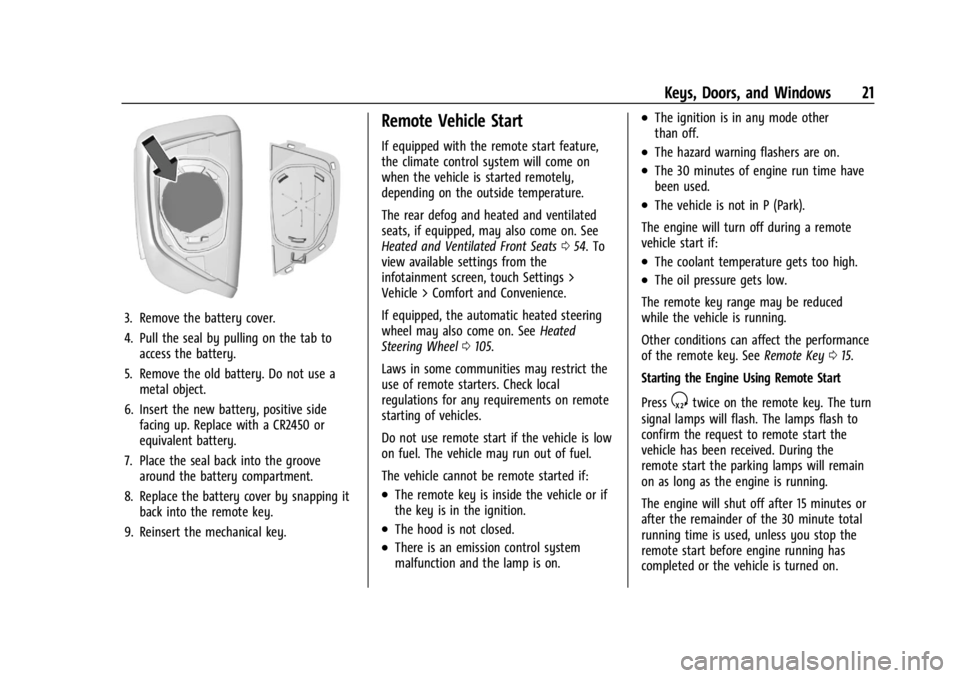
3. Remove the battery cover.
4. Pull the seal by pulling on the tab toaccess the battery.
5. Remove the old battery. Do not use a metal object.
6. Insert the new battery, positive side facing up. Replace with a CR2450 or
equivalent battery.
7. Place the seal back into the groove around the battery compartment.
8. Replace the battery cover by snapping it back into the remote key.
9. Reinsert the mechanical key.
Remote Vehicle Start
If equipped with the remote start feature,
the climate control system will come on
when the vehicle is started remotely,
depending on the outside temperature.
The rear defog and heated and ventilated
seats, if equipped, may also come on. See
Heated and Ventilated Front Seats 054. To
view available settings from the
infotainment screen, touch Settings >
Vehicle > Comfort and Convenience.
If equipped, the automatic heated steering
wheel may also come on. See Heated
Steering Wheel 0105.
Laws in some communities may restrict the
use of remote starters. Check local
regulations for any requirements on remote
starting of vehicles.
Do not use remote start if the vehicle is low
on fuel. The vehicle may run out of fuel.
The vehicle cannot be remote started if:
.The remote key is inside the vehicle or if
the key is in the ignition.
.The hood is not closed.
.There is an emission control system
malfunction and the lamp is on.
.The ignition is in any mode other
than off.
.The hazard warning flashers are on.
.The 30 minutes of engine run time have
been used.
.The vehicle is not in P (Park).
The engine will turn off during a remote
vehicle start if:
.The coolant temperature gets too high.
.The oil pressure gets low.
The remote key range may be reduced
while the vehicle is running.
Other conditions can affect the performance
of the remote key. See Remote Key015.
Starting the Engine Using Remote Start
Press
Stwice on the remote key. The turn
signal lamps will flash. The lamps flash to
confirm the request to remote start the
vehicle has been received. During the
remote start the parking lamps will remain
on as long as the engine is running.
The engine will shut off after 15 minutes or
after the remainder of the 30 minute total
running time is used, unless you stop the
remote start before engine running has
completed or the vehicle is turned on.
Page 57 of 440

GMC Sierra/Sierra Denali 2500 HD/3500 HD Owner Manual (GMNA-
Localizing-U.S./Canada-16908340) - 2024 - CRC - 12/7/22
Seats and Restraints 55
Press the button once for the highest
setting. With each press of the button, the
seat will change to the next lower setting,
and then to the off setting. The indicator
lights next to the buttons indicate three for
the highest setting and one for the lowest.
If the heated seats are on high for
30 minutes, their level will automatically be
lowered.
Auto Heated and Ventilated Seats
When the vehicle is on, this feature,
if enabled, will automatically activate the
heated or ventilated seats at the level
required by the vehicle’s interior
temperature.
The active high, medium, low, or off heated
or ventilated seat level will be indicated by
the manual heated or ventilated seat
buttons on the center stack. Use the manual
heated or ventilated seat buttons on the
center stack to turn auto heated or
ventilated seats off. If the passenger seat is
unoccupied, the auto heated or ventilated
seats feature will not activate that seat.
If equipped with a heated steering wheel,
the auto heated steering wheel activation
will follow the heated seat auto activation
and the heated wheel indicator will follow
the state of the steering wheel heat.To enable or disable auto heated or
ventilated seats, select Settings > Vehicle >
Climate and Air Quality > Auto Cooled or
Auto Heated Seats > ON or OFF.
Remote Start Heated and Ventilated Seats
If equipped, the heated seats will turn on
automatically during a remote start if it is
cold outside and the ventilated seats will
turn on automatically if it is hot outside.
If equipped, the heated steering wheel will
turn on automatically during a remote start
if it is cold outside. The heated and
ventilated seat indicators and heated
steering wheel indicator may come on
during this operation.
The heated and ventilated seats and heated
steering wheel may cancel when the vehicle
is started. These features can be manually
selected after the vehicle is turned on.
The temperature performance of an
unoccupied seat may be reduced. This is
normal.
To enable or disable remote start heated or
ventilated seats, select Settings > Vehicle >
Remote Lock, Unlock, and Start > Remote
Start Auto Heat Seats or Remote Start Auto
Cool Seats > ON or OFF. See
Remote Vehicle
Start 021.Rear Seats
Rear Seat Reminder
If equipped, the message REAR SEAT
REMINDER LOOK IN REAR SEAT displays
under certain conditions indicating there
may be an item or passenger in the rear
seat. Check before exiting the vehicle.
This feature will activate when a second row
door is opened while the vehicle is on or up
to 10 minutes before the vehicle is turned
on. There will be an alert when the vehicle
is turned off. The alert does not directly
detect objects in the rear seat; instead,
under certain conditions, it detects when a
rear door is opened and closed, indicating
that there may be something in the
rear seat.
The feature is active only once each time
the vehicle is turned on and off, and will
require reactivation by opening and closing
the second row doors. There may be an
alert even when there is nothing in the rear
seat; for example, if a child entered the
vehicle through the rear door and left the
vehicle without the vehicle being shut off.
Page 106 of 440
GMC Sierra/Sierra Denali 2500 HD/3500 HD Owner Manual (GMNA-
Localizing-U.S./Canada-16908340) - 2024 - CRC - 12/15/22
104 Instruments and Controls
Instruments and Controls
Controls
Steering Wheel Adjustment . . . . . . . . . . . 105
Heated Steering Wheel . . . . . . . . . . . . . . . . 105
Horn . . . . . . . . . . . . . . . . . . . . . . . . . . . . . . . . . . 106
Windshield Wiper/Washer . . . . . . . . . . . . 106
Compass . . . . . . . . . . . . . . . . . . . . . . . . . . . . . . . 107
Clock . . . . . . . . . . . . . . . . . . . . . . . . . . . . . . . . . . 107
Power Outlets . . . . . . . . . . . . . . . . . . . . . . . . . 107
Wireless Charging . . . . . . . . . . . . . . . . . . . . . 109
Warning Lights, Gauges, and Indicators
Warning Lights, Gauges, andIndicators . . . . . . . . . . . . . . . . . . . . . . . . . . . . . 111
Instrument Cluster (Base Level) . . . . . . . . 112
Instrument Cluster (Uplevel) . . . . . . . . . . . 113
Speedometer . . . . . . . . . . . . . . . . . . . . . . . . . . 116
Odometer . . . . . . . . . . . . . . . . . . . . . . . . . . . . . . 116
Trip Odometer . . . . . . . . . . . . . . . . . . . . . . . . . 116
Tachometer . . . . . . . . . . . . . . . . . . . . . . . . . . . . 116
Fuel Gauge . . . . . . . . . . . . . . . . . . . . . . . . . . . . 116
Engine Oil Pressure Gauge . . . . . . . . . . . . . 117
Engine Coolant Temperature Gauge . . . . 118
Transmission Temperature Gauge (Uplevel only) . . . . . . . . . . . . . . . . . . . . . . . . 119
Voltmeter Gauge . . . . . . . . . . . . . . . . . . . . . . 119
Seat Belt Reminders . . . . . . . . . . . . . . . . . . . 120
Airbag Readiness Light . . . . . . . . . . . . . . . . . 121
Passenger Airbag Status Indicator . . . . . . 121 Charging System Light . . . . . . . . . . . . . . . . . 122
Malfunction Indicator Lamp (Check
Engine Light) . . . . . . . . . . . . . . . . . . . . . . . . . 122
Brake System Warning Light . . . . . . . . . . 124
Electric Parking Brake Light . . . . . . . . . . . . 124
Service Electric Parking Brake Light . . . . 124
Antilock Brake System (ABS) Warning Light . . . . . . . . . . . . . . . . . . . . . . . . . . . . . . . . . 125
Four-Wheel-Drive Light . . . . . . . . . . . . . . . . . 125
Tow/Haul Mode Light . . . . . . . . . . . . . . . . . 125
Hill Descent Control Light . . . . . . . . . . . . . 126
Lane Departure Warning (LDW) Light . . . . . . . . . . . . . . . . . . . . . . . . . . . . . . . . . 126
Automatic Emergency Braking (AEB) Disabled Light . . . . . . . . . . . . . . . . . . . . . . . 126
Vehicle Ahead Indicator . . . . . . . . . . . . . . . . 126
Pedestrian Ahead Indicator . . . . . . . . . . . . 126
Traction Off Light . . . . . . . . . . . . . . . . . . . . . . 127
Traction Control System (TCS)/Electronic Stability Control Light . . . . . . . . . . . . . . . . 127
Electronic Stability Control (ESC) Off Light . . . . . . . . . . . . . . . . . . . . . . . . . . . . . . . . . 127
Engine Coolant Temperature Warning Light . . . . . . . . . . . . . . . . . . . . . . . . . . . . . . . . . 128
Driver Mode Control Light . . . . . . . . . . . . . 128
Tire Pressure Light . . . . . . . . . . . . . . . . . . . . . 129
Engine Oil Pressure Light (Uplevel Cluster) . . . . . . . . . . . . . . . . . . . . . . . . . . . . . . 129
Low Fuel Warning Light . . . . . . . . . . . . . . . 129
Security Light . . . . . . . . . . . . . . . . . . . . . . . . . . 130 High-Beam On Light . . . . . . . . . . . . . . . . . . . 130
Front Fog Lamp Light . . . . . . . . . . . . . . . . . . 130
Lamps On Reminder . . . . . . . . . . . . . . . . . . . 130
Cruise Control Light . . . . . . . . . . . . . . . . . . . . 131
Door Ajar Light . . . . . . . . . . . . . . . . . . . . . . . . . 131
Information Displays
Driver Information Center (DIC) (Base
Level) . . . . . . . . . . . . . . . . . . . . . . . . . . . . . . . . 131
Driver Information Center (DIC) (Uplevel) . . . . . . . . . . . . . . . . . . . . . . . . . . . . . 133
Head-Up Display (HUD) . . . . . . . . . . . . . . . . 135
Vehicle Messages
Vehicle Messages . . . . . . . . . . . . . . . . . . . . . . 139
Engine Power Messages . . . . . . . . . . . . . . . 139
Vehicle Speed Messages . . . . . . . . . . . . . . . 139
Universal Remote System
Universal Remote System . . . . . . . . . . . . . 140
Universal Remote System Programming . . . . . . . . . . . . . . . . . . . . . . . . 140
Universal Remote System Operation . . . 141
Page 154 of 440
GMC Sierra/Sierra Denali 2500 HD/3500 HD Owner Manual (GMNA-
Localizing-U.S./Canada-16908340) - 2024 - CRC - 12/7/22
152 Lighting
Battery Load Management
The vehicle has Electric Power Management
(EPM), which estimates the battery's
temperature and state of charge. It then
adjusts the voltage for best performance
and extended life of the battery.
When the battery's state of charge is low,
the voltage is raised slightly to quickly bring
the charge back up. When the state of
charge is high, the voltage is lowered
slightly to prevent overcharging. The
voltmeter gauge or the voltage display on
the Driver Information Center (DIC),
if equipped, may show the voltage moving
up or down. This is normal. If there is a
problem, an alert will be displayed.
The battery can be discharged at idle if the
electrical loads are very high. This is true for
all vehicles. This is because the generator
(alternator) may not be spinning fast
enough at idle to produce all the power that
is needed for very high electrical loads.A high electrical load occurs when several of
the following are on, such as: headlamps,
high beams, fog lamps, rear window
defogger, climate control fan at high speed,
heated seats, engine cooling fans, trailer
loads, and loads plugged into accessory
power outlets.
EPM works to prevent excessive discharge of
the battery. It does this by balancing the
generator's output and the vehicle's
electrical needs. It can increase engine idle
speed to generate more power, whenever
needed. It can temporarily reduce the power
demands of some accessories.
Normally, these actions occur in steps or
levels, without being noticeable. In rare
cases at the highest levels of corrective
action, this action may be noticeable to the
driver. If so, a DIC message might be
displayed and it is recommended that the
driver reduce the electrical loads as much as
possible.
Battery Power Protection
This feature helps prevent the battery from
being drained, if the interior courtesy lamps
or reading lamps are accidentally left on.
If any of these lamps are left on, they
automatically turn off after 10 minutes,
if the ignition is off. The lamps will not
come back on again until one of the
following occurs:
.The ignition is turned on.
.The doors are closed and then re-opened.
Exterior Lighting Battery Saver
The exterior lamps turn off about 10 minutes
after the vehicle is turned off, if the parking
lamps or headlamps have been manually
left on. This protects against draining the
battery. To restart the 10-minute timer, turn
the exterior lamp control to the
Oposition
and then back to the
;or2position.
To keep the lamps on for more than
10 minutes, the vehicle must be on or in
accessory mode.
Page 264 of 440
GMC Sierra/Sierra Denali 2500 HD/3500 HD Owner Manual (GMNA-
Localizing-U.S./Canada-16908340) - 2024 - CRC - 12/13/22
262 Driving and Operating
.The accessory trailer cameras were
plugged in when the vehicle was running.
The vehicle needs to be off, with all doors
closed, for at least five minutes prior to
plugging in a trailer camera.
A view may switch automatically if:
.The vehicle is shifted to another gear.
Park Assist
The vehicle may be equipped with Rear Park
Assist (RPA) or Front and Rear Park Assist
(FRPA). Under certain conditions, the Park
Assist system can assist the driver as the
vehicle moves at speeds of less than 8 km/h
(5 mph). The sensors on the bumpers may
detect objects up to 1.2 m (4 ft) in front and
1.8 m (6 ft) behind the vehicle within a zone
25 cm (10 in) high off the ground and below
bumper level. These detection distances may
be shorter during warmer or humid weather.
Blocked sensors will not detect objects and
can also cause false detections. Keep the
sensors clean of mud, dirt, snow, ice, and
slush; and clean sensors after a car wash in
freezing temperatures.
{Warning
The Park Assist system does not detect
children, pedestrians, bicyclists, animals,
or objects located below the bumper or
that are too close or too far from the
vehicle. It is not available at speeds
greater than 8 km/h (5 mph). To prevent
injury, death, or vehicle damage, even
with Park Assist, always check the area
around the vehicle and check all mirrors
before moving forward or backing.
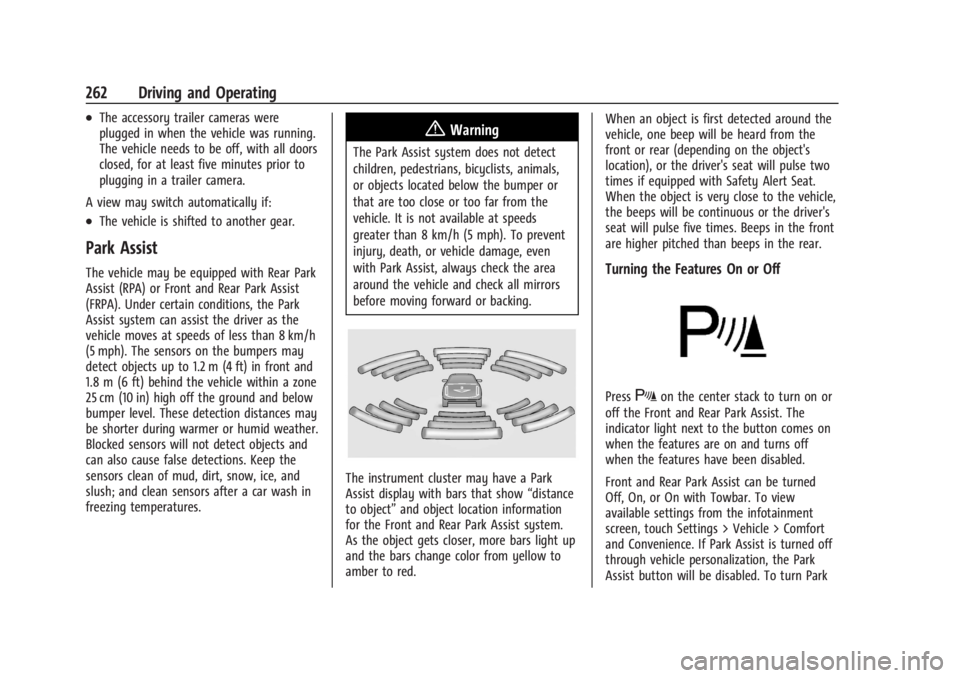
The instrument cluster may have a Park
Assist display with bars that show “distance
to object” and object location information
for the Front and Rear Park Assist system.
As the object gets closer, more bars light up
and the bars change color from yellow to
amber to red. When an object is first detected around the
vehicle, one beep will be heard from the
front or rear (depending on the object's
location), or the driver's seat will pulse two
times if equipped with Safety Alert Seat.
When the object is very close to the vehicle,
the beeps will be continuous or the driver's
seat will pulse five times. Beeps in the front
are higher pitched than beeps in the rear.
Turning the Features On or Off
PressXon the center stack to turn on or
off the Front and Rear Park Assist. The
indicator light next to the button comes on
when the features are on and turns off
when the features have been disabled.
Front and Rear Park Assist can be turned
Off, On, or On with Towbar. To view
available settings from the infotainment
screen, touch Settings > Vehicle > Comfort
and Convenience. If Park Assist is turned off
through vehicle personalization, the Park
Assist button will be disabled. To turn Park
Page 275 of 440
GMC Sierra/Sierra Denali 2500 HD/3500 HD Owner Manual (GMNA-
Localizing-U.S./Canada-16908340) - 2024 - CRC - 12/13/22
Driving and Operating 273
The use of E85 or FlexFuel is encouraged
when the vehicle is designed to use it. E85
or FlexFuel is made from renewable sources.
To help locate fuel stations that carry E85 or
FlexFuel, the U.S. Department of Energy has
an alternative fuel website. See
www.afdc.energy.gov/afdc/locator/stations.
E85 or FlexFuel should meet ASTM
Specification D 5798 or CAN/CGSB–3.512 in
Canada. Do not use the fuel if the ethanol
content is greater than 85%. Fuel mixtures
that do not meet ASTM or CGSB
specifications can affect driveability and
could cause the malfunction indicator lamp
to come on.
The starting characteristics of E85 or FlexFuel
make it unsuitable for use when
temperatures fall below−18 °C (0 °F). Use
gasoline or add gasoline to the E85 or
FlexFuel.
Because E85 or FlexFuel has less energy per
liter (gallon) than gasoline, the vehicle will
need to be refilled more often. See Filling
the Tank (Chassis Cab and Box Delete
Models) 0275 or
Filling the Tank (Pickup Models) 0273. The only GM approved aftermarket additive
is ACDelco Fuel System Treatment
Plus-FlexFuel. Follow the instructions on the
bottle for proper use. This product is
available at your GM dealer.
Caution
Some additives are not compatible with
E85 or FlexFuel and can harm the
vehicle's fuel system. Use only additives
approved by GM for E85 or FlexFuel
vehicles. Damage caused by unapproved
additives would not be covered by the
vehicle warranty.
Caution
Do not use fuel containing methanol.
It can corrode metal parts in the fuel
system and also damage plastic and
rubber parts. That damage would not be
covered under the vehicle warranty.
To help keep the engine running efficiently,
fill the tank with gasoline, up to E15, after
filling the tank with E85 one or two times.
Filling the Tank (Pickup Models)
If the vehicle has a diesel engine, see the
Duramax diesel supplement.
An arrow on the fuel gauge indicates which
side of the vehicle the fuel door is on. See
Fuel Gauge 0116.
{Warning
Fuel vapors and fuel fires burn violently
and can cause injury or death.
Follow these guidelines to help avoid
injuries to you and others:
.Read and follow all the instructions on
the fuel pump island.
.Turn off the engine when refueling.
.Keep sparks, flames, and smoking
materials away from fuel.
.Do not leave the fuel pump
unattended.
.Avoid using electronic devices while
refueling.
.Do not re-enter the vehicle while
pumping fuel.
(Continued)
Page 364 of 440
GMC Sierra/Sierra Denali 2500 HD/3500 HD Owner Manual (GMNA-
Localizing-U.S./Canada-16908340) - 2024 - CRC - 12/7/22
362 Vehicle Care
times as well on the government course
as a tire graded 100. The relative
performance of tires depends upon the
actual conditions of their use, however,
and may depart significantly from the
norm due to variations in driving habits,
service practices and differences in road
characteristics and climate.
Traction
The traction grades, from highest to
lowest, are AA, A, B, and C. Those
grades represent the tire's ability to
stop on wet pavement as measured
under controlled conditions on specified
government test surfaces of asphalt and
concrete. A tire marked C may have
poor traction performance. Warning:
The traction grade assigned to this tire
is based on straight-ahead braking
traction tests, and does not include
acceleration, cornering, hydroplaning,
or peak traction characteristics.Temperature
The temperature grades are A (the
highest), B, and C, representing the
tire's resistance to the generation of
heat and its ability to dissipate heat
when tested under controlled conditions
on a specified indoor laboratory test
wheel. Sustained high temperature can
cause the material of the tire to
degenerate and reduce tire life, and
excessive temperature can lead to
sudden tire failure. The grade C
corresponds to a level of performance
which all passenger car tires must meet
under the Federal Motor Safety
Standard No. 109. Grades B and A
represent higher levels of performance
on the laboratory test wheel than the
minimum required by law. Warning:
The temperature grade for this tire is
established for a tire that is properly
inflated and not overloaded. Excessive
speed, underinflation, or excessive
loading, either separately or in
combination, can cause heat buildup
and possible tire failure.Wheel Alignment and Tire
Balance
The tires and wheels were aligned and
balanced at the factory to provide the
longest tire life and best overall
performance. Adjustments to wheel
alignment and tire balancing are not
necessary on a regular basis. Consider an
alignment check if there is unusual tire wear
or the vehicle is significantly pulling to one
side or the other. Some slight pull to the
left or right, depending on the crown of the
road and/or other road surface variations
such as troughs or ruts, is normal. If the
vehicle is vibrating when driving on a
smooth road, the tires and wheels may
need to be rebalanced. See your dealer for
proper diagnosis.
Wheel Replacement
Replace any wheel that is bent, cracked,
or badly rusted or corroded. If wheel nuts
keep coming loose, the wheel, wheel bolts,
and wheel nuts should be replaced. If the
wheel leaks air, replace it. Some aluminum
wheels can be repaired. See your dealer if
any of these conditions exist.
Page 384 of 440
GMC Sierra/Sierra Denali 2500 HD/3500 HD Owner Manual (GMNA-
Localizing-U.S./Canada-16908340) - 2024 - CRC - 12/7/22
382 Vehicle Care
{Warning
To avoid death, serious injury,
or property damage, before dinghy
towing the vehicle, always disconnect and
secure the negative battery cable and
cover the negative battery post and cable
with a non-conductive material. If the
battery is left connected or the battery
cable contacts the post, the Electric
Parking Brake may activate during
towing, which could cause a crash.
8. Disconnect the negative (–) battery cable. See “Negative Battery Cable
Disconnection” inBattery - North
America 0327.
9. Shift the transmission to P (Park).
Caution
If the steering column is locked, vehicle
damage may occur.
10. Move the steering wheel to make sure the steering column is unlocked.
11. Keep the remote key outside of the vehicle and manually lock the doors.
Access the vehicle by using the key in
the door lock. See Door Locks022. Disconnecting the Towed Vehicle
Before disconnecting from the tow vehicle:
1. Park on a level surface. Secure the vehicle with wheel blocks.
2. Reconnect the negative (–) battery. See Battery - North America 0327.
3. Turn on the vehicle. With your foot off the brake pedal, press and hold ENGINE
START/STOP for five seconds until the
green light comes on in the button. See
Ignition Positions 0216.
4. Set the parking brake. See Electric
Parking Brake 0234.
5. Disconnect from the tow vehicle.
6. Shift the transmission to N (Neutral).
7. Shift the transfer case to 2
m(Two-Wheel
Drive High). When the shift to 2
m
(Two-Wheel Drive High) is complete, the
light in the instrument cluster will stop
flashing and stay lit. See
Four-Wheel-Drive Light 0125.
8. Start the engine. Check that the vehicle is in 2
m(Two-Wheel Drive High) by
starting the engine and shifting the
transmission to D (Drive) and then to
R (Reverse). There should be movement
of the vehicle while shifting. 9. Shift the transmission to P (Park) and
turn off the vehicle.
10. Release the parking brake and remove the wheel blocks.
11. Reset any lost presets.
The outside temperature display will
default to 0 °C (32 °F) but will reset with
normal usage.
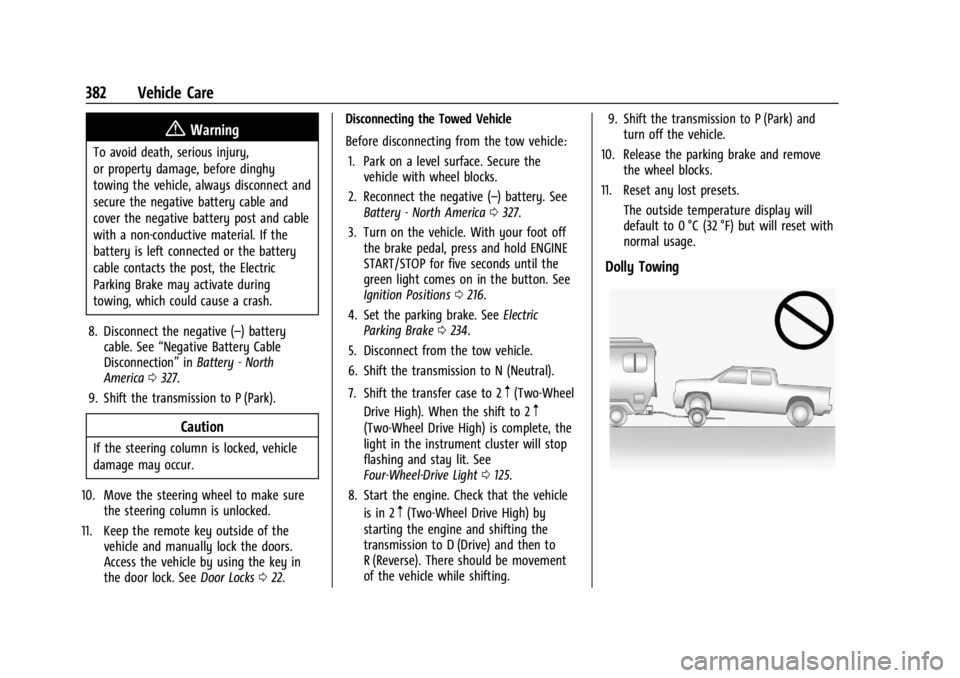
Dolly Towing