automatic transmission GMC SONOMA 2004 User Guide
[x] Cancel search | Manufacturer: GMC, Model Year: 2004, Model line: SONOMA, Model: GMC SONOMA 2004Pages: 412, PDF Size: 4.16 MB
Page 264 of 412
How to Check the Automatic
Transmission Fluid
Because this operation can be a little difficult, you may
choose to have this done at the dealership service
department.
If you do it yourself, be sure to follow all the instructions
here, or you could get a false reading on the dipstick.
Notice:Too much or too little �uid can damage
your transmission. Too much can mean that some
of the �uid could come out and fall on hot engine
part or exhaust system parts, starting a �re.
Too little �uid could cause the transmission to
overheat. Be sure to get an accurate reading if you
check your transmission �uid.
Wait at least 30 minutes before checking the
transmission fluid level if you have been driving:
•When outside temperatures are above 90°F (32°C).
•At high speed for quite a while.
•In heavy traffic–especially in hot weather.
•While pulling a trailer.To get the right reading, the fluid should be at normal
operating temperature, which is 180°F to 200°F
(82°C to 93°C)
Get the vehicle warmed up by driving about 15 miles
(24 km) when outside temperatures are above 50°F
(10°C). If it’s colder than 50°F (10°C), drive the vehicle
in THIRD (3) until the engine temperature gage
moves and then remains steady for 10 minutes.
A cold fluid check can be made after the vehicle has
been sitting for eight hours or more with the engine off,
but this is used only as a reference. Let the engine
run at idle for five minutes if outside temperatures are
50°F (10°C) or more. If it’s colder than 50°F (10°C), you
may have to idle the engine longer. Should the fluid
level be low during this cold check, you must check the
fluid hot before adding fluid. Checking the fluid hot
will give you a more accurate reading of the fluid level.
5-20
Page 265 of 412
Checking the Automatic Transmission
Fluid Level
Prepare your vehicle as follows:
•Park your vehicle on a level place. Keep the engine
running.
•With the parking brake applied, place the shift lever
in PARK (P).
•With your foot on the brake pedal, move the shift
lever through each gear range, pausing for about
three seconds in each range. Then, position the shift
lever in PARK (P).
•Let the engine run at idle for three minutes or more.Then, without shutting off the engine, follow
these steps:
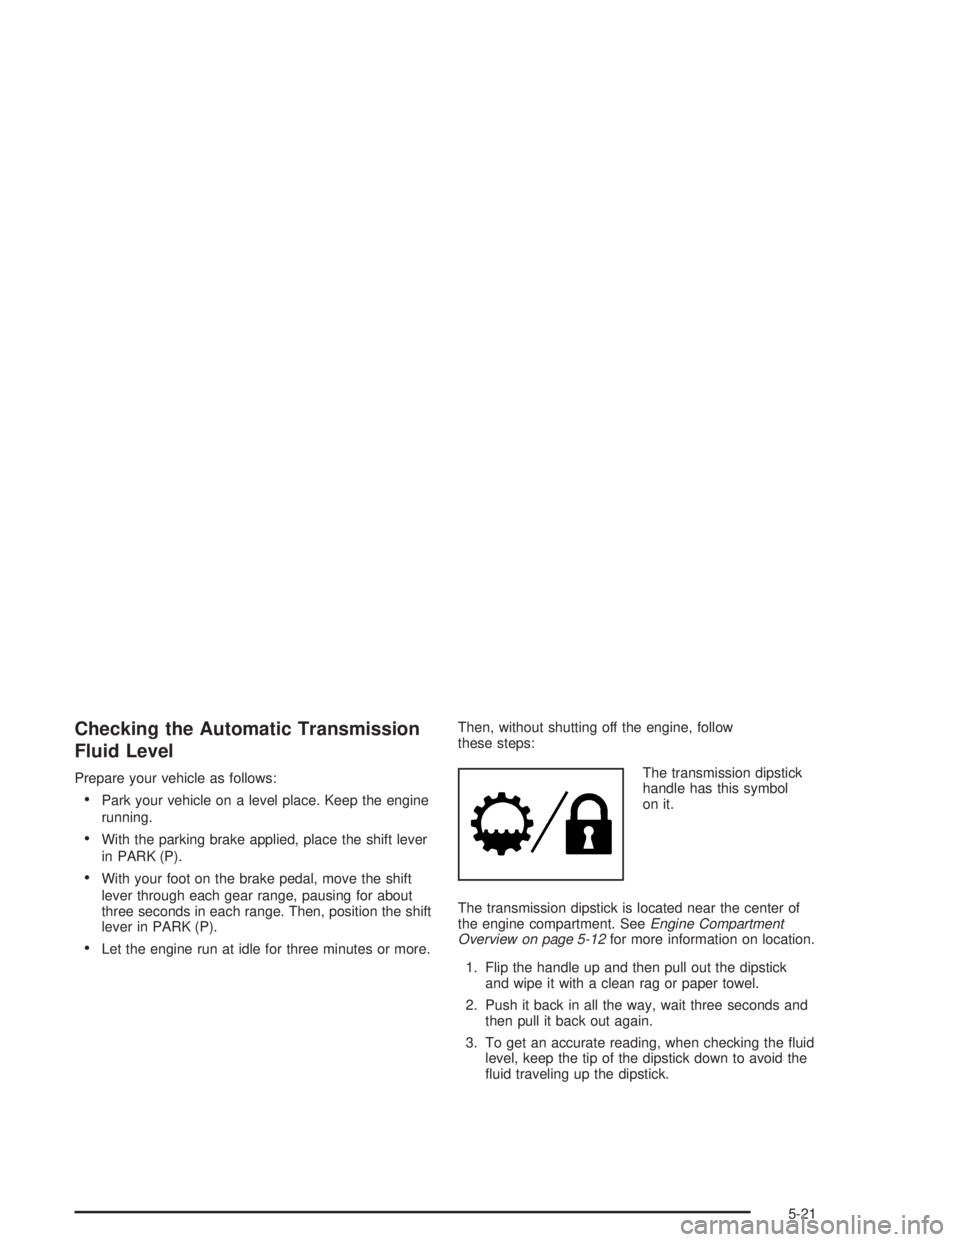
The transmission dipstick
handle has this symbol
on it.
The transmission dipstick is located near the center of
the engine compartment. SeeEngine Compartment
Overview on page 5-12for more information on location.
1. Flip the handle up and then pull out the dipstick
and wipe it with a clean rag or paper towel.
2. Push it back in all the way, wait three seconds and
then pull it back out again.
3. To get an accurate reading, when checking the fluid
level, keep the tip of the dipstick down to avoid the
fluid traveling up the dipstick.
5-21
Page 266 of 412
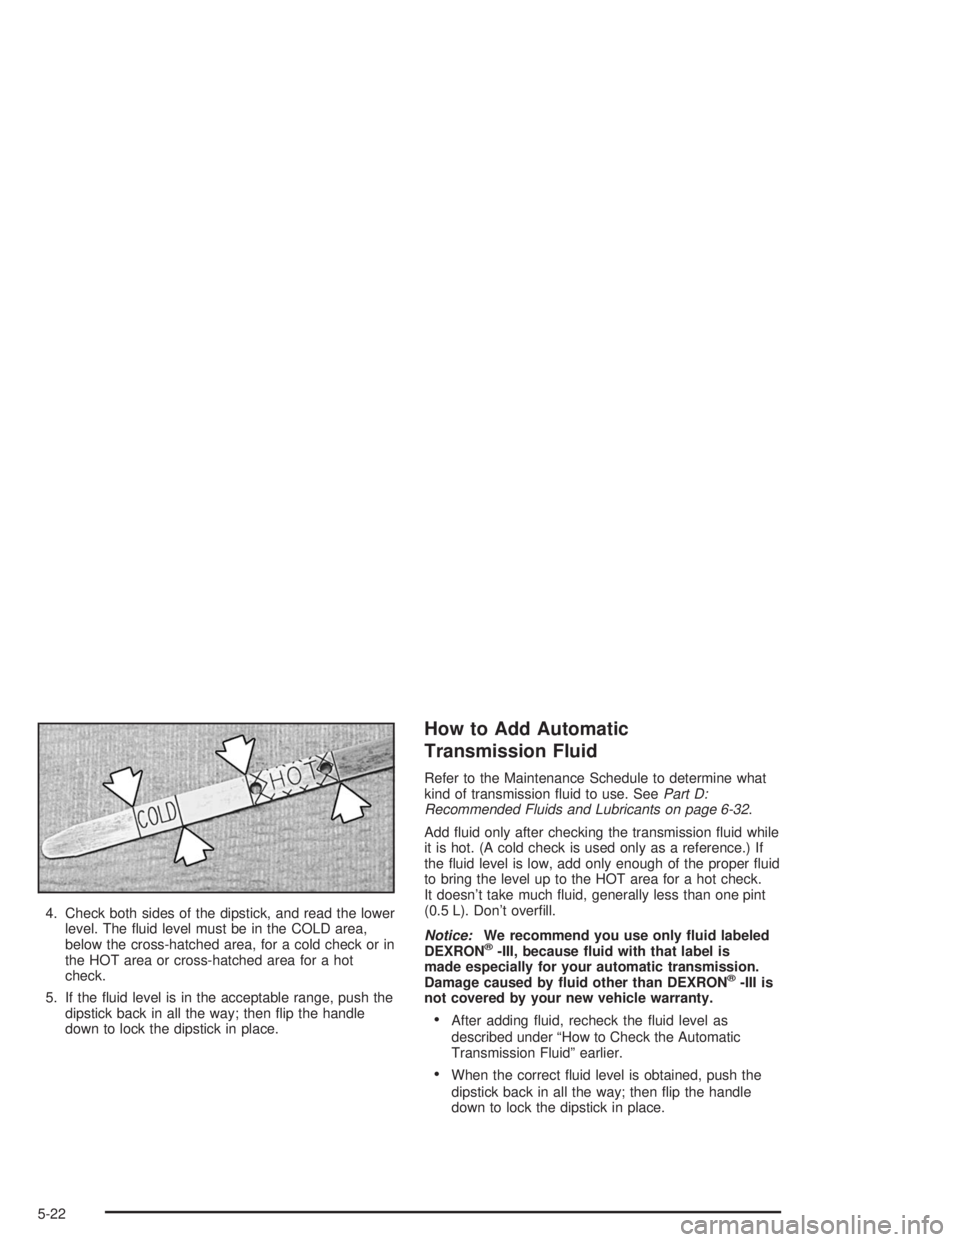
4. Check both sides of the dipstick, and read the lower
level. The fluid level must be in the COLD area,
below the cross-hatched area, for a cold check or in
the HOT area or cross-hatched area for a hot
check.
5. If the fluid level is in the acceptable range, push the
dipstick back in all the way; then flip the handle
down to lock the dipstick in place.
How to Add Automatic
Transmission Fluid
Refer to the Maintenance Schedule to determine what
kind of transmission fluid to use. SeePart D:
Recommended Fluids and Lubricants on page 6-32.
Add fluid only after checking the transmission fluid while
it is hot. (A cold check is used only as a reference.) If
the fluid level is low, add only enough of the proper fluid
to bring the level up to the HOT area for a hot check.
It doesn’t take much fluid, generally less than one pint
(0.5 L). Don’t overfill.
Notice:We recommend you use only �uid labeled
DEXRON
®-III, because �uid with that label is
made especially for your automatic transmission.
Damage caused by �uid other than DEXRON
®-III is
not covered by your new vehicle warranty.
•After adding fluid, recheck the fluid level as
described under “How to Check the Automatic
Transmission Fluid” earlier.
•When the correct fluid level is obtained, push the
dipstick back in all the way; then flip the handle
down to lock the dipstick in place.
5-22
Page 286 of 412
2. Get the vehicles close enough so the jumper cables
can reach, but be sure the vehicles aren’t touching
each other. If they are, it could cause a ground
connection you don’t want. You wouldn’t be able to
start your vehicle, and the bad grounding could
damage the electrical systems.
To avoid the possibility of the vehicles rolling, set
the parking brake firmly on both vehicles involved in
the jump start procedure. Put an automatic
transmission in PARK (P) or a manual transmission
in NEUTRAL before setting the parking brake. If
you have a four-wheel-drive vehicle, be sure
the transfer case is not in NEUTRAL (N).
Notice:If you leave your radio or other accessories
on during the jump starting procedure, they could
be damaged. The repairs would not be covered
by your warranty. Always turn off your radio and
other accessories when jump starting your vehicle.
3. Turn off the ignition on both vehicles. Unplug
unnecessary accessories plugged into the cigarette
lighter or in the accessory power outlets. Turn off
the radio and all lamps that aren’t needed. This will
avoid sparks and help save both batteries. And it
could save your radio!4. Open the hoods and locate the batteries. Find the
positive (+) and negative (-) terminal locations on
each vehicle. SeeEngine Compartment Overview
on page 5-12for more information on location of the
battery.
{CAUTION:
Using a match near a battery can cause battery
gas to explode. People have been hurt doing
this, and some have been blinded. Use a
�ashlight if you need more light.
Be sure the batteries have enough water. You
do not need to add water to the ACDelco
®
battery (or batteries) installed in your new
vehicle. But if a battery has �ller caps, be sure
the right amount of �uid is there. If it is low,
add water to take care of that �rst. If you do
not, explosive gas could be present.
Battery �uid contains acid that can burn you.
Do not get it on you. If you accidentally get it
in your eyes or on your skin, �ush the place
with water and get medical help immediately.
5-42
Page 308 of 412
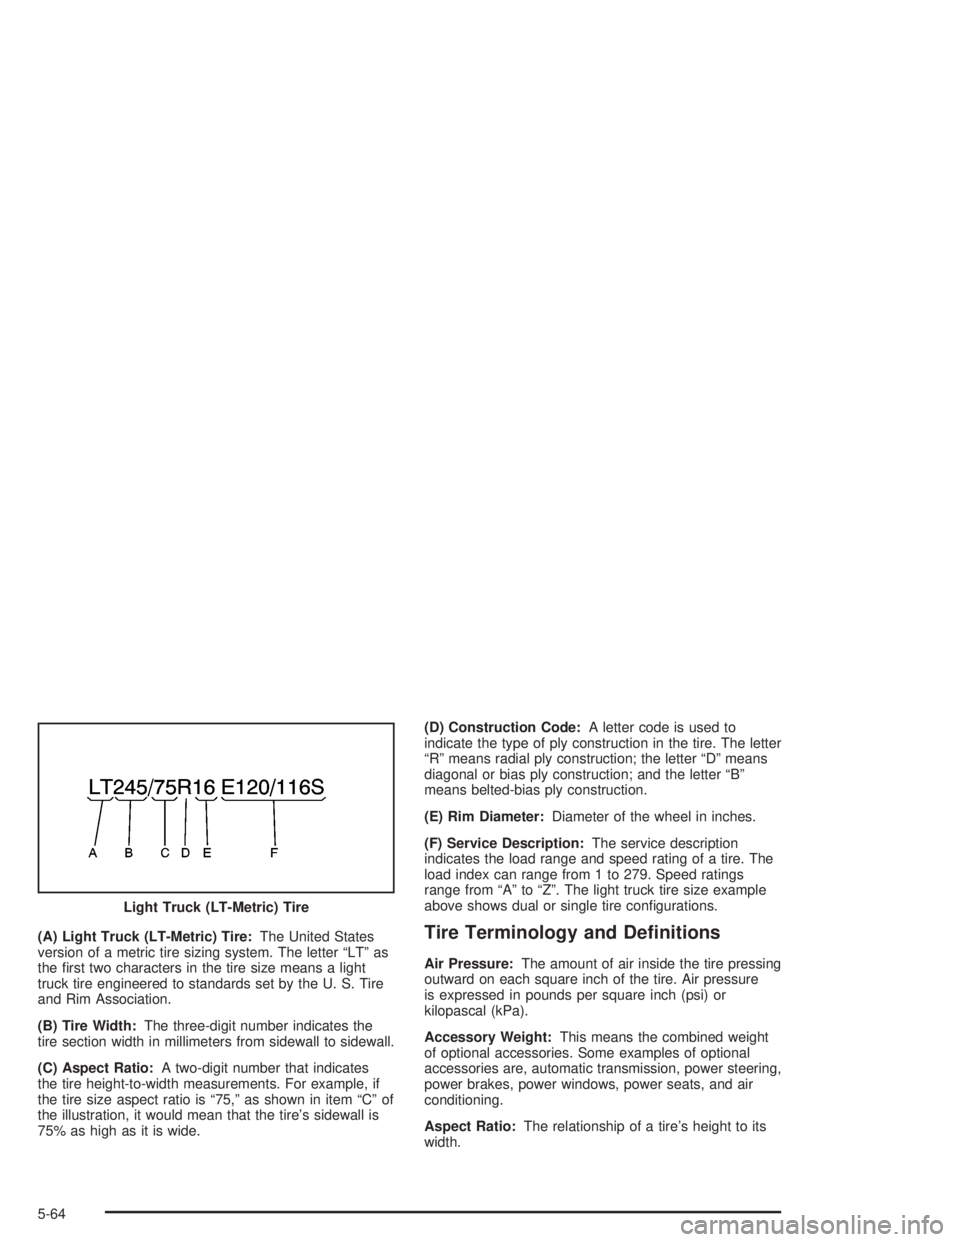
(A) Light Truck (LT-Metric) Tire:The United States
version of a metric tire sizing system. The letter “LT” as
the first two characters in the tire size means a light
truck tire engineered to standards set by the U. S. Tire
and Rim Association.
(B) Tire Width:The three-digit number indicates the
tire section width in millimeters from sidewall to sidewall.
(C) Aspect Ratio:A two-digit number that indicates
the tire height-to-width measurements. For example, if
the tire size aspect ratio is “75,” as shown in item “C” of
the illustration, it would mean that the tire’s sidewall is
75% as high as it is wide.(D) Construction Code:A letter code is used to
indicate the type of ply construction in the tire. The letter
“R” means radial ply construction; the letter “D” means
diagonal or bias ply construction; and the letter “B”
means belted-bias ply construction.
(E) Rim Diameter:Diameter of the wheel in inches.
(F) Service Description:The service description
indicates the load range and speed rating of a tire. The
load index can range from 1 to 279. Speed ratings
range from “A” to “Z”. The light truck tire size example
above shows dual or single tire configurations.Tire Terminology and De�nitions
Air Pressure:The amount of air inside the tire pressing
outward on each square inch of the tire. Air pressure
is expressed in pounds per square inch (psi) or
kilopascal (kPa).
Accessory Weight:This means the combined weight
of optional accessories. Some examples of optional
accessories are, automatic transmission, power steering,
power brakes, power windows, power seats, and air
conditioning.
Aspect Ratio:The relationship of a tire’s height to its
width. Light Truck (LT-Metric) Tire
5-64
Page 341 of 412
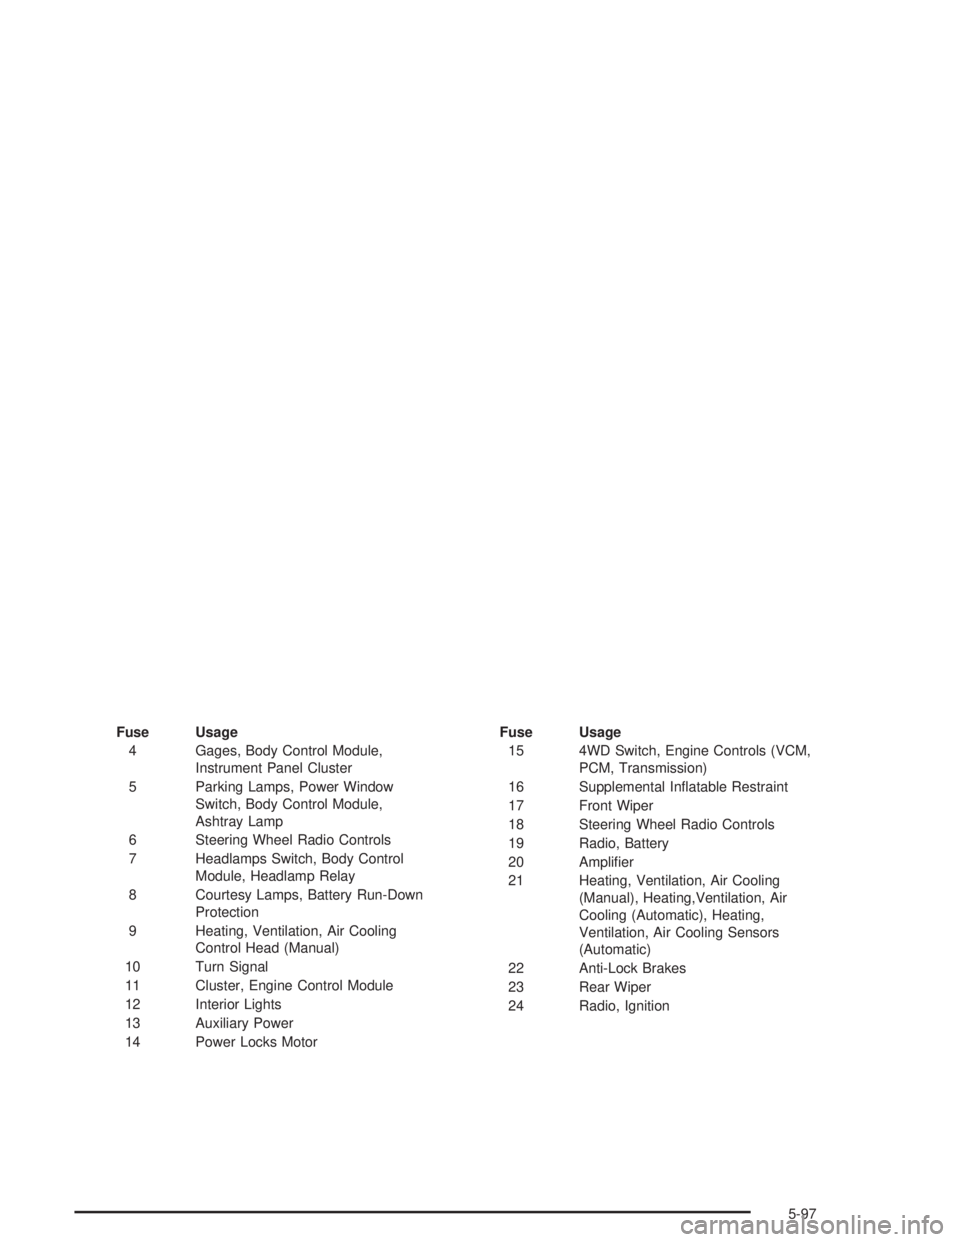
Fuse Usage
4 Gages, Body Control Module,
Instrument Panel Cluster
5 Parking Lamps, Power Window
Switch, Body Control Module,
Ashtray Lamp
6 Steering Wheel Radio Controls
7 Headlamps Switch, Body Control
Module, Headlamp Relay
8 Courtesy Lamps, Battery Run-Down
Protection
9 Heating, Ventilation, Air Cooling
Control Head (Manual)
10 Turn Signal
11 Cluster, Engine Control Module
12 Interior Lights
13 Auxiliary Power
14 Power Locks MotorFuse Usage
15 4WD Switch, Engine Controls (VCM,
PCM, Transmission)
16 Supplemental Inflatable Restraint
17 Front Wiper
18 Steering Wheel Radio Controls
19 Radio, Battery
20 Amplifier
21 Heating, Ventilation, Air Cooling
(Manual), Heating,Ventilation, Air
Cooling (Automatic), Heating,
Ventilation, Air Cooling Sensors
(Automatic)
22 Anti-Lock Brakes
23 Rear Wiper
24 Radio, Ignition
5-97
Page 343 of 412
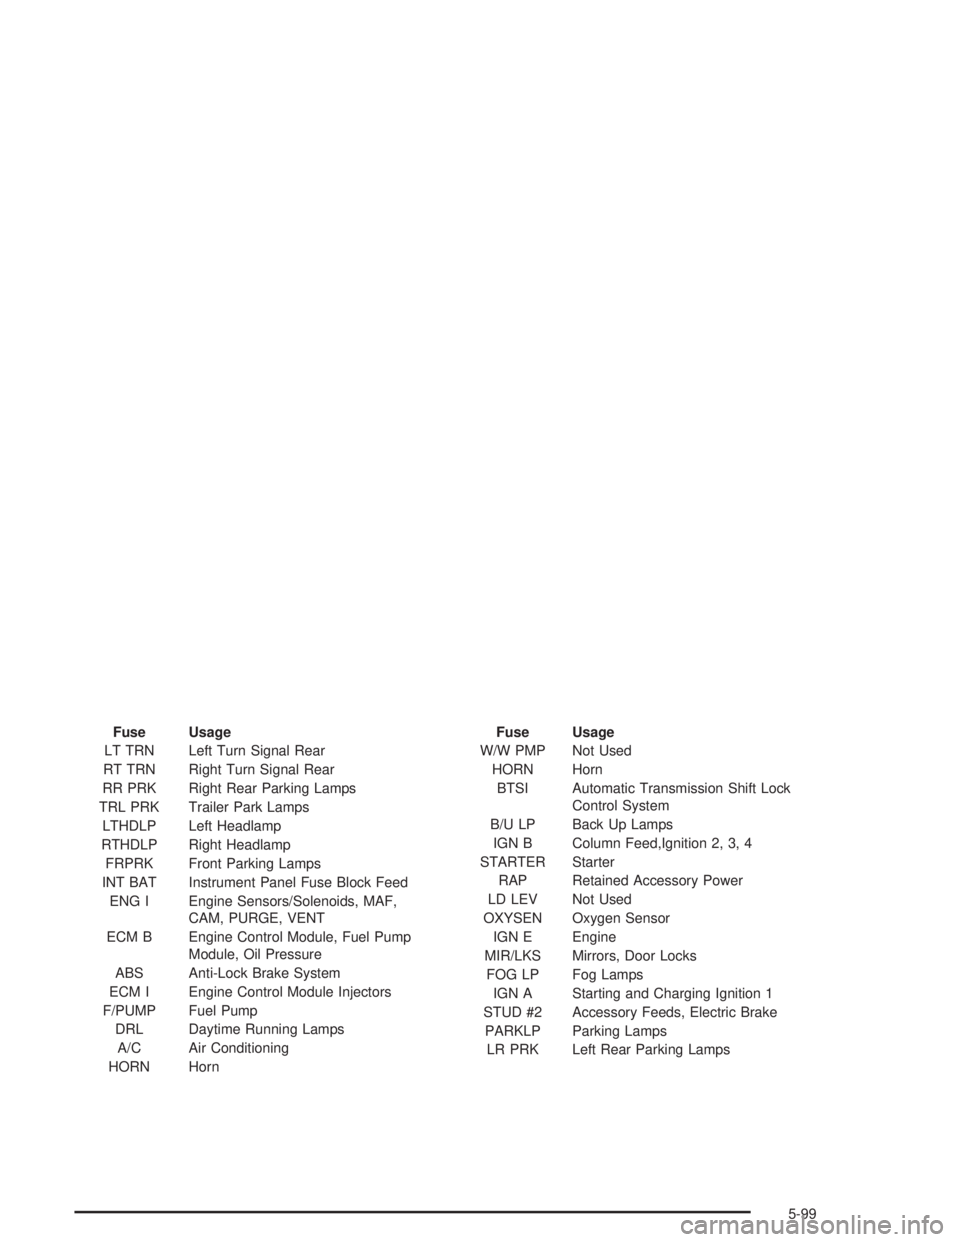
Fuse Usage
LT TRN Left Turn Signal Rear
RT TRN Right Turn Signal Rear
RR PRK Right Rear Parking Lamps
TRL PRK Trailer Park Lamps
LTHDLP Left Headlamp
RTHDLP Right Headlamp
FRPRK Front Parking Lamps
INT BAT Instrument Panel Fuse Block Feed
ENG I Engine Sensors/Solenoids, MAF,
CAM, PURGE, VENT
ECM B Engine Control Module, Fuel Pump
Module, Oil Pressure
ABS Anti-Lock Brake System
ECM I Engine Control Module Injectors
F/PUMP Fuel Pump
DRL Daytime Running Lamps
A/C Air Conditioning
HORN HornFuse Usage
W/W PMP Not Used
HORN Horn
BTSI Automatic Transmission Shift Lock
Control System
B/U LP Back Up Lamps
IGN B Column Feed,Ignition 2, 3, 4
STARTER Starter
RAP Retained Accessory Power
LD LEV Not Used
OXYSEN Oxygen Sensor
IGN E Engine
MIR/LKS Mirrors, Door Locks
FOG LP Fog Lamps
IGN A Starting and Charging Ignition 1
STUD #2 Accessory Feeds, Electric Brake
PARKLP Parking Lamps
LR PRK Left Rear Parking Lamps
5-99
Page 345 of 412
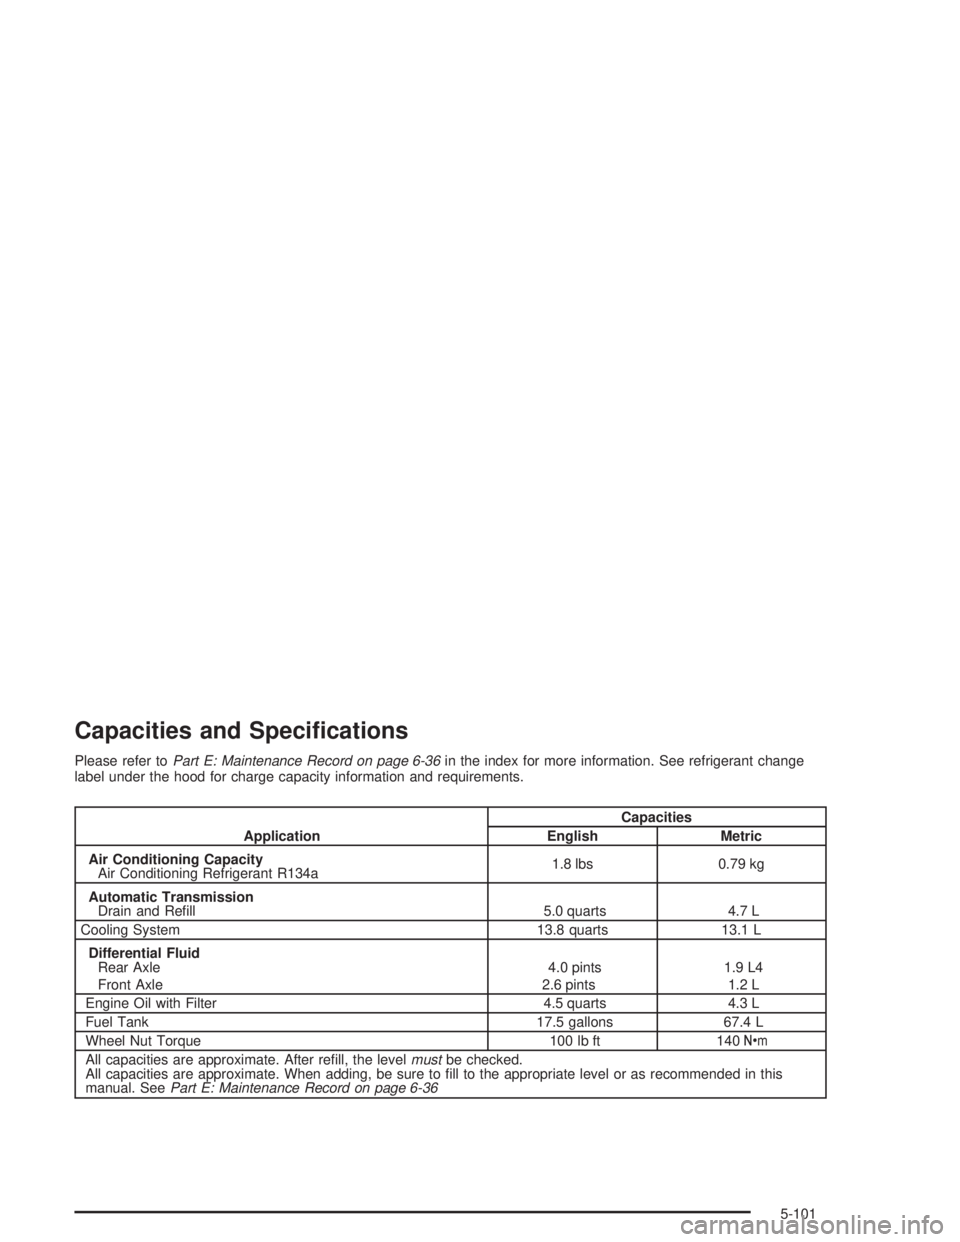
Capacities and Speci�cations
Please refer toPart E: Maintenance Record on page 6-36in the index for more information. See refrigerant change
label under the hood for charge capacity information and requirements.
ApplicationCapacities
English Metric
Air Conditioning Capacity
Air Conditioning Refrigerant R134a1.8 lbs 0.79 kg
Automatic Transmission
Drain and Refill 5.0 quarts 4.7 L
Cooling System 13.8 quarts 13.1 L
Differential Fluid
Rear Axle
Front Axle4.0 pints
2.6 pints1.9 L4
1.2 L
Engine Oil with Filter 4.5 quarts 4.3 L
Fuel Tank 17.5 gallons 67.4 L
Wheel Nut Torque 100 lb ft 140Y
All capacities are approximate. After refill, the levelmustbe checked.
All capacities are approximate. When adding, be sure to fill to the appropriate level or as recommended in this
manual. SeePart E: Maintenance Record on page 6-36
5-101
Page 346 of 412
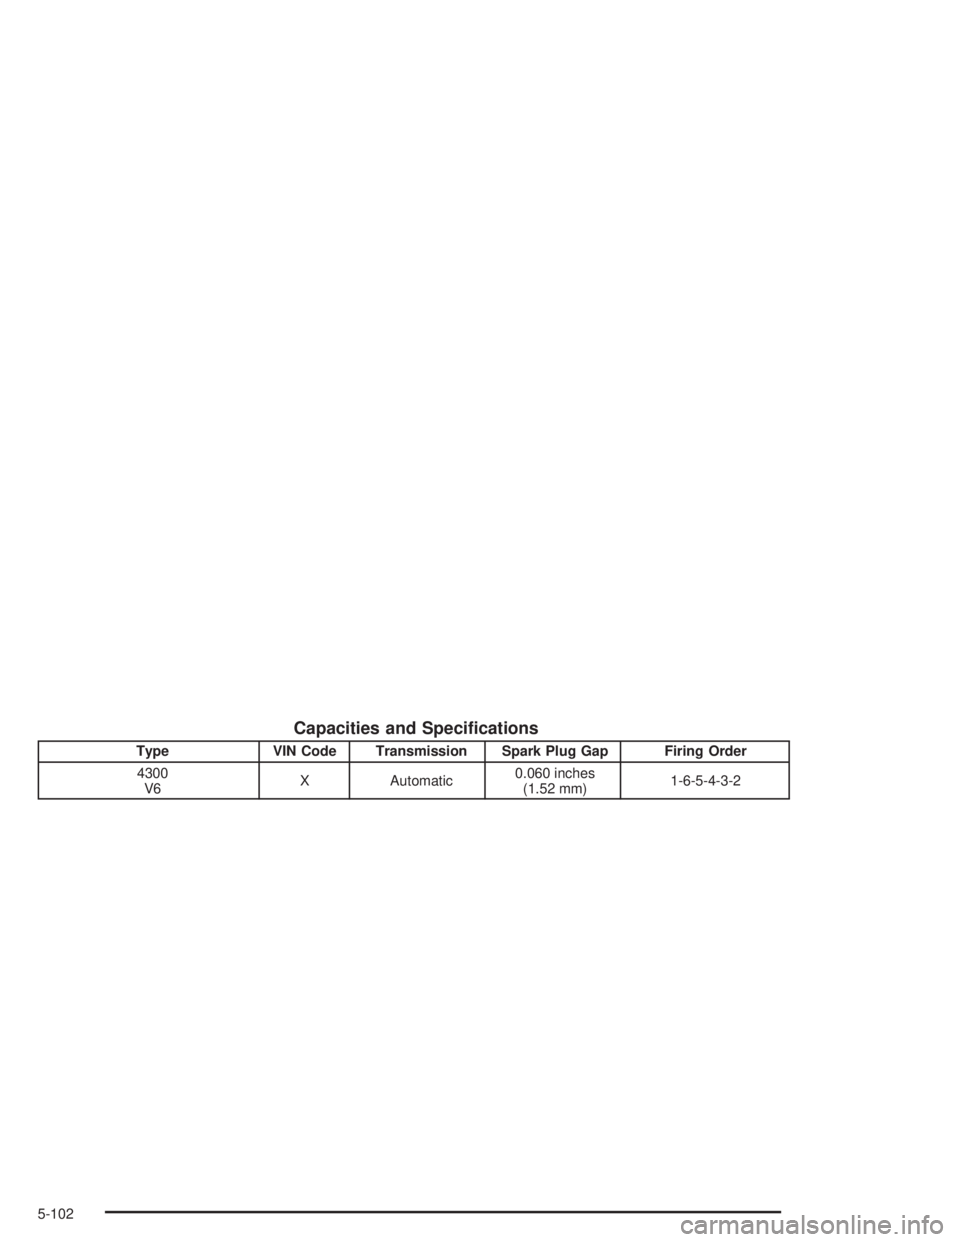
Capacities and Speci�cations
Type VIN Code Transmission Spark Plug Gap Firing Order
4300
V6X Automatic0.060 inches
(1.52 mm)1-6-5-4-3-2
5-102
Page 351 of 412
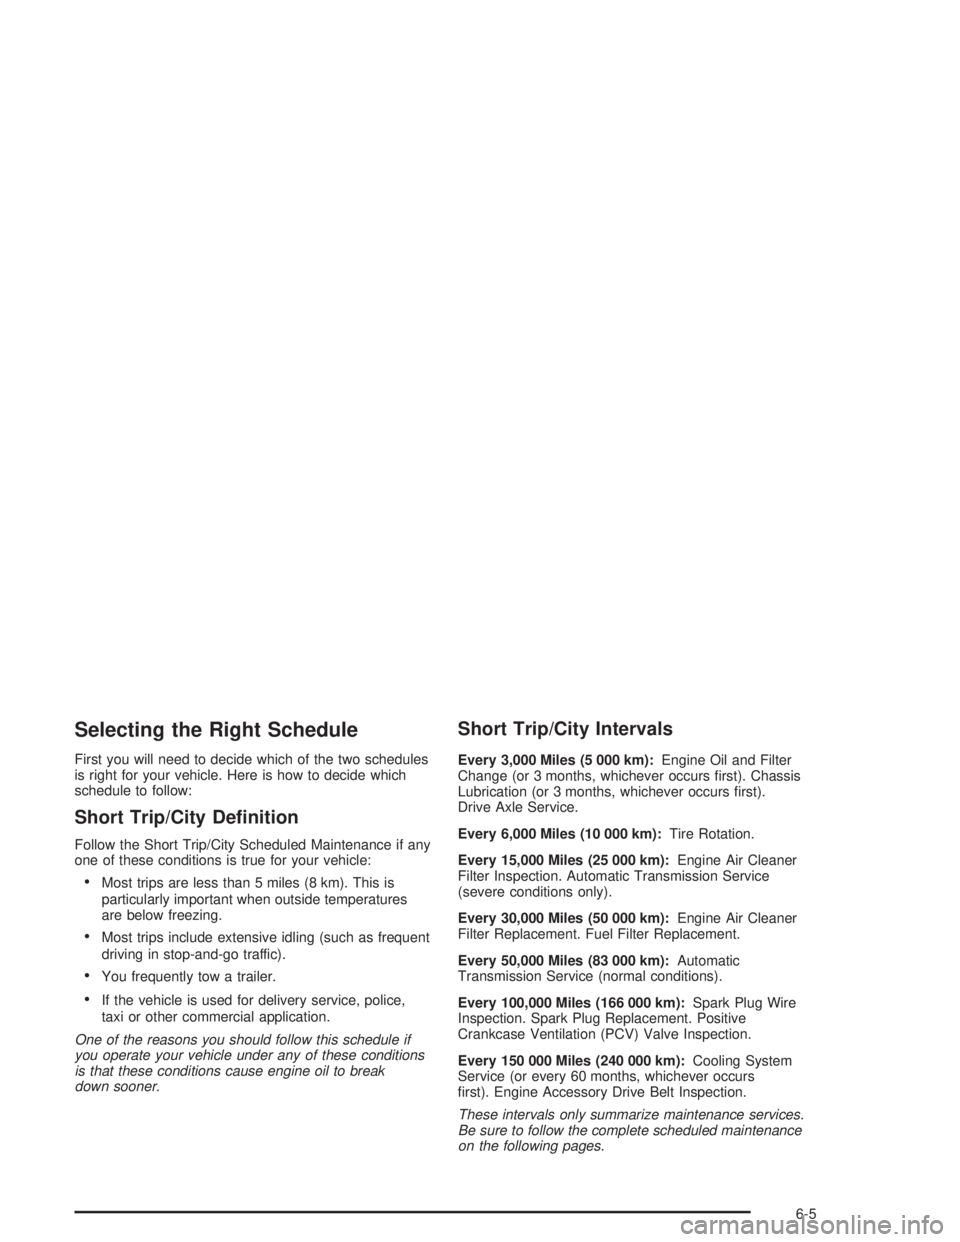
Selecting the Right Schedule
First you will need to decide which of the two schedules
is right for your vehicle. Here is how to decide which
schedule to follow:
Short Trip/City De�nition
Follow the Short Trip/City Scheduled Maintenance if any
one of these conditions is true for your vehicle:
•Most trips are less than 5 miles (8 km). This is
particularly important when outside temperatures
are below freezing.
•Most trips include extensive idling (such as frequent
driving in stop-and-go traffic).
•You frequently tow a trailer.
•If the vehicle is used for delivery service, police,
taxi or other commercial application.
One of the reasons you should follow this schedule if
you operate your vehicle under any of these conditions
is that these conditions cause engine oil to break
down sooner.
Short Trip/City Intervals
Every 3,000 Miles (5 000 km):Engine Oil and Filter
Change (or 3 months, whichever occurs first). Chassis
Lubrication (or 3 months, whichever occurs first).
Drive Axle Service.
Every 6,000 Miles (10 000 km):Tire Rotation.
Every 15,000 Miles (25 000 km):Engine Air Cleaner
Filter Inspection. Automatic Transmission Service
(severe conditions only).
Every 30,000 Miles (50 000 km):Engine Air Cleaner
Filter Replacement. Fuel Filter Replacement.
Every 50,000 Miles (83 000 km):Automatic
Transmission Service (normal conditions).
Every 100,000 Miles (166 000 km):Spark Plug Wire
Inspection. Spark Plug Replacement. Positive
Crankcase Ventilation (PCV) Valve Inspection.
Every 150 000 Miles (240 000 km):Cooling System
Service (or every 60 months, whichever occurs
first). Engine Accessory Drive Belt Inspection.
These intervals only summarize maintenance services.
Be sure to follow the complete scheduled maintenance
on the following pages.
6-5