flat tire GMC SONOMA 2004 Owner's Manual
[x] Cancel search | Manufacturer: GMC, Model Year: 2004, Model line: SONOMA, Model: GMC SONOMA 2004Pages: 412, PDF Size: 4.16 MB
Page 246 of 412
Tire Chains..................................................5-74
If a Tire Goes Flat........................................5-74
Changing a Flat Tire.....................................5-75
Compact Spare Tire......................................5-85
Appearance Care............................................5-86
Cleaning the Inside of Your Vehicle.................5-86
Care of Safety Belts......................................5-89
Weatherstrips...............................................5-89
Cleaning the Outside of Your Vehicle..............5-89
Sheet Metal Damage.....................................5-91
Finish Damage.............................................5-92
Underbody Maintenance................................5-92
Chemical Paint Spotting.................................5-92
Vehicle Care/Appearance Materials..................5-93Vehicle Identi�cation......................................5-94
Vehicle Identification Number (VIN).................5-94
Service Parts Identification Label.....................5-94
Electrical System............................................5-94
Add-On Electrical Equipment..........................5-94
Headlamps..................................................5-95
Windshield Wiper Fuses................................5-95
Power Windows and Other Power Options.......5-95
Fuses and Circuit Breakers............................5-95
Capacities and Speci�cations........................5-101
Section 5 Service and Appearance Care
5-2
Page 306 of 412
(A) Temporary Use Only:The compact spare tire or
temporary use tire has a tread life of approximately
3,000 miles (5 000 km) and should not be driven
at speeds over 65 mph (105 km/h). The compact spare
tire is for emergency use when a regular road tire
has lost air and gone flat. SeeCompact Spare Tire on
page 5-85andIf a Tire Goes Flat on page 5-74.
(B) Tire Ply Material:The type of cord and number of
plies in the sidewall and under the tread.
(C) Tire Identi�cation Number (TIN):The Tire
Identification Number (TIN). The TIN shows the
manufacturer and plant code, tire size, and date the tire
was manufactured. The TIN is molded onto both
sides of the tire, although only one side may have the
date of manufacture.
(D) Maximum Cold In�ation Load Limit:Maximum
load that can be carried and the maximum pressure
needed to support that load. SeeCompact Spare Tire
on page 5-85andLoading Your Vehicle on page 4-45.(E) Tire In�ation:The temporary use tire or compact
spare tire should be inflated to 60 psi (420 kPa).
For more information on tire pressure and inflation see
In�ation - Tire Pressure on page 5-67.
(F) Tire Size:A combination of letters and numbers
define a tire’s width, height, aspect ratio, construction
type and service description. The letter “T” as the
first character in the tire size means the tire is for
temporary use only.
(G) Tire Performance Criteria Speci�cation (TPC
Spec):Original equipment tires designed to GM’s
specific tire performance criteria have a TPC
specification code molded onto the sidewall. GM’s TPC
specifications meet or exceed all federal safety
guidelines.
5-62
Page 312 of 412
remove the valve cap from the tire valve stem. Press
the tire gage firmly onto the valve to get a pressure
measurement. If the cold tire inflation pressure matches
the recommended pressure on the tire and loading
information label, no further adjustment is necessary. If
the pressure is low, add air until you reach the
recommended amount.
If you overfill the tire, release air by pushing on the
metal stem in the center of the tire valve. Recheck the
tire pressure with the tire gage.
Be sure to put the valve caps back on the valve stems.
They help prevent leaks by keeping out dirt and
moisture.
Tire Inspection and Rotation
Tires should be rotated every 5,000 to 8,000 miles
(8 000 to 13 000 km).
Any time you notice unusual wear, rotate your tires as
soon as possible and check wheel alignment. Also
check for damaged tires or wheels. SeeWhen It Is Time
for New Tires on page 5-69andWheel Replacement
on page 5-72for more information.Make sure the spare tire is stored securely. Push, pull,
and then try to rotate or turn the tire. If it moves,
use the wheel wrench to tighten the cable. See
Changing a Flat Tire on page 5-75.
The purpose of regular rotation is to achieve more
uniform wear for all tires on the vehicle. The first rotation
is the most important. SeePart A: Scheduled
Maintenance Services on page 6-4, for scheduled
rotation intervals.
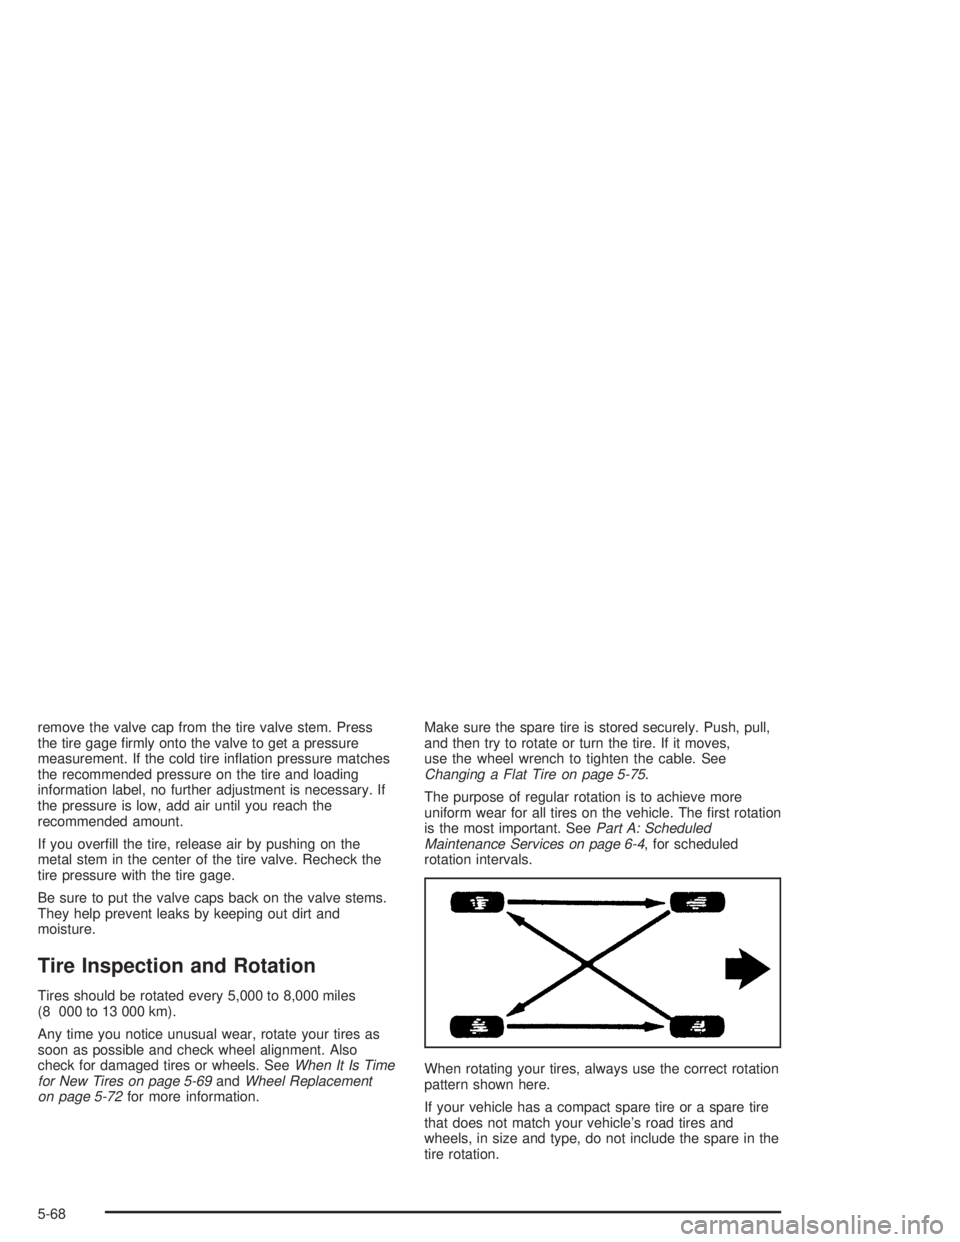
When rotating your tires, always use the correct rotation
pattern shown here.
If your vehicle has a compact spare tire or a spare tire
that does not match your vehicle’s road tires and
wheels, in size and type, do not include the spare in the
tire rotation.
5-68
Page 313 of 412
After the tires have been rotated, adjust the front and
rear inflation pressures as shown on the
Certification/Tire label or the Tire and Loading
Information label. Make certain that all wheel nuts are
properly tightened. See “Wheel Nut Torque” under
Capacities and Speci�cations on page 5-101.
{CAUTION:
Rust or dirt on a wheel, or on the parts to
which it is fastened, can make wheel nuts
become loose after a time. The wheel could
come off and cause an accident. When you
change a wheel, remove any rust or dirt from
places where the wheel attaches to the vehicle.
In an emergency, you can use a cloth or a
paper towel to do this; but be sure to use a
scraper or wire brush later, if you need to, to
get all the rust or dirt off. See “Changing a Flat
Tire” in the Index.
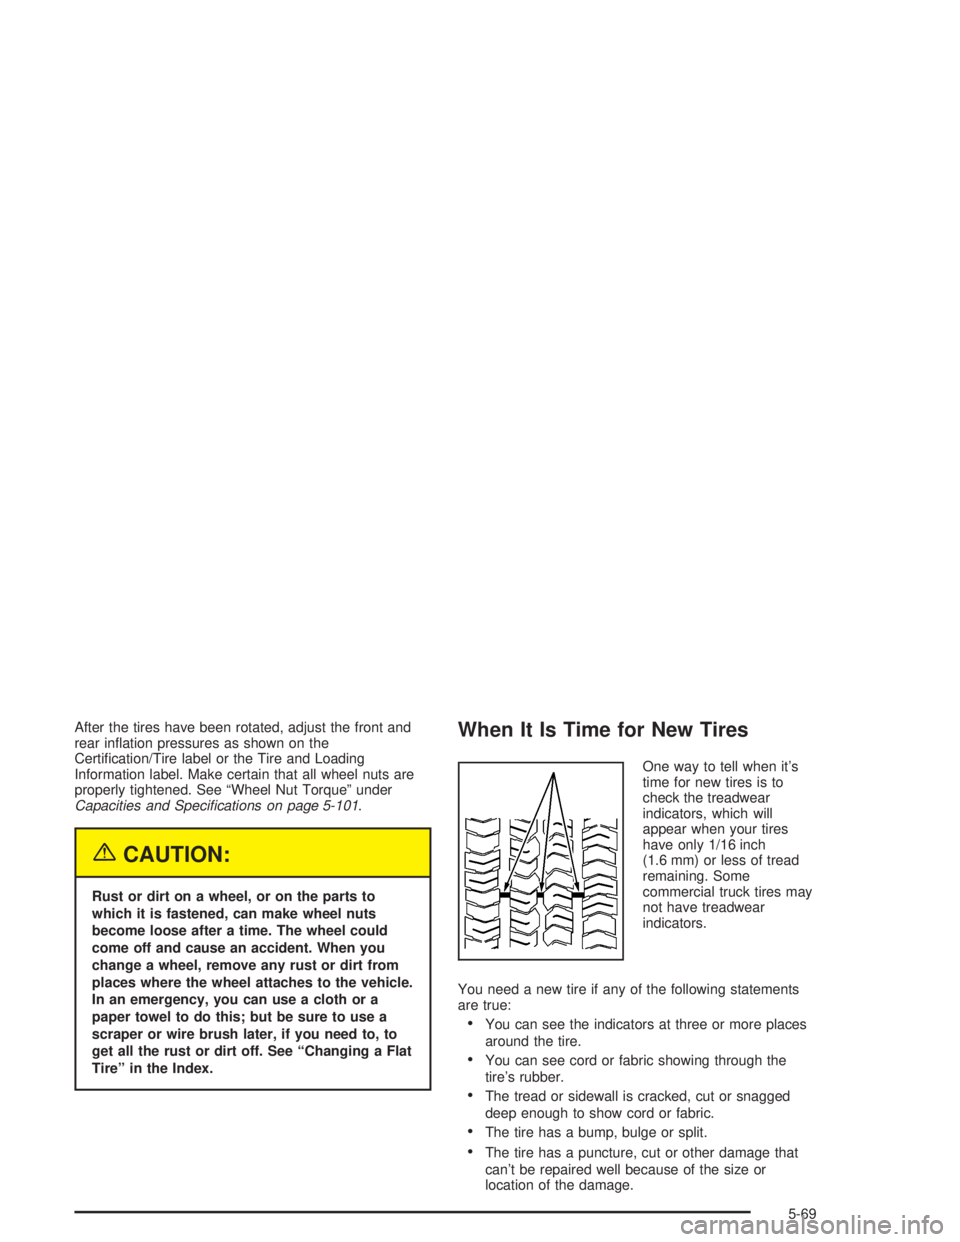
When It Is Time for New Tires
One way to tell when it’s
time for new tires is to
check the treadwear
indicators, which will
appear when your tires
have only 1/16 inch
(1.6 mm) or less of tread
remaining. Some
commercial truck tires may
not have treadwear
indicators.
You need a new tire if any of the following statements
are true:
•You can see the indicators at three or more places
around the tire.
•You can see cord or fabric showing through the
tire’s rubber.
•The tread or sidewall is cracked, cut or snagged
deep enough to show cord or fabric.
•The tire has a bump, bulge or split.
•The tire has a puncture, cut or other damage that
can’t be repaired well because of the size or
location of the damage.
5-69
Page 317 of 412
If you need to replace any of your wheels, wheel bolts
or wheel nuts, replace them only with new GM
original equipment parts. This way, you will be sure to
have the right wheel, wheel bolts and wheel nuts
for your vehicle.
{CAUTION:
Using the wrong replacement wheels, wheel
bolts or wheel nuts on your vehicle can be
dangerous. It could affect the braking and
handling of your vehicle, make your tires lose
air and make you lose control. You could have
a collision in which you or others could be
injured. Always use the correct wheel, wheel
bolts and wheel nuts for replacement.
Notice:The wrong wheel can also cause problems
with bearing life, brake cooling, speedometer or
odometer calibration, headlamp aim, bumper height,
vehicle ground clearance and tire or tire chain
clearance to the body and chassis.
SeeChanging a Flat Tire on page 5-75for more
information.
Used Replacement Wheels
{CAUTION:
Putting a used wheel on your vehicle is
dangerous. You can’t know how it’s been used
or how far it’s been driven. It could fail
suddenly and cause a crash. If you have to
replace a wheel, use a new GM original
equipment wheel.
5-73
Page 318 of 412
Tire Chains
{CAUTION:
Don’t use tire chains. There’s not enough
clearance. Tire chains used on a vehicle without
the proper amount of clearance can cause
damage to the brakes, suspension or other
vehicle parts. The area damaged by the tire
chains could cause you to lose control of your
vehicle and you or others may be injured in a
crash. Use another type of traction device only
if its manufacturer recommends it for use on
your vehicle and tire size combination and road
conditions. Follow that manufacturer’s
instructions. To help avoid damage to your
vehicle, drive slowly, readjust or remove the
device if it’s contacting your vehicle, and don’t
spin your wheels. If you do �nd traction devices
that will �t, install them on the rear tires.
If a Tire Goes Flat
It’s unusual for a tire to “blowout” while you’re driving,
especially if you maintain your tires properly. If air goes
out of a tire, it’s much more likely to leak out slowly.
But if you should ever have a “blowout,” here are a few
tips about what to expect and what to do:
If a front tire fails, the flat tire will create a drag that
pulls the vehicle toward that side. Take your foot off the
accelerator pedal and grip the steering wheel firmly.
Steer to maintain lane position, and then gently brake to
a stop well out of the traffic lane.
A rear blowout, particularly on a curve, acts much like a
skid and may require the same correction you’d use
in a skid. In any rear blowout, remove your foot from the
accelerator pedal. Get the vehicle under control by
steering the way you want the vehicle to go. It may be
very bumpy and noisy, but you can still steer. Gently
brake to a stop, well off the road if possible.
5-74
Page 319 of 412
{CAUTION:
Lifting a vehicle and getting under it to do
maintenance or repairs is dangerous without
the appropriate safety equipment and training.
The jack provided with your vehicle is
designed only for changing a �at tire. If it is
used for anything else, you or others could be
badly injured or killed if the vehicle slips off
the jack. Use the jack provided with your
vehicle only for changing a �at tire.
If a tire goes flat, the next part shows how to use your
jacking equipment to change a flat tire safely.
Changing a Flat Tire
If a tire goes flat, avoid further tire and wheel damage
by driving slowly to a level place. Turn on your
hazard warning flashers.
{CAUTION:
Changing a tire can cause an injury. The
vehicle can slip off the jack and roll over you
or other people. You and they could be badly
injured. Find a level place to change your tire.
To help prevent the vehicle from moving:
1. Set the parking brake �rmly.
2. Put the shift lever in PARK (P).
3. Turn off the engine.
To be even more certain the vehicle won’t
move, you can put blocks at the front and rear
of the tire farthest away from the one being
changed. That would be the tire on the other
side of the vehicle, at the opposite end.
5-75
Page 323 of 412
Removing the Flat Tire and Installing
the Spare Tire
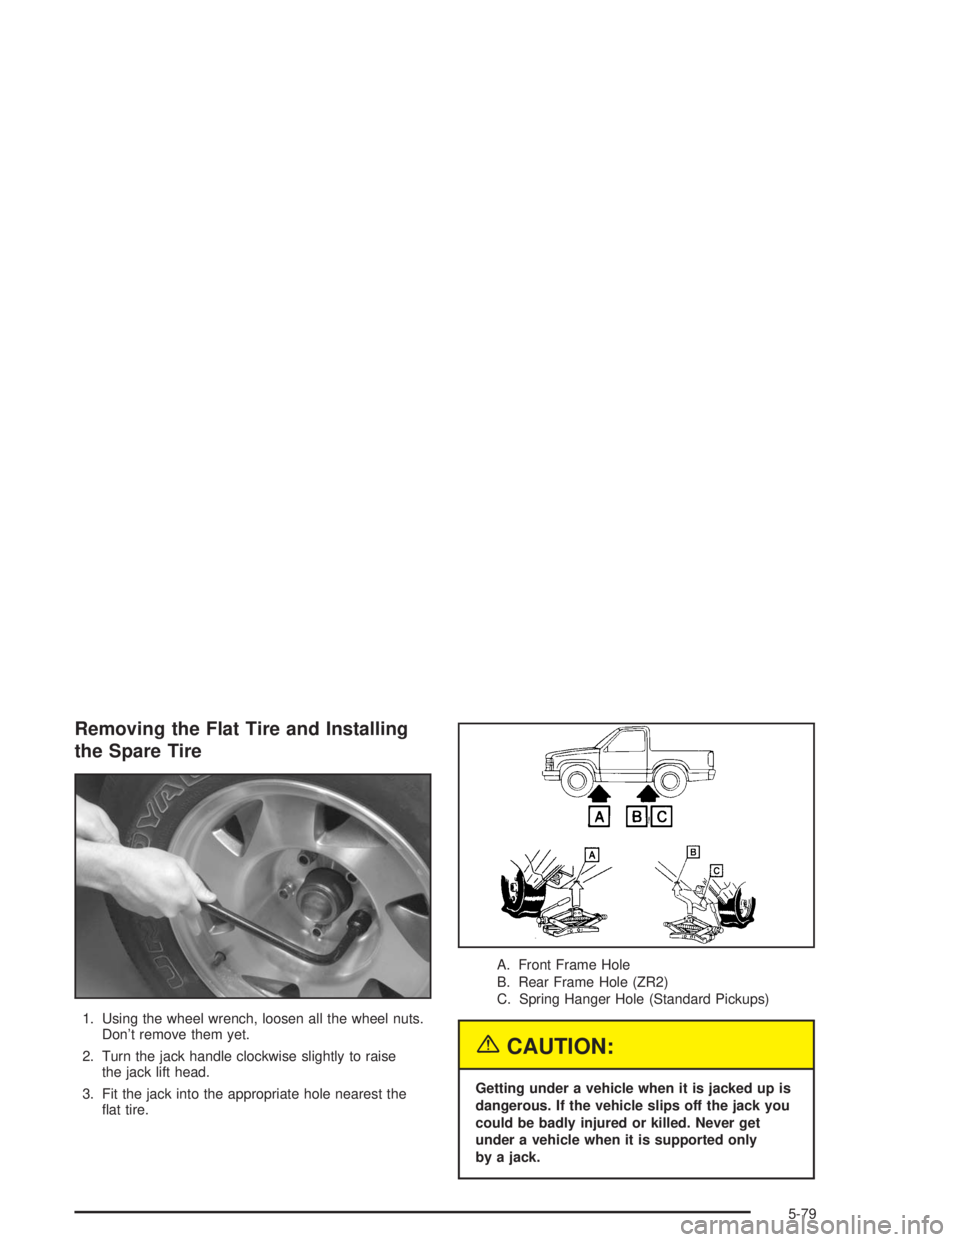
1. Using the wheel wrench, loosen all the wheel nuts.
Don’t remove them yet.
2. Turn the jack handle clockwise slightly to raise
the jack lift head.
3. Fit the jack into the appropriate hole nearest the
flat tire.A. Front Frame Hole
B. Rear Frame Hole (ZR2)
C. Spring Hanger Hole (Standard Pickups)
{CAUTION:
Getting under a vehicle when it is jacked up is
dangerous. If the vehicle slips off the jack you
could be badly injured or killed. Never get
under a vehicle when it is supported only
by a jack.
5-79
Page 327 of 412
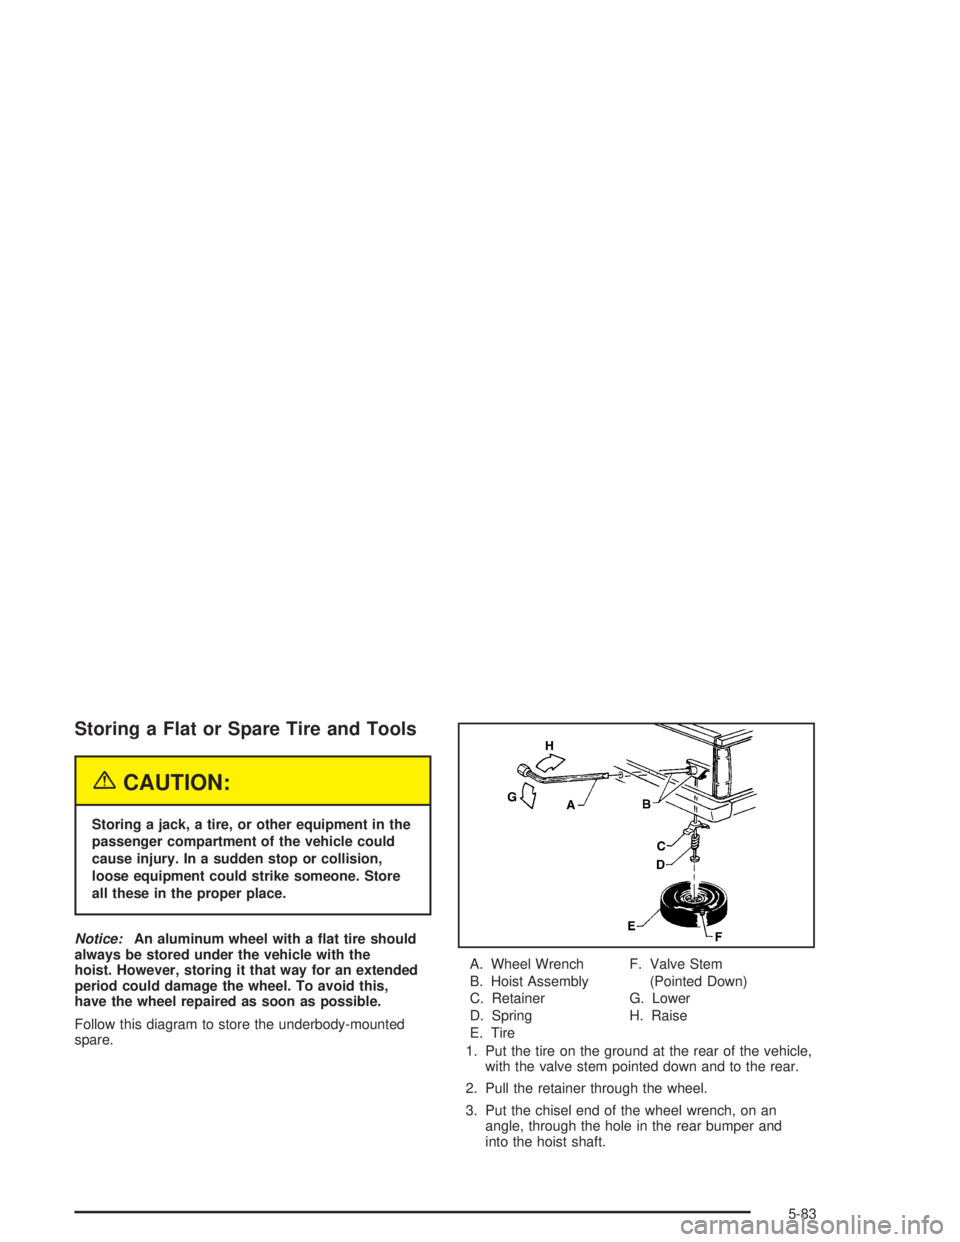
Storing a Flat or Spare Tire and Tools
{CAUTION:
Storing a jack, a tire, or other equipment in the
passenger compartment of the vehicle could
cause injury. In a sudden stop or collision,
loose equipment could strike someone. Store
all these in the proper place.
Notice:An aluminum wheel with a �at tire should
always be stored under the vehicle with the
hoist. However, storing it that way for an extended
period could damage the wheel. To avoid this,
have the wheel repaired as soon as possible.
Follow this diagram to store the underbody-mounted
spare.A. Wheel Wrench
B. Hoist Assembly
C. Retainer
D. Spring
E. TireF. Valve Stem
(Pointed Down)
G. Lower
H. Raise
1. Put the tire on the ground at the rear of the vehicle,
with the valve stem pointed down and to the rear.
2. Pull the retainer through the wheel.
3. Put the chisel end of the wheel wrench, on an
angle, through the hole in the rear bumper and
into the hoist shaft.
5-83
Page 372 of 412
At Least Twice a Year
Restraint System Check
Make sure the safety belt reminder light and all your
belts, buckles, latch plates, retractors and anchorages
are working properly. Look for any other loose or
damaged safety belt system parts. If you see anything
that might keep a safety belt system from doing its
job, have it repaired. Have any torn or frayed safety belts
replaced.
Also look for any opened or broken air bag coverings,
and have them repaired or replaced. (The air bag
system does not need regular maintenance.)
Wiper Blade Check
Inspect wiper blades for wear or cracking. Replace
blade inserts that appear worn or damaged or that
streak or miss areas of the windshield. Also see
Cleaning the Outside of Your Vehicle on page 5-89.
Spare Tire Check
At least twice a year, after the monthly inflation check of
the spare tire determines that the spare is inflated to
the correct tire inflation pressure, make sure that
the spare tire is stored securely. Push, pull, and then try
to rotate or turn the tire. If it moves, use the wheel
wrench to tighten the cable. SeeChanging a Flat Tire
on page 5-75.
Weatherstrip Lubrication
Silicone grease on weatherstrips will make them last
longer, seal better, and not stick or squeak. Apply
silicone grease with a clean cloth. During very cold,
damp weather more frequent application may be
required. SeePart D: Recommended Fluids and
Lubricants on page 6-32.
Automatic Transmission Check
Check the transmission fluid level; add if needed. See
Automatic Transmission Fluid on page 5-19. A fluid loss
may indicate a problem. Check the system and repair
if needed.
6-26