climate control GMC TERRAIN 2010 User Guide
[x] Cancel search | Manufacturer: GMC, Model Year: 2010, Model line: TERRAIN, Model: GMC TERRAIN 2010Pages: 410, PDF Size: 2.55 MB
Page 204 of 410
7-2 Climate Controls
Air Delivery Mode Control:To
change the current mode, select
one of the following:
F (Vent): Air is directed to the
instrument panel outlets.
* (Bi-Level): Air is directed to the
instrument panel outlets and the
floor outlets.
7 (Floor): Air is directed to the
floor outlets.
W(Defog): Clears the windows of
fog or moisture. Air is directed to the
windshield and floor outlets.
0(Defrost): Clears the
windshield of fog or frost more
quickly. Air is directed to the
windshield and side window outlets.
For best results, clear all snow and
ice from the windshield before
defrosting.
Do not drive the vehicle until all the
windows are clear.
Air Conditioning
#(Air Conditioning): Press to
turn the air conditioning on or off.
If the fan is turned off or the outside
temperature falls below freezing, the
air conditioning will not work.
h(Recirculation): Press to turn
on the recirculation. An indicator
light comes on. Air is recirculated
inside the vehicle. It helps to quickly
cool the air inside the vehicle or
prevent outside air and odors from
entering.
%(Outside Air): Press to turn
on the outside air. An indicator light
comes on. Outside air is circulated
throughout the vehicle.
Rear Window Defogger
<(Rear Defogger): Press to turn
the rear window defogger on or off.
The rear window defogger turns off
after about 10 minutes. It can also
be turned off by turning the ignition
to ACC/ACCESSORY or LOCK/
OFF. If turned on again, it runs for
about five minutes before
turning off.
Do not drive the vehicle until all the
windows are clear.
Notice: Do not use a razor blade
or sharp object to clear the inside
rear window. Do not adhere
anything to the defogger grid
lines in the rear glass. These
actions may damage the rear
defogger. Repairs would not be
covered by your warranty.
Page 205 of 410
Climate Controls 7-3
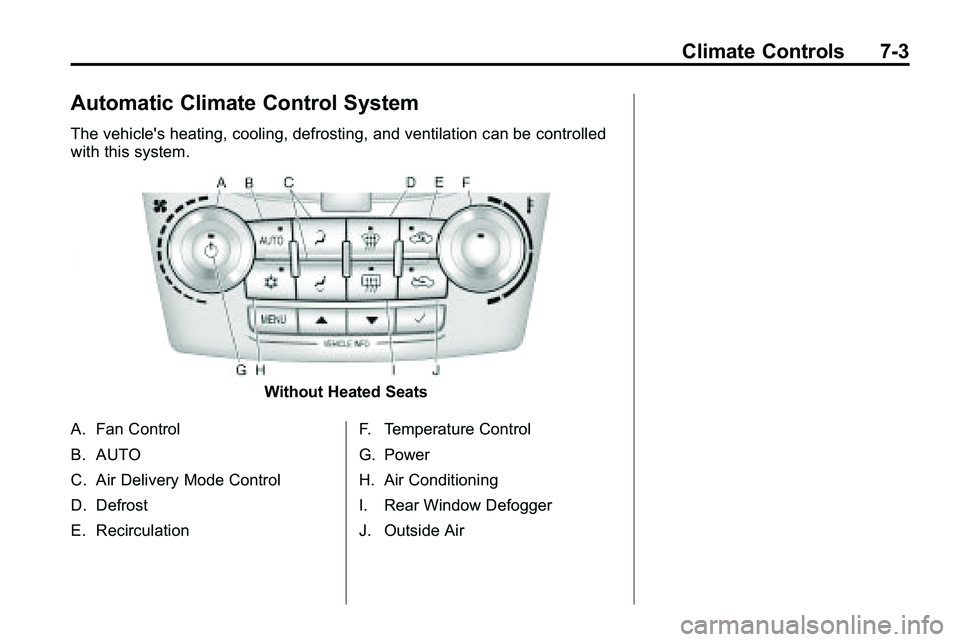
Automatic Climate Control System
The vehicle's heating, cooling, defrosting, and ventilation can be controlled
with this system.
Without Heated Seats
A. Fan Control
B. AUTO
C. Air Delivery Mode Control
D. Defrost
E. Recirculation F. Temperature Control
G. Power
H. Air Conditioning
I. Rear Window Defogger
J. Outside Air
Page 206 of 410
7-4 Climate Controls
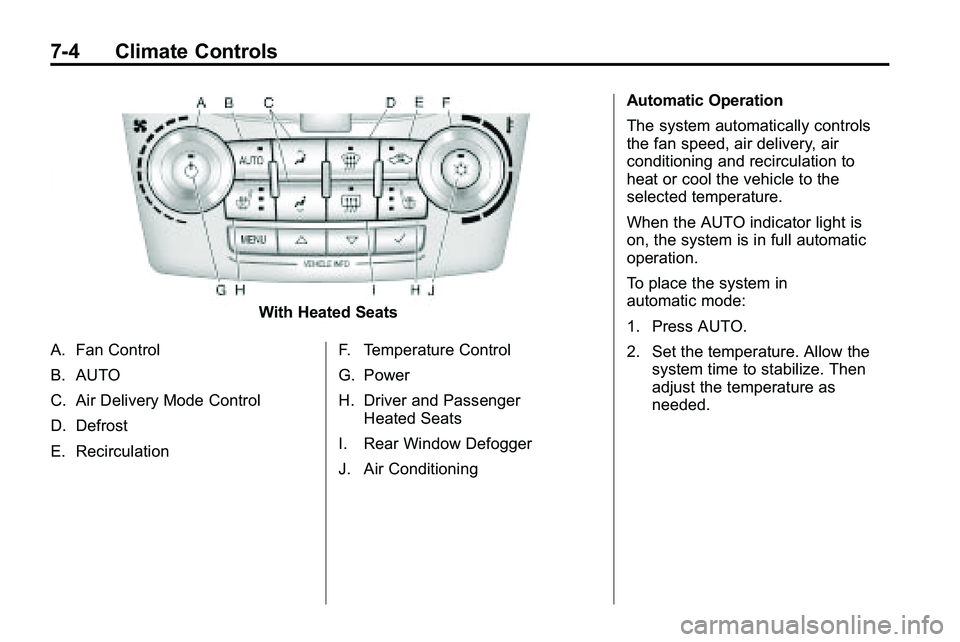
With Heated Seats
A. Fan Control
B. AUTO
C. Air Delivery Mode Control
D. Defrost
E. Recirculation F. Temperature Control
G. Power
H. Driver and Passenger
Heated Seats
I. Rear Window Defogger
J. Air Conditioning Automatic Operation
The system automatically controls
the fan speed, air delivery, air
conditioning and recirculation to
heat or cool the vehicle to the
selected temperature.
When the AUTO indicator light is
on, the system is in full automatic
operation.
To place the system in
automatic mode:
1. Press AUTO.
2. Set the temperature. Allow the
system time to stabilize. Then
adjust the temperature as
needed.
Page 207 of 410
Climate Controls 7-5
Manual Operation
O(Power):Press to turn the
climate control system on or off.
9(Fan Control): Turn to increase
or decrease the fan speed.
Adjusting the fan speed while in
automatic mode places the fan
under manual control. The AUTO
indicator light turns off. The air
delivery mode remains in automatic
control.
Temperature Control: Turn to
increase or decrease the
temperature inside the vehicle.
H/G(Air Delivery Mode
Control): Press mode up or mode
down to cycle through the different
air delivery modes. The current
mode is shown on the display. Select from the following:
F
(Vent): Air is directed to the
instrument panel outlets.
* (Bi-Level): Air is directed to the
instrument panel outlets and the
floor outlets.
7 (Floor): Air is directed to the
floor outlets.
W(Defog): Clears the windows of
fog or moisture. Air is directed to the
windshield and floor outlets.
0(Defrost): Clears the
windshield of fog or frost more
quickly. Air is directed to the
windshield and side window outlets.
Selecting defrost disables the
automatic mode.
For best results, clear all snow and
ice from the windshield before
defrosting.
Do not drive the vehicle until all the
windows are clear.
Air Conditioning
#(Air Conditioning): Press to
turn the air conditioning on or off.
If the fan is turned off or the outside
temperature falls below freezing, the
air conditioning will not work. When
in AUTO, the air conditioning will
come on automatically as needed.
h(Recirculation): Press to
turn on the recirculation. Press to
alternate between recirculation and
outside air, if the vehicle does not
have a separate outside air button.
The indicator light turns on when
recirculation is selected. Air is
recirculated inside the vehicle.
It helps quickly cool the air inside
the vehicle or prevent outside air
and odors from entering.
%(Outside Air, If Equipped):
Press to turn on the outside air. An
indicator light comes on. Outside air
is circulated throughout the vehicle.
Page 208 of 410

7-6 Climate Controls
Rear Window Defogger
<(Rear Defogger):Press to turn
the rear window defogger on or off.
The rear window defogger turns off
after about 10 minutes. It can also
be turned off by turning the ignition
to ACC/ACCESSORY or LOCK/
OFF. If turned on again, it runs for
about five minutes before
turning off.
Do not drive the vehicle until all the
windows are clear.
Notice: Do not use a razor blade
or sharp object to clear the inside
rear window. Do not adhere
anything to the defogger grid
lines in the rear glass. These
actions may damage the rear
defogger. Repairs would not be
covered by your warranty.
L/M(Driver and Passenger
Heated Seats): For vehicles with
heated seats, see Heated Front
Seats on page 2‑7.
Sensors
The solar sensor, located on top
of the instrument panel near the
windshield, monitors the solar heat.
The climate control system uses
the information to adjust the
temperature, fan speed,
recirculation, and air delivery mode.
Do not cover the solar sensor or the
system will not work properly.
Air Vents
Use the air outlets, located in the
center and on the side of the
instrument panel, to direct the
airflow. Use the thumbwheels
located near the center air outlets,
to open or close off the airflow.
Operation Tips
.Clear away any ice, snow,
or leaves from air inlets at the
base of the windshield that could
block the flow of air into the
vehicle.
.Keep the path under the front
seats clear of objects to help
circulate the air inside of the
vehicle more effectively.
.Use of non‐GM approved hood
deflectors can adversely affect
the performance of the system.
Check with your dealer/retailer
before adding equipment to the
outside of the vehicle.
Page 229 of 410
Driving and Operating 8-21
WARNING (Continued)
If the vehicle is stuck in the snow:
.Clear away snow from around
the base of your vehicle,
especially any that is blocking
the exhaust pipe.
.Check again from time to
time to be sure snow does
not collect there.
.Open a window about 5 cm
(two inches) on the side of
the vehicle that is away from
the wind to bring in fresh air.
.Fully open the air outlets on
or under the instrument
panel.
.Adjust the Climate Control
system to a setting that
circulates the air inside the
vehicle and set the fan speed
to the highest setting. See
Climate Control System in the
Index.(Continued)
WARNING (Continued)
For more information about
carbon monoxide, see Engine
Exhaust on page 8‑34.
Snow can trap exhaust gases
under your vehicle. This can
cause deadly CO (carbon
monoxide) gas to get inside. CO
could overcome you and kill you.
You cannot see it or smell it, so
you might not know it is in your
vehicle. Clear away snow from
around the base of your vehicle,
especially any that is blocking the
exhaust.
Run the engine for short periods
only as needed to keep warm, but
be careful. To save fuel, run the engine for only
short periods as needed to warm
the vehicle and then shut the engine
off and close the window most of
the way to save heat. Repeat this
until help arrives but only when you
feel really uncomfortable from the
cold. Moving about to keep warm
also helps.
If it takes some time for help to
arrive, now and then when you run
the engine, push the accelerator
pedal slightly so the engine runs
faster than the idle speed. This
keeps the battery charged to restart
the vehicle and to signal for help
with the headlamps. Do this as little
as possible to save fuel.
Page 337 of 410

Vehicle Care 9-63
The Uniform Tire Quality
Grading (UTQG) system does
not apply to deep tread,
winter-type snow tires,
space-saver, or temporary use
spare tires, tires with nominal
rim diameters of 10 to 12 inches
(25 to 30 cm), or to some
limited-production tires.
While the tires available on
General Motors passenger cars
and light trucks may vary with
respect to these grades, they
must also conform to federal
safety requirements and
additional General Motors Tire
Performance Criteria (TPC)
standards.
All Passenger Car Tires Must
Conform to Federal Safety
Requirements In Addition To
These Grades.Treadwear
The treadwear grade is a
comparative rating based on the
wear rate of the tire when tested
under controlled conditions on a
specified government test
course. For example, a tire
graded 150 would wear one and
a half (1½) times as well on the
government course as a tire
graded 100. The relative
performance of tires depends
upon the actual conditions of
their use, however, and may
depart significantly from the
norm due to variations in
driving habits, service practices
and differences in road
characteristics and climate.
Traction
–AA, A, B, C
The traction grades, from
highest to lowest, are AA, A, B,
and C. Those grades represent
the tire's ability to stop on wet
pavement as measured under
controlled conditions on
specified government test
surfaces of asphalt and
concrete. A tire marked C may
have poor traction performance.
Warning: The traction grade
assigned to this tire is based on
straight-ahead braking traction
tests, and does not include
acceleration, cornering,
hydroplaning, or peak traction
characteristics.
Page 399 of 410

INDEX i-1
A
Accessories andModifications . . . . . . . . . . . . . . . . . . 9-3
Accessory Power . . . . . . . . . . . . . . 8-29
Add-On Electrical Equipment . . . . . . . . . . . . . . . . . . . 8-66
Adding Equipment to the
Airbag-Equipped Vehicle . . . . . 2-38
Adjustments Lumbar, Front Seats . . . . . . . . . . . 2-5
Air Cleaner/Filter, Engine . . . . . . 9-13
Air Vents . . . . . . . . . . . . . . . . . . . . . . . 7-6
Airbag System
Check . . . . . . . . . . . . . . . . . . . . . . . . 2-40
How Does an AirbagRestrain? . . . . . . . . . . . . . . . . . . . 2-31
Passenger Sensing System . . . . . . . . . . . . . . . . . . . . . . 2-33
What Makes an Airbag Inflate? . . . . . . . . . . . . . . . . . . . . . . 2-31
What Will You See After an Airbag Inflates? . . . . . . . . . . 2-32 Airbag System (cont.)
When Should an Airbag
Inflate? . . . . . . . . . . . . . . . . . . . . . . 2-29
Where Are the Airbags? . . . . . . 2-27
Airbags Adding Equipment to theVehicle . . . . . . . . . . . . . . . . . . . . . . 2-38
Passenger Status Indicator . . . 4-15
Readiness Light . . . . . . . . . . . . . . 4-15
Servicing Airbag-Equipped Vehicles . . . . . . . . . . . . . . . . . . . . . 2-38
System Check . . . . . . . . . . . . . . . . 2-25
Alarm System Anti-Theft . . . . . . . . . . . . . . . . . . . . . 1-13
All-Wheel Drive . . . . . . . . . . 8-38, 9-26
AM-FM Radio . . . . . . . . . . . . . . . . . . 6-11
Antenna Multi-Band . . . . . . . . . . . . . . . . . . . . 6-18
Anti-Theft Alarm System . . . . . . . . . . . . . . . . 1-13
Alarm System Messages . . . . . 4-34 Antilock Brake
System (ABS) . . . . . . . . . . . . . . . . 8-39
Warning Light . . . . . . . . . . . . . . . . . 4-20
Appearance Care Exterior . . . . . . . . . . . . . . . . . . . . . . . 9-85
Interior . . . . . . . . . . . . . . . . . . . . . . . . 9-89
Assistance Program,
Roadside . . . . . . . . . . . . . . . . . . . . . 12-6
Audio Players . . . . . . . . . . . . . . . . . 6-18 CD . . . . . . . . . . . . . . . . . . . . . . . . . . . 6-18
Audio System
Radio Reception . . . . . . . . . . . . . . 6-17
Theft-Deterrent Feature . . . . . . . . 6-2
Automatic Climate Control System . . . . . . . . . . . . . . . . . . . . . . . . 7-3
Automatic Transmission . . . . . . . 8-35
Fluid . . . . . . . . . . . . . . . . . . . . . . . . . . 9-13
Manual Mode . . . . . . . . . . . . . . . . . 8-37
Shiftlock Control SystemCheck . . . . . . . . . . . . . . . . . . . . . . . 9-27
Auxiliary Devices . . . . . . . . 6-27, 6-30
Page 401 of 410
INDEX i-3
CleaningExterior Care . . . . . . . . . . . . . . . . . 9-85
Interior Care . . . . . . . . . . . . . . . . . . 9-89
Climate Control Systems . . . . . . . 7-1 Automatic . . . . . . . . . . . . . . . . . . . . . . 7-3
Clock . . . . . . . . . . . . . . . . . . . . . 4-9, 4-10
Cluster, IP . . . . . . . . . . . . . . . . . . . . . 4-12
Collision Damage Repair . . . . . 12-10
Compact Spare Tire . . . . . . . . . . . 9-76
Compass . . . . . . . . . . . . . . . . . . . . . . . 4-9
Compass Messages . . . . . . . . . . . 4-30
Control of a Vehicle . . . . . . . . . . . . . 8-4
Convenience Net . . . . . . . . . . . . . . . 3-2
Convex Mirrors . . . . . . . . . . . . . . . . 1-14
Coolant Engine . . . . . . . . . . . . . . . . . . . . . . . . 9-16
Engine Temperature
Gauge . . . . . . . . . . . . . . . . . . . . . . 4-14
Cooling System . . . . . . . . . . . . . . . . 9-15 Engine Messages . . . . . . . . . . . . 4-31
Courtesy Transportation
Program . . . . . . . . . . . . . . . . . . . . . . 12-8
Covers Engine . . . . . . . . . . . . . . . . . . . . . . . . . 9-9 Cruise Control . . . . . . . . . . . . . . . . . 8-44
Light . . . . . . . . . . . . . . . . . . . . . . . . . . 4-25
Messages . . . . . . . . . . . . . . . . . . . . 4-30
Cupholders . . . . . . . . . . . . . . . . . . . . . 3-1
Customer Assistance . . . . . . . . . . 12-4 Offices . . . . . . . . . . . . . . . . . . . . . . . . 12-3
Text Telephone (TTY)Users . . . . . . . . . . . . . . . . . . . . . . . 12-4
Customer Information Service PublicationsOrdering Information . . . . . . 12-12
Customer Satisfaction Procedure . . . . . . . . . . . . . . . . . . . . 12-1
D
Damage Repair, Collision . . . . . 12-10
Danger, Warnings, andCautions . . . . . . . . . . . . . . . . . . . . . . . . iv
Data Recorders, Event . . . . . . . 12-15
Daytime Running Lamps (DRL) . . . . . . . . . . . . . . . . . . 5-2
Defensive Driving . . . . . . . . . . . . . . . 8-3
Devices, Auxiliary . . . . . . . 6-27, 6-30
Dome Lamps . . . . . . . . . . . . . . . . . . . 5-4 Door
Ajar Messages . . . . . . . . . . . . . . . 4-30
Locks . . . . . . . . . . . . . . . . . . . . . . . . . . 1-6
Power Locks . . . . . . . . . . . . . . . . . . . 1-7
Drive Systems All-Wheel Drive . . . . . . . . . 8-38, 9-26
Driver Information
Center (DIC) . . . . . . . . . . . . . . . . . 4-25
Driving Better Fuel Economy . . . . . . . . . . 8-2
Characteristics andTowing Tips . . . . . . . . . . . . . . . . . 8-58
Defensive . . . . . . . . . . . . . . . . . . . . . . 8-3
Drunk . . . . . . . . . . . . . . . . . . . . . . . . . . 8-3
Highway Hypnosis . . . . . . . . . . . . 8-18
Hill and Mountain Roads . . . . . . 8-19
If the Vehicle is Stuck . . . . . . . . . 8-22
Loss of Control . . . . . . . . . . . . . . . . 8-7
Off-Road . . . . . . . . . . . . . . . . . . . . . . 8-7
Off-Road Recovery . . . . . . . . . . . . 8-6
Vehicle Load Limits . . . . . . . . . . . 8-22
Winter . . . . . . . . . . . . . . . . . . . . . . . . 8-20
DVD Rear Seat EntertainmentSystem . . . . . . . . . . . . . . . . . . . . . . 6-33
DVD/CD Player . . . . . . . . . . . . . . . . 6-21