buttons GMC TERRAIN 2012 User Guide
[x] Cancel search | Manufacturer: GMC, Model Year: 2012, Model line: TERRAIN, Model: GMC TERRAIN 2012Pages: 428, PDF Size: 5.45 MB
Page 62 of 428

Black plate (8,1)GMC Terrain Owner Manual (Include Mex) - 2012
3-8 Seats and Restraints
Recalling Button Memory
Positions
To recall the manually saved Button
Memory positions, press and hold
“1”or“2.” The driver seat and
outside mirrors move to the
positions stored to those buttons
when pressed. Releasing “1”or“2”
before the stored positions are
reached stops the recall.
If something has blocked the driver
seat while recalling a memory
position, the recall may stop.
Remove the obstruction; then press
and hold the appropriate manual
control for the memory item that is
not recalling for two seconds. Try
recalling the memory position again
by pressing the appropriate memory
button. If the memory position is still
not recalling, see your dealer for
service. Recalling RKE Memory Positions
(Memory Remote Recall)
The Memory Remote Recall feature
can recall the driver seat and
outside mirrors to previously stored
RKE Memory positions when
entering the vehicle.
Every time the ignition is turned off,
the positions of the driver seat and
outside mirrors are automatically
stored to the RKE transmitter that
was used to start the vehicle. These
positions are called RKE Memory
positions and may be different than
the previously mentioned Button
Memory positions saved to the
“1”
or“2” buttons. To automatically
recall RKE Memory positions,
unlock the driver door with the RKE
transmitter and open the driver door.
If the driver door is already open,
pressing the RKE transmitter K
button will also activate the RKE
Memory recall. The driver seat and
outside mirrors will move to the
previously saved RKE Memory
positions. This feature is turned on or off using
the vehicle personalization menu.
See
Vehicle Personalization on
page 5‑33 for more information.
To stop recall movement, press any
of the memory, power mirror,
or power seat controls.
If something has blocked the driver
seat while recalling a memory
position, the recall may stop.
Remove the obstruction; then press
and hold the appropriate manual
control for the memory item that is
not recalling for two seconds. Try
recalling the memory position again
by opening the driver door and
pressing the RKE Kbutton. If the
memory position is still not recalling,
see your dealer for service.
Page 63 of 428

Black plate (9,1)GMC Terrain Owner Manual (Include Mex) - 2012
Seats and Restraints 3-9
Easy Exit Driver Seat
This feature moves the seat
rearward allowing the driver more
room to exit the vehicle.
To activate, turn the ignition off and
open the driver door. If the driver
door is already open, turning the
ignition off will activate the easy exit
driver seat.
This feature can be turned on or off
using the vehicle personalization
menu. SeeVehicle Personalization
on page 5‑33 for more information.
To stop recall movement, press one
of the memory or power seat
controls.
If something has blocked the driver
seat while recalling the exit position,
the recall may stop. Remove the
obstruction; then press and hold the
power seat control rearward for
two seconds. Try recalling the exit
position again. If the exit position is
still not recalling, see your dealer for
service.Heated Front Seats
{WARNING
If you cannot feel temperature
change or pain to the skin, the
seat heater may cause burns
even at low temperatures. To
reduce the risk of burns, people
with such a condition should use
care when using the seat heater,
especially for long periods of
time. Do not place anything on
the seat that insulates against
heat, such as a blanket, cushion,
cover, or similar item. This may
cause the seat heater to
overheat. An overheated seat
heater may cause a burn or may
damage the seat.
Uplevel Climate Control System Shown, Base Similar
If available, the buttons are near the
climate controls. To operate, the
ignition must be in ON/RUN.
Press
zorJto heat the driver or
passenger seat cushion and
seatback.
Press the button once for the
highest setting. With each press of
the button, the heated seat will
change to the next lower setting,
and then the off setting. Three lights
indicate the highest setting, and one
light indicates the lowest.
Page 120 of 428
Black plate (6,1)GMC Terrain Owner Manual (Include Mex) - 2012
5-6 Instruments and Controls
Day + or Day−:Press the Day +
or Day −display buttons to increase
or decrease the day.
Display: Press Display to turn the
display of the time on the screen on
or off.
Power Outlets
The accessory power outlets can be
used to connect electrical
equipment, such as a cell phone or
MP3 player.
There are four accessory power
outlets in the following locations:
below the CD slot, inside the center
console storage, on the rear of the
center console storage, and in the
rear cargo compartment. To use the outlets, remove the cover
and close when not in use.
Notice:
Leaving electrical
equipment plugged in for an
extended period of time while the
vehicle is off will drain the
battery. Always unplug electrical
equipment when not in use and
do not plug in equipment that
exceeds the maximum 20 ampere
rating.
Certain accessory plugs may not be
compatible with the accessory
power outlets and could overload
vehicle and adapter fuses. If a
problem is experienced, see your
dealer. When adding electrical equipment,
be sure to follow the installation
instructions included with the
equipment. See
Add-On Electrical
Equipment on page 9‑64.
Notice: Hanging heavy
equipment from the power outlet
can cause damage not covered
by the vehicle warranty. The
power outlets are designed for
accessory power plugs only, such
as cell phone charge cords.
Page 137 of 428

Black plate (23,1)GMC Terrain Owner Manual (Include Mex) - 2012
Instruments and Controls 5-23
Information Displays
Driver Information
Center (DIC)
The vehicle may have a Driver
Information Center (DIC). It displays
information about the vehicle and
warning messages if there is a
system problem detected. DIC
messages display in the center of
the instrument panel cluster. See
Vehicle Messages on page 5‑26for
more information.
The vehicle may also have features
that can be customized through the
controls on the radio. See Vehicle
Personalization on page 5‑33 for
more information.
DIC Operation and Displays
Use the DIC buttons located in the
center of the instrument panel to
access different displays. The DIC
displays trip, fuel, vehicle system
information, and warning messages. It also shows the shift lever position,
the odometer, and the direction the
vehicle is driving.
DIC Buttons
MENU:
Press this button to get to
the Trip/Fuel Menu and the Vehicle
Information Menu.
QorR: Use these buttons to
scroll through the items in each
menu. A small marker will move
along the page as you scroll through
the items. This shows where each
page is in the menu. SET/CLR (Set/Clear):
Use this
button to set or clear the menu item
when it is displayed.
Trip/Fuel Menu Items
Press the MENU button until Trip/
Fuel Information Menu is displayed.
Then press
Rto scroll through the
following menu items:
.Trip 1
.Trip 2
.Fuel Range
.Average Fuel Economy
.Instantaneous Fuel Economy
.Average Vehicle Speed
.Timer
.Digital Speedometer
.Turn-by-Turn
.Blank Display
Page 157 of 428
Black plate (5,1)GMC Terrain Owner Manual (Include Mex) - 2012
Lighting 6-5
1(Door):The lamps come on
automatically when a door is
opened.
+(On): Turns the dome lamps on.
The dome lamps can also be turned
on and off by pressing the buttons
next to the lamps.
Reading Lamps
The reading lamps are located on
the overhead console. These lamps
come on automatically when any
door is opened.
For manual operation, press the
button next to each lamp to turn it
on or off.
Lighting Features
Entry Lighting
The dome lamp, cargo lamp, and
foot lamp inside the vehicle come
on when any door is opened, if the
dome lamp is in the door position. In
addition, these lamps come on
when the Remote Keyless Entry
(RKE) unlock button is pressed.
They stay on for 20 seconds or until
a door is opened. After the door is
opened and then closed, the light
remains on for 20 seconds, or until
the ignition is turned to ON/RUN.
Battery Load
Management
The vehicle has Electric Power
Management (EPM) that estimates
the battery's temperature and state
of charge. It then adjusts the voltage
for best performance and extended
life of the battery.
When the battery's state of charge
is low, the voltage is raised slightly
to quickly bring the charge back up.
When the state of charge is high,
the voltage is lowered slightly to
prevent overcharging. If the vehicle
has a voltmeter gauge or a voltage
display on the Driver Information
Center (DIC), you may see the
voltage move up or down. This is
normal. If there is a problem, an
alert will be displayed.
Page 161 of 428

Black plate (3,1)GMC Terrain Owner Manual (Include Mex) - 2012
Infotainment System 7-3
Overview
For vehicles equipped with the
MyLink®or IntelliLink®infotainment
system, see the separate MyLink/
IntelliLink Features and Functions
Guide for more information.
Keeping your eyes on the road and
your mind on the drive is important
for safe driving. The infotainment
system has built-in features
intended to help with this by
disabling some features when
driving. A grayed-out function is not
available when the vehicle is
moving. All functions are available when the
vehicle is parked. Do the following
before driving:.Become familiar with the
infotainment system operation,
buttons on the faceplate, and
touch-sensitive screen buttons.
.Set up the audio by presetting
favorite stations, setting the
tone, and adjusting the
speakers.
.Set up phone numbers in
advance so they can be called
easily by pressing a single
button or a single voice
command for vehicles equipped
with phone capability.
{WARNING
Taking your eyes off the road too
long or too often while using the
navigation system could cause a
crash and you or others could be
injured or killed. Focus your
attention on driving and limit
glances at the moving map on the
navigation screen. Use voice
guidance whenever possible.
Page 162 of 428

Black plate (4,1)GMC Terrain Owner Manual (Include Mex) - 2012
7-4 Infotainment System
Infotainment System Overview
The infotainment system is
controlled by using the buttons on
the faceplate and the touch screen.
See“Infotainment Control Buttons”
in this section for more information.
Page 163 of 428
Black plate (5,1)GMC Terrain Owner Manual (Include Mex) - 2012
Infotainment System 7-5
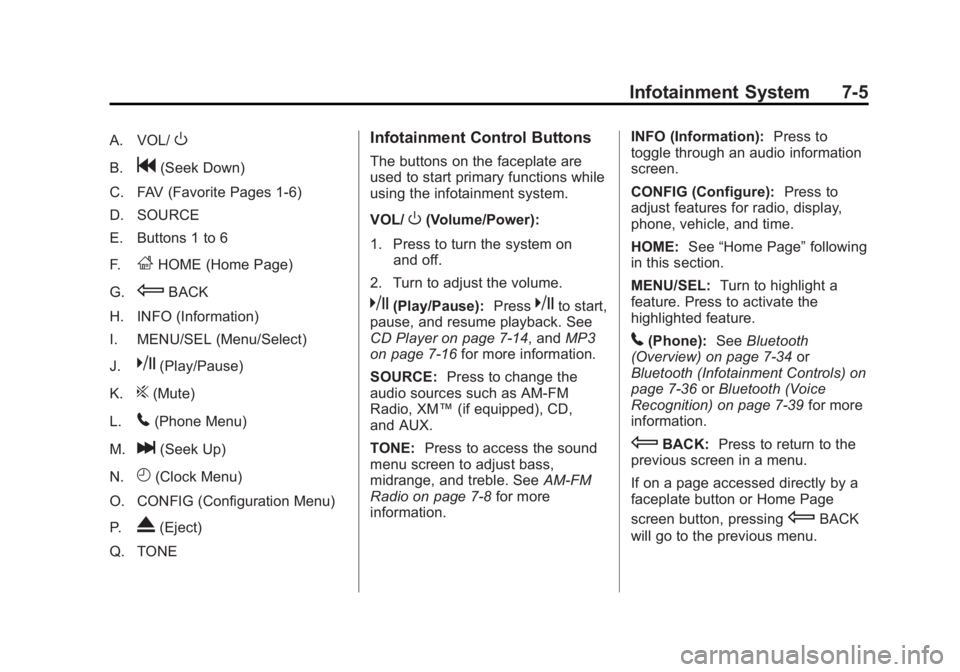
A. VOL/O
B.g(Seek Down)
C. FAV (Favorite Pages 1-6)
D. SOURCE
E. Buttons 1 to 6
F.
FHOME (Home Page)
G.
EBACK
H. INFO (Information)
I. MENU/SEL (Menu/Select)
J.
k(Play/Pause)
K.
?(Mute)
L.
5(Phone Menu)
M.
l(Seek Up)
N.
H(Clock Menu)
O. CONFIG (Configuration Menu)
P.
X(Eject)
Q. TONE
Infotainment Control Buttons
The buttons on the faceplate are
used to start primary functions while
using the infotainment system.
VOL/
O(Volume/Power):
1. Press to turn the system on and off.
2. Turn to adjust the volume.
k(Play/Pause): Presskto start,
pause, and resume playback. See
CD Player on page 7‑14, and MP3
on page 7‑16 for more information.
SOURCE: Press to change the
audio sources such as AM-FM
Radio, XM™ (if equipped), CD,
and AUX.
TONE: Press to access the sound
menu screen to adjust bass,
midrange, and treble. See AM-FM
Radio on page 7‑8 for more
information. INFO (Information):
Press to
toggle through an audio information
screen.
CONFIG (Configure): Press to
adjust features for radio, display,
phone, vehicle, and time.
HOME: See“Home Page” following
in this section.
MENU/SEL: Turn to highlight a
feature. Press to activate the
highlighted feature.
5(Phone): SeeBluetooth
(Overview) on page 7‑34 or
Bluetooth (Infotainment Controls) on
page 7‑36 orBluetooth (Voice
Recognition) on page 7‑39 for more
information.
EBACK: Press to return to the
previous screen in a menu.
If on a page accessed directly by a
faceplate button or Home Page
screen button, pressing
EBACK
will go to the previous menu.
Page 164 of 428
Black plate (6,1)GMC Terrain Owner Manual (Include Mex) - 2012
7-6 Infotainment System
FAV (Favorite Pages 1-6):Press
to display the current page number
above the preset buttons. The
stored stations for each list display
on the touch-sensitive preset
buttons at the bottom of the screen.
The number of preset FAV lists can
be changed in the
Configuration Menu.
l(Seek Up):
1. Press to seek the next track.
2. Press and hold to fast forward through a track.
3. Release the button to return to playing speed. See CD Player
on page 7‑14 andMP3 on
page 7‑16 for more information.
4. For AM, FM, or XM (if equipped), press to seek to the next strong
station.
g(Seek Down):
1. Press to seek to the beginning of the current or previous track.
If the track has been playing for
less than five seconds, it seeks
the previous track. If longer than
five seconds, the current track
starts from the beginning.
2. Press and hold to quickly reverse through a track. Release
the button to return to playing
speed. See CD Player on
page 7‑14 andMP3 on
page 7‑16 for more information.
3. For AM, FM, or XM (if equipped), press to seek to the previous
strong station.
Preset Buttons (1-6): The preset
buttons numbered one through six
can be used to select stored AM,
FM, and XM (if equipped) stations.
H: Press to set the time.
X(Eject): Press to eject a disc
from the CD player. See CD Player
on page 7‑14.
Touch Screen Buttons
Touch screen buttons are on the
screen and highlighted when a
feature is available. Some toggle
screen buttons highlight when active
and gray out when inactive.
Home Page
The infotainment system displays a
home page that makes accessing
many of the features an easy
process.
Back: If on page two of the Home
Page, press Back to return to page
one of the Home Page. If on page
one, Back serves no function.
Home: While navigating through
other menus, press to go back to
the Home Page to start a different
feature.
FAV: Press to display a page of
stored (favorite) AM, FM, or XM (if
equipped) stations. Keep pressing
FAV to scroll through the favorite
pages.
Page 165 of 428
Black plate (7,1)GMC Terrain Owner Manual (Include Mex) - 2012
Infotainment System 7-7
Info:Press to toggle through an
audio information screen.
The Home Page Menu lists the
options Customize Home Page and
Restore Home Page Defaults.
Out of all available Home Page
icons, up to eight icons can be
selected and sorted for the first
Home Page screen.
Home Page Features
Various functions are disabled when
the vehicle is moving.
Press the Now Playing screen
button to display the active source
page. The sources available are
AM, FM, XM (if equipped), CD,
USB/iPod, and AUX.
See AM-FM Radio on page 7‑8,
Satellite Radio on page 7‑11, CD
Player on page 7‑14, and Auxiliary
Devices on page 7‑18. Press the Phone screen button to
display the Phone main page. See
Bluetooth (Overview) on page 7‑34
or
Bluetooth (Infotainment Controls)
on page 7‑36 orBluetooth (Voice
Recognition) on page 7‑39.
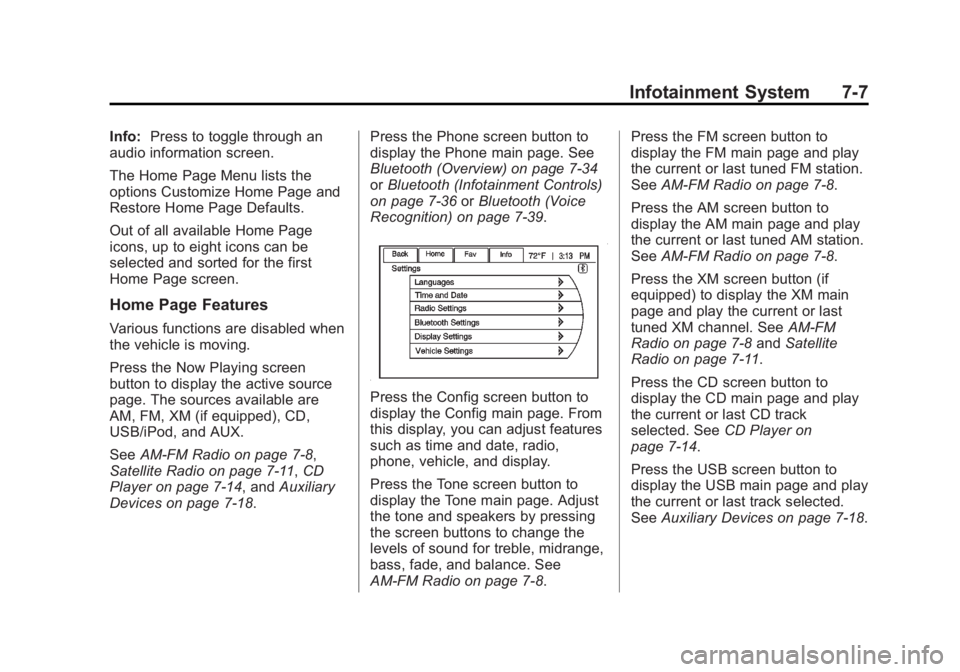
Press the Config screen button to
display the Config main page. From
this display, you can adjust features
such as time and date, radio,
phone, vehicle, and display.
Press the Tone screen button to
display the Tone main page. Adjust
the tone and speakers by pressing
the screen buttons to change the
levels of sound for treble, midrange,
bass, fade, and balance. See
AM-FM Radio on page 7‑8. Press the FM screen button to
display the FM main page and play
the current or last tuned FM station.
See
AM-FM Radio on page 7‑8.
Press the AM screen button to
display the AM main page and play
the current or last tuned AM station.
See AM-FM Radio on page 7‑8.
Press the XM screen button (if
equipped) to display the XM main
page and play the current or last
tuned XM channel. See AM-FM
Radio on page 7‑8 andSatellite
Radio on page 7‑11.
Press the CD screen button to
display the CD main page and play
the current or last CD track
selected. See CD Player on
page 7‑14.
Press the USB screen button to
display the USB main page and play
the current or last track selected.
See Auxiliary Devices on page 7‑18.