CD player GMC TERRAIN 2012 Owner's Guide
[x] Cancel search | Manufacturer: GMC, Model Year: 2012, Model line: TERRAIN, Model: GMC TERRAIN 2012Pages: 428, PDF Size: 5.45 MB
Page 187 of 428

Black plate (29,1)GMC Terrain Owner Manual (Include Mex) - 2012
Infotainment System 7-29
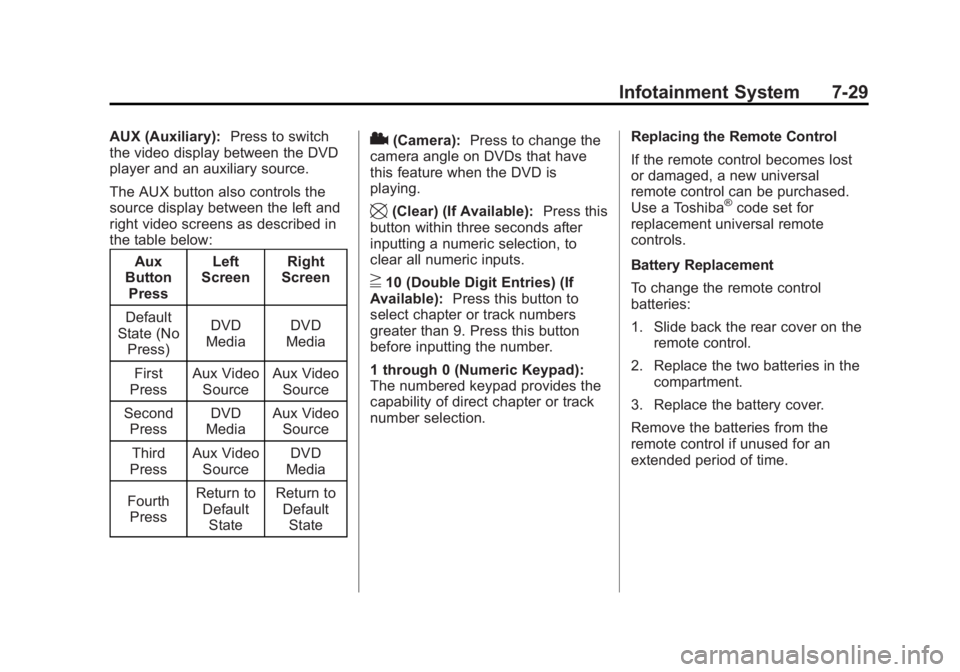
AUX (Auxiliary):Press to switch
the video display between the DVD
player and an auxiliary source.
The AUX button also controls the
source display between the left and
right video screens as described in
the table below:
Aux
Button
Press Left
Screen Right
Screen
Default
State (No Press) DVD
Media DVD
Media
First
Press Aux Video
Source Aux Video
Source
Second Press DVD
Media Aux Video
Source
Third
Press Aux Video
Source DVD
Media
Fourth Press Return to
DefaultState Return to
DefaultState2(Camera): Press to change the
camera angle on DVDs that have
this feature when the DVD is
playing.
\(Clear) (If Available): Press this
button within three seconds after
inputting a numeric selection, to
clear all numeric inputs.
}10 (Double Digit Entries) (If
Available): Press this button to
select chapter or track numbers
greater than 9. Press this button
before inputting the number.
1 through 0 (Numeric Keypad):
The numbered keypad provides the
capability of direct chapter or track
number selection. Replacing the Remote Control
If the remote control becomes lost
or damaged, a new universal
remote control can be purchased.
Use a Toshiba
®code set for
replacement universal remote
controls.
Battery Replacement
To change the remote control
batteries:
1. Slide back the rear cover on the remote control.
2. Replace the two batteries in the compartment.
3. Replace the battery cover.
Remove the batteries from the
remote control if unused for an
extended period of time.
Page 188 of 428

Black plate (30,1)GMC Terrain Owner Manual (Include Mex) - 2012
7-30 Infotainment System
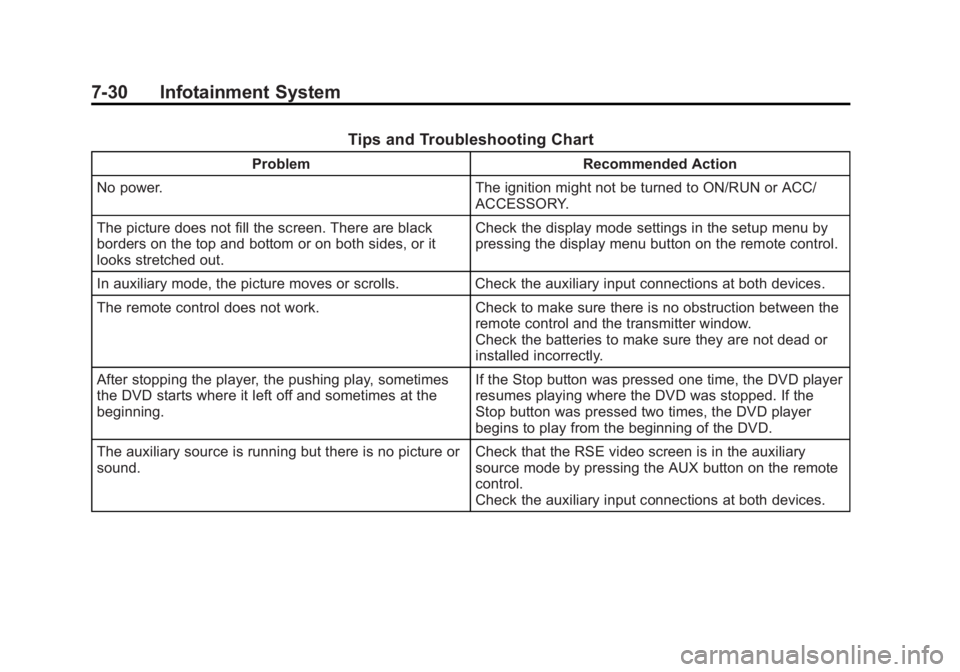
Tips and Troubleshooting Chart
ProblemRecommended Action
No power. The ignition might not be turned to ON/RUN or ACC/
ACCESSORY.
The picture does not fill the screen. There are black
borders on the top and bottom or on both sides, or it
looks stretched out. Check the display mode settings in the setup menu by
pressing the display menu button on the remote control.
In auxiliary mode, the picture moves or scrolls. Check the auxiliary input connections at both devices.
The remote control does not work. Check to make sure there is no obstruction between the
remote control and the transmitter window.
Check the batteries to make sure they are not dead or
installed incorrectly.
After stopping the player, the pushing play, sometimes
the DVD starts where it left off and sometimes at the
beginning. If the Stop button was pressed one time, the DVD player
resumes playing where the DVD was stopped. If the
Stop button was pressed two times, the DVD player
begins to play from the beginning of the DVD.
The auxiliary source is running but there is no picture or
sound. Check that the RSE video screen is in the auxiliary
source mode by pressing the AUX button on the remote
control.
Check the auxiliary input connections at both devices.
Page 189 of 428

Black plate (31,1)GMC Terrain Owner Manual (Include Mex) - 2012
Infotainment System 7-31
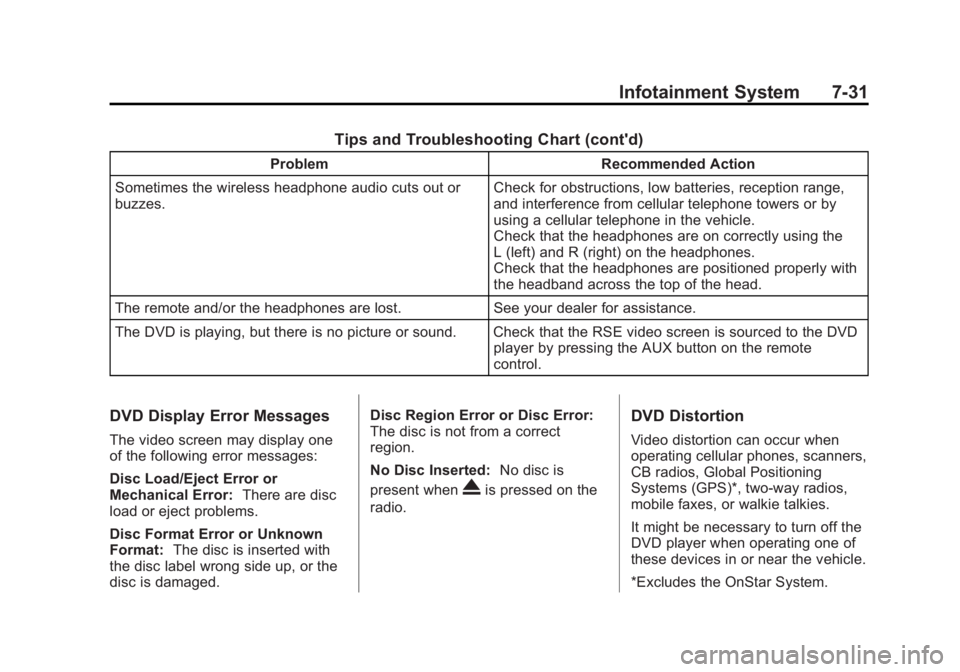
Tips and Troubleshooting Chart (cont'd)
ProblemRecommended Action
Sometimes the wireless headphone audio cuts out or
buzzes. Check for obstructions, low batteries, reception range,
and interference from cellular telephone towers or by
using a cellular telephone in the vehicle.
Check that the headphones are on correctly using the
L (left) and R (right) on the headphones.
Check that the headphones are positioned properly with
the headband across the top of the head.
The remote and/or the headphones are lost. See your dealer for assistance.
The DVD is playing, but there is no picture or sound. Check that the RSE video screen is sourced to the DVD player by pressing the AUX button on the remote
control.
DVD Display Error Messages
The video screen may display one
of the following error messages:
Disc Load/Eject Error or
Mechanical Error:There are disc
load or eject problems.
Disc Format Error or Unknown
Format: The disc is inserted with
the disc label wrong side up, or the
disc is damaged. Disc Region Error or Disc Error:
The disc is not from a correct
region.
No Disc Inserted:
No disc is
present when
Xis pressed on the
radio.
DVD Distortion
Video distortion can occur when
operating cellular phones, scanners,
CB radios, Global Positioning
Systems (GPS)*, two-way radios,
mobile faxes, or walkie talkies.
It might be necessary to turn off the
DVD player when operating one of
these devices in or near the vehicle.
*Excludes the OnStar System.
Page 194 of 428

Black plate (36,1)GMC Terrain Owner Manual (Include Mex) - 2012
7-36 Infotainment System
Bluetooth (Infotainment
Controls)
For vehicles equipped with the
MyLink or IntelliLink infotainment
system, see the separate MyLink/
IntelliLink Features and Functions
Guide for more information.
For information about how to
navigate the menu system using the
infotainment controls, seeOverview
on page 7‑3.
Pairing
A Bluetooth‐enabled cell phone
must be paired to the Bluetooth
system and then connected to the
vehicle before it can be used. See
your cell phone manufacturer's user
guide for Bluetooth functions before
pairing the cell phone. If a Bluetooth
phone is not connected, calls will be
made using OnStar Hands‐Free
Calling, if available. See OnStar
Overview on page 14‑1 for more
information. Pairing Information
.A Bluetooth phone with MP3
capability cannot be paired to
the vehicle as a phone and an
MP3 player at the same time.
.Up to five cell phones can be
paired to the Bluetooth system.
.The pairing process is disabled
when the vehicle is moving.
.Pairing only needs to be
completed once, unless the
pairing information on the cell
phone changes or the cell phone
is deleted from the system.
.Only one paired cell phone can
be connected to the Bluetooth
system at a time.
.If multiple paired cell phones are
within range of the system, the
system connects to the first
available paired cell phone in the
order that they were first paired
to the system. To link to a
different paired phone, see
“Linking to a Different Phone”
later in this section.Pairing a Phone
1. Press the CONFIG button.
2. Select Phone Settings or
Bluetooth Settings.
3. Select Bluetooth.
4. Select Pair Device (Phone). A four‐digit Personal
Identification Number (PIN)
appears on the display. The PIN
is used in Step 6.
5. Start the pairing process on the cell phone to be paired to the
vehicle. See the cell phone
manufacturer's user guide for
information on this process.
Page 198 of 428

Black plate (40,1)GMC Terrain Owner Manual (Include Mex) - 2012
7-40 Infotainment System
Pairing
A Bluetooth‐enabled cell phone
must be paired to the Bluetooth
system and then connected to the
vehicle before it can be used. See
your cell phone manufacturer's user
guide for Bluetooth functions before
pairing the cell phone. If a Bluetooth
phone is not connected, calls will be
made using OnStar Hands‐Free
Calling, if available. SeeOnStar
Overview on page 14‑1 for more
information.
Pairing Information
.A Bluetooth phone with MP3
capability cannot be paired to
the vehicle as a phone and an
MP3 player at the same time.
.Up to five cell phones can be
paired to the Bluetooth system.
.The pairing process is disabled
when the vehicle is moving.
.Pairing only needs to be
completed once, unless the
pairing information on the cell
phone changes or the cell phone
is deleted from the system.
.Only one paired cell phone can
be connected to the Bluetooth
system at a time.
.If multiple paired cell phones are
within range of the system, the
system connects to the first
available paired cell phone in the
order that they were first paired
to the system. To link to a
different paired phone, see
“Linking to a Different Phone”
later in this section.
Pairing a Phone
1. Press
b/g. The system
responds “Ready,”followed by
a tone.
2. Say “Bluetooth.” This command
can be skipped. 3. Say
“Pair.”The system responds
with instructions and a four‐digit
Personal Identification Number
(PIN). The PIN is used in Step 5.
4. Start the pairing process on the cell phone that you want to pair.
For help with this process, see
your cell phone manufacturer's
user guide.
5. Locate the device named “Your
Vehicle” in the list on the cell
phone. Follow the instructions
on the cell phone to enter the
PIN provided in Step 3. After the
PIN is successfully entered, the
system prompts you to provide a
name for the paired cell phone.
This name will be used to
indicate which phones are
paired and connected to the
vehicle. The system responds
with “
successfully paired” after the
pairing process is complete.
6. Repeat Steps 1 through 5 to pair additional phones.
Page 417 of 428

Black plate (1,1)GMC Terrain Owner Manual (Include Mex) - 2012
INDEX i-1
A
Accessories andModifications . . . . . . . . . . . . . . . . . 10-3
Accessory Power . . . . . . . . . . . . . . 9-25
Add-On Electrical Equipment . . . . . . . . . . . . . . . . . . . 9-64
Additional Information,
OnStar
®. . . . . . . . . . . . . . . . . . . . . . 14-5
Adjustments Lumbar, Front Seats . . . . . . . . . . . 3-5
Air Cleaner/Filter, Engine . . . . . 10-14
Air Conditioning . . . . . . . . . . . . . . . . 8-3
Air Filter, Passenger
Compartment . . . . . . . . . . . . . . . . . 8-6
Air Vents . . . . . . . . . . . . . . . . . . . . . . . 8-5
Airbag System Check . . . . . . . . . . . . . . . . . . . . . . . . 3-34
How Does an AirbagRestrain? . . . . . . . . . . . . . . . . . . . 3-26
Passenger Sensing
System . . . . . . . . . . . . . . . . . . . . . . 3-28
What Makes an Airbag Inflate? . . . . . . . . . . . . . . . . . . . . . . 3-26 Airbag System (cont'd)
What Will You See after an
Airbag Inflates? . . . . . . . . . . . . . 3-26
When Should an Airbag
Inflate? . . . . . . . . . . . . . . . . . . . . . . 3-24
Where Are the Airbags? . . . . . . 3-23
Airbags Adding Equipment to theVehicle . . . . . . . . . . . . . . . . . . . . . . 3-33
Passenger Status Indicator . . . 5-12
Readiness Light . . . . . . . . . . . . . . 5-11
Servicing Airbag-Equipped Vehicles . . . . . . . . . . . . . . . . . . . . . 3-32
System Check . . . . . . . . . . . . . . . . 3-21
Alarm System Anti-theft . . . . . . . . . . . . . . . . . . . . . . 2-13
All-Wheel Drive . . . . . . . . . 10-26, 9-32
AM-FM Radio . . . . . . . . . . . . . . . . . . . 7-8
Antenna Multi-band . . . . . . . . . . . . . . . . . . . . 7-14
Anti-theft Alarm System . . . . . . . . . . . . . . . . 2-13
Alarm System Messages . . . . . 5-31
Antilock Brake System (ABS) . . . . . . . . . . . . . . . . 9-32
Warning Light . . . . . . . . . . . . . . . . . 5-17 Appearance Care
Exterior . . . . . . . . . . . . . . . . . . . . . 10-83
Interior . . . . . . . . . . . . . . . . . . . . . . 10-86
Assistance Program, Roadside . . . . . . . . . . . . . . . 13-7, 13-9
Audio Players . . . . . . . . . . . . . . . . . 7-14 CD . . . . . . . . . . . . . . . . . . . . . . . . . . . 7-14
MP3 . . . . . . . . . . . . . . . . . . . . . . . . . . 7-16
Audio System Radio Reception . . . . . . . . . . . . . . 7-13
Rear Seat (RSA) . . . . . . . . . . . . . 7-32
Theft-Deterrent Feature . . . . . . . . 7-2
Automatic Climate Control System . . . . . . . . 8-3
Headlamp System . . . . . . . . . . . . . 6-3
Transmission . . . . . . . . . . . . . . . . . 9-29
Transmission Fluid . . . . . . . . . 10-13
Automatic Transmission Manual Mode . . . . . . . . . . . . . . . . . 9-31
Shift Lock ControlFunction Check . . . . . . . . . . . 10-27
Auxiliary Devices . . . . . . . . . . . . . . . . . . . . . . . 7-18
Page 418 of 428

Black plate (2,1)GMC Terrain Owner Manual (Include Mex) - 2012
i-2 INDEX
B
Battery . . . . . . . . . . . . . . . . . . . . . . . 10-26Jump Starting . . . . . . . . . . . . . . . 10-76
Load Management . . . . . . . . . . . . . 6-5
Voltage and ChargingMessages . . . . . . . . . . . . . . . . . . . 5-26
Blade Replacement, Wiper . . . 10-28
Blind Spot Mirrors . . . . . . . . . . . . . 2-15
Bluetooth . . . . . . . . . . 7-34, 7-36, 7-39
Brake System Warning Light . . . . . . . . 5-16
Brakes . . . . . . . . . . . . . . . . . . . . . . . . 10-23 Antilock . . . . . . . . . . . . . . . . . . . . . . . 9-32
Assist . . . . . . . . . . . . . . . . . . . . . . . . . 9-34
Fluid . . . . . . . . . . . . . . . . . . . . . . . . 10-24
Parking . . . . . . . . . . . . . . . . . . . . . . . 9-33
System Messages . . . . . . . . . . . . 5-27
Braking . . . . . . . . . . . . . . . . . . . . . . . . . 9-4
Break-In, New Vehicle . . . . . . . . . 9-20
Bulb Replacement . . . . . . . . . . . . 10-37 Fog Lamps . . . . . . . . . . . . . 10-33, 6-4
Headlamp Aiming . . . . . . . . . . . 10-30
Headlamps . . . . . . . . . . . . . . . . . 10-32 Bulb Replacement (cont'd)
Headlamps, Front Turn
Signal, Sidemarker, and
Parking Lamps . . . . . . . . . . . . 10-32
License Plate Lamps . . . . . . . 10-36
Taillamps, Turn Signal, Sidemarker, Stoplamps,
and Backup Lamps . . . . . . . . 10-34
Buying New Tires . . . . . . . . . . . . . 10-59
C
Calibration . . . . . . . . . . . . . . . . . . . . . . 5-5
California
Fuel Requirements . . . . . . . . . . . 9-52
Perchlorate MaterialsRequirements . . . . . . . . . . . . . . . 10-3
Warning . . . . . . . . . . . . . . . . . . . . . . 10-3
Camera, Rear Vision . . . . . . . . . . 9-45
Canadian Vehicle Owners . . . . . . . . iii
Capacities and Specifications . . . . . . . . . . . . . . . . 12-2
Carbon Monoxide Engine Exhaust . . . . . . . . . . . . . . . 9-28
Liftgate . . . . . . . . . . . . . . . . . . . . . . . . 2-9
Winter Driving . . . . . . . . . . . . . . . . 9-13 Cargo
Cover . . . . . . . . . . . . . . . . . . . . . . . . . . 4-2
Tie-Downs . . . . . . . . . . . . . . . . . . . . . 4-2
Cautions, Danger, and Warnings . . . . . . . . . . . . . . . . . . . . . . . . iv
CD Player . . . . . . . . . . . . . . . . . . . . . 7-14
Center Console Storage . . . . . . . . 4-1
Chains, Tire . . . . . . . . . . . . . . . . . . 10-65
Charging System Light . . . . . . . . 5-13
Check Engine Light . . . . . . . . . . . . . . . . . . 5-13
Ignition
Transmission Lock . . . . . . . . 10-28
Child Restraints Infants and YoungChildren . . . . . . . . . . . . . . . . . . . . . 3-37
Lower Anchors and Tethers for Children . . . . . . . . . 3-44
Older Children . . . . . . . . . . . . . . . . 3-35
Securing . . . . . . . . . . . . . . . . 3-49, 3-52
Systems . . . . . . . . . . . . . . . . . . . . . . 3-40
Cleaning Exterior Care . . . . . . . . . . . . . . . 10-83
Interior Care . . . . . . . . . . . . . . . . 10-86