display GMC TERRAIN 2012 Owner's Guide
[x] Cancel search | Manufacturer: GMC, Model Year: 2012, Model line: TERRAIN, Model: GMC TERRAIN 2012Pages: 428, PDF Size: 5.45 MB
Page 150 of 428
Black plate (36,1)GMC Terrain Owner Manual (Include Mex) - 2012
5-36 Instruments and Controls
Languages
Select the Languages menu and the
following will be displayed:
.English
.French
.Spanish
Turn the MENU/SELECT knob to
select the language. Press the knob
to confirm and go back to the
last menu.
Lighting
Select the Lighting menu and the
following will be displayed:
.Vehicle Locator Lights
.Exit Lighting Vehicle Locator Lights
This allows the vehicle locator lights
to be turned on or off.
Press the MENU/SELECT knob
when
“Vehicle Locator Lights” is
highlighted to toggle between “On”
or “Off.” Press
EBACK to confirm
the selection and go back to the
last menu.
Exit Lighting
This allows the selection of how
long the exterior lamps stay on
when leaving the vehicle when it is
dark outside.
Press the MENU/SELECT knob
when “Exit Lighting” is highlighted.
Turn the knob to select “Off,”
“30 Seconds,” “1 Minute,” or
“2 Minutes.” Press the knob to
confirm and go back to the
last menu.
Power Door Locks
Select Power Door Locks and the
following will be displayed:
.Unlocked Door Anti Lock Out
.Auto Door Unlock
.Delayed Door Lock
Unlocked Door Anti Lock Out
When on, this feature will keep the
driver door from locking when the
door is open. If off is selected, the
Delayed Door Lock menu will be
available.
Press the MENU/SELECT knob
when “Unlocked Door Anti Lock
Out” is highlighted to toggle
between “On”or“Off.” Press
E
BACK to confirm the selection and
go back to the last menu.
Page 151 of 428
Black plate (37,1)GMC Terrain Owner Manual (Include Mex) - 2012
Instruments and Controls 5-37
Auto Door Unlock
This allows selection of which of the
doors will automatically unlock when
the vehicle is shifted into P (Park).
Press the MENU/SELECT knob
when“Auto Door Unlock” is
highlighted. Turn the knob to select
“All Doors,” “Driver Door,” or“Off.”
Press the knob to confirm and go
back to the last menu.
Delayed Door Lock
When on, this feature will delay the
locking of the doors. If you want to
override the delay you can press the
power door lock on the instrument
panel.
Press the MENU/SELECT knob
when “Delayed Door Lock” is
highlighted. Turn the knob to select
“On” or“Off.” Press the knob to
confirm and go back to the
last menu.Remote Lock/Unlock/Start
Select Remote Lock/Unlock/Start
and the following will be displayed:
.Remote Unlock Light Feedback
.Remote Lock Feedback
.Remote Door Unlock
.Memory Remote Recall
Remote Unlock Light Feedback
When on, the exterior lamps will
flash when unlocking the vehicle
with the RKE transmitter.
Press the MENU/SELECT knob
when “Remote Unlock Light
Feedback” is highlighted. Turn the
knob to select “Flash Lights”or
“Off.” Press the knob to confirm and
go back to the last menu. Remote Lock Feedback
This allows selection of what type of
feedback is given when unlocking
the vehicle with the RKE transmitter.
Press the MENU/SELECT knob
when
“Remote Lock Feedback” is
highlighted. Turn the knob to select
“Lights and Horn,” “Lights Only,”
“Horn Only,” or“Off. ”Press the knob
to confirm and go back to the
last menu.
Remote Door Unlock
This allows selection of which doors
will unlock when pressing the unlock
button on the RKE transmitter.
Press the MENU/SELECT knob
when “Remote Door Unlock” is
highlighted. Turn the knob to select
“All Doors” or“Driver Door.” Press
the knob to confirm and go back to
the last menu.
Page 157 of 428
Black plate (5,1)GMC Terrain Owner Manual (Include Mex) - 2012
Lighting 6-5
1(Door):The lamps come on
automatically when a door is
opened.
+(On): Turns the dome lamps on.
The dome lamps can also be turned
on and off by pressing the buttons
next to the lamps.
Reading Lamps
The reading lamps are located on
the overhead console. These lamps
come on automatically when any
door is opened.
For manual operation, press the
button next to each lamp to turn it
on or off.
Lighting Features
Entry Lighting
The dome lamp, cargo lamp, and
foot lamp inside the vehicle come
on when any door is opened, if the
dome lamp is in the door position. In
addition, these lamps come on
when the Remote Keyless Entry
(RKE) unlock button is pressed.
They stay on for 20 seconds or until
a door is opened. After the door is
opened and then closed, the light
remains on for 20 seconds, or until
the ignition is turned to ON/RUN.
Battery Load
Management
The vehicle has Electric Power
Management (EPM) that estimates
the battery's temperature and state
of charge. It then adjusts the voltage
for best performance and extended
life of the battery.
When the battery's state of charge
is low, the voltage is raised slightly
to quickly bring the charge back up.
When the state of charge is high,
the voltage is lowered slightly to
prevent overcharging. If the vehicle
has a voltmeter gauge or a voltage
display on the Driver Information
Center (DIC), you may see the
voltage move up or down. This is
normal. If there is a problem, an
alert will be displayed.
Page 158 of 428
Black plate (6,1)GMC Terrain Owner Manual (Include Mex) - 2012
6-6 Lighting
The battery can be discharged at
idle if the electrical loads are very
high. This is true for all vehicles.
This is because the generator
(alternator) may not be spinning fast
enough at idle to produce all of the
power needed for very high
electrical loads.
A high electrical load occurs when
several of the following are on, such
as: headlamps, high beams, fog
lamps, rear window defogger,
climate control fan at high speed,
heated seats, engine cooling fans,
trailer loads, and loads plugged into
accessory power outlets.EPM works to prevent excessive
discharge of the battery. It does this
by balancing the generator's output
and the vehicle's electrical needs.
It can increase engine idle speed to
generate more power whenever
needed. It can temporarily reduce
the power demands of some
accessories.
Normally, these actions occur in
steps or levels, without being
noticeable. In rare cases at the
highest levels of corrective action,
this action may be noticeable to the
driver. If so, a DIC message might
be displayed and it is recommended
that the driver reduce the electrical
loads as much as possible. See
Battery Voltage and Charging
Messages on page 5‑26.
Page 163 of 428
Black plate (5,1)GMC Terrain Owner Manual (Include Mex) - 2012
Infotainment System 7-5
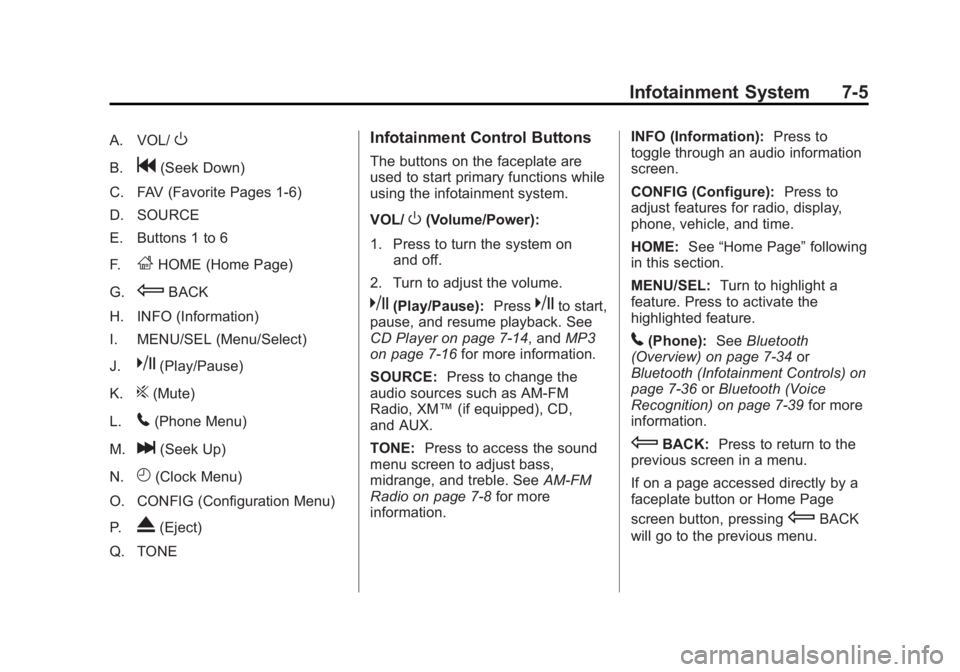
A. VOL/O
B.g(Seek Down)
C. FAV (Favorite Pages 1-6)
D. SOURCE
E. Buttons 1 to 6
F.
FHOME (Home Page)
G.
EBACK
H. INFO (Information)
I. MENU/SEL (Menu/Select)
J.
k(Play/Pause)
K.
?(Mute)
L.
5(Phone Menu)
M.
l(Seek Up)
N.
H(Clock Menu)
O. CONFIG (Configuration Menu)
P.
X(Eject)
Q. TONE
Infotainment Control Buttons
The buttons on the faceplate are
used to start primary functions while
using the infotainment system.
VOL/
O(Volume/Power):
1. Press to turn the system on and off.
2. Turn to adjust the volume.
k(Play/Pause): Presskto start,
pause, and resume playback. See
CD Player on page 7‑14, and MP3
on page 7‑16 for more information.
SOURCE: Press to change the
audio sources such as AM-FM
Radio, XM™ (if equipped), CD,
and AUX.
TONE: Press to access the sound
menu screen to adjust bass,
midrange, and treble. See AM-FM
Radio on page 7‑8 for more
information. INFO (Information):
Press to
toggle through an audio information
screen.
CONFIG (Configure): Press to
adjust features for radio, display,
phone, vehicle, and time.
HOME: See“Home Page” following
in this section.
MENU/SEL: Turn to highlight a
feature. Press to activate the
highlighted feature.
5(Phone): SeeBluetooth
(Overview) on page 7‑34 or
Bluetooth (Infotainment Controls) on
page 7‑36 orBluetooth (Voice
Recognition) on page 7‑39 for more
information.
EBACK: Press to return to the
previous screen in a menu.
If on a page accessed directly by a
faceplate button or Home Page
screen button, pressing
EBACK
will go to the previous menu.
Page 164 of 428
Black plate (6,1)GMC Terrain Owner Manual (Include Mex) - 2012
7-6 Infotainment System
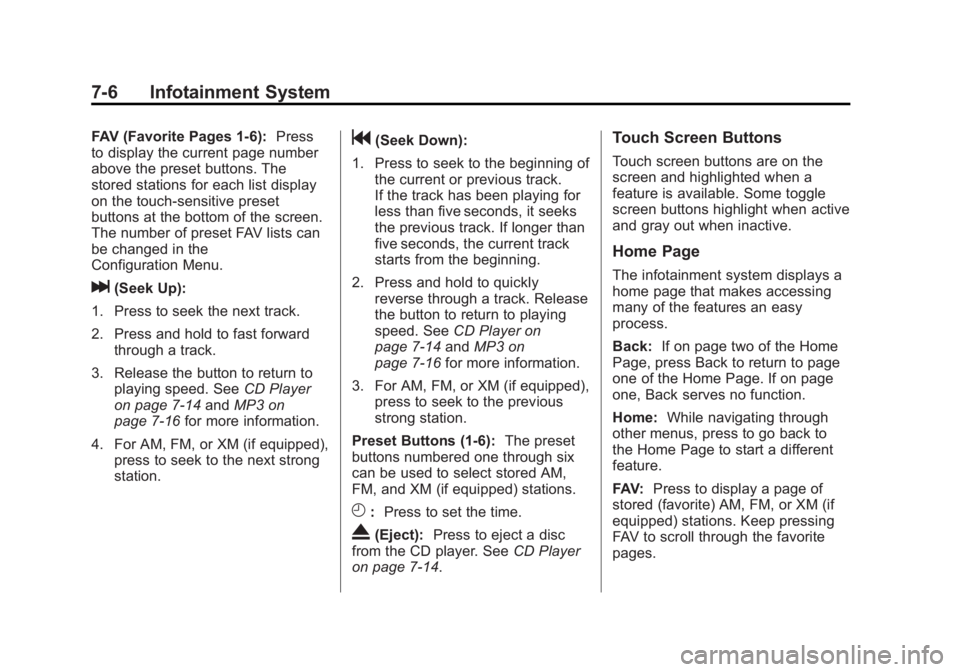
FAV (Favorite Pages 1-6):Press
to display the current page number
above the preset buttons. The
stored stations for each list display
on the touch-sensitive preset
buttons at the bottom of the screen.
The number of preset FAV lists can
be changed in the
Configuration Menu.
l(Seek Up):
1. Press to seek the next track.
2. Press and hold to fast forward through a track.
3. Release the button to return to playing speed. See CD Player
on page 7‑14 andMP3 on
page 7‑16 for more information.
4. For AM, FM, or XM (if equipped), press to seek to the next strong
station.
g(Seek Down):
1. Press to seek to the beginning of the current or previous track.
If the track has been playing for
less than five seconds, it seeks
the previous track. If longer than
five seconds, the current track
starts from the beginning.
2. Press and hold to quickly reverse through a track. Release
the button to return to playing
speed. See CD Player on
page 7‑14 andMP3 on
page 7‑16 for more information.
3. For AM, FM, or XM (if equipped), press to seek to the previous
strong station.
Preset Buttons (1-6): The preset
buttons numbered one through six
can be used to select stored AM,
FM, and XM (if equipped) stations.
H: Press to set the time.
X(Eject): Press to eject a disc
from the CD player. See CD Player
on page 7‑14.
Touch Screen Buttons
Touch screen buttons are on the
screen and highlighted when a
feature is available. Some toggle
screen buttons highlight when active
and gray out when inactive.
Home Page
The infotainment system displays a
home page that makes accessing
many of the features an easy
process.
Back: If on page two of the Home
Page, press Back to return to page
one of the Home Page. If on page
one, Back serves no function.
Home: While navigating through
other menus, press to go back to
the Home Page to start a different
feature.
FAV: Press to display a page of
stored (favorite) AM, FM, or XM (if
equipped) stations. Keep pressing
FAV to scroll through the favorite
pages.
Page 165 of 428
Black plate (7,1)GMC Terrain Owner Manual (Include Mex) - 2012
Infotainment System 7-7
Info:Press to toggle through an
audio information screen.
The Home Page Menu lists the
options Customize Home Page and
Restore Home Page Defaults.
Out of all available Home Page
icons, up to eight icons can be
selected and sorted for the first
Home Page screen.
Home Page Features
Various functions are disabled when
the vehicle is moving.
Press the Now Playing screen
button to display the active source
page. The sources available are
AM, FM, XM (if equipped), CD,
USB/iPod, and AUX.
See AM-FM Radio on page 7‑8,
Satellite Radio on page 7‑11, CD
Player on page 7‑14, and Auxiliary
Devices on page 7‑18. Press the Phone screen button to
display the Phone main page. See
Bluetooth (Overview) on page 7‑34
or
Bluetooth (Infotainment Controls)
on page 7‑36 orBluetooth (Voice
Recognition) on page 7‑39.
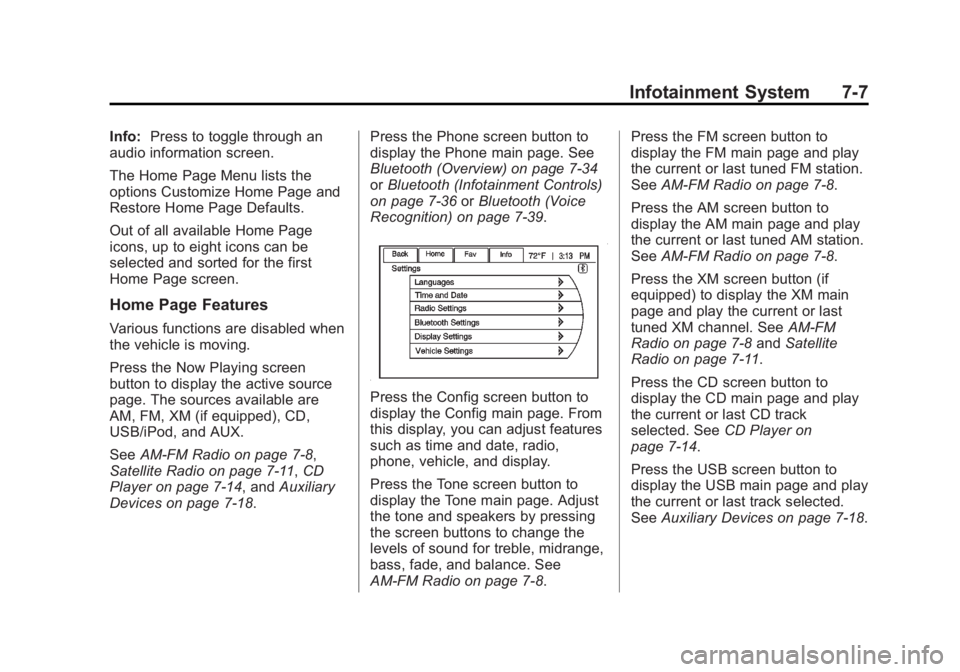
Press the Config screen button to
display the Config main page. From
this display, you can adjust features
such as time and date, radio,
phone, vehicle, and display.
Press the Tone screen button to
display the Tone main page. Adjust
the tone and speakers by pressing
the screen buttons to change the
levels of sound for treble, midrange,
bass, fade, and balance. See
AM-FM Radio on page 7‑8. Press the FM screen button to
display the FM main page and play
the current or last tuned FM station.
See
AM-FM Radio on page 7‑8.
Press the AM screen button to
display the AM main page and play
the current or last tuned AM station.
See AM-FM Radio on page 7‑8.
Press the XM screen button (if
equipped) to display the XM main
page and play the current or last
tuned XM channel. See AM-FM
Radio on page 7‑8 andSatellite
Radio on page 7‑11.
Press the CD screen button to
display the CD main page and play
the current or last CD track
selected. See CD Player on
page 7‑14.
Press the USB screen button to
display the USB main page and play
the current or last track selected.
See Auxiliary Devices on page 7‑18.
Page 166 of 428
Black plate (8,1)GMC Terrain Owner Manual (Include Mex) - 2012
7-8 Infotainment System
Press the AUX screen button to
access any connected auxiliary
device. SeeAuxiliary Devices on
page 7‑18.
Languages
The vehicle supports English,
French (Canadian), and Spanish.
The default language is English.
To change the display language,
see Vehicle Personalization on
page 5‑33 for more information.
English and Metric Unit
Conversion
To change the display units between
English and metric units, see Driver
Information Center (DIC) on
page 5‑23 for more information.
Cleaning the Display
Notice:Using abrasive cleaners
when cleaning glass surfaces
could scratch the glass. Use only
a soft cloth and do not spray
cleaner directly on the system as
it could affect the mechanical
parts.
Do not wipe the panel with a hard
cloth or use a volatile liquid such as
paint thinner; it could scratch the
surface or erase the characters on
the buttons.
Radio
AM-FM Radio
Playing the Radio
For vehicles equipped with the
MyLink or IntelliLink infotainment
system, see the separate MyLink/
IntelliLink Features and Functions
Guide for more information.
Audio Source
VOL/
O(Power/Volume):
1. Press to turn the radio on or off.
2. Turn to increase or decrease the volume of the active source
(i.e., current audio source, active
navigation voice guidance,
or traffic prompts).
The steering wheel controls can
also be used to adjust the volume.
See “Steering Wheel Controls” in
the vehicle owner manual for more
information.
Page 167 of 428
Black plate (9,1)GMC Terrain Owner Manual (Include Mex) - 2012
Infotainment System 7-9
To access the radio main page,
press the SOURCE button on the
faceplate, the Now Playing screen
button, or one of the audio screen
buttons on the Home Page.
While on the audio main page,
press the Source button repeatedly
to display and cycle through the
available sources (AM, FM, and XM
(if equipped), CD, USB/iPod,
and AUX).
Infotainment System Menus
Tone Settings
To access the tone settings, press
the Home Page Tone button or the
TONE button on the faceplate.
Use the tone settings to adjust the
following features:
.Setting the tone
.Adjusting the speakersSetting the Tone
To adjust the tone:
.Treble: Press + or
−to change
the level.
.Middle (Midrange): Press + or −
to change the level.
.Bass: Press + or −to change
the level.
Adjusting the Speakers
To adjust the speaker balance:
.Press the left arrow on the
bottom for more sound from the
left speakers or the right arrow
on the bottom for more sound
from the right speakers. The
middle position balances the
sound between the left and right
speakers. To adjust the speaker fade:
.Press the upper arrow for more
sound from the front speakers
and the lower arrow for more
sound from the rear speakers.
The middle position balances
the sound between the front and
rear speakers.
EQ Settings
The EQ settings are selected
through the tone menu. Press the
left or right arrows to cycle through
the EQ options. The available
choices are Pop, Rock, Jazz,
Classical, and Talk.
Finding a Station
To select the band, see “Audio
Source” earlier in this section.
Turn the MENU/SEL knob to find a
radio station. To select a preset
station, touch the FAV button and
choose a preset station.
Page 168 of 428
Black plate (10,1)GMC Terrain Owner Manual (Include Mex) - 2012
7-10 Infotainment System
Seeking a Station
Press
gorlto search for a
station.
AM
1. Press the AM screen button on the Home Page or select AM
from the source pop-up to
display the AM main page.
2. From the AM screen, press the Menu screen button to display
the AM stations.
3. Press to select the desired option. To update the station list,
touch Refresh.
FM
1. Press the FM screen button on the Home Page or select FM
from the source pop-up to
display the FM main page.
2. From the FM screen, press the Menu screen button to display
the FM stations. 3. Press to select the desired
option. To update the station list,
touch Refresh.
XM (If Equipped)
1. Press the XM screen button on the Home Page or select XM
from the source pop-up to
display the XM main page.
2. From the XM screen, press the Menu screen button to display
the XM categories.
3. Touch a desired category and then turn the TUNE/MENU knob
to scroll the station list.
Changing the Sources
To change audio sources from any
of the audio main pages (AM, FM,
XM, CD, USB/iPod, or AUX), press
the SOURCE button on the
faceplate or the Source screen
button to display a pop-up of
available audio sources. Touch-tap
or press the SOURCE button on the
faceplate repeatedly to change the
desired source.
Storing Radio Station Presets
There are a few ways to store
presets.
Up to 36 preset stations can be
stored. AM, FM, and XM,
if equipped, can be mixed.
1. From the AM, FM, or XM main page, press and hold one of the
preset screen buttons located at
the bottom of the screen. After a
few seconds, a beep will be
heard and the new preset
information will display on that
screen button.
2. Touch and hold a preset button to store the currently active
station. After a few seconds, a
beep will be heard and the new
preset information will display on
a small pop-up display at the
bottom of the screen.
3. Repeat the steps for each preset.
To change the number of preset
pages, see “Mixed-Band Presets”
following for more information.