language GMC TERRAIN 2012 Owner's Manual
[x] Cancel search | Manufacturer: GMC, Model Year: 2012, Model line: TERRAIN, Model: GMC TERRAIN 2012Pages: 428, PDF Size: 5.45 MB
Page 3 of 428
Black plate (3,1)GMC Terrain Owner Manual (Include Mex) - 2012
Introduction iii
The names, logos, emblems,
slogans, vehicle model names, and
vehicle body designs appearing in
this manual including, but not limited
to, GM, the GM logo, GMC, the
GMC Truck Emblem, and TERRAIN
are trademarks and/or service
marks of General Motors LLC, its
subsidiaries, affiliates, or licensors.This manual describes features that
may or may not be on your specific
vehicle either because they are
options that you did not purchase or
due to changes subsequent to the
printing of this owner manual.
Please refer to the purchase
documentation relating to your
specific vehicle to confirm each of
the features found on your vehicle.
For vehicles first sold in Canada,
substitute the name
“General
Motors of Canada Limited” for GMC
Motor Division wherever it appears
in this manual.
Keep this manual in the vehicle for
quick reference.
Canadian Vehicle Owners
Propriétaires Canadiens
A French language copy of this
manual can be obtained from your
dealer or from:
On peut obtenir un exemplaire de
ce guide en français auprès du
concessionnaire ou à l'adresse
suivante:
Helm, Incorporated
P.O. Box 07130
Detroit, MI 48207
1-800-551-4123
Numéro de poste 6438 de langue
française
www.helminc.com
Litho in U.S.A.
Part No. 22862219 B Second Printing©2011 General Motors LLC. All Rights Reserved.
Page 147 of 428
Black plate (33,1)GMC Terrain Owner Manual (Include Mex) - 2012
Instruments and Controls 5-33
Vehicle Reminder
Messages
ICE POSSIBLE DRIVE
WITH CARE
This message is displayed when ice
conditions are possible.
TURN WIPER CONTROL TO
INTERMITTENT FIRST
This message is displayed when
attempting to adjust the intermittent
wiper speed without intermittent
selected on the wiper control. See
Windshield Wiper/Washer on
page 5‑3.
Vehicle
Personalization
The audio system controls are used
to access the personalization
menus for customizing vehicle
features.
CONFIG (Configuration):Press to
access the Configuration
Settings Menu.
MENU/SELECT Knob: Press the
center of this knob to enter the
menus and select menu items. Turn
the knob to scroll through the
menus.
EBACK: Press to exit or move
backwards in a menu.
Entering the Personalization
Menus
1. Turn the infotainment system on and press the CONFIG button to
access the Configuration
Settings menu. 2. Turn the MENU/SELECT knob to
highlight Vehicle Settings.
3. Press the center of the MENU/ SELECT knob to select the
Vehicle Settings menu.
The following list of menu items will
be available:
.Climate and Air Quality
.Comfort and Convenience
.Collision/Detection Systems
.Languages
.Lighting
.Power Door Locks
.Remote Lock/Unlock/Start
.Return to Factory Settings
Turn the MENU/SELECT knob to
highlight the menu. Press the knob
to select it. Each of the menus is
detailed in the following information.
All of the menus may not be
available. Only those tied to the
features on your vehicle will be
shown.
Page 150 of 428
Black plate (36,1)GMC Terrain Owner Manual (Include Mex) - 2012
5-36 Instruments and Controls
Languages
Select the Languages menu and the
following will be displayed:
.English
.French
.Spanish
Turn the MENU/SELECT knob to
select the language. Press the knob
to confirm and go back to the
last menu.
Lighting
Select the Lighting menu and the
following will be displayed:
.Vehicle Locator Lights
.Exit Lighting Vehicle Locator Lights
This allows the vehicle locator lights
to be turned on or off.
Press the MENU/SELECT knob
when
“Vehicle Locator Lights” is
highlighted to toggle between “On”
or “Off.” Press
EBACK to confirm
the selection and go back to the
last menu.
Exit Lighting
This allows the selection of how
long the exterior lamps stay on
when leaving the vehicle when it is
dark outside.
Press the MENU/SELECT knob
when “Exit Lighting” is highlighted.
Turn the knob to select “Off,”
“30 Seconds,” “1 Minute,” or
“2 Minutes.” Press the knob to
confirm and go back to the
last menu.
Power Door Locks
Select Power Door Locks and the
following will be displayed:
.Unlocked Door Anti Lock Out
.Auto Door Unlock
.Delayed Door Lock
Unlocked Door Anti Lock Out
When on, this feature will keep the
driver door from locking when the
door is open. If off is selected, the
Delayed Door Lock menu will be
available.
Press the MENU/SELECT knob
when “Unlocked Door Anti Lock
Out” is highlighted to toggle
between “On”or“Off.” Press
E
BACK to confirm the selection and
go back to the last menu.
Page 166 of 428
Black plate (8,1)GMC Terrain Owner Manual (Include Mex) - 2012
7-8 Infotainment System
Press the AUX screen button to
access any connected auxiliary
device. SeeAuxiliary Devices on
page 7‑18.
Languages
The vehicle supports English,
French (Canadian), and Spanish.
The default language is English.
To change the display language,
see Vehicle Personalization on
page 5‑33 for more information.
English and Metric Unit
Conversion
To change the display units between
English and metric units, see Driver
Information Center (DIC) on
page 5‑23 for more information.
Cleaning the Display
Notice:Using abrasive cleaners
when cleaning glass surfaces
could scratch the glass. Use only
a soft cloth and do not spray
cleaner directly on the system as
it could affect the mechanical
parts.
Do not wipe the panel with a hard
cloth or use a volatile liquid such as
paint thinner; it could scratch the
surface or erase the characters on
the buttons.
Radio
AM-FM Radio
Playing the Radio
For vehicles equipped with the
MyLink or IntelliLink infotainment
system, see the separate MyLink/
IntelliLink Features and Functions
Guide for more information.
Audio Source
VOL/
O(Power/Volume):
1. Press to turn the radio on or off.
2. Turn to increase or decrease the volume of the active source
(i.e., current audio source, active
navigation voice guidance,
or traffic prompts).
The steering wheel controls can
also be used to adjust the volume.
See “Steering Wheel Controls” in
the vehicle owner manual for more
information.
Page 170 of 428
Black plate (12,1)GMC Terrain Owner Manual (Include Mex) - 2012
7-12 Infotainment System
Adding or Removing
Categories
1. From the Home Page press theConfig screen button or the
CONFIG button on the faceplate.
2. Select Radio Settings from the Config Menu list.
3. Select Add/Remove XM Categories.
4. From the Add/Remove XM Categories screen, select or
deselect any category to be
used in XM mode. A checkmark
will indicate that the category is
selected.
Turning XM Album Art On
or Off
1. From the Home Page press theConfig screen button or the
CONFIG button on the faceplate.
2. Select Radio Settings from the Config Menu list.
3. Select XM Album Art to turn on or off.
XM Messages
XL (Explicit Language
Channels): These channels, or any
others, can be blocked by request,
by calling 1-800-929-2100 in the
U.S. and 1-877-438-9677 in
Canada.
XM Updating: The encryption code
in the receiver is being updated, no
action is required. This process
should take no longer than
30 seconds.
Loading XM: The audio system is
acquiring and processing audio and
text data; no action is needed. This
message should disappear shortly.
Channel Off Air: This channel is
not currently in service. Tune in to
another channel.
Channel Unauth: This channel is
blocked or cannot be received with
your XM subscription package. Channel Unavailable:
This
previously assigned channel is no
longer assigned. Tune to another
station.
No Artist Info: The system is
working properly. No artist
information is available at this time
on this channel.
No Title Info: The system is
working properly. No song title
information is available at this time
on this channel.
No CAT Info: The system is
working properly. No category
information is available at this time
on this channel.
No Information: The system is
working properly. No text or
informational messages are
available at this time on this
channel.
Page 183 of 428
Black plate (25,1)GMC Terrain Owner Manual (Include Mex) - 2012
Infotainment System 7-25
Audio/Video (A/V) Jacks
If available, the A/V jacks are
located on the rear of the floor
console. They allow audio or video
cables to be connected from an
auxiliary device such as a
camcorder or a video game system.
The A/V jacks are color coded:
.Yellow for video input.
.White for left audio input.
.Red for right audio input.
Power for auxiliary devices is not
supplied by the radio system.
To use the auxiliary inputs of the
RSE system:
1. Connect the auxiliary device cables to the A/V jacks.
2. Power on both the auxiliary device and the RSE video
screen. Changing the Source on the Video
Display Screens
The image from the auxiliary device
can be switched between the video
display screens.
To change the display:
1. Press the AUX button on the
remote control to change the
source of both video screens
from the DVD player to the
auxiliary device.
2. Press the AUX button a second time to change the left video
screen source to the DVD player
and the right video screen to the
auxiliary device.
3. Press the AUX button a third time to change the left video
screen source to the auxiliary
device and the right video
screen to the DVD player.
4. Press the AUX button a fourth time to change the source of
both video screens to the DVD
player. Changing the RSE Video Screen
Settings
The screen display mode,
brightness, and language can be
changed from the setup menu using
the remote control. To change a
setting:
1. Press
z.
2. Use
n,q,p,o, andrto
select the settings.
3. Press
zagain to exit the
setup menu.
Page 185 of 428
Black plate (27,1)GMC Terrain Owner Manual (Include Mex) - 2012
Infotainment System 7-27
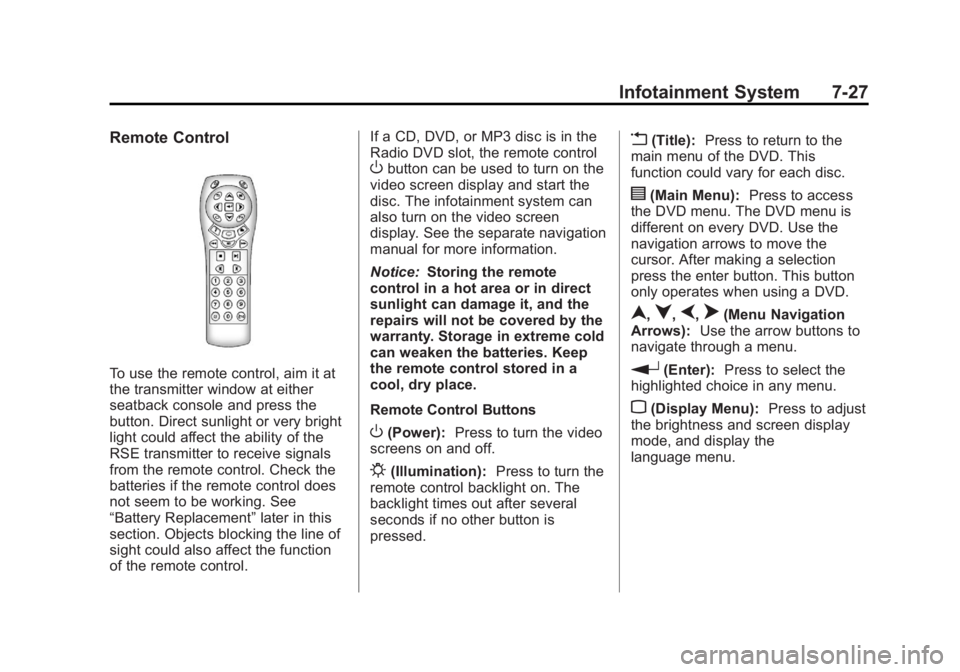
Remote Control
To use the remote control, aim it at
the transmitter window at either
seatback console and press the
button. Direct sunlight or very bright
light could affect the ability of the
RSE transmitter to receive signals
from the remote control. Check the
batteries if the remote control does
not seem to be working. See
“Battery Replacement”later in this
section. Objects blocking the line of
sight could also affect the function
of the remote control. If a CD, DVD, or MP3 disc is in the
Radio DVD slot, the remote control
Obutton can be used to turn on the
video screen display and start the
disc. The infotainment system can
also turn on the video screen
display. See the separate navigation
manual for more information.
Notice: Storing the remote
control in a hot area or in direct
sunlight can damage it, and the
repairs will not be covered by the
warranty. Storage in extreme cold
can weaken the batteries. Keep
the remote control stored in a
cool, dry place.
Remote Control Buttons
O(Power): Press to turn the video
screens on and off.
P(Illumination): Press to turn the
remote control backlight on. The
backlight times out after several
seconds if no other button is
pressed.
v(Title): Press to return to the
main menu of the DVD. This
function could vary for each disc.
y(Main Menu): Press to access
the DVD menu. The DVD menu is
different on every DVD. Use the
navigation arrows to move the
cursor. After making a selection
press the enter button. This button
only operates when using a DVD.
n,q,p,o(Menu Navigation
Arrows): Use the arrow buttons to
navigate through a menu.
r(Enter): Press to select the
highlighted choice in any menu.
z(Display Menu): Press to adjust
the brightness and screen display
mode, and display the
language menu.
Page 415 of 428
Black plate (7,1)GMC Terrain Owner Manual (Include Mex) - 2012
OnStar 14-7
OnStar Personal Identification
Number (PIN)
A PIN is needed to access some of
the OnStar services, like Remote
Door Unlock and Stolen Vehicle
Assistance. You will be prompted to
change the PIN the first time when
speaking with an Advisor. To
change the OnStar PIN, call OnStar
and provide the Advisor with the
current number.
Warranty
OnStar equipment may be
warranted as part of the new-vehicle
limited warranty. The manufacturer
of the vehicle furnishes detailed
warranty information.
Languages
The vehicle can be programmed to
respond in French or Spanish. Push
Qand ask an Advisor. Advisors
can speak French or Spanish.
Potential Issues
Some OnStar services are disabled
after five days. OnStar cannot
perform Remote Door Unlock or
Stolen Vehicle Assistance after the
vehicle has been off continuously
for five days. After five days, OnStar
can contact Roadside Assistance
and a locksmith to help gain access
to the vehicle.
Global Positioning
System (GPS)
.Obstruction of the GPS can
occur in a large city with tall
buildings; in parking garages;
around airports; in tunnels,
underpasses, or parking
garages; or in an area with very
dense trees. If GPS signals are
not available, the OnStar system
should still operate to call
OnStar. However, OnStar could
have difficulty identifying the
exact location.
.In emergency situations, OnStar
can use the last stored GPS
location to send to emergency
responders.
.A temporary loss of GPS can
cause loss of the ability to send
a Turn-by-Turn Navigation route.
The Advisor may give a verbal
route or may ask for a call back
after the vehicle is driven into an
open area.