instrument cluster GMC TERRAIN 2014 Get To Know Guide
[x] Cancel search | Manufacturer: GMC, Model Year: 2014, Model line: TERRAIN, Model: GMC TERRAIN 2014Pages: 20, PDF Size: 2.81 MB
Page 3 of 20
3
Refer to your Owner Manual to learn about the information being relayed \
by the lights, gauges and indicators of the instrument cluster.
See In Brief in your Owner Manual.
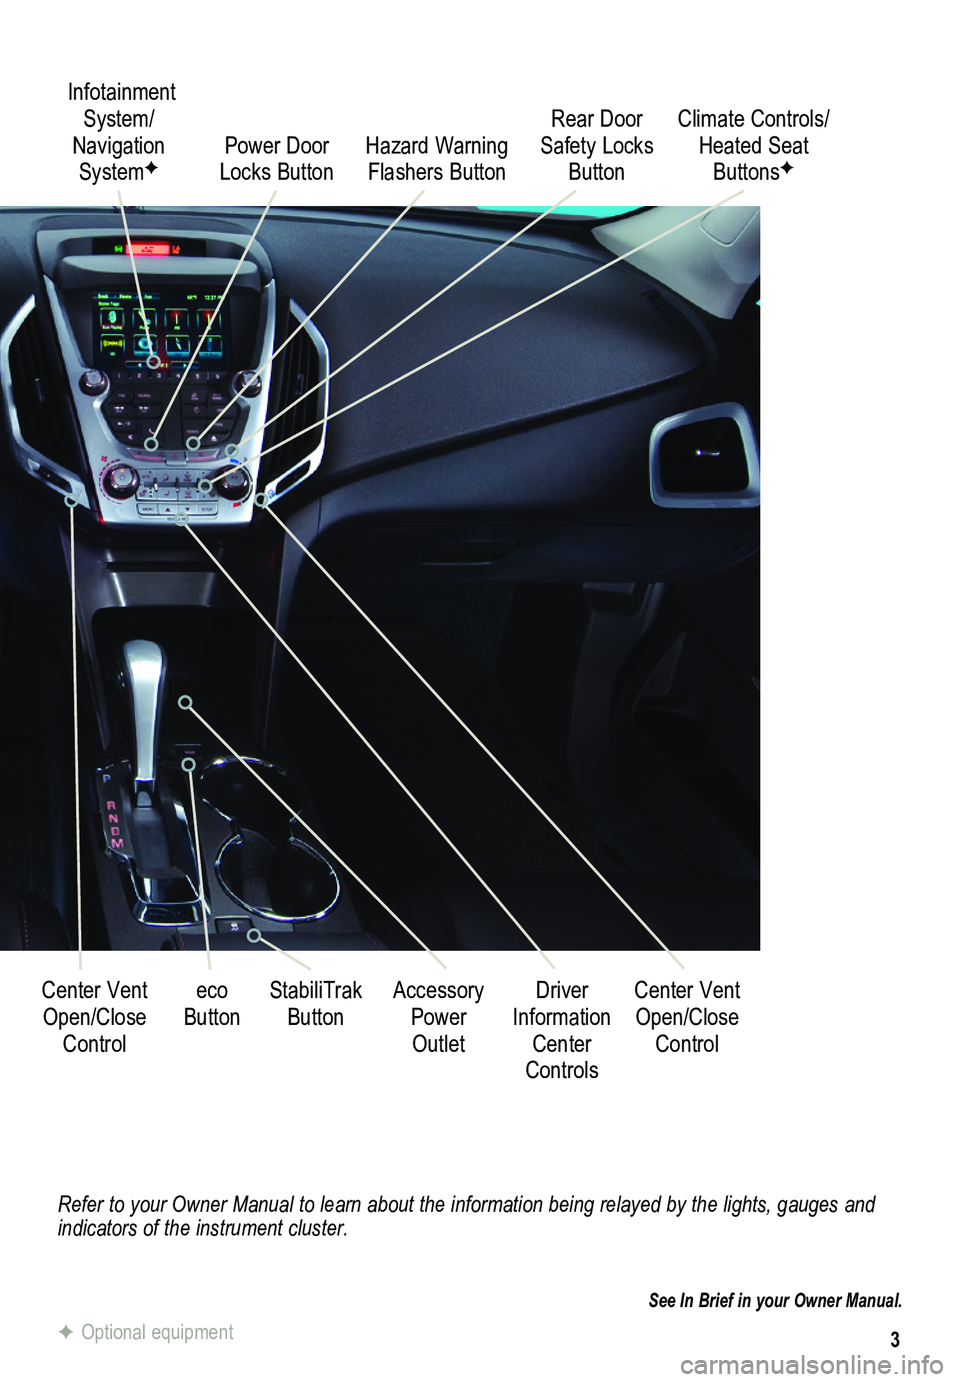
Infotainment System/ Navigation SystemFPower Door Locks Button
StabiliTrak ButtonCenter Vent Open/Close
Control
Accessory Power Outlet
Rear Door Safety Locks ButtonHazard Warning Flashers Button
Driver Information Center Controls
Climate Controls/ Heated Seat ButtonsF
Center Vent Open/Close
Control
eco Button
F Optional equipment
Page 14 of 20
14
Cruise Control
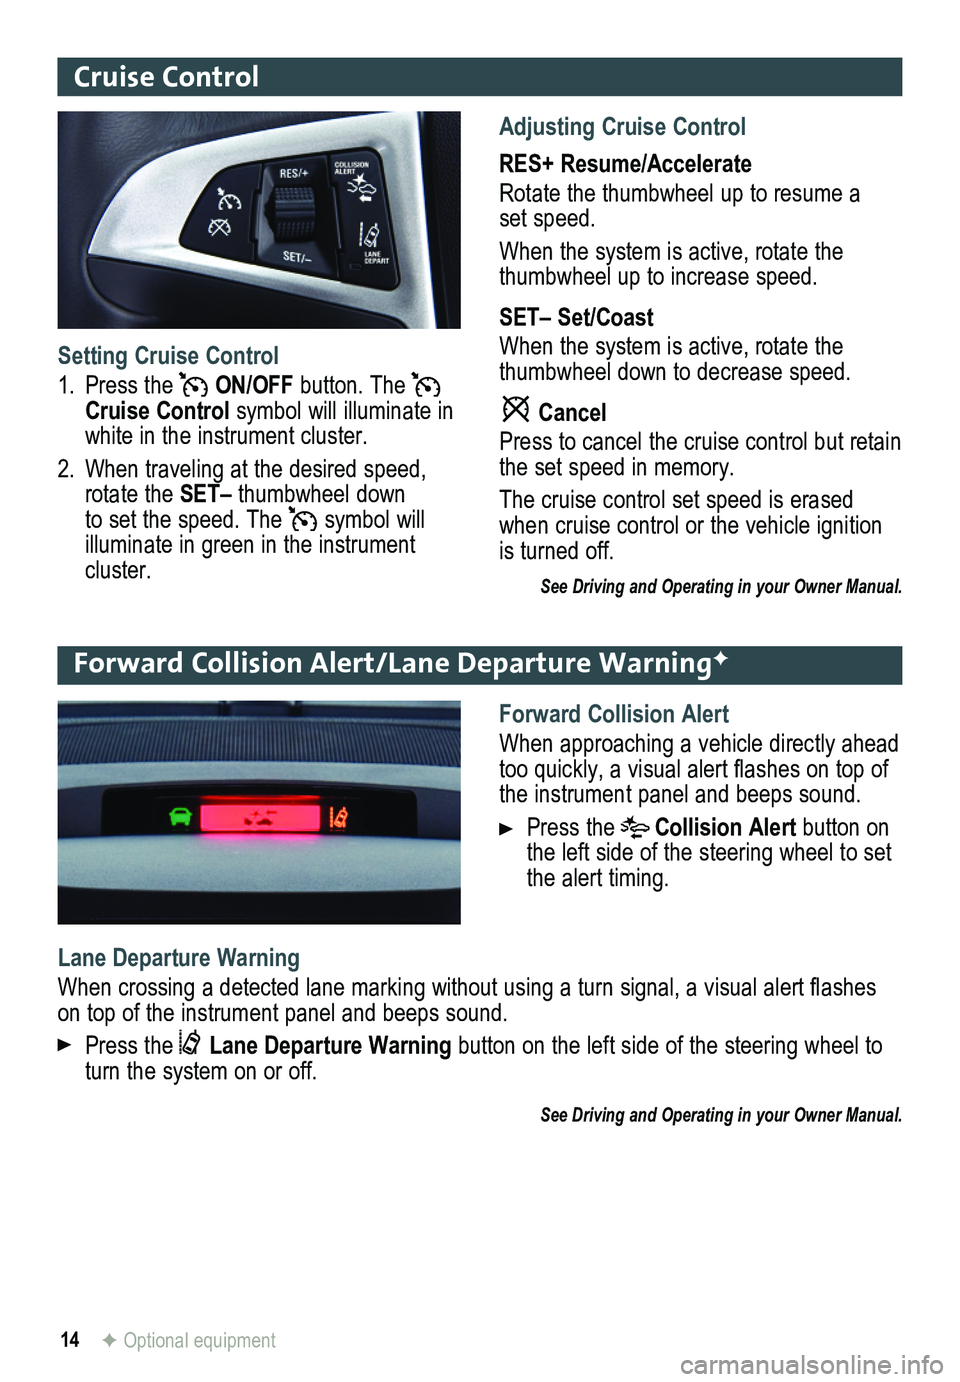
Adjusting Cruise Control
RES+ Resume/Accelerate
Rotate the thumbwheel up to resume a set speed.
When the system is active, rotate the thumbwheel up to increase speed.
SET– Set/Coast
When the system is active, rotate the thumbwheel down to decrease speed.
Cancel
Press to cancel the cruise control but retain the set speed in memory.
The cruise control set speed is erased when cruise control or the vehicle ignition is turned off.
See Driving and Operating in your Owner Manual.
Setting Cruise Control
1. Press the ON/OFF button. The Cruise Control symbol will illuminate in white in the instrument cluster.
2. When traveling at the desired speed, rotate the SET– thumbwheel down to set the speed. The symbol will illuminate in green in the instrument cluster.
Forward Collision Alert/Lane Departure WarningF
Forward Collision Alert
When approaching a vehicle directly ahead too quickly, a visual alert flashes on top of the instrument panel and beeps sound.
Press the Collision Alert button on the left side of the steering wheel to set the alert timing.
Lane Departure Warning
When crossing a detected lane marking without using a turn signal, a visual alert flashes on top of the instrument panel and beeps sound.
Press the Lane Departure Warning button on the left side of the steering wheel to turn the system on or off.
See Driving and Operating in your Owner Manual.
F Optional equipment
Page 16 of 20
16
Driver Information Center
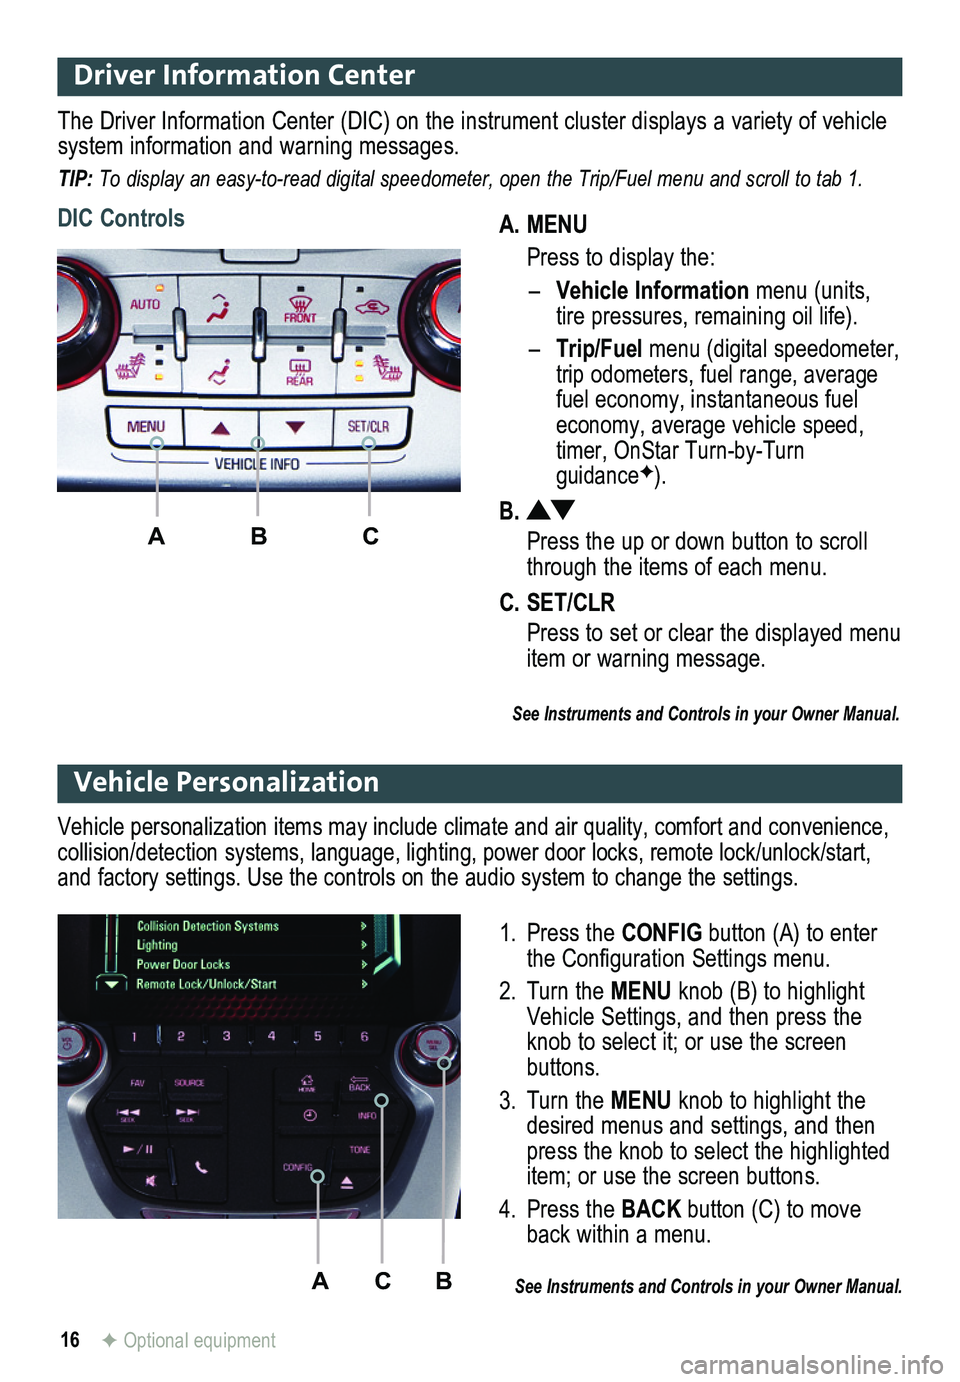
A. MENU
Press to display the:
– Vehicle Information menu (units, tire pressures, remaining oil life).
– Trip/Fuel menu (digital speed ometer, trip odometers, fuel range, average fuel economy, instantaneous fuel economy, average vehicle speed, timer, OnStar Turn-by-Turn guidanceF).
B.
Press the up or down button to scroll through the items of each menu.
C. SET/CLR
Press to set or clear the displayed menu item or warning message.
The Driver Information Center (DIC) on the instrument cluster displays a variety of vehicle system information and warning messages.
TIP: To display an easy-to-read digital speedometer, open the Trip/Fuel menu and scroll to tab 1.
DIC Controls
ABC
See Instruments and Controls in your Owner Manual.
ACB
Vehicle Personalization
1. Press the CONFIG button (A) to enter the Configuration Settings menu.
2. Turn the MENU knob (B) to highlight Vehicle Settings, and then press the knob to select it; or use the screen buttons.
3. Turn the MENU knob to highlight the desired menus and settings, and then press the knob to select the highlighted item; or use the screen buttons.
4. Press the BACK button (C) to move back within a menu.
See Instruments and Controls in your Owner Manual.
Vehicle personalization items may include climate and air quality, comfort and conven ience, collision/detection systems, language, lighting, power door locks, remot\
e lock/unlock/start, and factory settings. Use the controls on the audio system to change the settings.
F Optional equipment
Page 18 of 20
18
Automatic Transmission Features
Electronic Range Select (ERS) Mode
The Electronic Range Select mode allows the driver to manually select the range of gear positions. This feature can be used to limit the top gear while towing or to downshift when driving on a downhill grade to provide engine braking. ERS is not designed to provide sportier
performance or to be used to shift gears similar to a manual transmission.
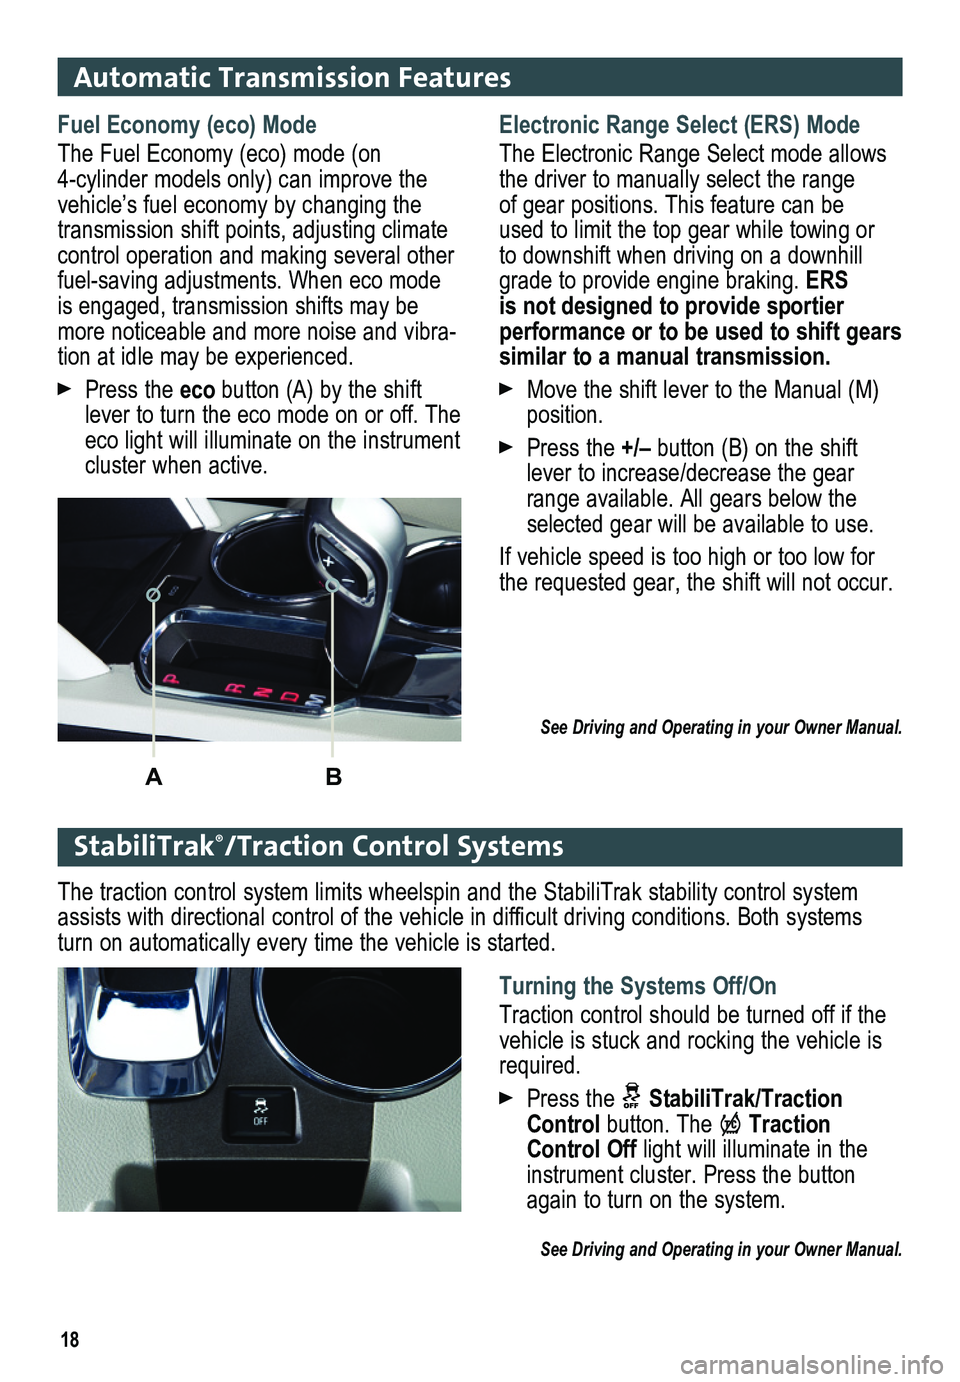
Move the shift lever to the Manual (M) position.
Press the +/– button (B) on the shift lever to increase/decrease the gear range available. All gears below the selected gear will be available to use.
If vehicle speed is too high or too low for the requested gear, the shift will not occur.
See Driving and Operating in your Owner Manual.
StabiliTrak®/Traction Control Systems
Fuel Economy (eco) Mode
The Fuel Economy (eco) mode (on 4-cylinder models only) can improve the vehicle’s fuel economy by changing the transmission shift points, adjusting climate control operation and making sev eral other fuel-saving adjustments. When eco mode is engaged, transmission shifts may be more noticeable and more noise and vibra-tion at idle may be experienced.
Press the eco button (A) by the shift lever to turn the eco mode on or off. The eco light will illuminate on the instrument cluster when active.
AB
Turning the Systems Off/On
Traction control should be turned off if the vehicle is stuck and rocking the vehicle is required.
Press the StabiliTrak/Traction Control button. The Traction Control Off light will illuminate in the instrument cluster. Press the button again to turn on the system.
See Driving and Operating in your Owner Manual.
The traction control system limits wheelspin and the StabiliTrak stabili\
ty control system assists with directional control of the vehicle in difficult driving conditions. Both systems turn on automatically every time the vehicle is started.
Page 19 of 20
19
The Low Tire Pressure warning light on the instrument cluster illuminates when one or more of the vehicle’s tires is significantly underinflated. Fill the tires to the proper tire pressures. The proper tire pressures for the vehicle are listed on the T\
ire and Loading Information label, located below the driver’s door latch. Current tir\
e pressures can be viewed in the Driver Information Center.
Tire pressure is affected by cold weather and distance driven. If the low tire pressure
warning light illuminates when the vehicle is first started in cooler temperatures and then turns off as the vehicle is driven, check for the proper tire pressures.\
Refer to your Owner Manual for additional information about normal monthly tire maintenance.
See Vehicle Care in your Owner Manual.
Tire Pressure Monitor
The roof rack cross rails can be secured in four positions along the roof rack side rails. When adjusting the cross rails, slide each cross rail slightly back and forth until the lock pins fully engage the holes. An audible click will be heard.
To help reduce wind noise when not in use, move the front cross rail to \
the forwardmost
position and the rear cross rail to the rearwardmost position.
See Storage in your Owner Manual.
Roof Rack Cross RailsF
The Oil Life System calculates engine oil life based on vehicle use and \
displays Change Engine Oil Soon on the Driver Information Center when it’s necessary \
to change the engine oil and filter. The Oil Life System should be reset to 100% only following an oil change.
See Vehicle Care in your Owner Manual.
Engine Oil Life System
To open the fuel door, press the dimple in the center of the rear edge o\
f the door. The fuel door will pop out. Pull the door open.
When tightening the fuel cap after refueling, turn it clockwise until it clicks. If the cap is not properly installed, the Check Engine light will illuminate on the instrument cluster.
See Driving and Operating in your Owner Manual.
Refueling the Vehicle
F Optional equipment