service GMC TERRAIN 2014 Owner's Manual
[x] Cancel search | Manufacturer: GMC, Model Year: 2014, Model line: TERRAIN, Model: GMC TERRAIN 2014Pages: 360, PDF Size: 3.93 MB
Page 2 of 360
Black plate (2,1)GMC Terrain/Terrain Denali Owner Manual (GMNA-Localizing-U.S./Canada/
Mexico-6081485) - 2014 - CRC - 12/6/13
2014 GMC Terrain/Terrain Denali Owner ManualM
Jump Starting . . . . . . . . . . . . . . . 10-69
Towing the Vehicle . . . . . . . . . . 10-72
Appearance Care . . . . . . . . . . . 10-75
Service and Maintenance . . . 11-1
General Information . . . . . . . . . . 11-1
Maintenance Schedule . . . . . . . 11-2
Special Application Services . . . . . . . . . . . . . . . . . . . . 11-8
Additional Maintenance and Care . . . . . . . . . . . . . . . . . . . . 11-8
Recommended Fluids, Lubricants, and Parts . . . . . . 11-12
Maintenance Records . . . . . . . 11-15
Technical Data . . . . . . . . . . . . . . . 12-1
Vehicle Identification . . . . . . . . . 12-1
Vehicle Data . . . . . . . . . . . . . . . . . . 12-2
Customer Information . . . . . . . 13-1
Customer Information . . . . . . . . 13-1
Reporting Safety Defects . . . . 13-12
Vehicle Data Recording and Privacy . . . . . . . . . . . . . . . . . . . . 13-14 OnStar
. . . . . . . . . . . . . . . . . . . . . . . 14-1
OnStar Overview . . . . . . . . . . . . . 14-1
OnStar Services . . . . . . . . . . . . . . 14-2
OnStar Additional
Information . . . . . . . . . . . . . . . . . . 14-5
Index . . . . . . . . . . . . . . . . . . . . . i-1
Page 3 of 360
Black plate (3,1)GMC Terrain/Terrain Denali Owner Manual (GMNA-Localizing-U.S./Canada/
Mexico-6081485) - 2014 - CRC - 12/6/13
Introduction iii
The names, logos, emblems,
slogans, vehicle model names, and
vehicle body designs appearing in
this manual including, but not limited
to, GM, the GM logo, GMC, the
GMC Truck Emblem, TERRAIN, and
DENALI are trademarks and/or
service marks of General Motors
LLC, its subsidiaries, affiliates,
or licensors.This manual describes features that
may or may not be on your specific
vehicle either because they are
options that you did not purchase or
due to changes subsequent to the
printing of this owner manual.
Please refer to the purchase
documentation relating to your
specific vehicle to confirm each of
the features found on your vehicle.
For vehicles first sold in Canada,
substitute the name
“General
Motors of Canada Limited” for GMC
Motor Division wherever it appears
in this manual.
Keep this manual in the vehicle for
quick reference.
Canadian Vehicle Owners
Propriétaires Canadiens
A French language manual can be
obtained from your dealer, at
www.helminc.com, or from:
On peut obtenir un exemplaire de
ce guide en français auprès du
concessionnaire ou à l'adresse
savant:
Helm, Incorporated
Attention: Customer Service
47911 Halyard Drive
Plymouth, MI 48170
Using this Manual
To quickly locate information about
the vehicle, use the Index in the
back of the manual. It is an
alphabetical list of what is in the
manual and the page number where
it can be found.
Litho in U.S.A.
Part No. 22852844 B Second Printing©2013 General Motors LLC. All Rights Reserved.
Page 4 of 360
Black plate (4,1)GMC Terrain/Terrain Denali Owner Manual (GMNA-Localizing-U.S./Canada/
Mexico-6081485) - 2014 - CRC - 12/6/13
iv Introduction
Danger, Warnings, and
Cautions
{Danger
Text marked{Danger provides
information on risk of fatal injury.
Disregarding this information may
endanger life.
{Warning
Text marked{Warning provides
information on risk of accident or
injury. Disregarding this
information may lead to injury.
{Caution
Text marked{Caution provides
information that may indicate a
hazard that could result in injury
or death. It could also result in
possible damage to the vehicle.
A circle with a slash through it is a
safety symbol which means “Do
Not,” “Do not do this,” or“Do not let
this happen.”
Symbols
The vehicle has components and
labels that use symbols instead of
text. Symbols are shown along with
the text describing the operation or
information relating to a specific
component, control, message,
gauge, or indicator.
M: This symbol is shown when
you need to see your owner manual
for additional instructions or
information.
*: This symbol is shown when
you need to see a service manual
for additional instructions or
information.
Page 27 of 360
Black plate (21,1)GMC Terrain/Terrain Denali Owner Manual (GMNA-Localizing-U.S./Canada/
Mexico-6081485) - 2014 - CRC - 12/6/13
In Brief 1-21
.Always follow posted speed
limits or drive more slowly when
conditions require.
.Keep vehicle tires properly
inflated.
.Combine several trips into a
single trip.
.Replace the vehicle's tires with
the same TPC Spec number
molded into the tire's sidewall
near the size.
.Follow recommended scheduled
maintenance.
Roadside Assistance
Program
U.S.: 1-888-881-3302
TTY Users (U.S. Only):
1-888-889-2438
Canada: 1-800-268-6800
New GMC owners are automatically
enrolled in the Roadside Assistance
Program.See
Roadside Assistance Program
on page 13-5.
OnStar®
If equipped, this vehicle has a
comprehensive, in-vehicle system
that can connect to a live Advisor
for Emergency, Security, Navigation,
Connection, and Diagnostic
Services. See OnStar Overview on
page 14-1.
Page 30 of 360
Black plate (2,1)GMC Terrain/Terrain Denali Owner Manual (GMNA-Localizing-U.S./Canada/
Mexico-6081485) - 2014 - CRC - 12/6/13
2-2 Keys, Doors, and Windows
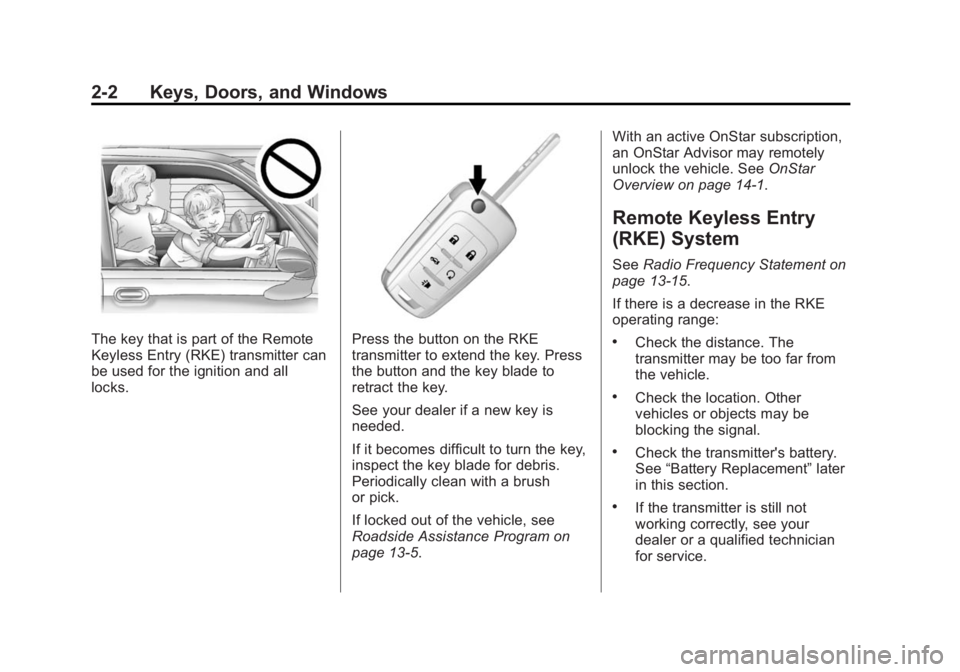
The key that is part of the Remote
Keyless Entry (RKE) transmitter can
be used for the ignition and all
locks.Press the button on the RKE
transmitter to extend the key. Press
the button and the key blade to
retract the key.
See your dealer if a new key is
needed.
If it becomes difficult to turn the key,
inspect the key blade for debris.
Periodically clean with a brush
or pick.
If locked out of the vehicle, see
Roadside Assistance Program on
page 13-5.With an active OnStar subscription,
an OnStar Advisor may remotely
unlock the vehicle. See
OnStar
Overview on page 14-1.
Remote Keyless Entry
(RKE) System
See Radio Frequency Statement on
page 13-15.
If there is a decrease in the RKE
operating range:
.Check the distance. The
transmitter may be too far from
the vehicle.
.Check the location. Other
vehicles or objects may be
blocking the signal.
.Check the transmitter's battery.
See “Battery Replacement” later
in this section.
.If the transmitter is still not
working correctly, see your
dealer or a qualified technician
for service.
Page 39 of 360
Black plate (11,1)GMC Terrain/Terrain Denali Owner Manual (GMNA-Localizing-U.S./Canada/
Mexico-6081485) - 2014 - CRC - 12/6/13
Keys, Doors, and Windows 2-11
The liftgate can be opened manually
by pressing the touch pad under the
liftgate handle, with the doors
unlocked and lifting up.
In either the MAX or the 3/4 mode,
the liftgate can be power opened
and closed by:
.Pressing and holdingVorY
on the RKE transmitter until the
liftgate starts moving. See
Remote Keyless Entry (RKE)
System Operation on page 2-3.
.Pressing the power liftgate
button in the center of the mode
switch on the overhead console,
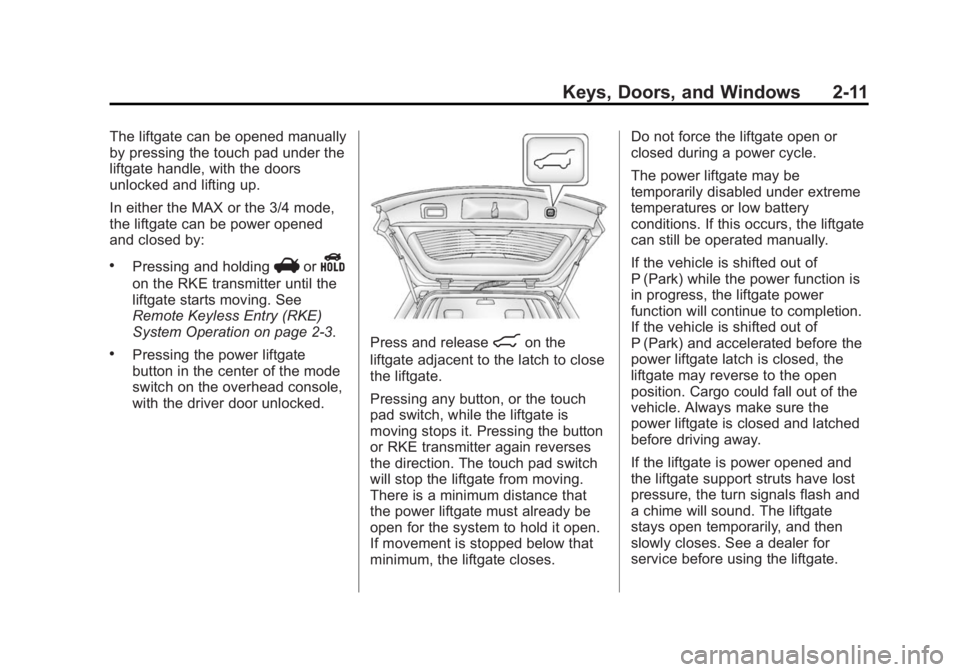
with the driver door unlocked.Press and release8on the
liftgate adjacent to the latch to close
the liftgate.
Pressing any button, or the touch
pad switch, while the liftgate is
moving stops it. Pressing the button
or RKE transmitter again reverses
the direction. The touch pad switch
will stop the liftgate from moving.
There is a minimum distance that
the power liftgate must already be
open for the system to hold it open.
If movement is stopped below that
minimum, the liftgate closes. Do not force the liftgate open or
closed during a power cycle.
The power liftgate may be
temporarily disabled under extreme
temperatures or low battery
conditions. If this occurs, the liftgate
can still be operated manually.
If the vehicle is shifted out of
P (Park) while the power function is
in progress, the liftgate power
function will continue to completion.
If the vehicle is shifted out of
P (Park) and accelerated before the
power liftgate latch is closed, the
liftgate may reverse to the open
position. Cargo could fall out of the
vehicle. Always make sure the
power liftgate is closed and latched
before driving away.
If the liftgate is power opened and
the liftgate support struts have lost
pressure, the turn signals flash and
a chime will sound. The liftgate
stays open temporarily, and then
slowly closes. See a dealer for
service before using the liftgate.
Page 43 of 360
Black plate (15,1)GMC Terrain/Terrain Denali Owner Manual (GMNA-Localizing-U.S./Canada/
Mexico-6081485) - 2014 - CRC - 12/6/13
Keys, Doors, and Windows 2-15
The security light in the instrument
cluster comes on if there is a
problem with arming or disarming
the theft-deterrent system.
When trying to start the vehicle, the
security light comes on briefly when
the ignition is turned on.
If the engine does not start and the
security light stays on, there is a
problem with the system. Turn the
ignition off and try again.
If the engine still does not start, and
the key appears to be undamaged
or the light continues to stay on, try
another ignition key. If the engine
does not start with the other key, the
vehicle needs service. If the vehicle
does start, the first key may be
damaged. See your dealer who can
service the theft-deterrent system
and have a new key made.
Do not leave the key or device that
disarms or deactivates the
theft-deterrent system in the vehicle.Exterior Mirrors
Convex Mirrors
{Warning
A convex mirror can make things,
like other vehicles, look farther
away than they really are. If you
cut too sharply into the right lane,
you could hit a vehicle on the
right. Check the inside mirror or
glance over your shoulder before
changing lanes.
The passenger side mirror is convex
shaped. A convex mirror's surface is
curved so more can be seen from
the driver seat.
Power Mirrors
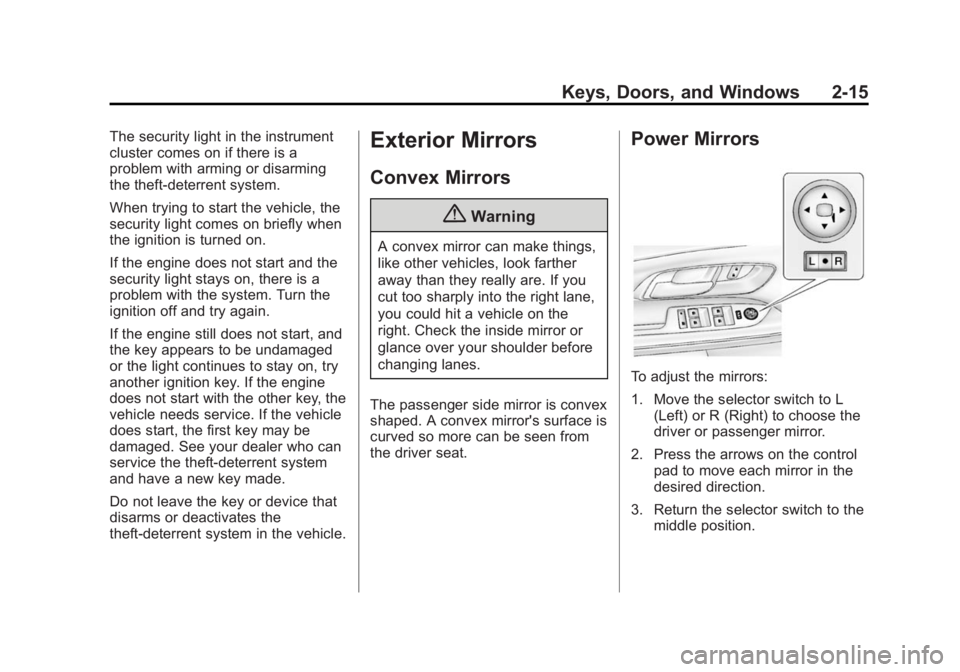
To adjust the mirrors:
1. Move the selector switch to L (Left) or R (Right) to choose the
driver or passenger mirror.
2. Press the arrows on the control pad to move each mirror in the
desired direction.
3. Return the selector switch to the middle position.
Page 55 of 360
Black plate (7,1)GMC Terrain/Terrain Denali Owner Manual (GMNA-Localizing-U.S./Canada/
Mexico-6081485) - 2014 - CRC - 12/6/13
Seats and Restraints 3-7
turned off. These automatically
stored positions are referred to as
RKE Memory positions. See
Remote Keyless Entry (RKE)
System Operation on page 2-3.
Storing Button Memory Positions
To save positions into Button
Memory:
1. Adjust the driver seat, seatbackrecliner, and both outside mirrors
to the desired driving positions.
2. Press and hold MEM (Memory) and “1”at the same time until a
beep sounds.
3. Repeat Steps 1 and 2 for a second driver using “2.”
Recalling Button Memory
Positions
To recall the Button Memory
positions, press and hold “1”or“2.”
The driver seat and outside mirrors
move to the positions stored to
those buttons when pressed. Releasing
“1”or“2” before the
stored positions are reached stops
the recall.
If something has blocked the driver
seat while recalling a memory
position, the recall may stop.
Remove the obstruction; then press
and hold the appropriate manual
control for the memory item that is
not recalling for two seconds. Try
recalling the memory position again
by pressing the appropriate memory
button. If the memory position is still
not recalling, see your dealer for
service.
Recalling RKE Memory Positions
(Memory Remote Recall)
The Memory Remote Recall feature
can recall the driver seat and
outside mirrors to previously stored
RKE Memory positions when
entering the vehicle.
Every time the ignition is turned off,
the positions of the driver seat and
outside mirrors are automatically
stored to the RKE transmitter that
was used to start the vehicle. These positions are called RKE Memory
positions and may be different than
the previously mentioned Button
Memory positions saved to the
“1”
or“2” buttons. To recall RKE
Memory positions, unlock the driver
door with the RKE transmitter and
open the driver door. If the driver
door is already open, pressing the
RKE transmitter
Kbutton will also
activate the RKE Memory recall.
The driver seat and outside mirrors
will move to the previously saved
RKE Memory positions.
This feature is turned on or off using
the vehicle personalization menu.
See Vehicle Personalization on
page 5-31.
To stop recall movement, press any
of the memory, power mirror,
or power seat controls.
If something has blocked the driver
seat while recalling a memory
position, the recall may stop.
Remove the obstruction; then press
and hold the appropriate manual
control for the memory item that is
Page 56 of 360
Black plate (8,1)GMC Terrain/Terrain Denali Owner Manual (GMNA-Localizing-U.S./Canada/
Mexico-6081485) - 2014 - CRC - 12/6/13
3-8 Seats and Restraints
not recalling for two seconds. Try
recalling the memory position again
by opening the driver door and
pressing the RKE
Kbutton. If the
memory position is still not recalling,
see your dealer for service.
Easy Exit Driver Seat
This feature moves the seat
rearward allowing the driver more
room to exit the vehicle.
To activate, turn the ignition off and
open the driver door. If the driver
door is already open, turning the
ignition off will activate the recall.
This feature can be turned on or off
using the vehicle personalization
menu. See Vehicle Personalization
on page 5-31.
To stop recall movement, press one
of the memory or power seat
controls.
If something has blocked the driver
seat while recalling the exit position,
the recall may stop. Remove the
obstruction; then press and hold the
power seat control rearward for two seconds. Try recalling the exit
position again. If the exit position is
still not recalling, see your dealer for
service.
Heated Front Seats
{Warning
If you cannot feel temperature
change or pain to the skin, the
seat heater may cause burns. To
reduce the risk of burns, people
with such a condition should use
care when using the seat heater,
especially for long periods of
time. Do not place anything on
the seat that insulates against
heat, such as a blanket, cushion,
cover, or similar item. This may
cause the seat heater to
overheat. An overheated seat
heater may cause a burn or may
damage the seat.
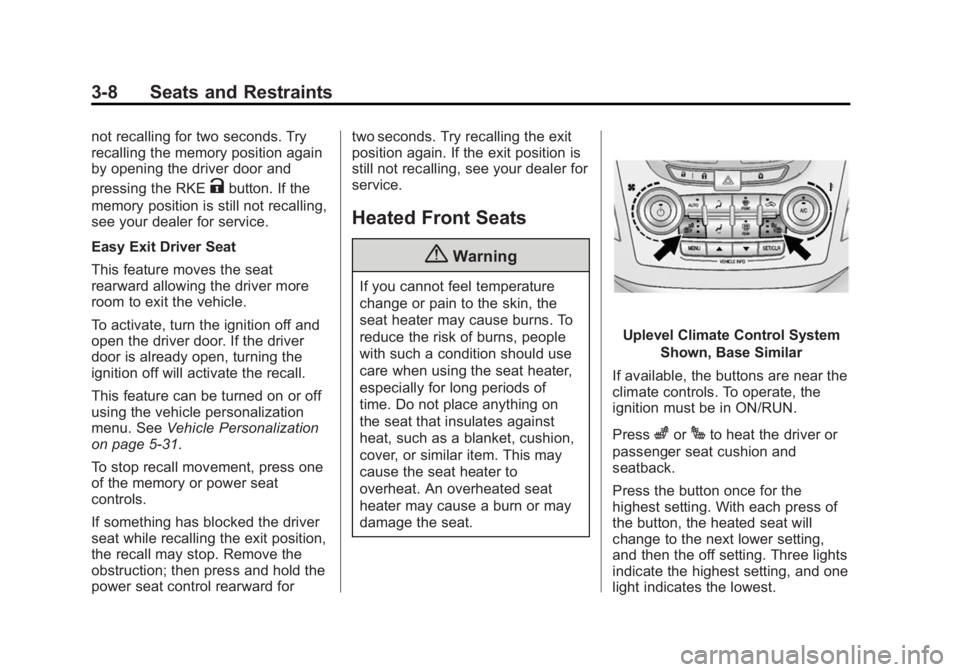
Uplevel Climate Control System
Shown, Base Similar
If available, the buttons are near the
climate controls. To operate, the
ignition must be in ON/RUN.
Press
zorJto heat the driver or
passenger seat cushion and
seatback.
Press the button once for the
highest setting. With each press of
the button, the heated seat will
change to the next lower setting,
and then the off setting. Three lights
indicate the highest setting, and one
light indicates the lowest.
Page 73 of 360
Black plate (25,1)GMC Terrain/Terrain Denali Owner Manual (GMNA-Localizing-U.S./Canada/
Mexico-6081485) - 2014 - CRC - 12/6/13
Seats and Restraints 3-25
to help protect you in another
crash. A new system will include
airbag modules and possibly
other parts. The service manual
for the vehicle covers the need
to replace other parts.
.The vehicle has a crash sensing
and diagnostic module which
records information after a
crash. SeeVehicle Data
Recording and Privacy on
page 13-14 andEvent Data
Recorders on page 13-14.
.Let only qualified technicians
work on the airbag systems.
Improper service can mean that
an airbag system will not work
properly. See your dealer for
service.
Passenger Sensing
System
The vehicle has a passenger
sensing system for the front
outboard passenger position. The passenger airbag status indicator
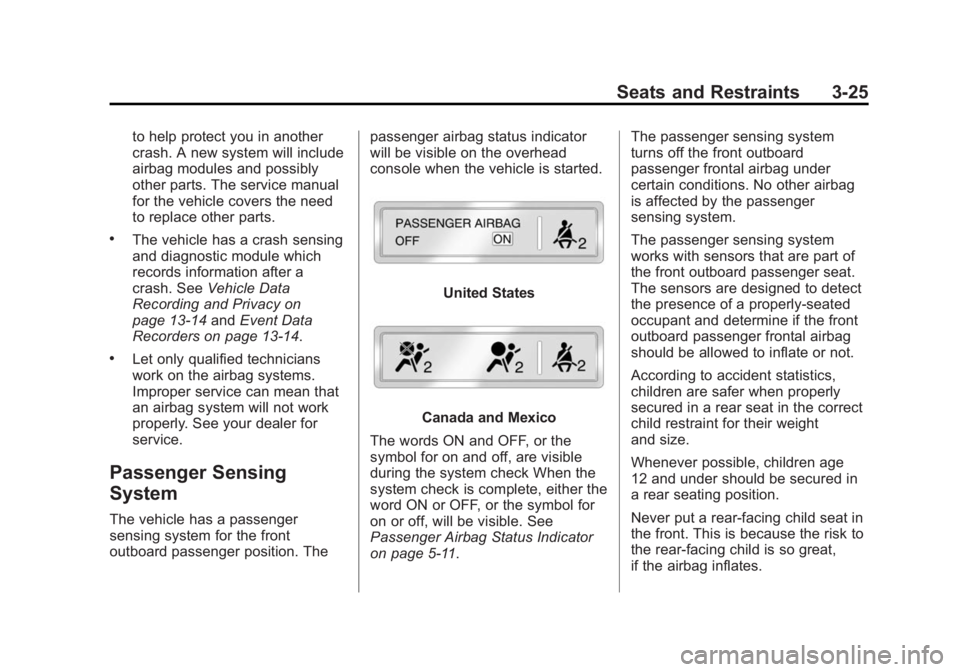
will be visible on the overhead
console when the vehicle is started.
United States
Canada and Mexico
The words ON and OFF, or the
symbol for on and off, are visible
during the system check When the
system check is complete, either the
word ON or OFF, or the symbol for
on or off, will be visible. See
Passenger Airbag Status Indicator
on page 5-11. The passenger sensing system
turns off the front outboard
passenger frontal airbag under
certain conditions. No other airbag
is affected by the passenger
sensing system.
The passenger sensing system
works with sensors that are part of
the front outboard passenger seat.
The sensors are designed to detect
the presence of a properly-seated
occupant and determine if the front
outboard passenger frontal airbag
should be allowed to inflate or not.
According to accident statistics,
children are safer when properly
secured in a rear seat in the correct
child restraint for their weight
and size.
Whenever possible, children age
12 and under should be secured in
a rear seating position.
Never put a rear-facing child seat in
the front. This is because the risk to
the rear-facing child is so great,
if the airbag inflates.