engine GMC TERRAIN 2017 Get To Know Guide
[x] Cancel search | Manufacturer: GMC, Model Year: 2017, Model line: TERRAIN, Model: GMC TERRAIN 2017Pages: 20, PDF Size: 2.79 MB
Page 1 of 20
Review this Quick Reference Guide for an overview of some important features in your GMC Terrain. More detailed information can be found in your Owner Manual. Some option\
al equipment described in this guide may not be included in your vehicle. For easy reference, keep this guide\
with your Owner Manual in your glove box.
www.gmc.com
Instrument Panel .............2Remote Keyless Entry Transmitter .................4Rear Door Safety Locks .......4Tilt/Telescopic Steering Wheel ..4Driver’s Seat Adjustments ......5Rear Seat Adjustments ........6Exterior/Interior Lighting .......6Wipers and Washers ..........7Power Programmable Liftgate ...7Audio System ...............8Bluetooth System ...........10Audio Steering Wheel Controls .10
GMC IntelliLink .............11Navigation System ..........13Rear Seat Entertainment System ....................13Cruise Control ..............14Forward Collision Alert/ Lane Departure Warning ......14Accessory Power Outlets .....15Passenger Presence System ..15Parking Brake ..............15Wind Noise ................15Driver Information Center .....16Vehicle Personalization .......16
Climate Controls ............17Automatic Transmission Features ..................18StabiliTrak/Traction Control Systems ............18Roof Rack Cross Rails .......19Tire Pressure Monitor ........19Engine Oil Life System .......19Refueling the Vehicle ........19Roadside Assistance .........20myGMC and OnStar Mobile Apps ................20GMC Owner Center ..........20
This Important Information To Be REMOVED AND READ BY THE CUSTOMER
Page 2 of 20
2
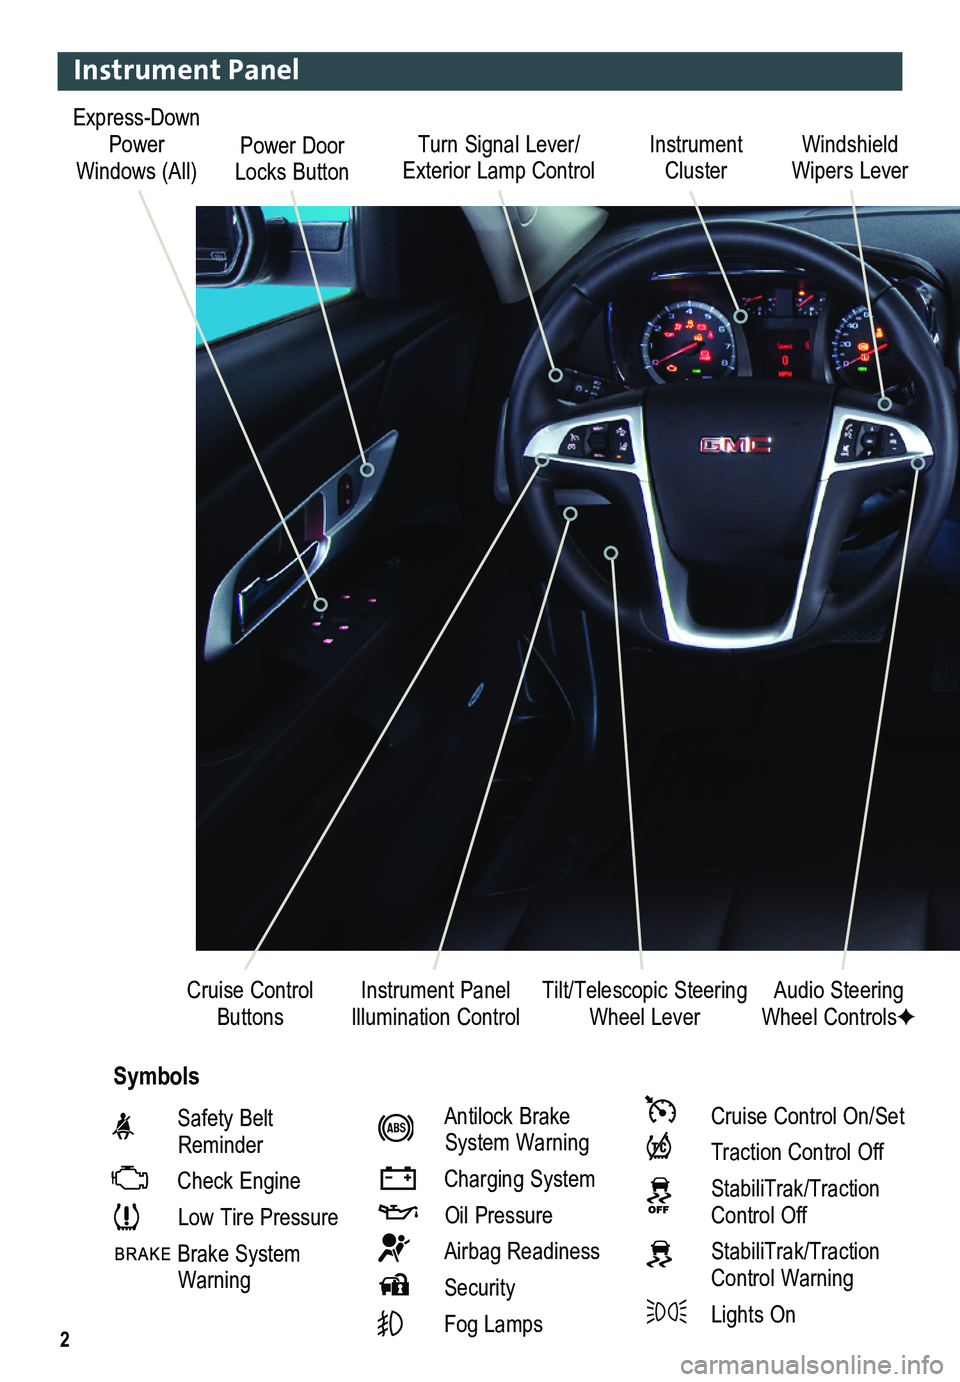
Turn Signal Lever/ Exterior Lamp ControlInstrument Cluster
Tilt/Telescopic Steering Wheel Lever
Windshield Wipers Lever
Instrument Panel Illumination ControlCruise Control Buttons
Instrument Panel
Safety Belt Reminder
Check Engine
Low Tire Pressure
Brake System Warning
Antilock Brake System Warning
Charging System
Oil Pressure
Airbag Readiness
Security
Fog Lamps
Cruise Control On/Set
Traction Control Off
StabiliTrak/Traction Control Off
StabiliTrak/Traction Control Warning
Lights On
Audio Steering Wheel ControlsF
Symbols
Express-Down Power Windows (All)Power Door Locks Button
Page 4 of 20
4
Remote Keyless Entry Transmitter
Unlock
Press to unlock the driver’s door. Press again to unlock all doors and the liftgate.
Lock
Press to lock all doors and the liftgate. The driver’s door will not lock if open.
TIP: The unlock and lock settings can be changed in the Vehicle Settings menu by using the audio system controls.
Liftgate
Press to open/stop/close the power liftgate (optional).
Vehicle Locator/Panic Alarm
Press and release to locate your vehicle. The turn signal lamps will flash and the horn will sound.
Press and hold to activate the alarm. The turn signal lamps will flash and the horn will sound until the button is pressed again or the ignition is turned on.
Remote Vehicle StartF
Press and release the Lock button and then press and hold the button to start the engine from outside the vehicle. After entering the vehicle, turn the ignition to the On position.
– The engine will run for 10 minutes. Repeat these steps for a 10-minute time extension.
– Only two remote starts are allowed between ignition cycles.
– Press and hold the button to cancel a remote start.
Note: Open the Vehicle Settings in the Configuration menu to have the heated seatsF turn on during a remote start.
See Keys, Doors and Windows in your Owner Manual.
Tilt/Telescopic Steering Wheel
With the vehicle in Park, push down the lever on the left side of the steering column to\
adjust the steering wheel. The steering wheel can then be moved up or do\
wn and in or out. After adjustment, pull up the lever to lock the steering wheel in place.
See Instruments and Controls in your Owner Manual.
Rear Door Safety Locks
F Optional equipment
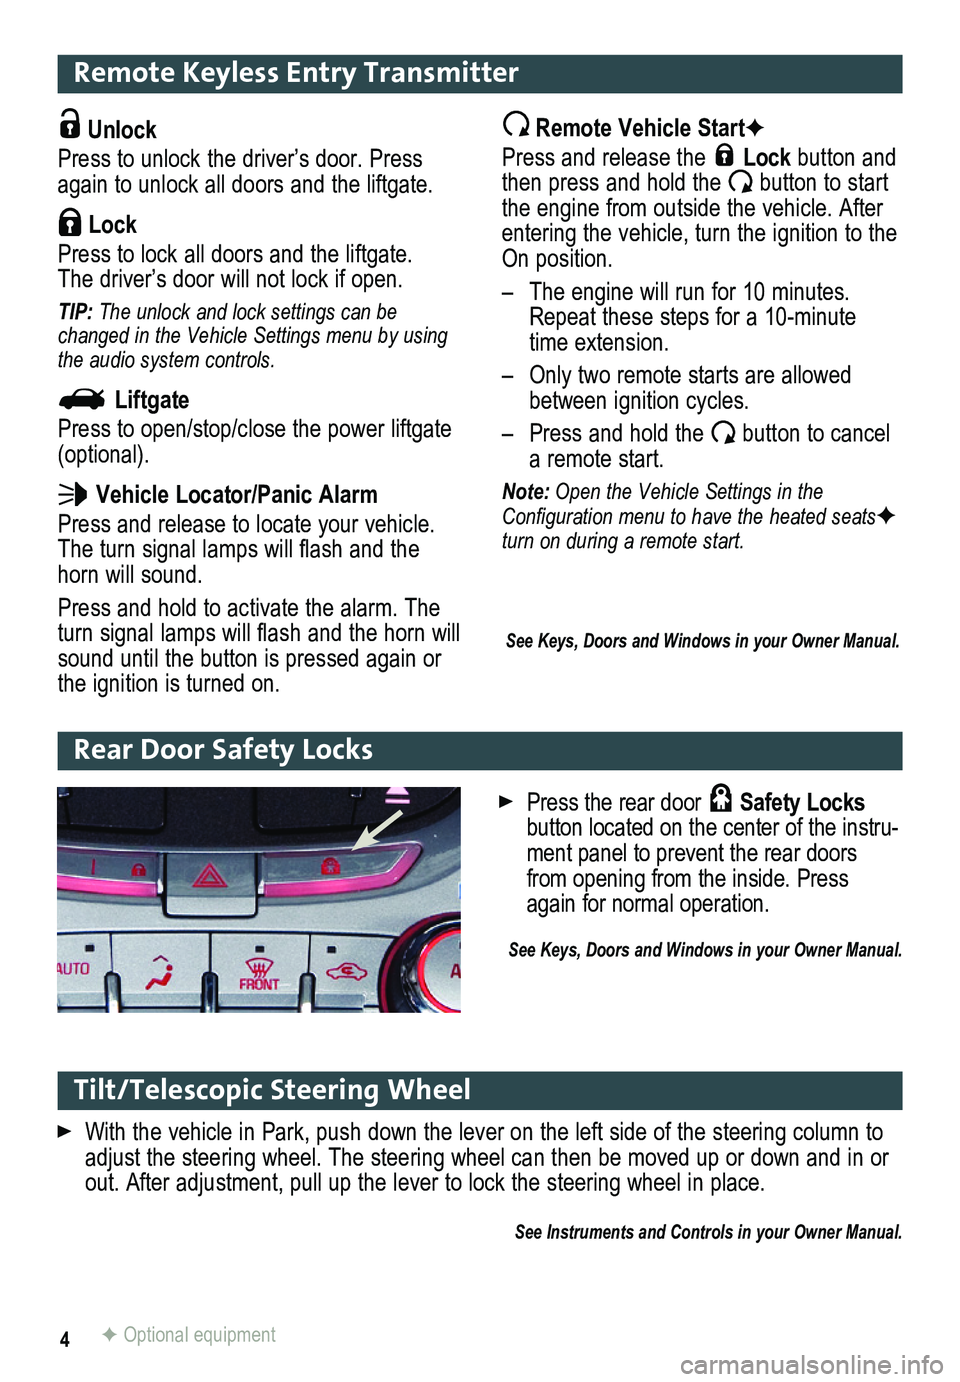
Press the rear door Safety Locks button located on the center of the instru-ment panel to prevent the rear doors from opening from the inside. Press again for normal operation.
See Keys, Doors and Windows in your Owner Manual.
Page 18 of 20
18
Automatic Transmission Features
Electronic Range Select (ERS) Mode
The Electronic Range Select mode allows the driver to manually select the range of gear positions. This feature can be used to limit the top gear while towing or to downshift when driving on a downhill grade to provide engine braking. ERS is not designed to provide sportier
performance or to be used to shift gears similar to a manual transmission.
Move the shift lever to the Manual (M) position.
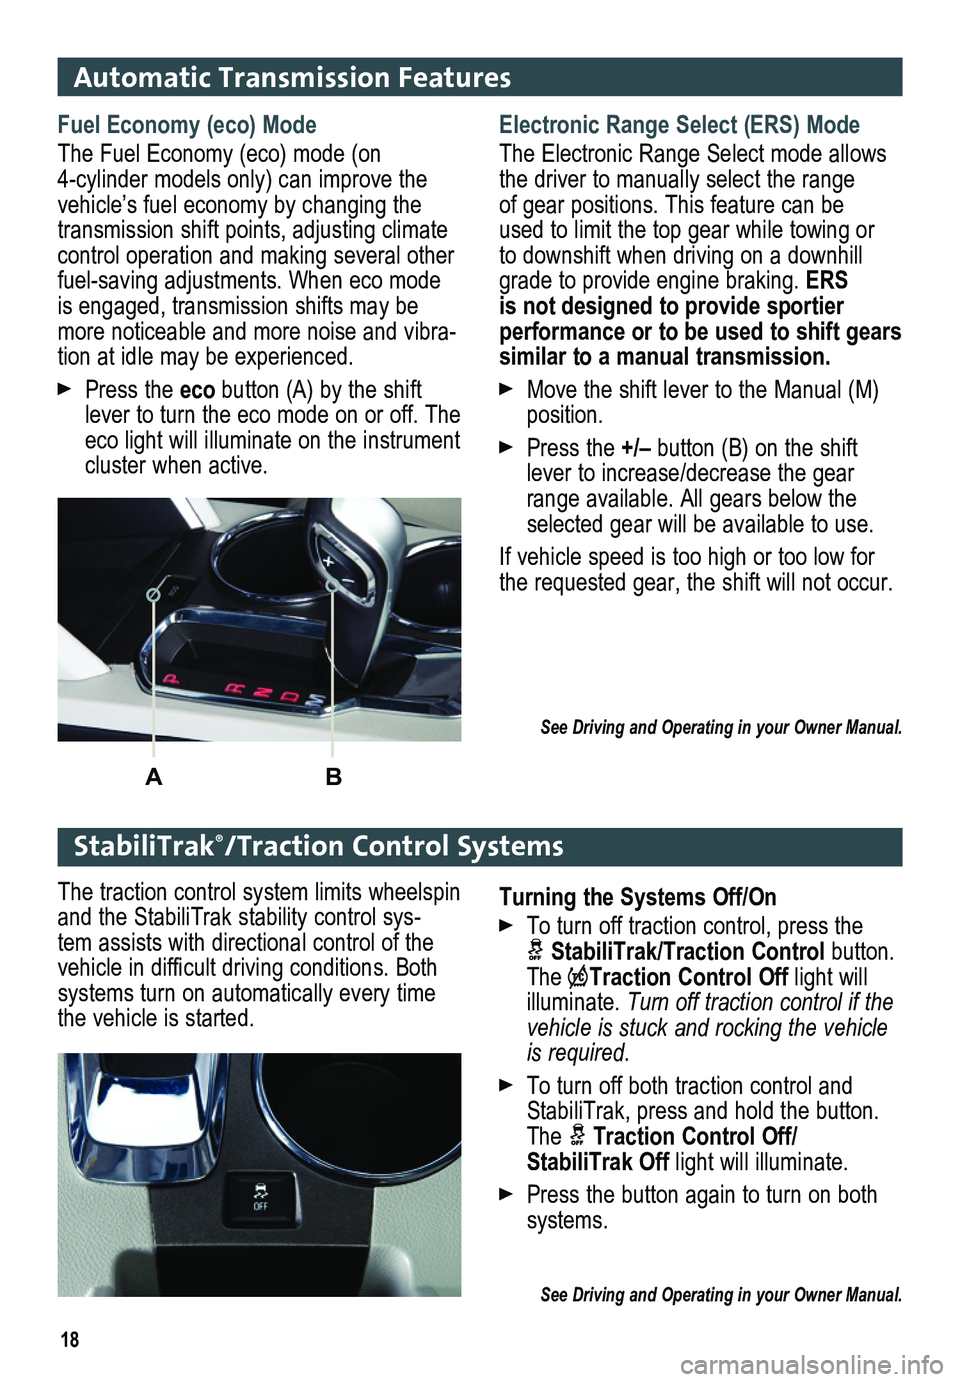
Press the +/– button (B) on the shift lever to increase/decrease the gear range available. All gears below the selected gear will be available to use.
If vehicle speed is too high or too low for the requested gear, the shift will not occur.
See Driving and Operating in your Owner Manual.
StabiliTrak®/Traction Control Systems
Fuel Economy (eco) Mode
The Fuel Economy (eco) mode (on 4-cylinder models only) can improve the vehicle’s fuel economy by changing the transmission shift points, adjusting climate control operation and making sev eral other fuel-saving adjustments. When eco mode is engaged, transmission shifts may be more noticeable and more noise and vibra-tion at idle may be experienced.
Press the eco button (A) by the shift lever to turn the eco mode on or off. The eco light will illuminate on the instrument cluster when active.
AB
Turning the Systems Off/On
To turn off traction control, press the
StabiliTrak/Traction Control button. The Traction Control Off light will illuminate. Turn off traction control if the vehicle is stuck and rocking the vehicle is required.
To turn off both traction control and StabiliTrak, press and hold the button. The Traction Control Off/ StabiliTrak Off light will illuminate.
Press the button again to turn on both systems.
See Driving and Operating in your Owner Manual.
The traction control system limits wheelspin and the StabiliTrak stability control sys-tem assists with directional control of the vehicle in difficult driving conditions. Both systems turn on automatically every time the vehicle is started.
Page 19 of 20
19
The Low Tire Pressure warning light illuminates on the instrument cluster when a
significant reduction in pressure occurs in one or more of the vehicle’s tires. It will remain on until the tire pressure is corrected. Current tire pressures can be displayed using the Driver Information Center. Proper tire pressures are listed on the Tire and Loading Information label, located below the driver’s door latch.
Tire pressure is affected by cold weather and distance driven. If the lo\
w tire pressure warn-ing light illuminates and then turns off as the vehicle is driven in coo\
ler temperatures, check for the proper tire pressures. Maintaining tire pressures also is import\
ant for fuel economy.
See Vehicle Care in your Owner Manual.
Tire Pressure Monitor
The roof rack cross rails can be secured in four positions along the roof rack side rails. When adjusting the cross rails, slide each cross rail slightly back and forth until the lock pins fully engage the holes. An audible click will be heard.
To help reduce wind noise when not in use, move the front cross rail to \
the forwardmost
position and the rear cross rail to the rearwardmost position.
See Storage in your Owner Manual.
Roof Rack Cross RailsF
The Oil Life System calculates engine oil life based on vehicle use and \
displays Change Engine Oil Soon on the Driver Information Center when it’s necessary \
to change the engine oil and filter. The Oil Life System should be reset to 100% only following an oil change.
Resetting the Oil Life System
1. Turn the ignition to the On position, but do not start the engine.
2. Press the MENU button to display the Vehicle Information menu.
3. Press the up or down arrow to view Remaining Oil Life.
4. Press and hold the SET/CLR button until 100% is displayed.
5. Turn off the ignition.
See Vehicle Care in your Owner Manual.
Engine Oil Life System
To open the fuel door, press the dimple in the center of the rear edge o\
f the door. The fuel door will pop out. Pull the door open.
When tightening the fuel cap after refueling, turn it clockwise until it clicks. If the cap is not properly installed, the Check Engine light will illuminate on the instrument cluster.
See Driving and Operating in your Owner Manual.
Refueling the Vehicle