window GMC TERRAIN 2017 Get To Know Guide
[x] Cancel search | Manufacturer: GMC, Model Year: 2017, Model line: TERRAIN, Model: GMC TERRAIN 2017Pages: 20, PDF Size: 2.79 MB
Page 2 of 20
2
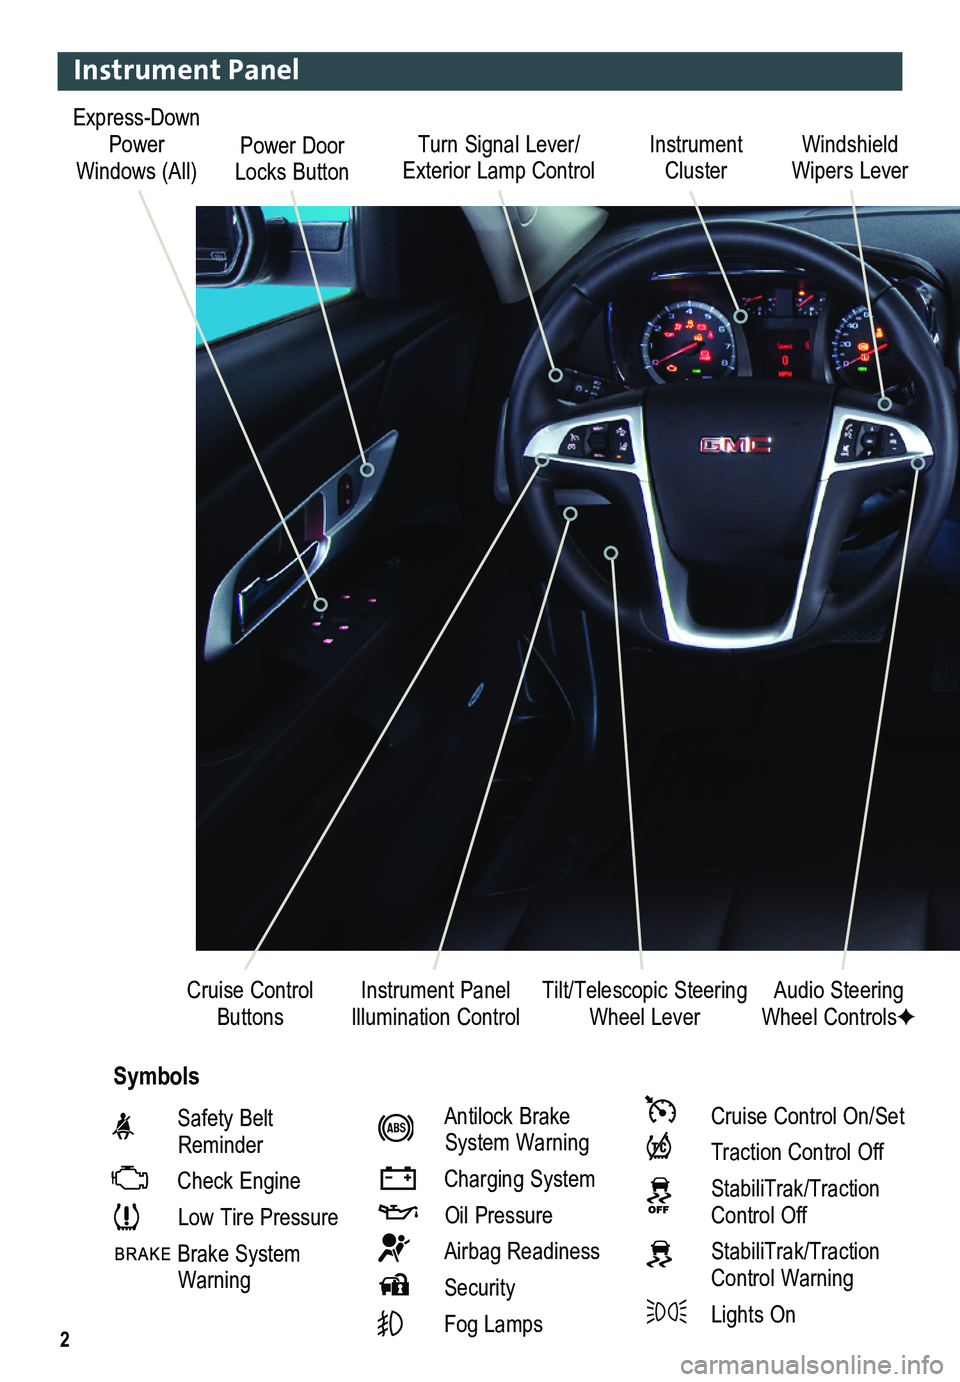
Turn Signal Lever/ Exterior Lamp ControlInstrument Cluster
Tilt/Telescopic Steering Wheel Lever
Windshield Wipers Lever
Instrument Panel Illumination ControlCruise Control Buttons
Instrument Panel
Safety Belt Reminder
Check Engine
Low Tire Pressure
Brake System Warning
Antilock Brake System Warning
Charging System
Oil Pressure
Airbag Readiness
Security
Fog Lamps
Cruise Control On/Set
Traction Control Off
StabiliTrak/Traction Control Off
StabiliTrak/Traction Control Warning
Lights On
Audio Steering Wheel ControlsF
Symbols
Express-Down Power Windows (All)Power Door Locks Button
Page 4 of 20
4
Remote Keyless Entry Transmitter
Unlock
Press to unlock the driver’s door. Press again to unlock all doors and the liftgate.
Lock
Press to lock all doors and the liftgate. The driver’s door will not lock if open.
TIP: The unlock and lock settings can be changed in the Vehicle Settings menu by using the audio system controls.
Liftgate
Press to open/stop/close the power liftgate (optional).
Vehicle Locator/Panic Alarm
Press and release to locate your vehicle. The turn signal lamps will flash and the horn will sound.
Press and hold to activate the alarm. The turn signal lamps will flash and the horn will sound until the button is pressed again or the ignition is turned on.
Remote Vehicle StartF
Press and release the Lock button and then press and hold the button to start the engine from outside the vehicle. After entering the vehicle, turn the ignition to the On position.
– The engine will run for 10 minutes. Repeat these steps for a 10-minute time extension.
– Only two remote starts are allowed between ignition cycles.
– Press and hold the button to cancel a remote start.
Note: Open the Vehicle Settings in the Configuration menu to have the heated seatsF turn on during a remote start.
See Keys, Doors and Windows in your Owner Manual.
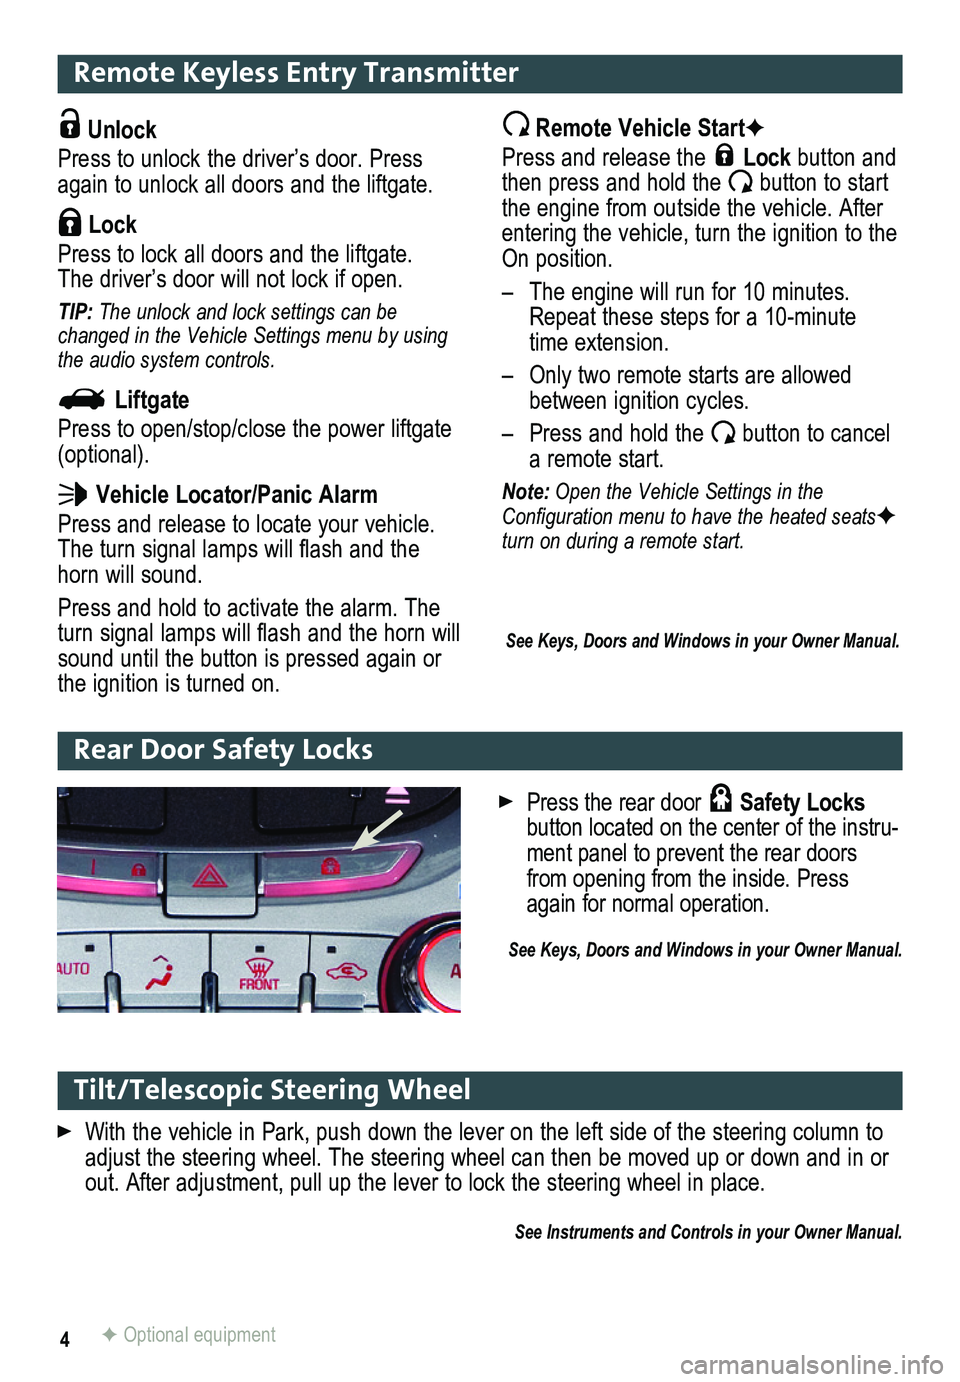
Tilt/Telescopic Steering Wheel
With the vehicle in Park, push down the lever on the left side of the steering column to\
adjust the steering wheel. The steering wheel can then be moved up or do\
wn and in or out. After adjustment, pull up the lever to lock the steering wheel in place.
See Instruments and Controls in your Owner Manual.
Rear Door Safety Locks
F Optional equipment
Press the rear door Safety Locks button located on the center of the instru-ment panel to prevent the rear doors from opening from the inside. Press again for normal operation.
See Keys, Doors and Windows in your Owner Manual.
Page 7 of 20
7
Wipers and Washers
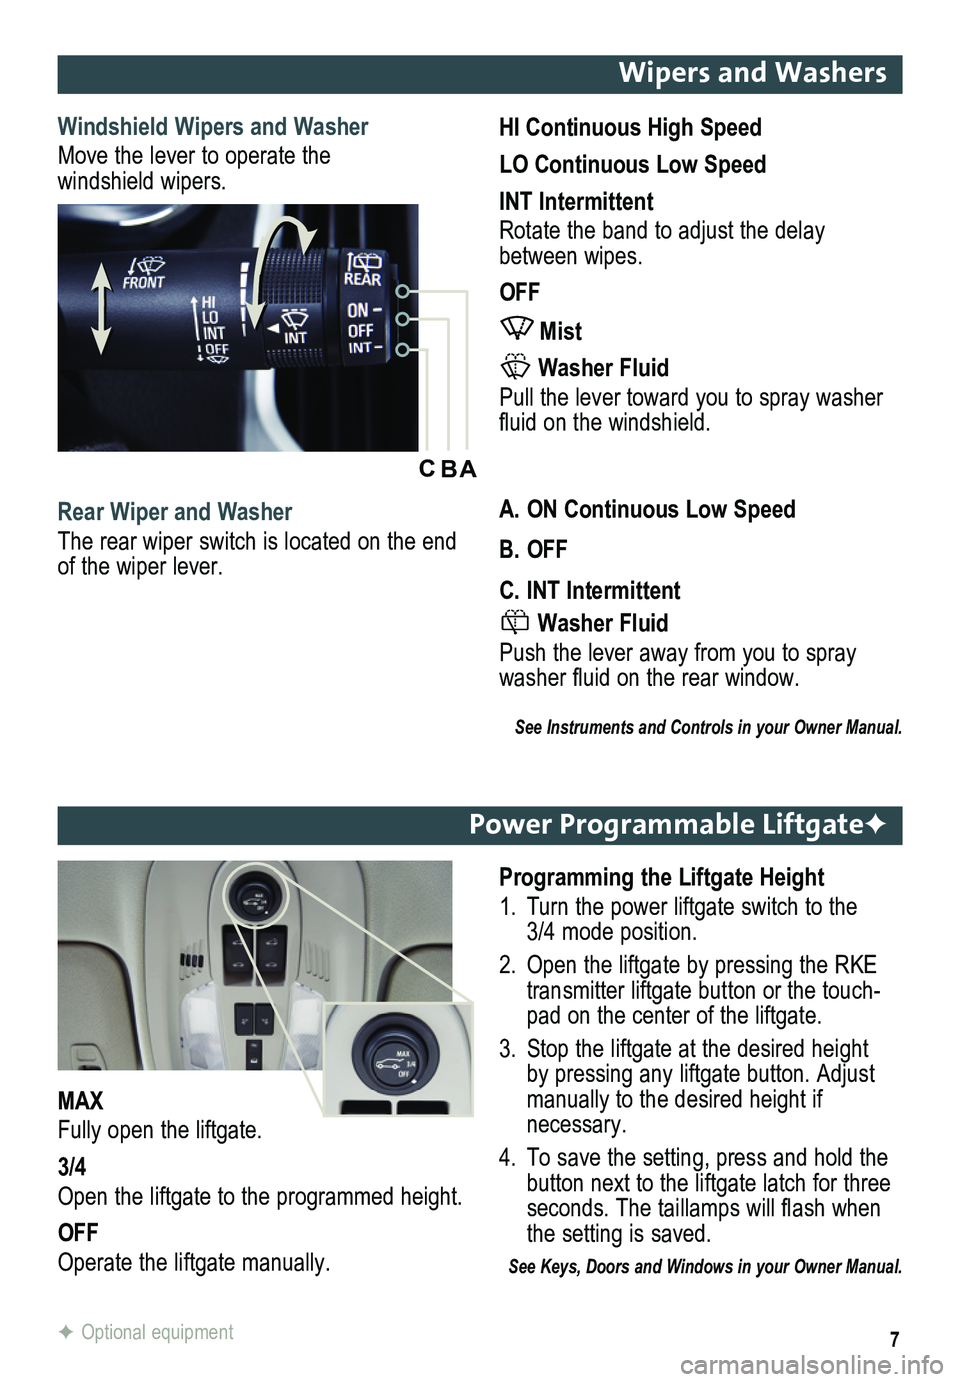
Windshield Wipers and Washer
Move the lever to operate the windshield wipers.
HI Continuous High Speed
LO Continuous Low Speed
INT Intermittent
Rotate the band to adjust the delay between wipes.
OFF
Mist
Washer Fluid
Pull the lever toward you to spray washer fluid on the windshield.
Rear Wiper and Washer
The rear wiper switch is located on the end of the wiper lever.
A. ON Continuous Low Speed
B. OFF
C. INT Intermittent
Washer Fluid
Push the lever away from you to spray washer fluid on the rear window.
See Instruments and Controls in your Owner Manual.
ABC
Power Programmable LiftgateF
Programming the Liftgate Height
1. Turn the power liftgate switch to the 3/4 mode position.
2. Open the liftgate by pressing the RKE transmitter liftgate button or the touch-pad on the center of the liftgate.
3. Stop the liftgate at the desired height by pressing any liftgate button. Adjust manually to the desired height if necessary.
4. To save the setting, press and hold the button next to the liftgate latch for three seconds. The taillamps will flash when the setting is saved.
See Keys, Doors and Windows in your Owner Manual.
MAX
Fully open the liftgate.
3/4
Open the liftgate to the programmed height.
OFF
Operate the liftgate manually.
F Optional equipment
Page 15 of 20
15
Passenger Presence System
The passenger’s frontal airbag On indicator located on the overhead c\
onsole may illuminate if an object, such as a handbag, briefcase, notebook computer or other elec\
tronic device, is on the unoccupied front seat. If this is not desired, remove the object fro\
m the seat.
See Seats and Restraints in your Owner Manual.
Wind Noise
If a rear window is open, there may be a buffeting wind noise inside the\
vehicle. Opening a front window slightly when a rear window is open will prevent this noise from occurring.
See Keys, Doors and Windows in your Owner Manual.
Accessory Power Outlets
There are four accessory power outlets in the vehicle — located below\
the audio system, inside the center console, on the rear of the center console, and in the\
rear cargo area. All of the outlets except the rear cargo area outlet are not powered when the v\
ehicle is off to avoid draining the battery. Always unplug electrical equipment when not in use\
.
See Instruments and Controls in your Owner Manual.
Parking Brake
To set the parking brake, hold down the regular brake pedal; then push d\
own the
parking brake pedal.
To release the parking brake, hold down the regular brake pedal; then pu\
sh down the parking brake pedal until you feel the pedal release.
See Driving and Operating in your Owner Manual.
Page 17 of 20
17
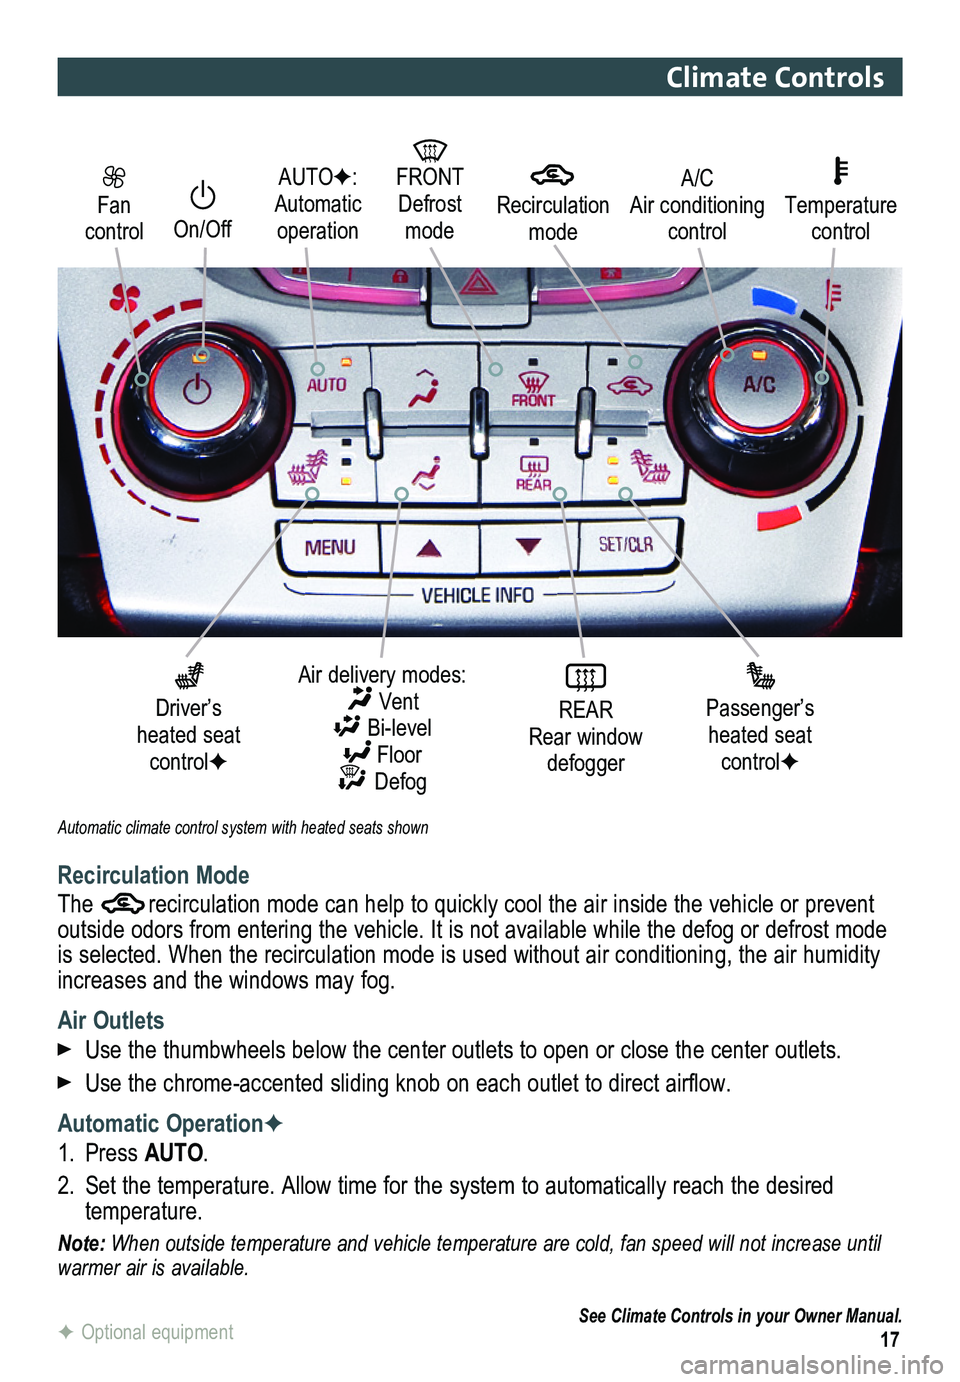
Fan control
On/Off
AUTOF: Automatic operation
FRONT Defrost mode
Driver’s heated seat controlF
Air delivery modes: Vent Bi-level Floor Defog
REAR Rear window defogger
Passenger’s heated seat controlF
Automatic climate control system with heated seats shown
A/C Air conditioning control
Temperature control
Climate Controls
Recirculation Mode
The recirculation mode can help to quickly cool the air inside the vehicle or prevent outside odors from entering the vehicle. It is not available while the defog or defrost mode is selected. When the recirculation mode is used without air conditioning, the air humidity increases and the windows may fog.
Air Outlets
Use the thumbwheels below the center outlets to open or close the center\
outlets.
Use the chrome-accented sliding knob on each outlet to direct airflow.
Automatic OperationF
1. Press AUTO.
2. Set the temperature. Allow time for the system to automatically reach the desired temperature.
Note: When outside temperature and vehicle temperature are cold, fan speed will not increase until warmer air is available.
See Climate Controls in your Owner Manual.
Recirculation mode
F Optional equipment