Engine GMC TERRAIN 2017 Owners Manual
[x] Cancel search | Manufacturer: GMC, Model Year: 2017, Model line: TERRAIN, Model: GMC TERRAIN 2017Pages: 330, PDF Size: 4.54 MB
Page 241 of 330
GMC Terrain/Terrain Denali Owner Manual (GMNA-Localizing-U.S./Canada/
Mexico-9919509) - 2017 - crc - 8/16/16
240 Vehicle Care
Tire Designations
Tire Size
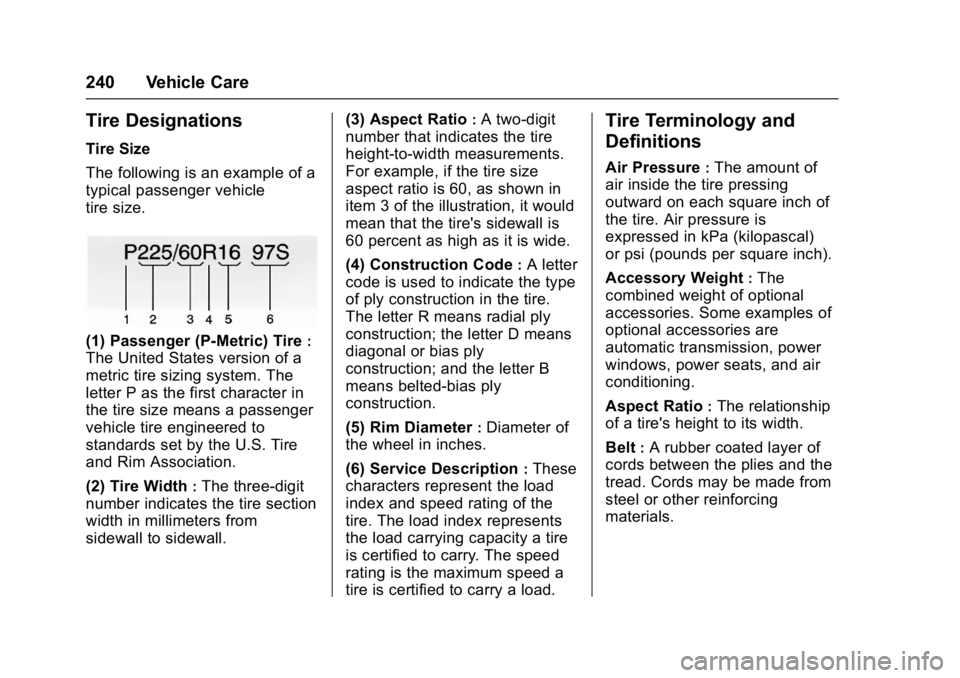
The following is an example of a
typical passenger vehicle
tire size.
(1) Passenger (P-Metric) Tire:
The United States version of a
metric tire sizing system. The
letter P as the first character in
the tire size means a passenger
vehicle tire engineered to
standards set by the U.S. Tire
and Rim Association.
(2) Tire Width
:The three-digit
number indicates the tire section
width in millimeters from
sidewall to sidewall. (3) Aspect Ratio
:A two-digit
number that indicates the tire
height-to-width measurements.
For example, if the tire size
aspect ratio is 60, as shown in
item 3 of the illustration, it would
mean that the tire's sidewall is
60 percent as high as it is wide.
(4) Construction Code
:A letter
code is used to indicate the type
of ply construction in the tire.
The letter R means radial ply
construction; the letter D means
diagonal or bias ply
construction; and the letter B
means belted-bias ply
construction.
(5) Rim Diameter
:Diameter of
the wheel in inches.
(6) Service Description
:These
characters represent the load
index and speed rating of the
tire. The load index represents
the load carrying capacity a tire
is certified to carry. The speed
rating is the maximum speed a
tire is certified to carry a load.
Tire Terminology and
Definitions
Air Pressure:The amount of
air inside the tire pressing
outward on each square inch of
the tire. Air pressure is
expressed in kPa (kilopascal)
or psi (pounds per square inch).
Accessory Weight
:The
combined weight of optional
accessories. Some examples of
optional accessories are
automatic transmission, power
windows, power seats, and air
conditioning.
Aspect Ratio
:The relationship
of a tire's height to its width.
Belt
:A rubber coated layer of
cords between the plies and the
tread. Cords may be made from
steel or other reinforcing
materials.
Page 248 of 330
GMC Terrain/Terrain Denali Owner Manual (GMNA-Localizing-U.S./Canada/
Mexico-9919509) - 2017 - crc - 8/16/16
Vehicle Care 247
installed and the sensor
matching process is performed
successfully. See your dealer for
service.
. Replacement tires or wheels do
not match the original equipment
tires or wheels. Tires and wheels
other than those recommended
could prevent the TPMS from
functioning properly. See Buying
New Tires 0250.
. Operating electronic devices or
being near facilities using radio
wave frequencies similar to the
TPMS could cause the TPMS
sensors to malfunction.
If the TPMS is not functioning
properly, it cannot detect or signal a
low tire condition. See your dealer
for service if the TPMS malfunction
light and DIC message comes on
and stays on.
TPMS Sensor Matching
Process
Each TPMS sensor has a unique
identification code. The identification
code needs to be matched to a new
tire/wheel position after rotating the tires or replacing one or more of the
TPMS sensors. The TPMS sensor
matching process should also be
performed after replacing a spare
tire with a road tire containing the
TPMS sensor. The malfunction light
and the DIC message should go off
at the next ignition cycle. The
sensors are matched to the tire/
wheel positions, using a TPMS
relearn tool, in the following order:
driver side front tire, passenger side
front tire, passenger side rear tire,
and driver side rear. See your
dealer for service or to purchase a
relearn tool. A TPMS relearn tool
can also be purchased. See Tire
Pressure Monitor Sensor Activation
Tool at
www.gmtoolsandequipment.com or
call 1-800-GM TOOLS
(1-800-468-6657).
There are two minutes to match the
first tire/wheel position, and
five minutes overall to match all four
tire/wheel positions. If it takes
longer, the matching process stops
and must be restarted.
The TPMS sensor matching
process is:
1. Set the parking brake.
2. Turn the ignition to ON/RUN with the engine off.
3. Use the MENU button to select the Vehicle Information Menu
in the Driver Information Center
(DIC). Use the arrow keys to
scroll to the Tire Pressure
screen.
4. Press the SET/CLR button to begin the sensor matching
process.
A message requesting
acceptance of the process
should display.
5. Press the SET/CLR button again to confirm the selection.
The horn sounds twice to
signal the receiver is in relearn
mode and the TIRE
LEARNING ACTIVE message
displays on the DIC screen.
6. Start with the driver side front tire.
Page 257 of 330
GMC Terrain/Terrain Denali Owner Manual (GMNA-Localizing-U.S./Canada/
Mexico-9919509) - 2017 - crc - 8/16/16
256 Vehicle Care
if possible. Turn on the hazard
warning flashers. SeeHazard
Warning Flashers 0137.
{Warning
Changing a tire can be
dangerous. The vehicle can slip
off the jack and roll over or fall
causing injury or death. Find a
level place to change the tire. To
help prevent the vehicle from
moving:
1. Set the parking brake firmly.
2. Put an automatictransmission in P (Park) or a
manual transmission in
1 (First) or R (Reverse).
3. Turn off the engine and do not restart while the vehicle
is raised.
4. Do not allow passengers to remain in the vehicle.
(Continued)
Warning (Continued)
5. Place wheel blocks,if equipped, on both sides of
the tire at the opposite
corner of the tire being
changed.
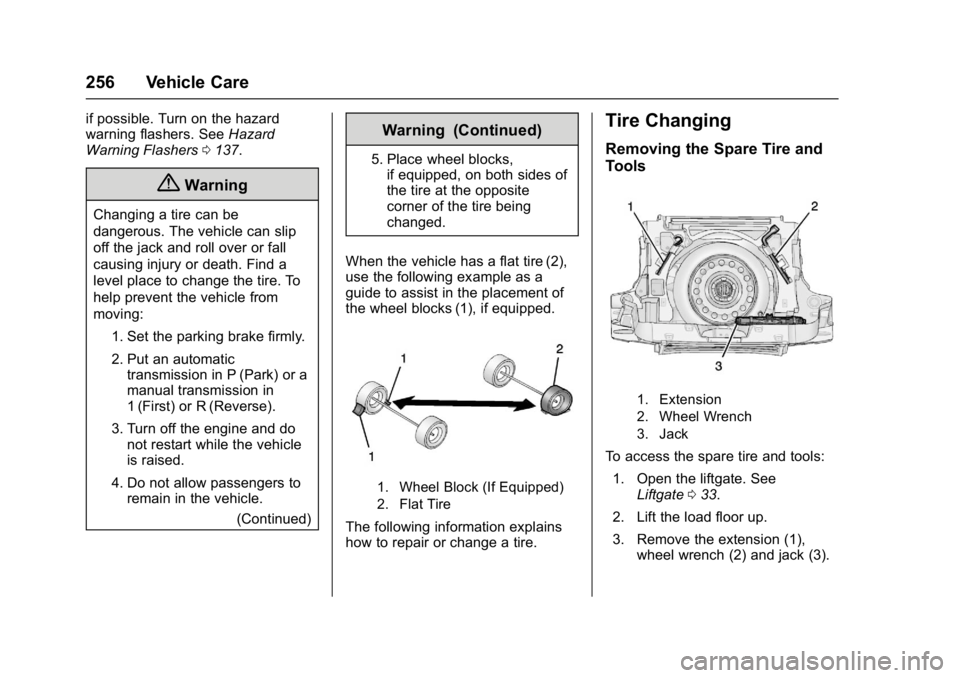
When the vehicle has a flat tire (2),
use the following example as a
guide to assist in the placement of
the wheel blocks (1), if equipped.
1. Wheel Block (If Equipped)
2. Flat Tire
The following information explains
how to repair or change a tire.
Tire Changing
Removing the Spare Tire and
Tools
1. Extension
2. Wheel Wrench
3. Jack
To access the spare tire and tools: 1. Open the liftgate. See Liftgate 033.
2. Lift the load floor up.
3. Remove the extension (1), wheel wrench (2) and jack (3).
Page 266 of 330
GMC Terrain/Terrain Denali Owner Manual (GMNA-Localizing-U.S./Canada/
Mexico-9919509) - 2017 - crc - 8/16/16
Vehicle Care 265
off the radio and all lamps that
are not needed. Turn off the
ignition on both vehicles.
4. Locate the positive (+) and negative (−) terminals on both
vehicles. Some vehicles have
remote jump starting terminals.
{Warning
An electric fan can start up even
when the engine is not running
and can injure you. Keep hands,
clothing, and tools away from any
underhood electric fan.
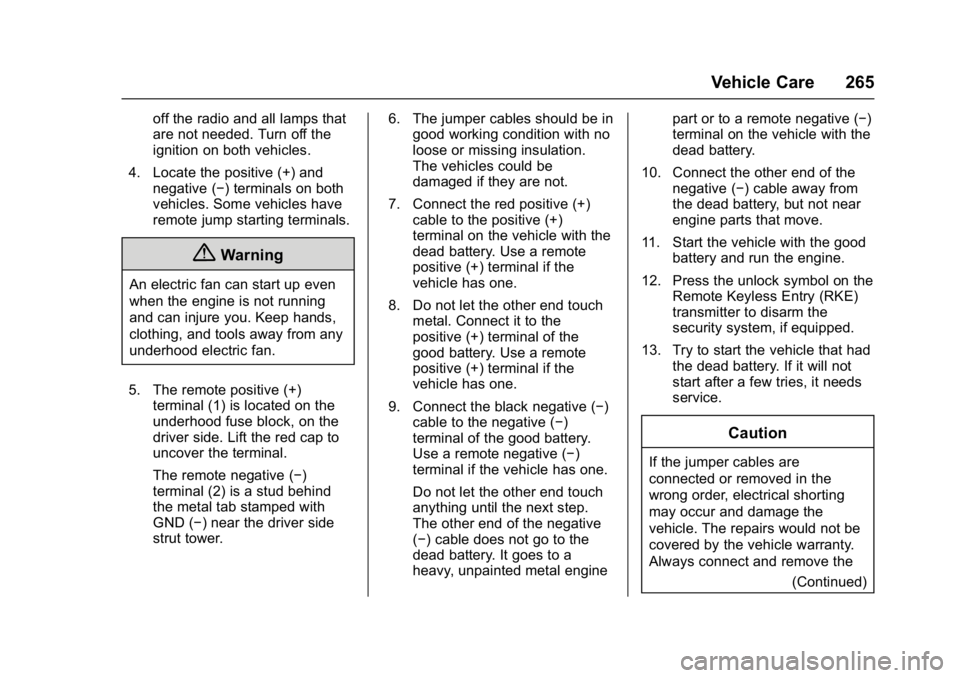
5. The remote positive (+) terminal (1) is located on the
underhood fuse block, on the
driver side. Lift the red cap to
uncover the terminal.
The remote negative (−)
terminal (2) is a stud behind
the metal tab stamped with
GND (−) near the driver side
strut tower. 6. The jumper cables should be in
good working condition with no
loose or missing insulation.
The vehicles could be
damaged if they are not.
7. Connect the red positive (+) cable to the positive (+)
terminal on the vehicle with the
dead battery. Use a remote
positive (+) terminal if the
vehicle has one.
8. Do not let the other end touch metal. Connect it to the
positive (+) terminal of the
good battery. Use a remote
positive (+) terminal if the
vehicle has one.
9. Connect the black negative (−) cable to the negative (−)
terminal of the good battery.
Use a remote negative (−)
terminal if the vehicle has one.
Do not let the other end touch
anything until the next step.
The other end of the negative
(−) cable does not go to the
dead battery. It goes to a
heavy, unpainted metal engine part or to a remote negative (−)
terminal on the vehicle with the
dead battery.
10. Connect the other end of the negative (−) cable away from
the dead battery, but not near
engine parts that move.
11. Start the vehicle with the good battery and run the engine.
12. Press the unlock symbol on the Remote Keyless Entry (RKE)
transmitter to disarm the
security system, if equipped.
13. Try to start the vehicle that had the dead battery. If it will not
start after a few tries, it needs
service.
Caution
If the jumper cables are
connected or removed in the
wrong order, electrical shorting
may occur and damage the
vehicle. The repairs would not be
covered by the vehicle warranty.
Always connect and remove the
(Continued)
Page 269 of 330
GMC Terrain/Terrain Denali Owner Manual (GMNA-Localizing-U.S./Canada/
Mexico-9919509) - 2017 - crc - 8/16/16
268 Vehicle Care
Once the destination is reached:1. Set the parking brake.
2. Shift the transmission to P (Park).
3. Turn the ignition key to LOCK/OFF.
4. Install fuse 32, the Discrete Logic Ignition Switch fuse. See
Instrument Panel Fuse
Block 0234.
5. Start the engine and let it idle for more than three minutes
before driving the vehicle.
Caution
Do not tow a vehicle with the front
drive wheels on the ground if one
of the front tires is a compact
spare tire. Towing with two
different tire sizes on the front of
the vehicle can cause severe
damage to the transmission.
Caution
Use of a shield mounted in front
of the vehicle grille could restrict
airflow and cause damage to the
transmission. The repairs would
not be covered by the vehicle
warranty. If using a shield, only
use one that attaches to the
towing vehicle.
Dolly Towing (All-Wheel-Drive
Vehicles)
All-wheel-drive vehicles should not
be towed with two wheels on the
ground. To properly tow these
vehicles, they should be placed on
a platform trailer with all four wheels
off of the ground or dinghy towed
from the front.
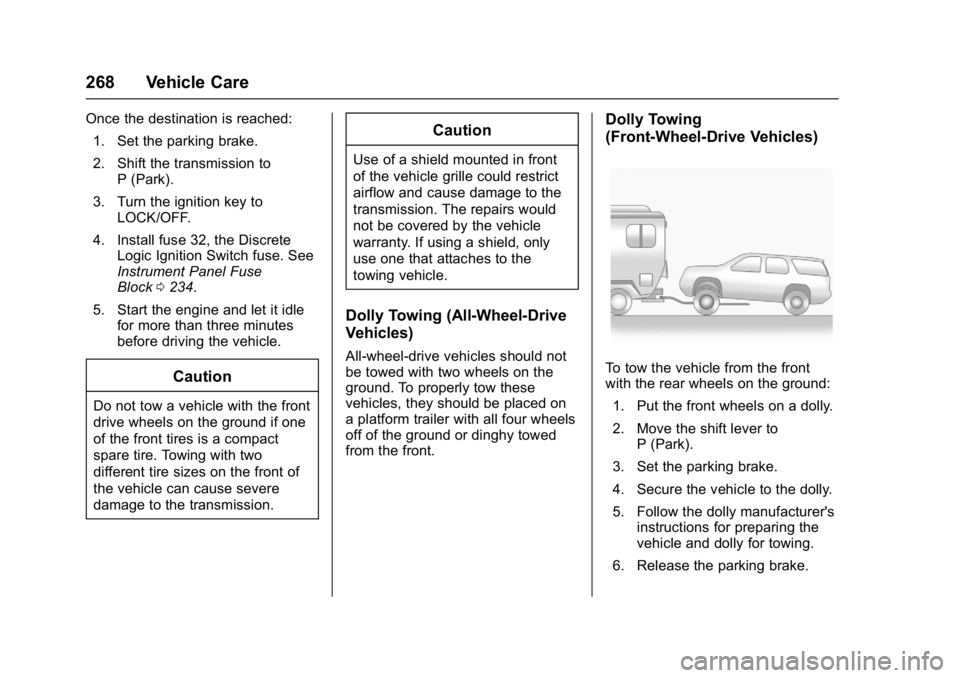
Dolly Towing
(Front-Wheel-Drive Vehicles)
To tow the vehicle from the front
with the rear wheels on the ground:
1. Put the front wheels on a dolly.
2. Move the shift lever to P (Park).
3. Set the parking brake.
4. Secure the vehicle to the dolly.
5. Follow the dolly manufacturer's instructions for preparing the
vehicle and dolly for towing.
6. Release the parking brake.
Page 281 of 330
GMC Terrain/Terrain Denali Owner Manual (GMNA-Localizing-U.S./Canada/
Mexico-9919509) - 2017 - crc - 8/16/16
280 Service and Maintenance
frequent checks and services. The
Additional Required Services -
Normal are for vehicles that:
.Carry passengers and cargo
within recommended limits on
the Tire and Loading Information
label. See Vehicle Load
Limits 0161.
. Are driven on reasonable road
surfaces within legal driving
limits.
. Use the recommended fuel. See
Fuel 0191.
Refer to the information in the
Maintenance Schedule Additional
Required Services - Normal chart.
The Additional Required Services -
Severe are for vehicles that are:
. Mainly driven in heavy city traffic
in hot weather.
. Mainly driven in hilly or
mountainous terrain.
. Frequently towing a trailer.
. Used for high speed or
competitive driving. .
Used for taxi, police, or delivery
service.
Refer to the information in the
Maintenance Schedule Additional
Required Services - Severe chart.
{Warning
Performing maintenance work can
be dangerous and can cause
serious injury. Perform
maintenance work only if the
required information, proper tools,
and equipment are available.
If they are not, see your dealer to
have a trained technician do the
work. See Doing Your Own
Service Work 0204.
Maintenance
Schedule
Owner Checks and Services
At Each Fuel Stop
.
Check the engine oil level. See
Engine Oil 0209.
Once a Month
. Check the tire inflation
pressures. See Tire
Pressure 0243.
. Inspect the tires for wear. See
Tire Inspection 0248.
. Check the windshield washer
fluid level. See Washer
Fluid 0221.
Engine Oil Change
When the CHANGE ENGINE OIL
SOON message displays, have the
engine oil and filter changed within
the next 1 000 km/600 mi. If driven
under the best conditions, the
engine oil life system may not
indicate the need for vehicle service
for up to a year. The engine oil and
filter must be changed at least once
Page 282 of 330
GMC Terrain/Terrain Denali Owner Manual (GMNA-Localizing-U.S./Canada/
Mexico-9919509) - 2017 - crc - 8/16/16
Service and Maintenance 281
a year and the oil life system must
be reset. Your trained dealer
technician can perform this work.
If the engine oil life system is reset
accidentally, service the vehicle
within 5 000 km/3,000 mi since the
last service. Reset the oil life
system when the oil is changed.
SeeEngine Oil Life System 0212.
Tire Rotation and Required
Services Every 12 000 km/
7,500 mi
Rotate the tires, if recommended for
the vehicle, and perform the
following services. See Tire
Rotation 0248.
. Check engine oil level and oil
life percentage. If needed,
change engine oil and filter, and
reset oil life system. See Engine
Oil 0209 andEngine Oil Life
System 0212. .
Check engine coolant level. See
Engine Coolant 0215.
. Check windshield washer fluid
level. See Washer Fluid 0221.
. Visually inspect windshield wiper
blades for wear, cracking,
or contamination. See Exterior
Care 0269. Replace worn or
damaged wiper blades. See
Wiper Blade
Replacement 0225.
. Check tire inflation pressures.
See Tire Pressure 0243.
. Inspect tire wear. See Tire
Inspection 0248.
. Visually check for fluid leaks.
. Inspect engine air cleaner filter.
See Engine Air Cleaner/
Filter 0213.
. Inspect brake system. See
Exterior Care 0269. .
Visually inspect steering,
suspension, and chassis
components for damaged, loose,
or missing parts or signs of
wear. See Exterior Care 0269.
. Check restraint system
components. See Safety System
Check 060.
. Visually inspect fuel system for
damage or leaks.
. Visually inspect exhaust system
and nearby heat shields for
loose or damaged parts.
. Lubricate body components. See
Exterior Care 0269.
. Check starter switch. See Starter
Switch Check 0224.
. Check automatic transmission
shift lock control function. See
Automatic Transmission Shift
Lock Control Function
Check 0224.
Page 284 of 330
GMC Terrain/Terrain Denali Owner Manual (GMNA-Localizing-U.S./Canada/
Mexico-9919509) - 2017 - crc - 8/16/16
Service and Maintenance 283
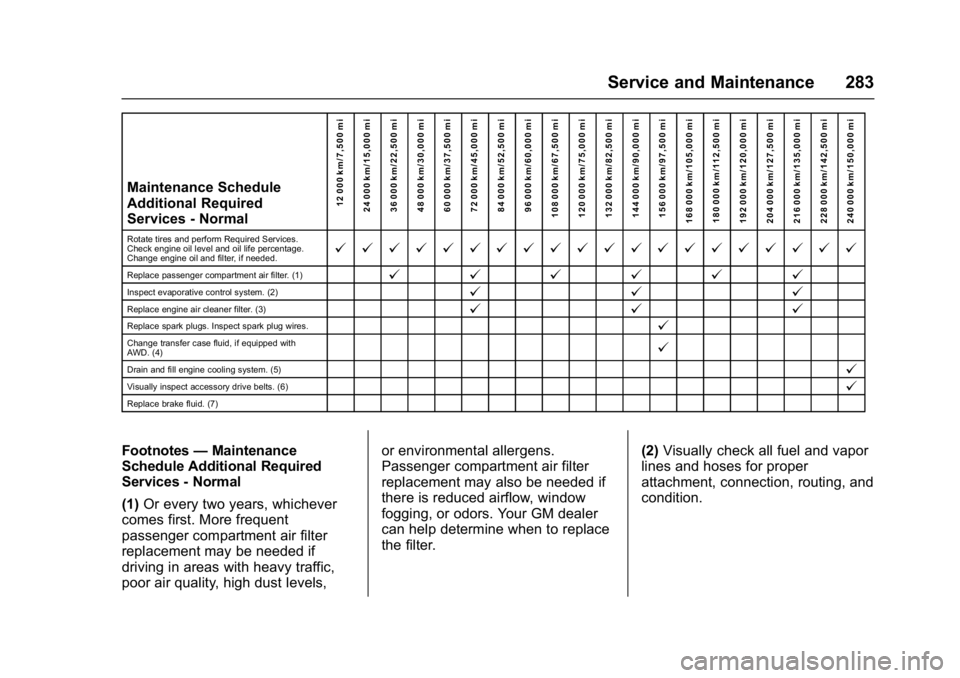
Maintenance Schedule
Additional Required
Services - Normal12 000 km/7,500 mi
24 000 km/15,000 mi
36 000 km/22,500 mi
48 000 km/30,000 mi
60 000 km/37,500 mi
72 000 km/45,000 mi
84 000 km/52,500 mi
96 000 km/60,000 mi
108 000 km/67,500 mi
120 000 km/75,000 mi
132 000 km/82,500 mi
144 000 km/90,000 mi
156 000 km/97,500 mi
168 000 km/105,000 mi 180 000 km/112,500 mi
192 000 km/120,000 mi
204 000 km/127,500 mi
216 000 km/135,000 mi
228 000 km/142,500 mi
240 000 km/150,000 mi
Rotate tires and perform Required Services.
Check engine oil level and oil life percentage.
Change engine oil and filter, if needed.@ @ @ @ @ @ @ @ @ @ @ @ @ @ @ @ @ @ @ @
Replace passenger compartment air filter. (1)@ @@@@@
Inspect evaporative control system. (2)@ @@
Replace engine air cleaner filter. (3)@@@
Replace spark plugs. Inspect spark plug wires.@
Change transfer case fluid, if equipped with
AWD. (4)@
Drain and fill engine cooling system. (5)@
Visually inspect accessory drive belts. (6)@
Replace brake fluid. (7)
Footnotes—Maintenance
Schedule Additional Required
Services - Normal
(1) Or every two years, whichever
comes first. More frequent
passenger compartment air filter
replacement may be needed if
driving in areas with heavy traffic,
poor air quality, high dust levels, or environmental allergens.
Passenger compartment air filter
replacement may also be needed if
there is reduced airflow, window
fogging, or odors. Your GM dealer
can help determine when to replace
the filter.
(2)
Visually check all fuel and vapor
lines and hoses for proper
attachment, connection, routing, and
condition.
Page 286 of 330
GMC Terrain/Terrain Denali Owner Manual (GMNA-Localizing-U.S./Canada/
Mexico-9919509) - 2017 - crc - 8/16/16
Service and Maintenance 285
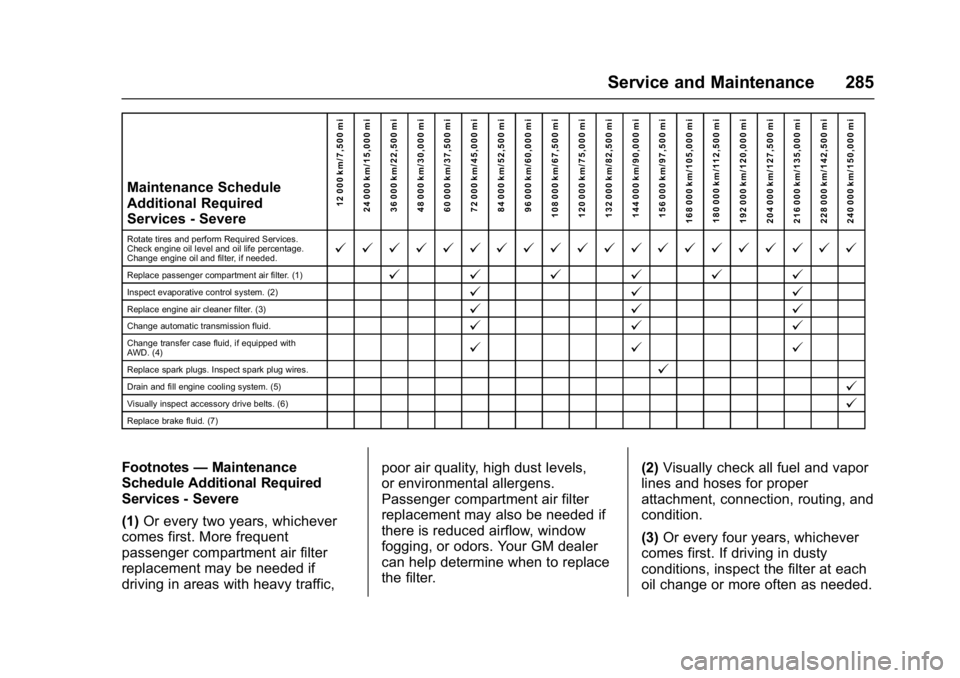
Maintenance Schedule
Additional Required
Services - Severe12 000 km/7,500 mi
24 000 km/15,000 mi
36 000 km/22,500 mi
48 000 km/30,000 mi
60 000 km/37,500 mi
72 000 km/45,000 mi
84 000 km/52,500 mi
96 000 km/60,000 mi
108 000 km/67,500 mi
120 000 km/75,000 mi
132 000 km/82,500 mi
144 000 km/90,000 mi
156 000 km/97,500 mi
168 000 km/105,000 mi 180 000 km/112,500 mi
192 000 km/120,000 mi
204 000 km/127,500 mi
216 000 km/135,000 mi
228 000 km/142,500 mi
240 000 km/150,000 mi
Rotate tires and perform Required Services.
Check engine oil level and oil life percentage.
Change engine oil and filter, if needed.@ @ @ @ @ @ @ @ @ @ @ @ @ @ @ @ @ @ @ @
Replace passenger compartment air filter. (1)@ @@@@@
Inspect evaporative control system. (2)@ @@
Replace engine air cleaner filter. (3)@@@
Change automatic transmission fluid.@@@
Change transfer case fluid, if equipped with
AWD. (4)@@@
Replace spark plugs. Inspect spark plug wires.@
Drain and fill engine cooling system. (5)@
Visually inspect accessory drive belts. (6)@
Replace brake fluid. (7)
Footnotes—Maintenance
Schedule Additional Required
Services - Severe
(1) Or every two years, whichever
comes first. More frequent
passenger compartment air filter
replacement may be needed if
driving in areas with heavy traffic, poor air quality, high dust levels,
or environmental allergens.
Passenger compartment air filter
replacement may also be needed if
there is reduced airflow, window
fogging, or odors. Your GM dealer
can help determine when to replace
the filter.
(2)
Visually check all fuel and vapor
lines and hoses for proper
attachment, connection, routing, and
condition.
(3) Or every four years, whichever
comes first. If driving in dusty
conditions, inspect the filter at each
oil change or more often as needed.
Page 287 of 330

GMC Terrain/Terrain Denali Owner Manual (GMNA-Localizing-U.S./Canada/
Mexico-9919509) - 2017 - crc - 8/16/16
286 Service and Maintenance
(4)Do not directly power wash the
transfer case and/or front/rear axle
output seals. High pressure water
can overcome the seals and
contaminate the fluid. Contaminated
fluid will decrease the life of the
transfer case and/or drive axles and
should be replaced.
(5) Or every five years, whichever
comes first. See Cooling
System 0214.
(6) Or every 10 years, whichever
comes first. Inspect for fraying,
excessive cracking, or damage;
replace, if needed.
(7) Replace brake fluid every five
years. See Brake Fluid 0222.Special Application
Services
.
Severe Commercial Use
Vehicles Only: Lubricate chassis
components every oil change.
. Have underbody flushing service
performed. See "Underbody
Maintenance" in Exterior
Care 0269.
Additional
Maintenance and Care
Your vehicle is an important
investment and caring for it properly
may help to avoid future costly
repairs. To maintain vehicle
performance, additional
maintenance services may be
required.
It is recommended that your dealer
perform these services —their
trained dealer technicians know
your vehicle best. Your dealer can
also perform a thorough
assessment with a multi-point
inspection to recommend when your
vehicle may need attention.
The following list is intended to
explain the services and conditions
to look for that may indicate
services are required.
Battery
The 12-volt battery supplies power
to start the engine and operate any
additional electrical accessories.