window GMC TERRAIN 2017 Owner's Guide
[x] Cancel search | Manufacturer: GMC, Model Year: 2017, Model line: TERRAIN, Model: GMC TERRAIN 2017Pages: 330, PDF Size: 4.54 MB
Page 67 of 330
GMC Terrain/Terrain Denali Owner Manual (GMNA-Localizing-U.S./Canada/
Mexico-9919509) - 2017 - crc - 8/16/16
66 Seats and Restraints
For airbag locations, seeWhere Are
the Airbags? 063.
How Does an Airbag
Restrain?
In moderate to severe frontal or
near frontal collisions, even belted
occupants can contact the steering
wheel or the instrument panel. In
moderate to severe side collisions,
even belted occupants can contact
the inside of the vehicle.
Airbags supplement the protection
provided by safety belts by
distributing the force of the impact
more evenly over the
occupant's body.
Rollover capable roof-rail airbags
are designed to help contain the
head and chest of occupants in the
outboard seating positions in the
first and second rows. The rollover
capable roof-rail airbags are
designed to help reduce the risk of
full or partial ejection in rollover
events, although no system can
prevent all such ejections. But airbags would not help in many
types of collisions, primarily
because the occupant's motion is
not toward those airbags. See
When
Should an Airbag Inflate? 065.
Airbags should never be regarded
as anything more than a supplement
to safety belts.
What Will You See after
an Airbag Inflates?
After the frontal airbags and
seat-mounted side impact airbags
inflate, they quickly deflate, so
quickly that some people may not
even realize an airbag inflated.
Roof-rail airbags may still be at least
partially inflated for some time after
they inflate. Some components of
the airbag module may be hot for
several minutes. For location of the
airbags, see Where Are the
Airbags? 063.
The parts of the airbag that come
into contact with you may be warm,
but not too hot to touch. There may
be some smoke and dust coming
from the vents in the deflated
airbags. Airbag inflation does not prevent the driver from seeing out of
the windshield or being able to steer
the vehicle, nor does it prevent
people from leaving the vehicle.
{Warning
When an airbag inflates, there
may be dust in the air. This dust
could cause breathing problems
for people with a history of
asthma or other breathing trouble.
To avoid this, everyone in the
vehicle should get out as soon as
it is safe to do so. If you have
breathing problems but cannot
get out of the vehicle after an
airbag inflates, then get fresh air
by opening a window or a door.
If you experience breathing
problems following an airbag
deployment, you should seek
medical attention.
The vehicle has a feature that may
automatically unlock the doors, turn
on the interior lamps and hazard
warning flashers, and shut off the
fuel system after the airbags inflate.
Page 97 of 330
GMC Terrain/Terrain Denali Owner Manual (GMNA-Localizing-U.S./Canada/
Mexico-9919509) - 2017 - crc - 8/16/16
96 Instruments and Controls
Instruments and
Controls
Controls
Steering Wheel Adjustment . . . . 97
Steering Wheel Controls . . . . . . . 97
Horn . . . . . . . . . . . . . . . . . . . . . . . . . . . 97
Windshield Wiper/Washer . . . . . . 97
Rear Window Wiper/Washer . . . 98
Compass . . . . . . . . . . . . . . . . . . . . . . 99
Clock . . . . . . . . . . . . . . . . . . . . . . . . . . 99
Power Outlets . . . . . . . . . . . . . . . . 100
Warning Lights, Gauges, and
Indicators
Warning Lights, Gauges, andIndicators . . . . . . . . . . . . . . . . . . . 101
Instrument Cluster . . . . . . . . . . . . 102
Speedometer . . . . . . . . . . . . . . . . . 103
Odometer . . . . . . . . . . . . . . . . . . . . . 103
Tachometer . . . . . . . . . . . . . . . . . . . 103
Fuel Gauge . . . . . . . . . . . . . . . . . . . 103
Engine Coolant Temperature Gauge . . . . . . . . . . . . . . . . . . . . . . 104
Safety Belt Reminders . . . . . . . . 105
Airbag Readiness Light . . . . . . . 105
Passenger Airbag Status Indicator . . . . . . . . . . . . . . . . . . . . 106
Charging System Light . . . . . . . 107 Malfunction Indicator Lamp
(Check Engine Light) . . . . . . . . 107
Brake System Warning Light . . . . . . . . . . . . . . . . . . . . . . . . 109
Antilock Brake System (ABS)
Warning Light . . . . . . . . . . . . . . . 110
Lane Departure Warning (LDW) Light . . . . . . . . . . . . . . . . . 110
Forward Collision Alert (FCA) Warning Light . . . . . . . . . . . . . . . 110
Vehicle Ahead Indicator . . . . . . . 111
Traction Off Light . . . . . . . . . . . . . 111
StabiliTrak
®OFF Light . . . . . . . . 111
Traction Control System (TCS)/ StabiliTrak
®Light . . . . . . . . . . . . 111
Tire Pressure Light . . . . . . . . . . . 112
Engine Oil Pressure Light . . . . . 112
Fuel Economy Light . . . . . . . . . . 113
Low Fuel Warning Light . . . . . . . 113
Security Light . . . . . . . . . . . . . . . . . 114
High-Beam On Light . . . . . . . . . . 114
Lamps On Reminder . . . . . . . . . . 114
Cruise Control Light . . . . . . . . . . 114
Information Displays
Driver Information Center (DIC) . . . . . . . . . . . . . . . . 115
Vehicle Messages
Vehicle Messages . . . . . . . . . . . . 118 Battery Voltage and Charging
Messages . . . . . . . . . . . . . . . . . . . 118
Brake System Messages . . . . . 119
Compass Messages . . . . . . . . . . 119
Cruise Control Messages . . . . . 119
Door Ajar Messages . . . . . . . . . . 119
Engine Cooling System Messages . . . . . . . . . . . . . . . . . . . 119
Engine Oil Messages . . . . . . . . . 120
Engine Power Messages . . . . . 121
Fuel System Messages . . . . . . . 121
Key and Lock Messages . . . . . 121
Object Detection System Messages . . . . . . . . . . . . . . . . . . . 121
Ride Control System Messages . . . . . . . . . . . . . . . . . . . 122
Airbag System Messages . . . . 123
Security Messages . . . . . . . . . . . 123
Service Vehicle Messages . . . . 123
Tire Messages . . . . . . . . . . . . . . . . 124
Transmission Messages . . . . . . 124
Vehicle Reminder Messages . . . . . . . . . . . . . . . . . . . 124
Vehicle Personalization
Vehicle Personalization . . . . . . . 125
Page 99 of 330

GMC Terrain/Terrain Denali Owner Manual (GMNA-Localizing-U.S./Canada/
Mexico-9919509) - 2017 - crc - 8/16/16
98 Instruments and Controls
INT :Move the lever up to INT for
intermittent wipes, then turn the
3INT band up for more frequent
wipes or down for less frequent
wipes.
OFF : Use to turn the wipers off.
1X : For a single wipe, briefly move
the wiper lever down. For several
wipes, hold the wiper lever down.
n LFRONT : Pull the windshield
wiper lever toward you to spray
windshield washer fluid and activate
the wipers. The wipers will continue
until the lever is released or the
maximum wash time is reached.
When the windshield wiper lever is
released, additional wipes may
occur depending on how long the
windshield washer had been
activated. See Washer Fluid0221
for information on filling the
windshield washer fluid reservoir.
{Warning
In freezing weather, do not use
the washer until the windshield is
warmed. Otherwise the washer
fluid can form ice on the
windshield, blocking your vision.
Clear snow and ice from the wiper
blades before using them. If frozen
to the windshield, carefully loosen or
thaw them. Damaged blades should
be replaced. See Wiper Blade
Replacement 0225.
Heavy snow or ice can overload the
wiper motor.
Wiper Parking
If the ignition is turned to LOCK/
OFF while the wipers are on LO, HI,
or INT, they will immediately stop.
If the windshield wiper lever is then
moved to OFF before the driver
door is opened or within 10 minutes,
the wipers will restart and move to
the base of the windshield. If the ignition is turned to LOCK/
OFF while the wipers are performing
wipes due to windshield washing,
the wipers continue to run until they
reach the base of the windshield.
Rear Window Wiper/
Washer
The rear wiper controls are on the
end of the windshield wiper lever.
ON :
Press the upper portion of the
button for continuous rear window
wipes.
OFF : The rear wiper turns off when
the button is returned to the middle
position.
INT : Press the lower portion of the
button to set a delay between
wipes.
Page 100 of 330
GMC Terrain/Terrain Denali Owner Manual (GMNA-Localizing-U.S./Canada/
Mexico-9919509) - 2017 - crc - 8/16/16
Instruments and Controls 99
a:Push the windshield wiper lever
forward to spray washer fluid on the
rear window. The lever returns to its
starting position when released.
Rear Wiper Arm Assembly
Protection
When using an automatic car wash,
move the rear wiper control to OFF.
This disables the rear wiper.
If the transmission is in N (Neutral)
and the vehicle speed is very slow,
the rear wiper will automatically stop
at the base of the rear window.
The wiper operations return to
normal when the transmission is no
longer in N (Neutral) or the vehicle
speed has increased.
The windshield washer reservoir is
used for the windshield and the rear
window. Check the fluid level in the
reservoir if either washer is not
working. See Washer Fluid 0221.Compass
The vehicle may have a compass
display in the Driver Information
Center (DIC). The compass receives
its heading and other information
from the Global Positioning
System (GPS) antenna, StabiliTrak,
and vehicle speed information.
Avoid covering the GPS antenna,
located on the roof, for long periods
of time with objects that may
interfere with the antenna's ability to
receive a satellite signal. The
compass system is designed to
operate for a certain number of
miles or degrees of turn before
needing a signal from the GPS
satellites. When the compass
display shows CAL, drive the
vehicle for a short distance in an
open area where it can receive a
GPS signal. The compass system
will automatically determine when
the GPS signal is restored and
provide a heading again.
Clock
The infotainment system controls
are used to access the time and
date settings through the menu
system. See “Using the System” in
the infotainment manual.
Setting the Clock Using the
Faceplate
To set the time and date:
1. Turn the infotainment system on.
2. Press the CONFIG button and select Time and Date, or press
the
Hbutton.
3. Select Set Time or Set Date.
4. Turn the MENU/SEL knob to adjust the highlighted value.
5. Press the MENU/SEL knob to select the next value.
6. To save the settings and return to the Time and Date menu,
press
EBACK.
To set the 12/24 hour format: 1. Turn the infotainment system on.
Page 127 of 330

GMC Terrain/Terrain Denali Owner Manual (GMNA-Localizing-U.S./Canada/
Mexico-9919509) - 2017 - crc - 8/16/16
126 Instruments and Controls
.Software Versions Menu
Auto Volume
This feature adjusts the volume to
minimize the effects of unwanted
background noise that can result
from changing road surfaces, driving
speeds, or open windows. This
feature works best at lower volume
settings where background noise is
typically louder than the sound
system volume.
Select Off, Low, Medium, or High.
Gracenote Options
Select and the following may
display:
. Normalization
Normalization
This feature improves voice
recognition and media groupings.
See “USB,” “Auxiliary Devices,” and
“Bluetooth Audio” in the infotainment
manual.
Select to enable or disable. XM Channel Art
This feature turns the XM Audio
page background on the XM
Channel display on and off.
Select to enable or disable.
Max Startup Volume
This feature sets the maximum
startup volume. If the vehicle is
started and the volume is greater
than this level, the volume is
adjusted to this level.
Select + or
−to increase or
decrease the volume.
Number of Favorites Pages
Select to set the number of favorites
to display.
Select the desired number.
XM Categories
This allows which available XM
Categories are used and displayed.
Press to enable or disable available
categories. Software Versions Menu
Select to display information about
the system and update software if
available.
Phone Settings
Select and the following may
display:
.
Bluetooth
. Sort Order
Bluetooth
Select and the following may
display:
. Device List
. Pair Device
Device List
Select to connect to a different
phone source, disconnect a phone,
or delete a phone.
Pair Device
Select to pair a new device. See
“Pairing a Phone/Device” under
“Bluetooth” in the infotainment
manual.
Page 130 of 330
GMC Terrain/Terrain Denali Owner Manual (GMNA-Localizing-U.S./Canada/
Mexico-9919509) - 2017 - crc - 8/16/16
Instruments and Controls 129
Auto Defog
When turned on and high humidity
is detected, the climate control
system may adjust to outside air
supply and turn on the air
conditioner or the heater. The fan
speed may slightly increase to help
prevent fogging. When high
humidity is no longer detected, the
system will return to its prior
operation.
Select On or Off.
Auto Rear Defog
When on, this feature turns on the
rear defogger at vehicle start when
the interior temperature is cold and
fog is likely. The auto rear defog
function can be disabled by
pressing
1REAR. When off, the
feature can be turned on by
pressing
1REAR. See “Rear
Window Defogger” underClimate
Control Systems 0142 orAutomatic
Climate Control System 0144.
Select On or Off.
Comfort and Convenience
Select and the following may
display:
. Easy Exit Driver Seat
. Chime Volume
. Reverse Tilt Mirror
. Memory Remote Recall
. Button Chime
Easy Exit Driver Seat
This feature moves the seat
rearward allowing the driver more
room to exit the vehicle. See “Easy
Exit Driver Seat” underMemory
Seats 050.
Select On or Off.
Chime Volume
This allows the selection of the
chime volume level.
Select Low or High.
Reverse Tilt Mirror
When on, both the driver and
passenger mirrors will tilt downward
when the vehicle is shifted to
R (Reverse) to improve visibility of the ground near the rear wheels.
They will return to their previous
driving position when the vehicle is
shifted out of R (Reverse), the
ignition is turned to OFF, or the
vehicle is left in R (Reverse). See
Reverse Tilt Mirrors
040.
Select On or Off.
Memory Remote Recall
This feature automatically recalls
the current driver ’s previously stored
1 or 2 button positions when
entering the vehicle. See "Recalling
RKE Memory Positions (Memory
Remote Recall)" under Memory
Seats 050.
Select On or Off.
Button Chime
When enabled, a sound will be
heard when a selection is made
using the infotainment system.
Select to enable or disable.
Page 140 of 330
GMC Terrain/Terrain Denali Owner Manual (GMNA-Localizing-U.S./Canada/
Mexico-9919509) - 2017 - crc - 8/16/16
Lighting 139
Lighting Features
Entry Lighting
Some exterior lamps and interior
lamps turn on briefly at night, or in
areas with limited lighting, when
K
is pressed on the Remote Keyless
Entry (RKE) transmitter. When a
door is opened, the interior lamps
come on. They stay on for about
20 seconds. When all of the doors
have been closed or the ignition is
turned to ON/RUN, they gradually
fade out.
This feature can be changed. See
“Vehicle Locator Lights”under
Vehicle Personalization 0125.
Exit Lighting
Some exterior lamps and interior
lamps come on at night, or in areas
with limited lighting, when the key is
removed from the ignition. The
dome lamp comes on after the
ignition is changed to the OFF
position. The exterior lamps and dome lamp remain on for a set
amount of time, then automatically
turn off.
The exterior lamps turn off
immediately by turning the exterior
lamp control off.
This feature can be changed. See
Vehicle Personalization
0125.
Battery Load
Management
The vehicle has Electric Power
Management (EPM) that estimates
the battery's temperature and state
of charge. It then adjusts the voltage
for best performance and extended
life of the battery.
When the battery's state of charge
is low, the voltage is raised slightly
to quickly bring the charge back up.
When the state of charge is high,
the voltage is lowered slightly to
prevent overcharging. If the vehicle
has a voltmeter gauge or a voltage
display on the Driver Information
Center (DIC), you may see the voltage move up or down. This is
normal. If there is a problem, an
alert will be displayed.
The battery can be discharged at
idle if the electrical loads are very
high. This is true for all vehicles.
This is because the generator
(alternator) may not be spinning fast
enough at idle to produce all of the
power needed for very high
electrical loads.
A high electrical load occurs when
several of the following are on, such
as: headlamps, high beams, rear
window defogger, climate control fan
at high speed, heated seats, engine
cooling fans, trailer loads, and loads
plugged into accessory power
outlets.
EPM works to prevent excessive
discharge of the battery. It does this
by balancing the generator's output
and the vehicle's electrical needs.
It can increase engine idle speed to
generate more power whenever
needed. It can temporarily reduce
the power demands of some
accessories.
Page 143 of 330
GMC Terrain/Terrain Denali Owner Manual (GMNA-Localizing-U.S./Canada/
Mexico-9919509) - 2017 - crc - 8/16/16
142 Climate Controls
Climate Controls
Climate Control Systems
Climate Control Systems . . . . . 142
Automatic Climate ControlSystem . . . . . . . . . . . . . . . . . . . . . . 144
Air Vents
Air Vents . . . . . . . . . . . . . . . . . . . . . 147
Maintenance
Passenger Compartment AirFilter . . . . . . . . . . . . . . . . . . . . . . . . 147
Service . . . . . . . . . . . . . . . . . . . . . . . 148
Climate Control Systems
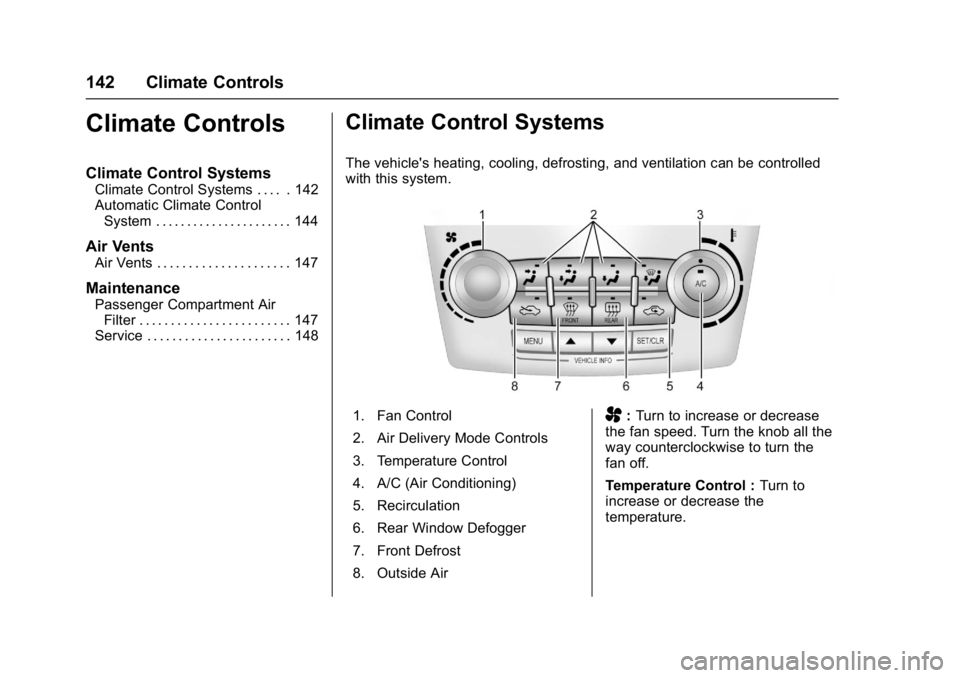
The vehicle's heating, cooling, defrosting, and ventilation can be controlled
with this system.
1. Fan Control
2. Air Delivery Mode Controls
3. Temperature Control
4. A/C (Air Conditioning)
5. Recirculation
6. Rear Window Defogger
7. Front Defrost
8. Outside AirA: Turn to increase or decrease
the fan speed. Turn the knob all the
way counterclockwise to turn the
fan off.
Temperature Control : Turn to
increase or decrease the
temperature.
Page 144 of 330
GMC Terrain/Terrain Denali Owner Manual (GMNA-Localizing-U.S./Canada/
Mexico-9919509) - 2017 - crc - 8/16/16
Climate Controls 143
Air Delivery Mode Control :To
change the current mode, select
one of the following:
F :Air is directed to the instrument
panel outlets.
* :Air is directed to the instrument
panel outlets and the floor outlets.
7 :Air is directed to the floor outlets
with some air directed to the
windshield and the side window
outlets.
W: Clears the windows of fog or
moisture. Air is directed to the
windshield with some air directed to
the floor and side window outlets.
0FRONT : Press to clear the
windshield of fog or frost more
quickly. Air is directed to the
windshield and side window outlets.
The system allows outside air into
the vehicle and the air conditioning
compressor will run, unless the
outside temperature is below
freezing.
For best results, clear all snow and
ice from the windshield before
defrosting. Do not drive the vehicle until all the
windows are clear.
If equipped with the Fuel Economy
Mode, the climate controls may take
longer to heat or cool the cabin and
the rear window defogger will turn
off sooner, when this feature is in
use. See
Fuel Economy
Mode 0174.
Air Conditioning
A/C : Press to turn the air
conditioning on or off. An indicator
light comes on to show that the air
conditioning is enabled. If the fan is
turned off, the air conditioner will not
run. The A/C light will stay on even
if the outside temperature is below
freezing.
h: Press to turn on the
recirculation. An indicator light
comes on. Air is recirculated inside
the vehicle. It helps to quickly cool
the air inside the vehicle and reduce
the outside air and odor that might
enter. The air conditioning may
come on under certain conditions. To improve fuel efficiency and to
cool the vehicle faster, recirculation
may be automatically selected in
warm weather. The recirculation
light will not come on. To override
this feature, select outside air.
%:
Press to turn on the outside
air. An indicator light comes on.
Outside air is circulated throughout
the vehicle.
Rear Window Defogger
1REAR : Press to turn the rear
window defogger on or off. An
indicator light on the button comes
on to show that the rear window
defogger is on. It turns off if the
ignition is put in the ACC/
ACCESSORY or LOCK/OFF
position.
The ignition must be on to use the
rear window defogger.
Do not drive the vehicle until all the
windows are clear.
Page 145 of 330
GMC Terrain/Terrain Denali Owner Manual (GMNA-Localizing-U.S./Canada/
Mexico-9919509) - 2017 - crc - 8/16/16
144 Climate Controls
Caution
Do not use a razor blade or sharp
object to clear the inside rear
window. Do not adhere anything
to the defogger grid lines in the
rear glass. These actions may
damage the rear defogger.
Repairs would not be covered by
the vehicle warranty.
Automatic Climate Control System
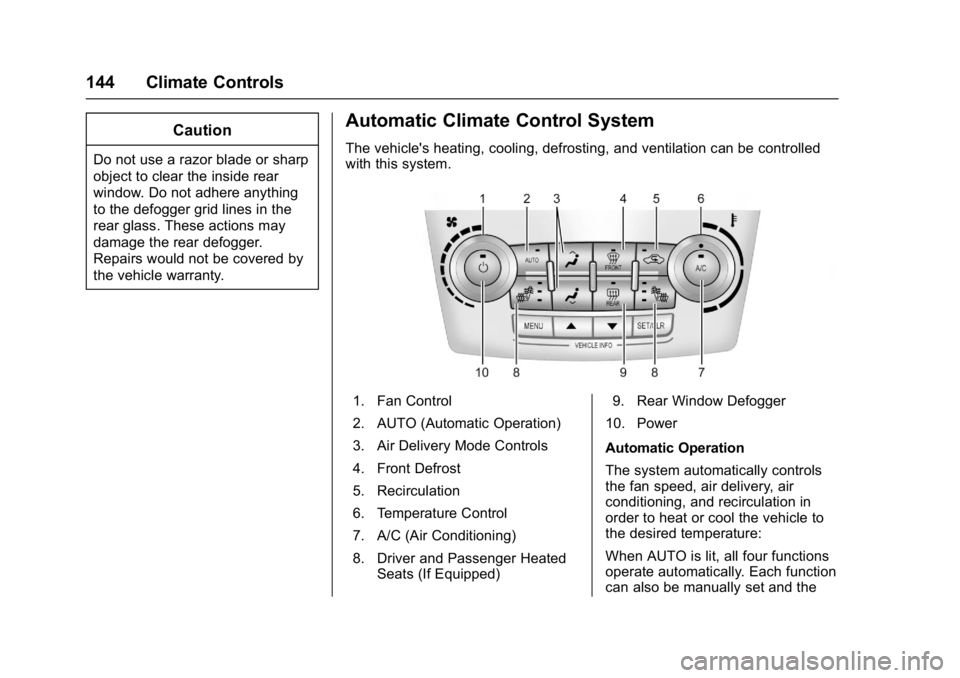
The vehicle's heating, cooling, defrosting, and ventilation can be controlled
with this system.
1. Fan Control
2. AUTO (Automatic Operation)
3. Air Delivery Mode Controls
4. Front Defrost
5. Recirculation
6. Temperature Control
7. A/C (Air Conditioning)
8. Driver and Passenger HeatedSeats (If Equipped) 9. Rear Window Defogger
10. Power
Automatic Operation
The system automatically controls
the fan speed, air delivery, air
conditioning, and recirculation in
order to heat or cool the vehicle to
the desired temperature:
When AUTO is lit, all four functions
operate automatically. Each function
can also be manually set and the