buttons GMC TERRAIN 2020 Get To Know Guide
[x] Cancel search | Manufacturer: GMC, Model Year: 2020, Model line: TERRAIN, Model: GMC TERRAIN 2020Pages: 20, PDF Size: 3.69 MB
Page 2 of 20
2
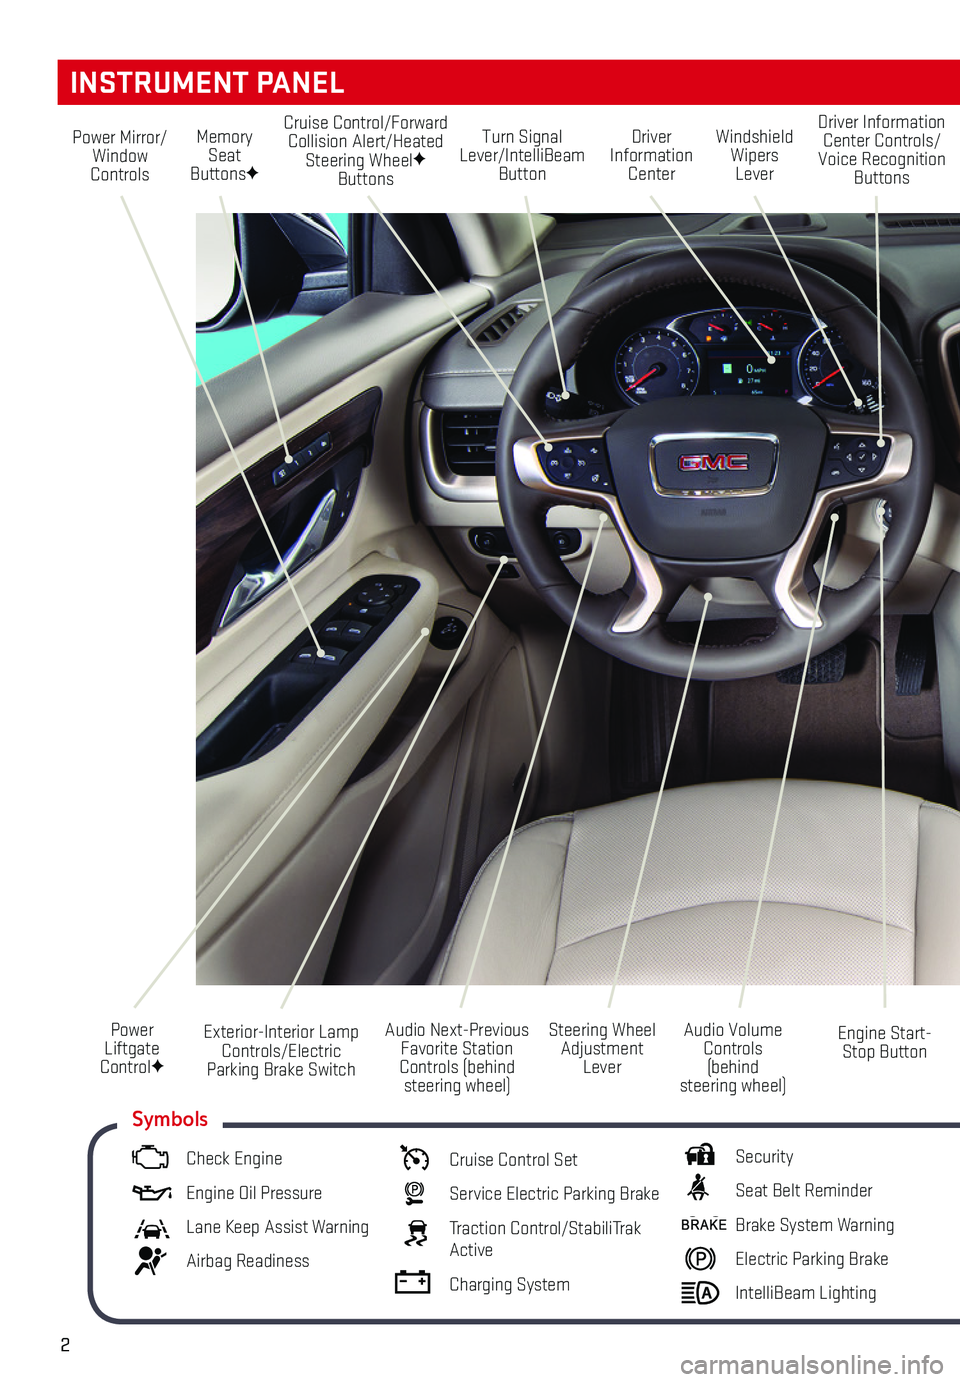
Turn Signal Lever/IntelliBeam Button
Driver Information Center
Steering Wheel Adjustment Lever
Audio Next-Previous Favorite Station Controls (behind steering wheel)
Windshield Wipers Lever
Engine Start-Stop Button
Cruise Control/Forward Collision Alert/Heated Steering WheelF Buttons
Power Mirror/Window Controls
Power Liftgate ControlF
INSTRUMENT PANEL
Audio Volume Controls (behind steering wheel)
Driver Information Center Controls/Voice Recognition Buttons
Memory Seat ButtonsF
Exterior-Interior Lamp Controls/Electric Parking Brake Switch
Check Engine
Engine Oil Pressure
Lane Keep Assist Warning
Airbag Readiness
Cruise Control Set
Service Electric Parking Brake
Traction Control/StabiliTrak Active
Charging System
Security
Seat Belt Reminder
Brake System Warning
Electric Parking Brake
IntelliBeam Lighting
Symbols
Page 3 of 20
3
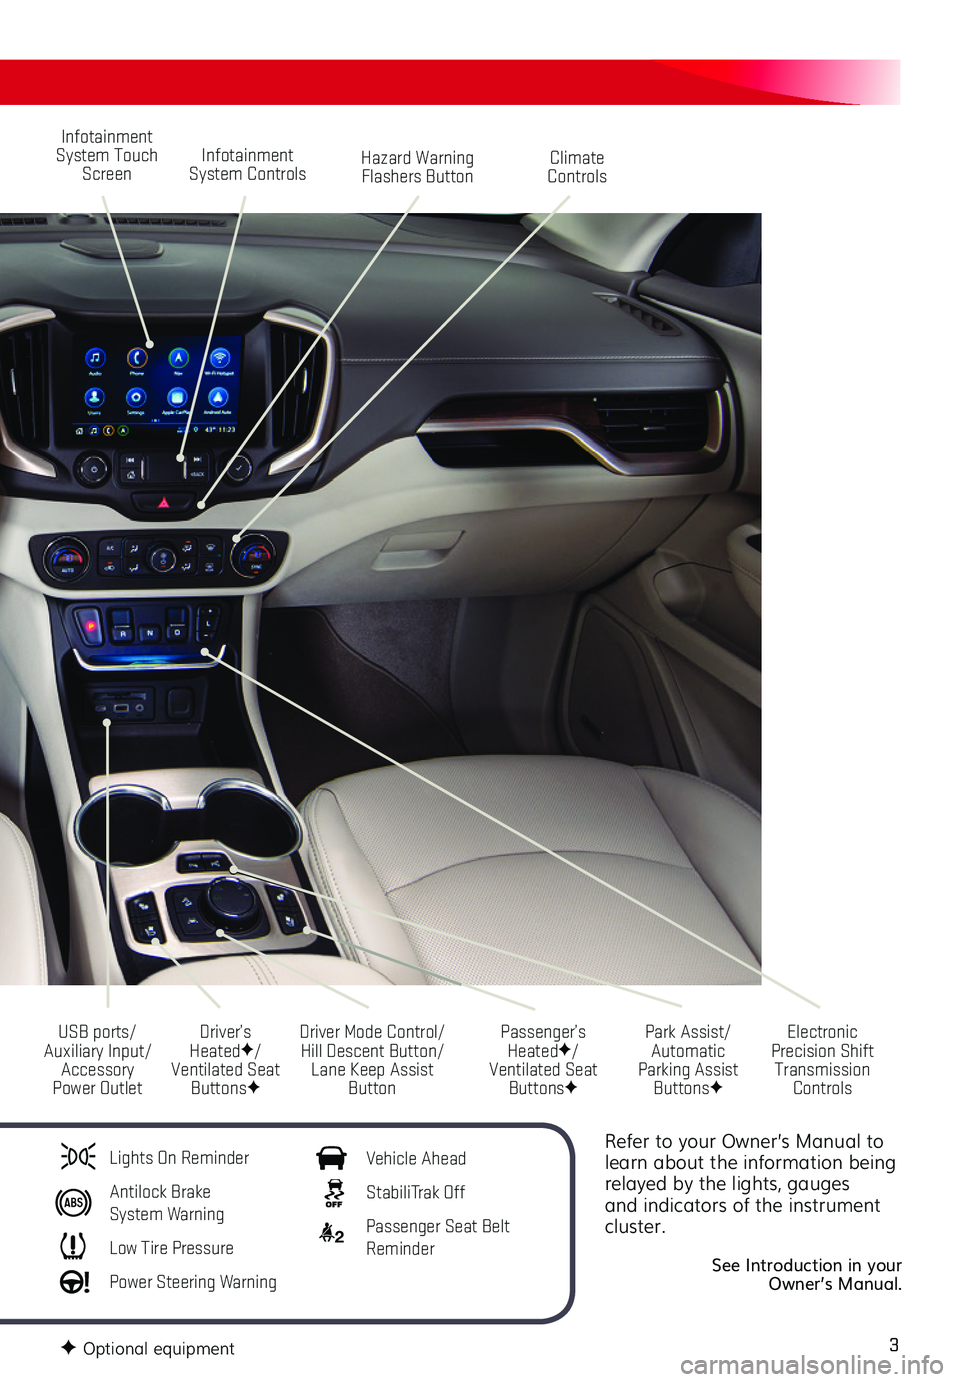
Refer to your Owner’s Manual to learn about the information being relayed by the lights, gauges and indicators of the instrument cluster.
See Introduction in your Owner’s Manual.
Infotainment System Touch Screen
Driver Mode Control/Hill Descent Button/Lane Keep Assist Button
USB ports/Auxiliary Input/Accessory Power Outlet
Infotainment System ControlsHazard Warning Flashers Button
Park Assist/Automatic Parking Assist ButtonsF
Climate Controls
Passenger’s HeatedF/Ventilated Seat ButtonsF
Electronic Precision Shift Transmission Controls
Driver’s HeatedF/Ventilated Seat ButtonsF
Lights On Reminder
Antilock Brake System Warning
Low Tire Pressure
Power Steering Warning
Vehicle Ahead
StabiliTrak Off
2 Passenger Seat Belt Reminder
F Optional equipment
Page 13 of 20
13
INFOTAINMENT SYSTEM
SETTING THE TIME
1. Select Settings on the Home page.
2. Select System tab > Time/Date.
3. Select Set Time.
4. Touch the arrows to adjust the hours and minutes.
5. Press the BACK button to exit the menu.
Turn on Automatic Time and Date to have the time updated automatically as the system obtains information from the cellular network.
STORING FAVORITES
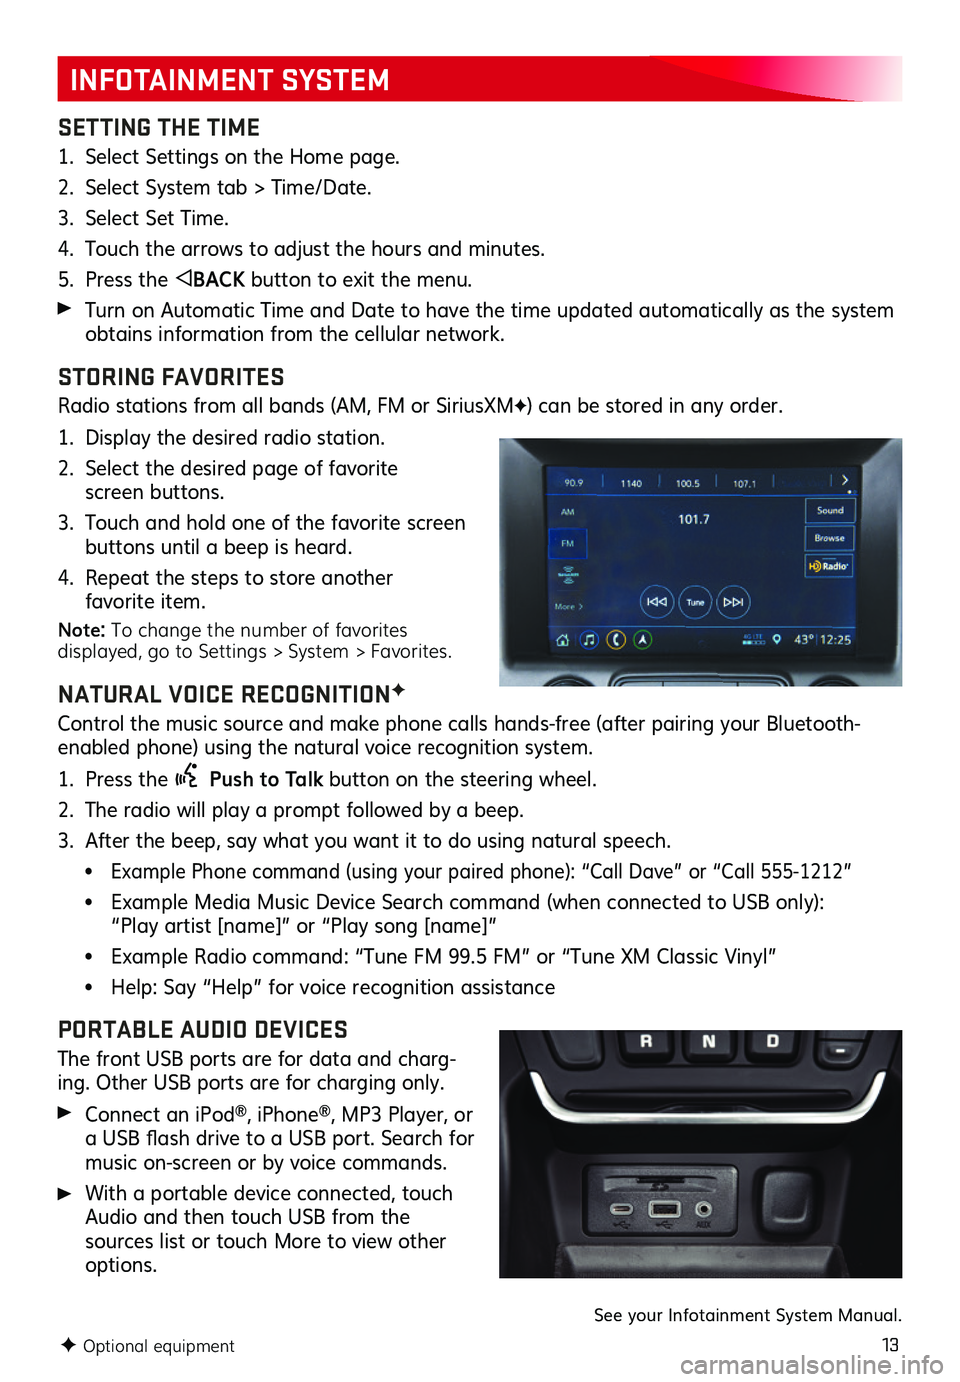
Radio stations from all bands (AM, FM or SiriusXMF) can be stored in any order.
1. Display the desired radio station.
2. Select the desired page of favorite screen buttons.
3. Touch and hold one of the favorite screen buttons until a beep is heard.
4. Repeat the steps to store another favorite item.
Note: To change the number of favorites displayed, go to Settings > System > Favorites.
NATURAL VOICE RECOGNITIONF
Control the music source and make phone calls hands-free (after pairing your Bluetooth-enabled phone) using the natural voice recognition system.
1. Press the Push to Talk button on the steering wheel.
2. The radio will play a prompt followed by a beep.
3. After the beep, say what you want it to do using natural speech.
• Example Phone command (using your paired phone): “Call Dave” or “Call 555-1212”
• Example Media Music Device Search command (when connected to USB only): “Play artist [name]” or “Play song [name]”
• Example Radio command: “Tune FM 99.5 FM” or “Tune XM Classic Vinyl”
• Help: Say “Help” for voice recognition assistance
PORTABLE AUDIO DEVICES
The front USB ports are for data and charg-ing. Other USB ports are for charging only.
Connect an iPod®, iPhone®, MP3 Player, or a USB flash drive to a USB port. Search for music on-screen or by voice commands.
With a portable device connected, touch Audio and then touch USB from the
sources list or touch More to view other options.
F Optional equipment
See your Infotainment System Manual.
Page 17 of 20
17
DRIVER ASSISTANCE SYSTEMS
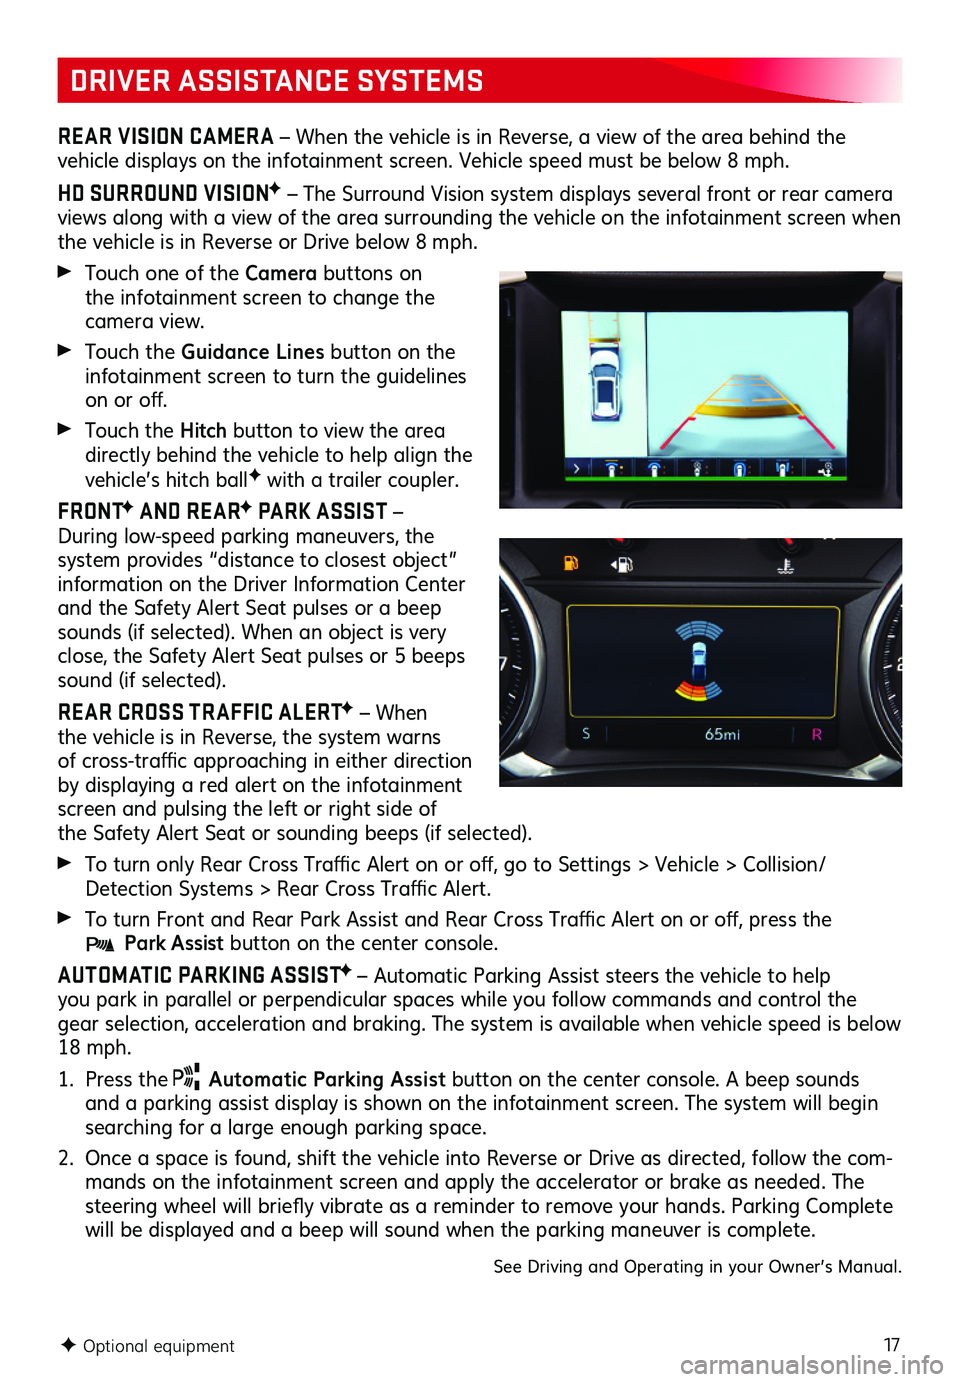
REAR VISION CAMERA – When the vehicle is in Reverse, a view of the area behind the
vehicle displays on the infotainment screen. Vehicle speed must be below 8 mph.
HD SURROUND VISIONF – The Surround Vision system displays several front or rear camera views along with a view of the area surrounding the vehicle on the infotainment screen when the vehicle is in Reverse or Drive below 8 mph.
Touch one of the Camera buttons on the infotainment screen to change the camera view.
Touch the Guidance Lines button on the infotainment screen to turn the guidelines on or off.
Touch the Hitch button to view the area directly behind the vehicle to help align the vehicle’s hitch ballF with a trailer coupler.
FRONTF AND REARF PARK ASSIST – During low-speed parking maneuvers, the system provides “distance to closest object” information on the Driver Information Center and the Safety Alert Seat pulses or a beep sounds (if selected). When an object is very close, the Safety Alert Seat pulses or 5 beeps sound (if selected).
REAR CROSS TR AFFIC ALERTF – When the vehicle is in Reverse, the system warns of cross-traffic approaching in either direction by displaying a red alert on the infotainment screen and pulsing the left or right side of the Safety Alert Seat or sounding beeps (if selected).
To turn only Rear Cross Traffic Alert on or off, go to Settings > Vehicle > Collision/Detection Systems > Rear Cross Traffic Alert.
To turn Front and Rear Park Assist and Rear Cross Traffic Alert on or off, press the Park Assist button on the center console.
AUTOMATIC PARKING ASSISTF – Automatic Parking Assist steers the vehicle to help you park in parallel or perpendicular spaces while you follow commands and control the gear selection, acceleration and braking. The system is available when vehicle speed is below 18 mph.
1. Press the Automatic Parking Assist button on the center console. A beep sounds and a parking assist display is shown on the infotainment screen. The system will begin searching for a large enough parking space.
2. Once a space is found, shift the vehicle into Reverse or Drive as directed, follow the com-mands on the infotainment screen and apply the accelerator or brake as needed. The steering wheel will briefly vibrate as a reminder to remove your hands. Parking Complete will be displayed and a beep will sound when the parking maneuver is complete.
See Driving and Operating in your Owner’s Manual.
F Optional equipment
Page 19 of 20
19
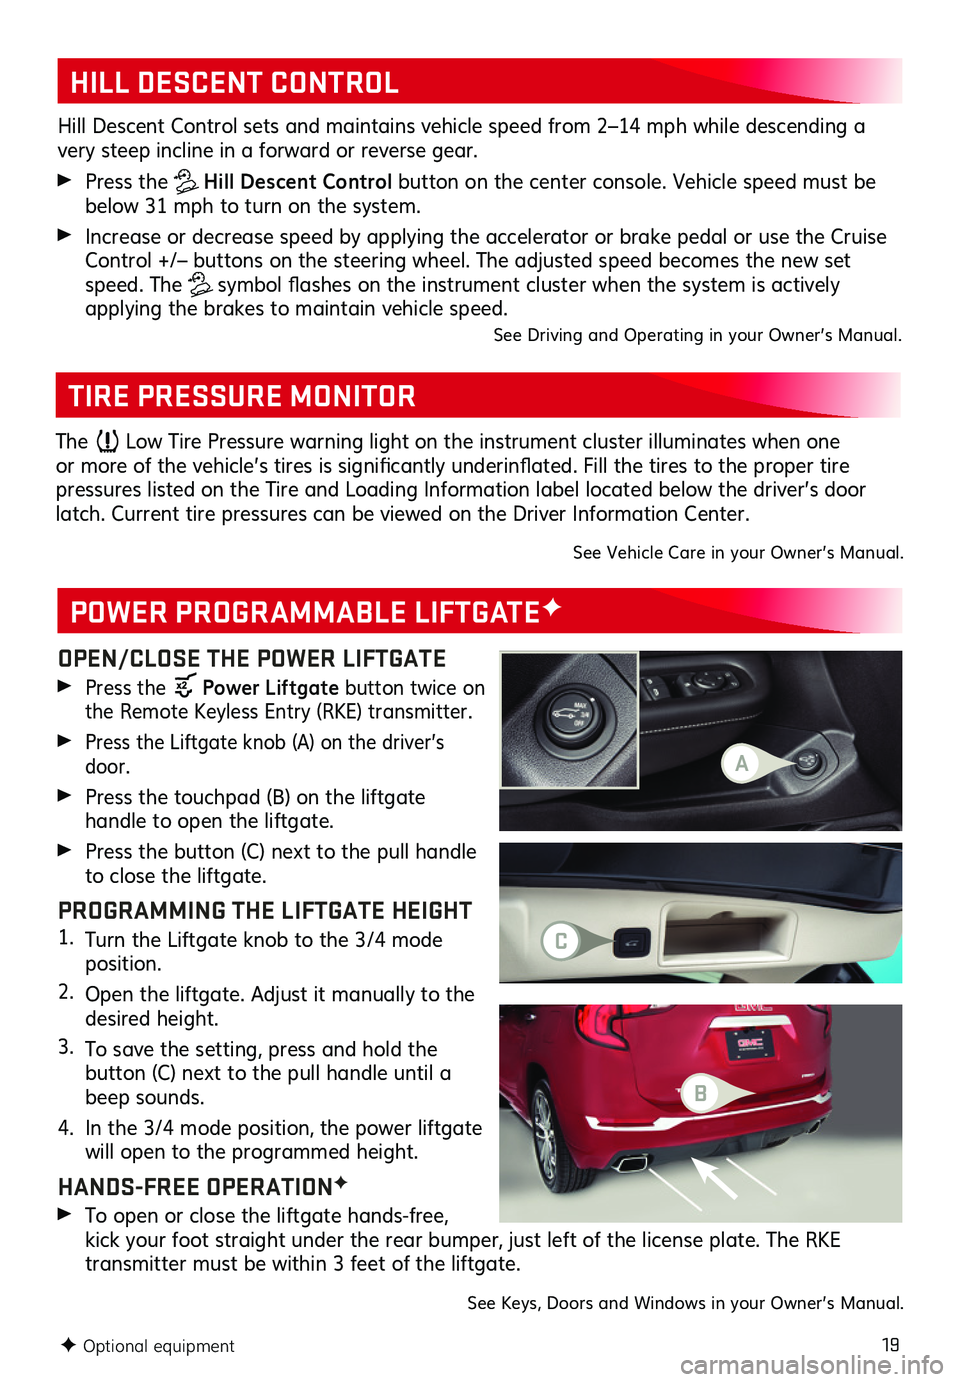
OPEN/CLOSE THE POWER LIFTGATE
Press the Power Liftgate button twice on the Remote Keyless Entry (RKE) transmitter.
Press the Liftgate knob (A) on the driver’s door.
Press the touchpad (B) on the liftgate
handle to open the liftgate.
Press the button (C) next to the pull handle to close the liftgate.
PROGRAMMING THE LIFTGATE HEIGHT1. Turn the Liftgate knob to the 3/4 mode position.
2. Open the liftgate. Adjust it manually to the desired height.
3. To save the setting, press and hold the
button (C) next to the pull handle until a beep sounds.
4. In the 3/4 mode position, the power liftgate will open to the programmed height.
HANDS-FREE OPERATIONF
To open or close the liftgate hands-free, kick your foot straight under the rear bumper, just left of the license plate. The RKE
transmitter must be within 3 feet of the liftgate.
POWER PROGRAMMABLE LIFTGATEF
TIRE PRESSURE MONITOR
HILL DESCENT CONTROL
Hill Descent Control sets and maintains vehicle speed from 2–14 mph while descending a very steep incline in a forward or reverse gear.
Press the Hill Descent Control button on the center console. Vehicle speed must be below 31 mph to turn on the system.
Increase or decrease speed by applying the accelerator or brake pedal or use the Cruise Control +/– buttons on the steering wheel. The adjusted speed becomes the new set speed. The symbol flashes on the instrument cluster when the system is actively
applying the brakes to maintain vehicle speed.See Driving and Operating in your Owner’s Manual.
F Optional equipment
The Low Tire Pressure warning light on the instrument cluster illuminates when one or more of the vehicle’s tires is significantly underinflated. Fill the tires to the proper tire
pressures listed on the Tire and Loading Information label located below the driver’s door latch. Current tire pressures can be viewed on the Driver Information Center.
See Vehicle Care in your Owner’s Manual.
See Keys, Doors and Windows in your Owner’s Manual.
A
C
B