warning lights GMC TERRAIN 2020 Owner's Manual
[x] Cancel search | Manufacturer: GMC, Model Year: 2020, Model line: TERRAIN, Model: GMC TERRAIN 2020Pages: 425, PDF Size: 6.59 MB
Page 48 of 425
GMC Terrain/Terrain Denali Owner Manual (GMNA-Localizing-U.S./Canada/
Mexico-13556230) - 2020 - CRC - 9/4/19
Seats and Restraints 45
PressCor{, if equipped, to
ventilate the driver or passenger
seat. A ventilated seat has a fan
that pulls air through the cushion
and seatback. The air is not cooled.
Press the button once for the
highest setting. With each press of
the button, the seat will change to
the next lower setting, and then to
the off setting. The indicator lights
next to the buttons indicate three for
the highest setting and one for the
lowest.
Remote Start Heated and
Ventilated Seats
During a remote start, the heated or
ventilated seats, if equipped, can be
turned on automatically. When it is
cold outside, the heated seats turn
on, and when it is hot outside the
ventilated seats turn on. The heated
or ventilated seats are canceled
when the ignition is turned on. Press
the heated or ventilated seat button
to use the heated or ventilated seats
after the vehicle is started. The heated or ventilated seat
indicator lights do not turn on during
a remote start.
The temperature performance of an
unoccupied seat may be reduced.
This is normal.
The remote start heated or
ventilated seats may be enabled or
disabled in the vehicle
personalization menu. See
Remote
Vehicle Start 015 and
Vehicle Personalization 0135.
Folding Seatback
The front passenger seatback
folds flat.
{Warning
If you fold the seatback forward to
carry longer objects, such as skis,
be sure any such cargo is not
near an airbag. In a crash, an
inflating airbag might force that
object toward a person. This
could cause severe injury or even
(Continued)
Warning (Continued)
death. Secure objects away from
the area in which an airbag would
inflate. For more information, see
Where Are the Airbags? 060 and
Vehicle Load Limits 0175.
{Warning
Things you put on this seatback
can strike and injure people in a
sudden stop or turn, or in a crash.
Remove or secure all items
before driving.
To fold the seatback: 1. Lower the head restraint all the way. See Head Restraints
0 37.
2. Move the seat as far back as possible. See Seat Adjustment
0 39.
Page 52 of 425
GMC Terrain/Terrain Denali Owner Manual (GMNA-Localizing-U.S./Canada/
Mexico-13556230) - 2020 - CRC - 9/4/19
Seats and Restraints 49
1. Ensure the seat belt is in thebelt stowage clip.
2. Lift the seatback up and push it rearward to lock it in place.
A tab near the seatback lever
retracts when the seatback is
locked in place.
3. Return the head restraint to the upright position. See Head
Restraints 037.
4. Push and pull the top of the seatback to be sure it is locked
into position.
5. Repeat the steps to raise the other seatback, if necessary.
When the seat is not in use, it
should be kept in the upright, locked
position.Heated Rear Seats
{Warning
If temperature change or pain to
the skin cannot be felt, the seat
heater may cause burns. See the
Warning under Heated and
Ventilated Front Seats 044.
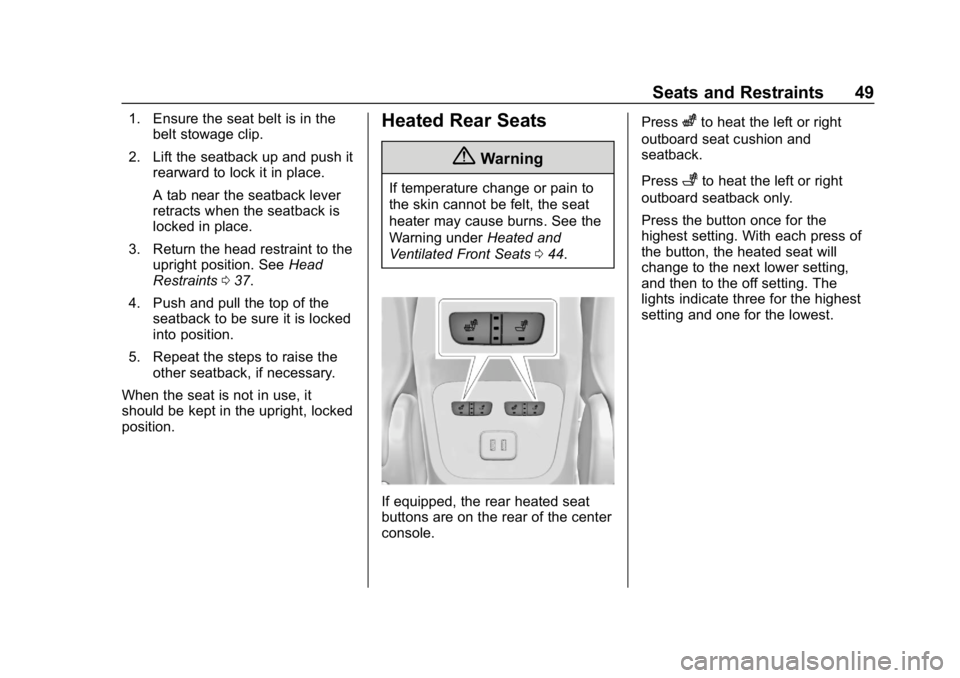
If equipped, the rear heated seat
buttons are on the rear of the center
console. Press
zto heat the left or right
outboard seat cushion and
seatback.
Press
+to heat the left or right
outboard seatback only.
Press the button once for the
highest setting. With each press of
the button, the heated seat will
change to the next lower setting,
and then to the off setting. The
lights indicate three for the highest
setting and one for the lowest.
Page 97 of 425
GMC Terrain/Terrain Denali Owner Manual (GMNA-Localizing-U.S./Canada/
Mexico-13556230) - 2020 - CRC - 9/4/19
94 Instruments and Controls
Instruments and
Controls
Controls
Steering Wheel Adjustment . . . . 95
Steering Wheel Controls . . . . . . . 95
Heated Steering Wheel . . . . . . . . 95
Horn . . . . . . . . . . . . . . . . . . . . . . . . . . . 95
Windshield Wiper/Washer . . . . . . 95
Rear Window Wiper/Washer . . . 97
Compass . . . . . . . . . . . . . . . . . . . . . . 97
Clock . . . . . . . . . . . . . . . . . . . . . . . . . . 98
Power Outlets . . . . . . . . . . . . . . . . . 98
Wireless Charging . . . . . . . . . . . . . 99
Warning Lights, Gauges, and
Indicators
Warning Lights, Gauges, andIndicators . . . . . . . . . . . . . . . . . . . 102
Instrument Cluster (Base and Midlevel) . . . . . . . . . . . . . . . . . . . . 103
Instrument Cluster (Uplevel) . . . . . . . . . . . . . . . . . . . . 107
Speedometer . . . . . . . . . . . . . . . . . 110
Odometer . . . . . . . . . . . . . . . . . . . . . 110
Trip Odometer . . . . . . . . . . . . . . . . 110
Tachometer . . . . . . . . . . . . . . . . . . . 110
Fuel Gauge . . . . . . . . . . . . . . . . . . . 111 Engine Coolant Temperature
Gauge . . . . . . . . . . . . . . . . . . . . . . 112
Seat Belt Reminders . . . . . . . . . . 113
Airbag Readiness Light . . . . . . . 113
Passenger Airbag Status Indicator . . . . . . . . . . . . . . . . . . . . . 114
Charging System Light . . . . . . . 115
Malfunction Indicator Lamp (Check Engine Light) . . . . . . . . 115
Brake System Warning Light . . . . . . . . . . . . . . . . . . . . . . . . 117
Electric Parking Brake Light . . . . . . . . . . . . . . . . . . . . . . . . 118
Service Electric Parking Brake Light . . . . . . . . . . . . . . . . . . . . . . . . 118
Antilock Brake System (ABS) Warning Light . . . . . . . . . . . . . . . 118
Tow/Haul Mode Light . . . . . . . . . 119
Hill Descent Control Light . . . . . 119
Lane Keep Assist (LKA) Light . . . . . . . . . . . . . . . . . . . . . . . . 119
Vehicle Ahead Indicator . . . . . . . 119
Pedestrian Ahead Indicator . . . 120
Traction Off Light . . . . . . . . . . . . . 120
StabiliTrak OFF Light . . . . . . . . . 120
Traction Control System (TCS)/ StabiliTrak Light . . . . . . . . . . . . . 120
Wait-to-Start Light . . . . . . . . . . . . 121
Tire Pressure Light . . . . . . . . . . . 121
Engine Oil Pressure Light . . . . 122 Low Fuel Warning Light . . . . . . 122
Diesel Exhaust Fluid (DEF)
Warning Light . . . . . . . . . . . . . . . 122
Security Light . . . . . . . . . . . . . . . . . 123
High-Beam On Light . . . . . . . . . . 123
Front Fog Lamp Light . . . . . . . . . 123
Lamps On Reminder . . . . . . . . . 123
Cruise Control Light . . . . . . . . . . 124
Door Ajar Light . . . . . . . . . . . . . . . 124
Information Displays
Driver Information Center (DIC) (Base and Midlevel) . . . . . . . . . 124
Driver Information Center (DIC) (Uplevel) . . . . . . . . . . . . . . . . . . . . 130
Vehicle Messages
Vehicle Messages . . . . . . . . . . . . 134
Engine Power Messages . . . . . 134
Vehicle Speed Messages . . . . . 135
Vehicle Personalization
Vehicle Personalization . . . . . . . 135
Universal Remote System
Universal Remote System . . . . 140
Universal Remote SystemProgramming . . . . . . . . . . . . . . . 140
Universal Remote System Operation . . . . . . . . . . . . . . . . . . . 143
Page 105 of 425
GMC Terrain/Terrain Denali Owner Manual (GMNA-Localizing-U.S./Canada/
Mexico-13556230) - 2020 - CRC - 9/4/19
102 Instruments and Controls
OR PROFITS; OR BUSINESS
INTERRUPTION) HOWEVER
CAUSED AND ON ANY THEORY
OF LIABILITY, WHETHER IN
CONTRACT, STRICT LIABILITY,
OR TORT (INCLUDING
NEGLIGENCE OR OTHERWISE)
ARISING IN ANY WAY OUT OF
THE USE OF THIS SOFTWARE,
EVEN IF ADVISED OF THE
POSSIBILITY OF SUCH DAMAGE.Warning Lights,
Gauges, and
Indicators
Warning lights and gauges can
signal that something is wrong
before it becomes serious enough
to cause an expensive repair or
replacement. Paying attention to the
warning lights and gauges could
prevent injury.
Some warning lights come on briefly
when the engine is started to
indicate they are working. When
one of the warning lights comes on
and stays on while driving, or when
one of the gauges shows there may
be a problem, check the section that
explains what to do. Waiting to do
repairs can be costly and even
dangerous.
Page 117 of 425
GMC Terrain/Terrain Denali Owner Manual (GMNA-Localizing-U.S./Canada/
Mexico-13556230) - 2020 - CRC - 9/4/19
114 Instruments and Controls
The airbag readiness light comes on
for several seconds when the
vehicle is started. If the light does
not come on then, have it fixed
immediately.
{Warning
If the airbag readiness light stays
on after the vehicle is started or
comes on while driving, it means
the airbag system might not be
working properly. The airbags in
the vehicle might not inflate in a
crash, or they could even inflate
without a crash. To help avoid
injury, have the vehicle serviced
right away.
If there is a problem with the airbag
system, a Driver Information Center
(DIC) message may also come on.
Passenger Airbag Status
Indicator
The vehicle has a passenger
sensing system. See Passenger
Sensing System 064 for important safety information. The overhead
console has a passenger airbag
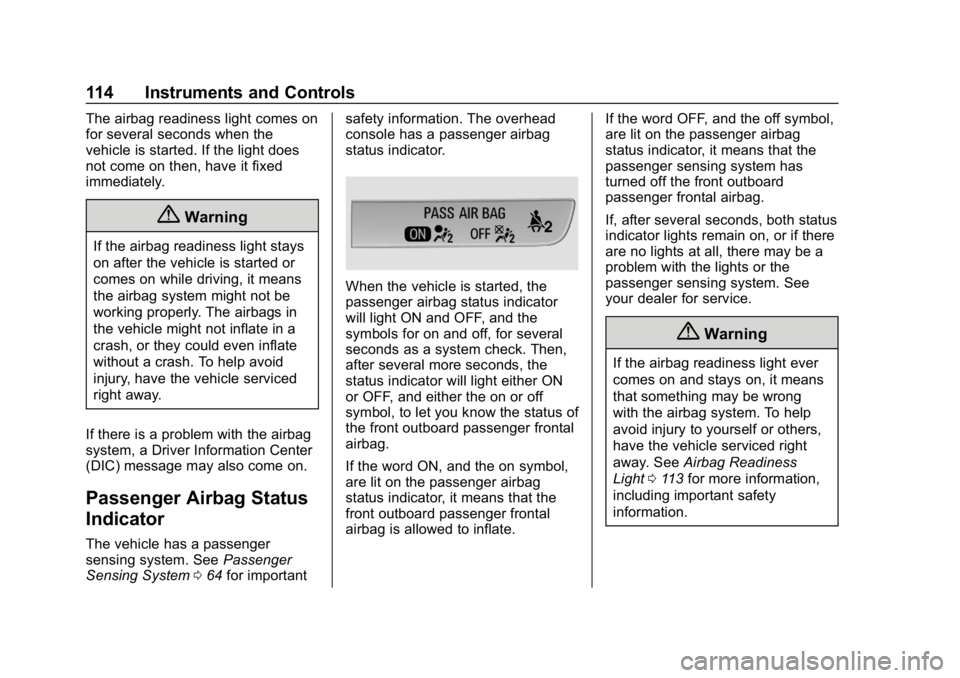
status indicator.
When the vehicle is started, the
passenger airbag status indicator
will light ON and OFF, and the
symbols for on and off, for several
seconds as a system check. Then,
after several more seconds, the
status indicator will light either ON
or OFF, and either the on or off
symbol, to let you know the status of
the front outboard passenger frontal
airbag.
If the word ON, and the on symbol,
are lit on the passenger airbag
status indicator, it means that the
front outboard passenger frontal
airbag is allowed to inflate.
If the word OFF, and the off symbol,
are lit on the passenger airbag
status indicator, it means that the
passenger sensing system has
turned off the front outboard
passenger frontal airbag.
If, after several seconds, both status
indicator lights remain on, or if there
are no lights at all, there may be a
problem with the lights or the
passenger sensing system. See
your dealer for service.
{Warning
If the airbag readiness light ever
comes on and stays on, it means
that something may be wrong
with the airbag system. To help
avoid injury to yourself or others,
have the vehicle serviced right
away. See
Airbag Readiness
Light 0113 for more information,
including important safety
information.
Page 150 of 425

GMC Terrain/Terrain Denali Owner Manual (GMNA-Localizing-U.S./Canada/
Mexico-13556230) - 2020 - CRC - 9/4/19
Lighting 147
When the DRL are on, the taillamps,
sidemarker lamps, instrument panel
lights, and other lamps will not be
on. The instrument cluster will be lit.
The DRL turn off when the
headlamps are turned to
Oor the
ignition is off. For vehicles first sold
in Canada, the DRL can only be
turned off when the vehicle is
parked.
The regular headlamp system
should be turned on when needed.
Automatic Headlamp
System
When the exterior lamp control is
set to AUTO and it is dark enough
outside, the headlamps come on
automatically.
There is a light sensor on top of the
instrument panel. Do not cover the
sensor; otherwise the headlamps
will come on when they are not
needed.
The system may also turn on the
headlamps when driving through a
parking garage or tunnel.
When it is bright enough outside,
the headlamps will turn off or may
change to Daytime Running
Lamps (DRL).
The automatic headlamp system
turns off when the exterior lamp
control is turned to
Oor the ignition
is off.
Lights On with Wipers
If the windshield wipers are
activated in daylight with the engine
on, and the exterior lamp control is
in AUTO, the headlamps, parking
lamps, and other exterior lamps
come on. The transition time for the
lamps coming on varies based on
wiper speed. When the wipers are
not operating, these lamps turn off.
Move the exterior lamp control to
O
or;to disable this feature.
Hazard Warning Flashers
Page 196 of 425
GMC Terrain/Terrain Denali Owner Manual (GMNA-Localizing-U.S./Canada/
Mexico-13556230) - 2020 - CRC - 9/4/19
Driving and Operating 193
{Warning
During DPF self-cleaning or
during extended idling in P (Park),
the exhaust system and exhaust
gases are very hot. Things that
burn could touch hot exhaust
parts under the vehicle and ignite.
You or others could be burned.
Do not park, or idle for an
extended period of time, near or
over papers, leaves, dry grass,
or other things that can burn.
Keep the exhaust area clear of
material that could ignite or burn.
SeeParking over Things That
Burn 0190.
Caution
Avoid extended idling because
the DPF system is not capable of
self-cleaning at idle. During
extended idling, monitor the
instrument cluster lights and DIC
(Continued)
Caution (Continued)
for messages and take
appropriate action. Continued
idling with the warning light/
message on could cause damage
to the DPF requiring repair and
possible replacement that might
not be covered by the vehicle
warranty.
During self-cleaning there will be a
change in the exhaust sound and
engine idle speed. Along with this, a
burning smell and reduction in fuel
economy may be noticed. This is
normal.
If the vehicle is idled or driven on
very short trips with the DPF
warning message on and the
exhaust filter is not cleaned as
required, the malfunction indicator
lamp and a DIC message will
display. See your dealer. Also see
Malfunction Indicator Lamp (Check
Engine Light) 0115. If equipped with Power
Take-Off (PTO), monitor the
instrument cluster for lights related
to the DPF.
See
Accessories and Modifications
0 275 if you are adding accessories
or modifying the vehicle.
Manual Regeneration of Diesel
Particulate Filter
This feature is only available on
Fleet and Commercial vehicles.
To verify that the vehicle has this
feature, refer to the Vehicle Service
Parts Identification label (SPID) for
RPO code FPF or see
www.gmupfitter.com to contact the
GM Upfitter Integration Group.
If equipped, this feature allows for
manual cleaning/regeneration of the
DPF when it is unable to clean
itself. It may be necessary to
perform manual regeneration if
driving conditions —such as
extended slow speed, stop-and-go
traffic, extended idling, short drive
cycles, or stationary PTO operation
— prevent DPF self-cleaning.
Page 240 of 425

GMC Terrain/Terrain Denali Owner Manual (GMNA-Localizing-U.S./Canada/
Mexico-13556230) - 2020 - CRC - 9/4/19
Driving and Operating 237
If the vehicle exceeds 10 km/h
(6 mph), APA is automatically
disengaged and automatic steering
will turn off. A progress arrow
displays the status of the parking
maneuver. Depending on the space
size, additional maneuvers may be
required, and there will be additional
instructions. When changing gears,
allow the automatic steering to
complete before continuing the
parking maneuver. Upon successful
completion of a maneuver, APA will
beep and display a PARKING
COMPLETE message. Place the
vehicle in P (Park).
APA may automatically disengage if:
.The steering wheel is used by
the driver.
. The maximum allowed speed is
exceeded.
. There is a failure with the APA
system.
. Electronic stability control or
antilock brakes are activated. .
A high priority vehicle message
is displayed in the Driver
Information Center (DIC).
To cancel APA, press
Oagain.
When the System Does Not Seem
to Work Properly
The APA system may require a
short period of driving along curves
to calibrate.
Assistance Systems for
Driving
If equipped, when driving the
vehicle in a forward gear, Forward
Collision Alert (FCA), Lane
Departure Warning (LDW), Lane
Keep Assist (LKA), Side Blind Zone
Alert (SBZA), Lane Change Alert
(LCA), Automatic Emergency
Braking (AEB), and/or the Front
Pedestrian Braking (FPB) System
can help to avoid a crash or reduce
crash damage.
Forward Collision Alert
(FCA) System
If equipped, the FCA system may
help to avoid or reduce the harm
caused by front-end crashes. When
approaching a vehicle ahead too
quickly, FCA provides a red flashing
alert on the windshield and rapidly
beeps or pulses the driver seat.
FCA also lights an amber visual
alert if following another vehicle
much too closely.
FCA detects vehicles within a
distance of approximately 60 m
(197 ft) and operates at speeds
above 8 km/h (5 mph).
{Warning
FCA is a warning system and
does not apply the brakes. When
approaching a slower-moving or
stopped vehicle ahead too rapidly,
or when following a vehicle too
closely, FCA may not provide a
warning with enough time to help (Continued)
Page 247 of 425

GMC Terrain/Terrain Denali Owner Manual (GMNA-Localizing-U.S./Canada/
Mexico-13556230) - 2020 - CRC - 9/4/19
244 Driving and Operating
Warning (Continued)
provide alerts when changing
lanes under all driving conditions.
Failure to use proper care when
changing lanes may result in
injury, death, or vehicle damage.
Before making a lane change,
always check mirrors, glance over
your shoulder, and use the turn
signals.
LCA Detection Zones
1. SBZA Detection Zone
2. LCA Detection Zone
The LCA sensor covers a zone of
approximately one lane over from
both sides of the vehicle, or 3.5 m
(11 ft). The height of the zone is
approximately between 0.5 m (1.5 ft)
and 2 m (6 ft) off the ground. The
Side Blind Zone Alert (SBZA)
warning area starts at approximately
the middle of the vehicle and goes
back 5 m (16 ft). Drivers are also
warned of vehicles rapidly
approaching from up to 25 m (82 ft)
behind the vehicle.
How the System Works
The LCA symbol lights up in the
side mirrors when the system
detects a moving vehicle in the next
lane over that is in the side blind
zone or rapidly approaching that
zone from behind. A lit LCA symbol
indicates it may be unsafe to
change lanes. Before making a lane
change, check the LCA display,
check mirrors, glance over your
shoulder, and use the turn signals.
Left Side Mirror DisplayRight Side Mirror Display
When the vehicle is started, both
outside mirror LCA displays will
briefly come on to indicate the
system is operating. When the
vehicle is in a forward gear, the left
or right side mirror display will light
up if a moving vehicle is detected in
the next lane over in that blind zone
or rapidly approaching that zone.
If the turn signal is activated in the
same direction as a detected
vehicle, this display will flash as an
extra warning not to change lanes.
LCA can be disabled through
vehicle personalization. See
“Collision/Detection Systems” under
Vehicle Personalization 0135.
If LCA is disabled by the driver, the
LCA mirror displays will not light up.
Page 354 of 425
GMC Terrain/Terrain Denali Owner Manual (GMNA-Localizing-U.S./Canada/
Mexico-13556230) - 2020 - CRC - 9/5/19
Vehicle Care 351
4. Turn the ignition off. Turn off alllights and accessories in both
vehicles, except the hazard
warning flashers if needed.
{Warning
An electric fan can start up even
when the engine is not running
and can injure you. Keep hands,
clothing, and tools away from any
underhood electric fan.
{Warning
Using a match near a battery can
cause battery gas to explode.
People have been hurt doing this,
and some have been blinded.
Use a flashlight if you need more
light.
Battery fluid contains acid that
can burn you. Do not get it on
you. If you accidentally get it in
your eyes or on your skin, flush
the place with water and get
medical help immediately.
{Warning
Fans or other moving engine
parts can injure you badly. Keep
your hands away from moving
parts once the engine is running.
5. Connect one end of the red positive (+) cable to the
positive (+) terminal on the
discharged battery.
6. Connect the other end of the red positive (+) cable to the
positive (+) terminal of the good
battery.
7. Connect one end of the black negative (–) cable to the
negative (–) terminal of the
good battery.
8. Connect the other end of the black negative (–) cable to the
negative (–) grounding stud for
the discharged battery.
9. Start the engine in the vehicle with the good battery and run
the engine at idle speed for at
least four minutes. 10. Try to start the vehicle that had
the dead battery. If it will not
start after a few tries, it
probably needs service.
Caution
If the jumper cables are
connected or removed in the
wrong order, electrical shorting
may occur and damage the
vehicle. The repairs would not be
covered by the vehicle warranty.
Always connect and remove the
jumper cables in the correct order,
making sure that the cables do
not touch each other or other
metal.
Jumper Cable Removal
Reverse the sequence exactly when
removing the jumper cables.
After starting the disabled vehicle
and removing the jumper cables,
allow it to idle for several minutes.