ECO mode GMC TERRAIN 2022 Owners Manual
[x] Cancel search | Manufacturer: GMC, Model Year: 2022, Model line: TERRAIN, Model: GMC TERRAIN 2022Pages: 371, PDF Size: 17.71 MB
Page 12 of 371

GMC Terrain/Terrain Denali Owner Manual (GMNA-Localizing-U.S./Canada/
Mexico-16540740) - 2023 - CRC - 6/16/22
Keys, Doors, and Windows 11
Programming Remote Keys to the
Vehicle
Only remote keys programmed to the
vehicle will work. If a remote key is lost or
stolen, a replacement can be purchased and
programmed through your dealer. The
vehicle can be reprogrammed so that lost or
stolen remote keys no longer work. Each
vehicle can have up to eight remote keys
matched to it.
Programming with Recognized Remote Keys
A new remote key can be programmed to
the vehicle when there are two recognized
remote keys.
To program, the vehicle must be off and all
of the remote keys, both currently
recognized and new, must be with you.1. Remove the key from the remote key.
2. Place the two recognized remote keys in the cupholder.
3. Remove the key lock cylinder cap on the driver door handle. See Door Locks015.
Insert the vehicle key of the new remote
key into the key lock cylinder on the
driver door handle and turn the key,
counterclockwise, to the unlock position
five times within 10 seconds.
The DIC displays READY FOR REMOTE #3,
4, 5, ETC.
4. Remove the two recognized remote keys from the cupholder.
5. Place the new remote key into the cupholder. 6. Press ENGINE START/STOP. When the
remote key is learned the DIC display
will show that it is ready to program the
next remote key.
7. Remove the remote key from the cupholder and press
KorQon the
remote key.
To program additional remote keys,
repeat Steps 4–6.
When all additional remote keys are
programmed, press and hold ENGINE
START/STOP for 12 seconds to exit
programming mode.
8. Put the key back into the remote key.
9. Replace the key lock cylinder cap. See Door Locks 015.
Programming without Recognized
Remote Keys
If two currently recognized remote keys are
not available, follow this procedure to
program up to eight remote keys. This
feature is not available in Canada. This
procedure will take approximately
30 minutes to complete. The vehicle must
be off and all of the remote keys you wish
to program must be with you. 1. Remove the key from the remote key.
Page 13 of 371

GMC Terrain/Terrain Denali Owner Manual (GMNA-Localizing-U.S./Canada/
Mexico-16540740) - 2023 - CRC - 6/16/22
12 Keys, Doors, and Windows
2. Remove the key lock cylinder cap on thedriver door handle. See Door Locks015.
Insert the vehicle key of the remote key
into the key lock cylinder on the driver
door handle and turn the key,
counterclockwise, to the unlock position
five times within 10 seconds.
The DIC displays REMOTE LEARN
PENDING, PLEASE WAIT.
3. Wait for 10 minutes until the DIC displays PRESS ENGINE START BUTTON TO
LEARN and then press ENGINE
START/STOP.
The DIC display will again show REMOTE
LEARN PENDING, PLEASE WAIT.
4. Repeat Step 2 two additional times. After the third time all previously known
remote keys will no longer work with
the vehicle. Remaining remote keys can
be relearned during the next steps.
The DIC display should now show READY
FOR REMOTE # 1.
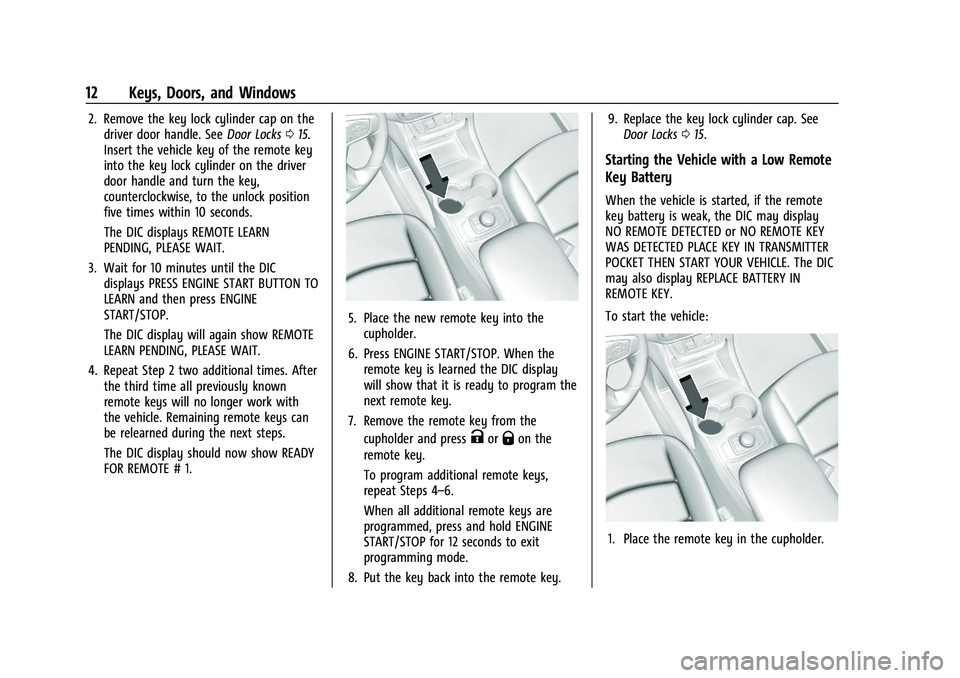
5. Place the new remote key into thecupholder.
6. Press ENGINE START/STOP. When the remote key is learned the DIC display
will show that it is ready to program the
next remote key.
7. Remove the remote key from the cupholder and press
KorQon the
remote key.
To program additional remote keys,
repeat Steps 4–6.
When all additional remote keys are
programmed, press and hold ENGINE
START/STOP for 12 seconds to exit
programming mode.
8. Put the key back into the remote key. 9. Replace the key lock cylinder cap. See
Door Locks 015.
Starting the Vehicle with a Low Remote
Key Battery
When the vehicle is started, if the remote
key battery is weak, the DIC may display
NO REMOTE DETECTED or NO REMOTE KEY
WAS DETECTED PLACE KEY IN TRANSMITTER
POCKET THEN START YOUR VEHICLE. The DIC
may also display REPLACE BATTERY IN
REMOTE KEY.
To start the vehicle:
1. Place the remote key in the cupholder.
Page 22 of 371

GMC Terrain/Terrain Denali Owner Manual (GMNA-Localizing-U.S./Canada/
Mexico-16540740) - 2023 - CRC - 6/16/22
Keys, Doors, and Windows 21
The power liftgate may be temporarily
disabled under extreme low temperatures,
or after repeated power cycling over a short
period of time. If this occurs, the liftgate can
still be operated manually.
If the vehicle is shifted out of P (Park) while
the power function is in progress, the
liftgate will continue to completion. If the
vehicle is accelerated before the liftgate has
completed moving, the liftgate may stop or
reverse direction. Check for Driver
Information Center (DIC) messages and make
sure the liftgate is closed and latched before
driving.
Falling Liftgate Detection
If the power liftgate automatically closes
after a power opening cycle, it indicates that
the system is reacting to excess weight on
the liftgate or a possible support strut
failure. A repetitive chime will sound while
the falling liftgate detection feature is
operating. Remove any excess weight. If the
liftgate continues to automatically close
after opening, see your dealer for service
before using the power liftgate.
Interfering with the power liftgate motion
or manually closing the liftgate too quickly
after power opening may resemble a
support strut failure. This could also activatethe falling liftgate detection feature. Allow
the liftgate to complete its operation and
wait a few seconds before manually closing
the liftgate.
Obstacle Detection Features
If the liftgate encounters an obstacle during
a power open or close cycle, the liftgate will
automatically reverse direction and move a
short distance away from the obstacle. After
removing the obstruction, the power liftgate
operation can be used again. If the liftgate
encounters multiple obstacles on the same
power cycle, the power function will
deactivate. After removing the obstructions,
manually close the liftgate which will allow
normal power operation functions to
resume.
If the vehicle is locked while the liftgate is
closing, and an obstacle is encountered that
prevents the liftgate from completely
closing, the horn will sound as an alert that
the liftgate did not close.
Setting the 3/4 Mode
To change the position the liftgate stops at
when opening:
1. Select MAX or 3/4 mode and power open the liftgate. 2. Stop the liftgate movement at the
desired height by pressing any liftgate
switch. Manually adjust the liftgate
position if needed.
3. Press and hold
lnext to the pull cup
on the bottom of the liftgate until the
turn signals flash and a beep sounds.
This indicates the setting has been
recorded.
The liftgate cannot be set below a minimum
programmable height. If there is no light
flash or sound, then the height adjustment
may be too low.
Manual Operation
Select OFF to manually operate the liftgate.
Caution
Attempting to move the liftgate too
quickly and with excessive force may
result in damage to the vehicle.
Operate the liftgate manually with a
smooth motion and moderate speed. The
system includes a feature which limits the
manual closing speed to protect the
components.
Page 28 of 371

GMC Terrain/Terrain Denali Owner Manual (GMNA-Localizing-U.S./Canada/
Mexico-16540740) - 2023 - CRC - 6/16/22
Keys, Doors, and Windows 27
The vehicle aerodynamics are designed to
improve fuel economy performance. This
may result in a pulsing sound when either
rear window is down and the front windows
are up. To reduce the sound, open either a
front window or the sunroof, if equipped.
Power Windows
{Warning
Children could be seriously injured or
killed if caught in the path of a closing
window. Never leave the remote key in a
vehicle with children. When there are(Continued)
Warning (Continued)
children in the rear seat, use the window
lockout switch to prevent operation of
the windows. SeeKeys07.
The power windows work when the ignition
is on, in accessory mode, or in Retained
Accessory Power (RAP). See Retained
Accessory Power (RAP) 0205.
Using the window switch, press to open or
pull to close the window.
The windows may be temporarily disabled if
they are used repeatedly within a
short time.
Window Lockout
This feature stops the rear door passenger
window switches from working.
Press
2to engage the rear window
lockout feature. The indicator light is on
when engaged.
Press
2again to disengage.
Window Express Movement
All windows can be opened without holding
the window switch. Press the switch down
fully and quickly release to express open the
window.
Page 30 of 371

GMC Terrain/Terrain Denali Owner Manual (GMNA-Localizing-U.S./Canada/
Mexico-16540740) - 2023 - CRC - 6/16/22
Keys, Doors, and Windows 29
Roof
Sunroof
1. Sunroof Switch
2. Sunshade Switch
If equipped, the sunroof only operates when
the ignition is on or in ACC/ACCESSORY,
or when Retained Accessory Power (RAP) is
active. SeeIgnition Positions 0199 and
Retained Accessory Power (RAP) 0205.
Sunroof Switch
Vent : From the closed position, press and
release
e(1) to vent the sunroof. Press
and release
g(1) to close the vent. Express-Open/Express-Close :
To
express-open the sunroof, press and release
e(1). Press and releasee(1) at any
time to stop movement. To express-close the
sunroof, press and release
g(1). Press
and release
g(1) at any time to stop
movement.
Open/Close (Manual Mode) : To open the
sunroof, press and hold
e(1) until the
sunroof reaches the desired position. To
close the sunroof, press and hold
g(1).
Comfort Stop : The sunroof has a comfort
stop feature that stops the sunroof from
opening fully. Press and release the rear of
gto move the sunroof to the partially
opened comfort stop position. Pressing the
rear of
gagain will open the sunroof
fully. If the sunshade is not fully open when
the comfort stop feature is pressed the
second time, the sunshade will open fully.
Sunshade Switch
Express-open/Express-close : To express-open
the sunshade, press and release
r(2).
Press and release
r(2) at any time to
stop movement. To express-close the sunshade, press and release
Q(2). Press
and release
Q(2) at any time to stop
movement.
Open/Close (Manual Mode) : To open the
sunshade, press and hold
r(2) until the
sunshade reaches the desired position. To
close the sunshade, press and hold
Q(2).
When the sunroof is opened, an air deflector
will automatically raise. The air deflector will
retract when the sunroof is closed.
The sunroof cannot be opened or closed if
the vehicle has an electrical failure.
Automatic Reversal System
The sunroof has an automatic reversal
system that is only active when the sunroof
is operated in express-close mode.
If an object is in the path while express
closing, the reversal system will detect the
object, stop, and open the sunroof slightly.
If frost or other conditions prevent closing,
override the feature by closing the sunroof
in manual mode. To stop movement, release
the switch.
Page 37 of 371

GMC Terrain/Terrain Denali Owner Manual (GMNA-Localizing-U.S./Canada/
Mexico-16540740) - 2023 - CRC - 6/16/22
36 Seats and Restraints
section. The memory recalls may be
cancelled at any time during the recall. See
“Cancel Memory Seating Recalls”later in this
section.
Identifying Driver Number
The vehicle identifies the current driver by
their remote key number 1–8. The current
remote key number may be identified by
Driver Information Center (DIC) welcome
message, “You are driver x for memory
recalls.” This message is displayed the first
few times the vehicle is turned on when a
different remote key is used. For Seat Entry
Memory to work properly, save positions to
the 1 or 2 memory button matching the
driver number of this welcome message. To
aid in identifying remote key IDs, it is
recommended to only carry one remote key
when entering the vehicle. Perform the
following if the welcome message is not
displayed:
1. Move all keys and remote keys away from the vehicle.
2. Start the vehicle with another remote key. A DIC welcome message should
display indicating the driver number of
the other remote key. Turn the vehicle
off and remove the other key or remote
key from the vehicle. 3. Start the vehicle with the initial key or
remote key. The DIC welcome message
should display the driver number of the
initial remote key.
Saving Seating Positions
Read these instructions completely before
saving memory positions.
To save preferred driving positions to
1 and 2: 1. Turn the vehicle on or to accessory mode. A DIC welcome message may
indicate the driver number of the current
remote key. See “Identifying Driver
Number” previously in this section.
2. Adjust all available memory features to the desired driving position.
3. Press and release SET; a beep will sound.
4. Immediately upon releasing SET, press and hold memory button 1 or 2 matching
the current Driver’s remote key number
until two beeps sound. If too much time
passes between releasing SET and
pressing 1 or 2, the two beeps will not
sound indicating memory position were
not saved. Repeat Steps 3 and 4 to try
again. 5. Repeat Steps 1–4 for the other remote
key 1 or 2 using the other 1 or 2 memory
button.
It is recommended to save the preferred
driving positions to both 1 and 2 if you are
the only driver.
To save the common exit seating position to
Bthat is used by all drivers for Manually
Recalling Seating Positions and Auto Seat
Exit Memory Recall features, repeat Steps 1–
4 using
B, the exit button.
Manually Recalling Seating Positions
Press and hold 1, 2, or
Bbutton until the
recall is complete, to recall the positions
previously saved to that button.
Manual Memory recall movement for 1, 2 or
Bbuttons may be initiated and will
complete to the saved memory position if
the vehicle is in or out of P (Park).
Enabling Automatic Recalls
.Seat Entry Memory moves the driver seat
to the selected 1 or 2 position when the
vehicle is started. Select Settings > Vehicle
> Seating Position > Seat Entry Memory >
ON or OFF. See “Auto Seat Entry Memory
Recall” later in this section.
Page 53 of 371

GMC Terrain/Terrain Denali Owner Manual (GMNA-Localizing-U.S./Canada/
Mexico-16540740) - 2023 - CRC - 6/16/22
52 Seats and Restraints
Frontal airbags are designed to inflate in
moderate to severe frontal crashes to help
reduce the potential for severe injuries,
mainly to the driver's or front outboard
passenger's head and chest.
Whether the frontal airbags will or should
inflate is not based primarily on how fast
the vehicle is traveling. It depends on what
is hit, the direction of the impact, and how
quickly the vehicle slows down.
Frontal airbags may inflate at different crash
speeds depending on whether the vehicle
hits an object straight on or at an angle,
and whether the object is fixed or moving,
rigid or deformable, narrow or wide.
Frontal airbags are not intended to inflate
during vehicle rollovers, rear impacts,
or many side impacts.
In addition, the vehicle has advanced
technology frontal airbags. Advanced
technology frontal airbags adjust the
restraint according to crash severity.
Seat-mounted side impact airbags are
designed to inflate in moderate to severe
side crashes depending on the location of
the impact. These airbags may also inflate
in some moderate to severe frontal impacts.
Seat-mounted side impact airbags are notdesigned to inflate in rollovers or rear
impacts. A seat-mounted side impact airbag
is designed to inflate on the side of the
vehicle that is struck.
Roof-rail airbags are designed to inflate in
moderate to severe side crashes depending
on the location of the impact. In addition,
these roof-rail airbags may inflate during a
rollover or in a severe frontal impact.
Roof-rail airbags are not designed to inflate
in rear impacts. Both roof-rail airbags may
inflate when either side of the vehicle is
struck or if the sensing system predicts that
the vehicle is about to roll over on its side,
or in a severe frontal impact.
In any particular crash, no one can say
whether an airbag should have inflated
simply because of the vehicle damage or
repair costs.
What Makes an Airbag Inflate?
In a deployment event, the sensing system
sends an electrical signal triggering a release
of gas from the inflator. Gas from the
inflator fills the airbag causing the bag to
break out of the cover. The inflator, the
airbag, and related hardware are all part of
the airbag module.
For airbag locations, see
Where Are the
Airbags? 050.
How Does an Airbag Restrain?
In moderate to severe frontal or near frontal
collisions, even belted occupants can contact
the steering wheel or the instrument panel.
In moderate to severe side collisions, even
belted occupants can contact the inside of
the vehicle.
Airbags supplement the protection provided
by seat belts by distributing the force of the
impact more evenly over the
occupant's body.
Rollover capable roof-rail airbags are
designed to help contain the head and chest
of occupants in the outboard seating
positions in the first and second rows. The
rollover capable roof-rail airbags are
designed to help reduce the risk of full or
partial ejection in rollover events, although
no system can prevent all such ejections.
But airbags would not help in many types
of collisions, primarily because the
occupant's motion is not toward those
airbags. See When Should an Airbag Inflate?
0 51.
Page 62 of 371

GMC Terrain/Terrain Denali Owner Manual (GMNA-Localizing-U.S./Canada/
Mexico-16540740) - 2023 - CRC - 6/16/22
Seats and Restraints 61
Warning (Continued)
is not possible to hold it during a crash.
For example, in a crash at only
40 km/h (25 mph), a 5.5 kg (12 lb) infant
will suddenly become a 110 kg (240 lb)
force on a person's arms. An infant or
child should be secured in an appropriate
child restraint.
{Warning
Children who are up against, or very
close to, any airbag when it inflates can
be seriously injured or killed. Never put a
rear-facing child restraint in the front(Continued)
Warning (Continued)
outboard seat. Secure a rear-facing child
restraint in a rear seat. It is also better to
secure a forward-facing child restraint in
a rear seat. If you must secure a
forward-facing child restraint in the front
outboard seat, always move the front
passenger seat as far back as it will go.
Child restraints are devices used to restrain,
seat, or position children in the vehicle and
are sometimes called child seats or car seats.
There are three basic types of child
restraints:
.Forward-facing child restraints
.Rear-facing child restraints
.Belt-positioning booster seats
The proper child restraint for your child
depends on their size, weight, and age, and
also on whether the child restraint is
compatible with the vehicle in which it will
be used.
For each type of child restraint, there are
many different models available. When
purchasing a child restraint, be sure it is
designed to be used in a motor vehicle and
is designed by a genuine child restraint
manufacturer. If it is, the child restraint will
have a label saying that it meets federal
motor vehicle safety standards.
The instruction manual that is provided with
the child restraint states the weight and
height limitations for that particular child
restraint. In addition, there are many kinds
of child restraints available for children with
special needs.
{Warning
To reduce the risk of neck and head
injury in a crash, infants and toddlers
should be secured in a rear-facing child (Continued)
Page 69 of 371

GMC Terrain/Terrain Denali Owner Manual (GMNA-Localizing-U.S./Canada/
Mexico-16540740) - 2023 - CRC - 6/16/22
68 Seats and Restraints
To assist in locating the lower anchors, each
second row anchor position has a label, near
the crease between the seatback and the
seat cushion.
To assist in locating the top tether anchors,
the top tether anchor symbol is near the
top tether anchors.
Top Tether Anchors
The top tether anchors for each rear seating
position are on the back of the rear
seatback. Be sure to use an anchor located
directly behind the seating position where
the child restraint will be placed.
For models with a cargo cover, the top
tether anchors are on the back of the rear
seatbacks. Remove the cargo cover before
installing the top tether. The cargo cover
should remain off while the top tether is in use. Be sure to use an anchor directly
behind the seating position where the child
restraint will be placed.
Do not secure a child restraint in a position
without a top tether anchor if a national or
local law requires that the top tether be
attached, or if the instructions that come
with the child restraint say that the top
tether must be attached.
According to accident statistics, children and
infants are safer when properly restrained in
a child restraint system or infant restraint
system secured in a rear seating position.
See
Where to Put the Restraint 064 for
additional information.Securing a Child Restraint Designed for
the LATCH System
{Warning
A child could be seriously injured or killed
in a crash if the child restraint is not
properly attached to the vehicle using
either the LATCH anchors or the vehicle
seat belt. Follow the instructions that
came with the child restraint and the
instructions in this manual.
Page 86 of 371

GMC Terrain/Terrain Denali Owner Manual (GMNA-Localizing-U.S./Canada/
Mexico-16540740) - 2023 - CRC - 6/16/22
Instruments and Controls 85
(RAP) off and then back on. SeeRetained
Accessory Power (RAP) 0205. The power
restarts when equipment using 150 watts or
less is plugged into the outlet and a system
fault is not detected.
The power outlet is not designed for the
following and may not work properly if they
are plugged in:
.Equipment with high initial peak wattage,
such as compressor-driven refrigerators
and electric power tools
.Other equipment requiring an extremely
stable power supply, such as
microcomputer-controlled electric blankets
and touch sensor lamps
.Medical equipment
Wireless Charging
If equipped and enabled, the vehicle has
wireless charging pocket outside the armrest
of the center console. The system operates
at 145 kHz and wirelessly charges one Qi
compatible smartphone. The power output
of the system is capable of charging at a
rate up to 3 amp (15 W), as requested by
the compatible smartphone. See Radio
Frequency Statement 0347.
{Warning
Wireless charging may affect the
operation of an implanted pacemaker or
other medical devices. If you have one, it
is recommended to consult with your
doctor before using the wireless charging
system.
The vehicle must be on, in accessory mode,
or Retained Accessory Power (RAP) must be
active. The wireless charging feature may
not correctly indicate charging when the
vehicle is in RAP, during a Bluetooth phone
call, or when phone projection (e.g. Apple
CarPlay / Android Auto) is active. See
Retained Accessory Power (RAP) 0205. The operating temperature is
−40 °C (−40 °F)
to 85 °C (185 °F) for the charging system and
0 °C (32 °F) to 35 °C (95 °F) for the phone.
A charging stopped alert may be displayed
on the infotainment screen, if the wireless
charger or smartphone are outside of
normal operating temperature. Charging will
automatically resume when a normal
operating temperature is reached.
{Warning
Remove all objects from the charger
before charging your compatible
smartphone. Objects, such as coins, keys,
rings, paper clips, or cards, between the
smartphone and charger may become
very hot.
On the rare occasion that the charging
system does not detect an object, and
the object gets wedged between the
smartphone and charger, remove the
smartphone and allow the object to cool
before removing it from the charger, to
prevent burns.