CD player GMC YUKON 2005 Owner's Guide
[x] Cancel search | Manufacturer: GMC, Model Year: 2005, Model line: YUKON, Model: GMC YUKON 2005Pages: 530, PDF Size: 3.2 MB
Page 272 of 530
y(Main DVD Menu):Press this button to access the
DVD menu. The DVD menu is different on every
DVD. Use the up, down, left, and right arrow buttons to
move the cursor around the DVD menu. After making
a selection press the enter button. This button only
operates when playing a DVD.
z(Set-up Menu):Press this button to adjust the
color, tint, brightness, contrast, display mode, and
dynamic range compression. The dynamic range
compression feature can be used to reduce loud audio
and increase low audio produced by some DVDs.
To change a feature back to the factory default setting,
press this button to display the feature, then press
and hold this button. The default setting will appear on
the display.
While playing an Audio or DVD disc, press and hold this
button to display and to remove the track and time
information.
n,q,p,o(Menu Navigation Arrows):Use the
arrow buttons to navigate through a menu.
r(Enter):Press this button to select the choices
that are highlighted in any menu.
Playing a Disc
To play a disc, gently insert the disc with the label side up
into the loading slot. The DVD player will continue loading
the disc and the player will automatically start, if the
vehicle is in RUN, ACCESSORY, or when RAP is active.
If a disc is already in the player, press the play/pause
button on the DVD player faceplate or on the remote
control.
Some DVDs will not allow fast forwarding or skipping of
the copyright information or the previews. Some DVDs
will begin playing after the previews have �nished. If the
DVD does not begin to play the main title, refer to the
on-screen instructions.
Stopping and Resuming Playback
To stop playing a disc, press and release the stop button
on the DVD player faceplate or the remote control.
To resume playback, press the play/pause button on
the DVD player faceplate or the remote control.
The movie should resume play from where it was last
stopped, if the disc has not been ejected and the
stop button has not been pressed twice. If the disc has
been ejected or if the stop button has been pressed
twice, the disc will resume play at the beginning.
3-122
Page 273 of 530
Ejecting a Disc
Press the eject button on the DVD player faceplate to
eject the disc. There is not an eject button on the remote
control.
If a disc is ejected from the player, but is not removed,
the DVD player will reload the disc after a short
period of time. The disc will be stored in the DVD player.
The DVD player will not resume play of the disc
automatically.
Remote Control
To use the remote control, aim it at the transmitter
window below the video screen and press the desired
button. Direct sunlight or very bright light may affect the
ability of the RSE system to receive signals from the
remote control. If the remote control does not seem to
be working, the batteries may need to be replaced.
See “Battery Replacement” later in this section.
Objects blocking the line of sight may also affect the
function of the remote control.
Notice:Storing the remote control in a hot area or
in direct sunlight may damage it, and the repairs
would not be covered by your warranty. Keep
the remote control stored in a cool, dry place.
To extend the life of the batteries, the remote control
does not have a press and hold feature.
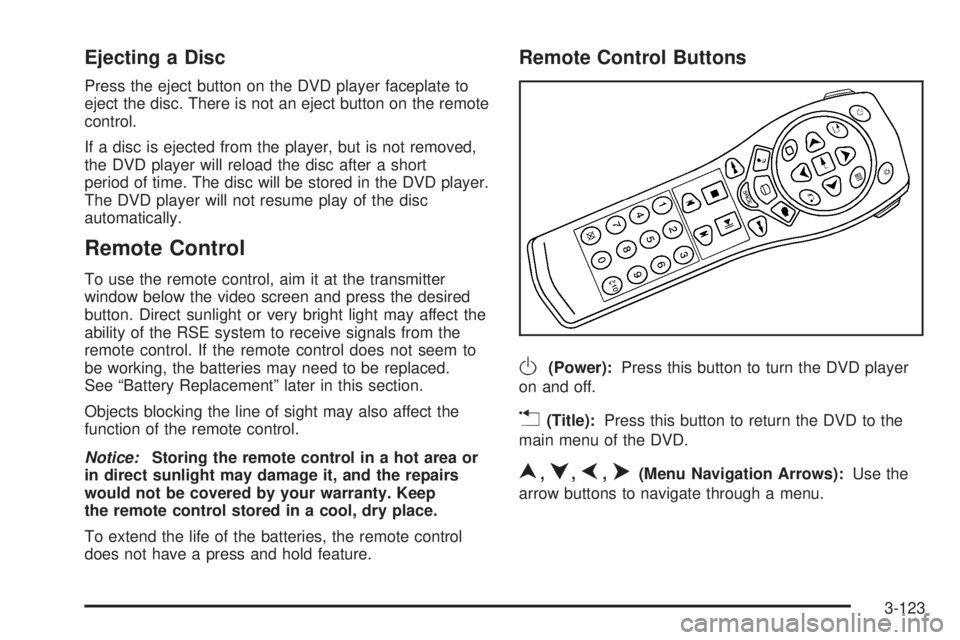
Remote Control Buttons
O(Power):Press this button to turn the DVD player
on and off.
v(Title):Press this button to return the DVD to the
main menu of the DVD.
n,q,p,o(Menu Navigation Arrows):Use the
arrow buttons to navigate through a menu.
3-123
Page 274 of 530
z(Set-up Menu):Press this button to adjust the
color, tint, brightness, contrast, display mode, and
dynamic range compression. The dynamic range
compression feature can be used to reduce loud audio
and increase low audio produced by some DVDs.
e(Audio):Press this button to display a menu that
will only appear when a DVD is being played. The format
and content of this function will vary for each disc.
r(Fast Reverse):Press this button to fast reverse
the DVD or CD. To stop fast reversing, press this button
again. This button may not work when the DVD is
playing the copyright information or the previews.
SRCE (Source):Press this button to switch between
the DVD player and an auxiliary source.
c(Stop):Press this button to stop playing, rewinding,
or fast forwarding a DVD or CD. Press this button
twice to return to the beginning of the DVD.
t(Previous Track/Chapter):Press this button to
return to the start of the current track or chapter. Press
this button again to return to the previous track or
chapter. This button may not work when the DVD is
playing the copyright information or the previews.1 through 0 (Numeric Keypad):The numeric keypad
provides you with the capability of direct chapter,
title, and track number selection.
}10 (Double Digit Entries):Press this button to
select chapter, title, and track numbers greater than 9.
Press this button before inputting the number.
\(Clear):Press this button within three seconds after
inputting a number to clear the number(s).
P(Illumination):Press this button to turn the remote
control backlight on. The backlight will time out after
about 7 to 10 seconds if no other button is pressed while
the backlight is on.
y(Main DVD Menu):Press this button to access the
DVD menu. The DVD menu is different on every
DVD. Use the up, down, left, and right arrow buttons to
move the cursor around the DVD menu. After making
a selection press the enter button. This button only
operates when playing a DVD.
3-124
Page 276 of 530
Battery Replacement
To change the batteries, do the following:
1. Remove the battery compartment door located on
the bottom of the remote control.
2. Replace the two AA batteries in the compartment.
Make sure that they are installed correctly, using
the diagram on the inside of the battery
compartment.
3. Close the battery door securely.
If the remote control is to be stored for a long period of
time, remove the batteries and keep them in a cool,
dry place.
Problem Recommended Action
No power. The ignition might not be
in on or accessory.
The parental control
button might have been
turned on. The power
indicator light will �ash.
Problem Recommended Action
Disc will not play. The system might be off.
The parental control
button might have been
turned on. The power
indicator light will �ash.
The system might be in
auxiliary mode.
The disc is upside down
or is not compatible.
The picture does not �ll
the screen. There are
black borders on the top
and bottom or on both
sides or it looks
stretched out.Check the display mode
settings in the display
menu.
The disc was ejected, but
it was pulled back into
the DVD player.The disc is being stored
in the DVD player. Press
the eject button again to
eject the disc.
3-126
Page 277 of 530
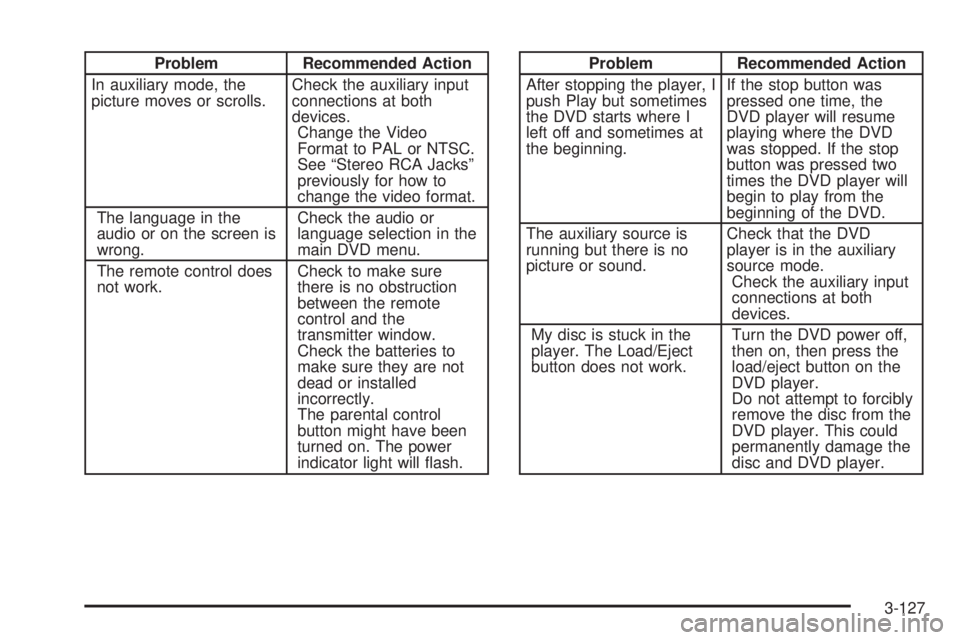
Problem Recommended Action
In auxiliary mode, the
picture moves or scrolls.Check the auxiliary input
connections at both
devices.
Change the Video
Format to PAL or NTSC.
See “Stereo RCA Jacks”
previously for how to
change the video format.
The language in the
audio or on the screen is
wrong.Check the audio or
language selection in the
main DVD menu.
The remote control does
not work.Check to make sure
there is no obstruction
between the remote
control and the
transmitter window.
Check the batteries to
make sure they are not
dead or installed
incorrectly.
The parental control
button might have been
turned on. The power
indicator light will �ash.Problem Recommended Action
After stopping the player, I
push Play but sometimes
the DVD starts where I
left off and sometimes at
the beginning.If the stop button was
pressed one time, the
DVD player will resume
playing where the DVD
was stopped. If the stop
button was pressed two
times the DVD player will
begin to play from the
beginning of the DVD.
The auxiliary source is
running but there is no
picture or sound.Check that the DVD
player is in the auxiliary
source mode.
Check the auxiliary input
connections at both
devices.
My disc is stuck in the
player. The Load/Eject
button does not work.Turn the DVD power off,
then on, then press the
load/eject button on the
DVD player.
Do not attempt to forcibly
remove the disc from the
DVD player. This could
permanently damage the
disc and DVD player.
3-127
Page 278 of 530
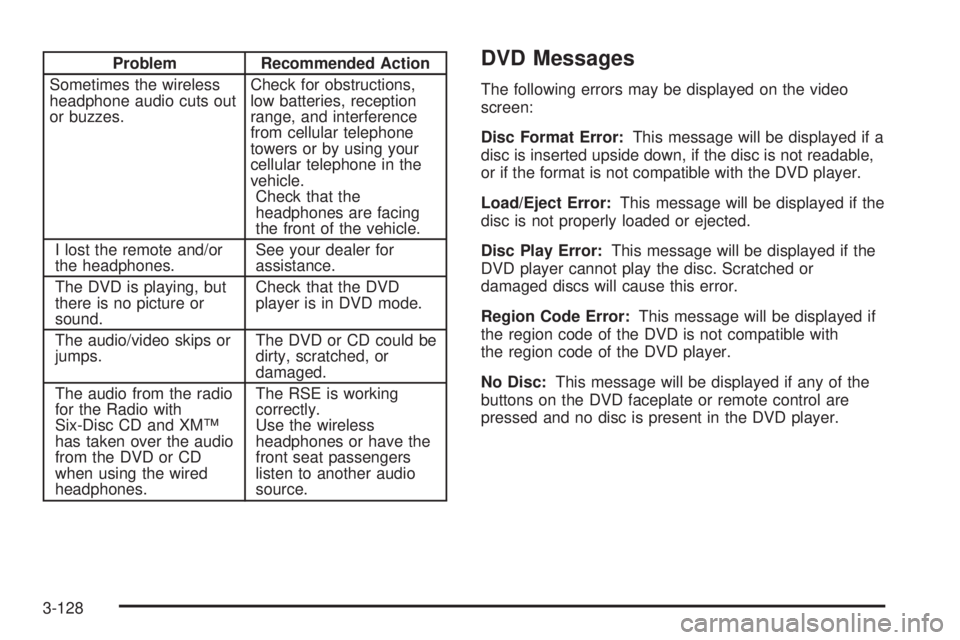
Problem Recommended Action
Sometimes the wireless
headphone audio cuts out
or buzzes.Check for obstructions,
low batteries, reception
range, and interference
from cellular telephone
towers or by using your
cellular telephone in the
vehicle.
Check that the
headphones are facing
the front of the vehicle.
I lost the remote and/or
the headphones.See your dealer for
assistance.
The DVD is playing, but
there is no picture or
sound.Check that the DVD
player is in DVD mode.
The audio/video skips or
jumps.The DVD or CD could be
dirty, scratched, or
damaged.
The audio from the radio
for the Radio with
Six-Disc CD and XM™
has taken over the audio
from the DVD or CD
when using the wired
headphones.The RSE is working
correctly.
Use the wireless
headphones or have the
front seat passengers
listen to another audio
source.DVD Messages
The following errors may be displayed on the video
screen:
Disc Format Error:This message will be displayed if a
disc is inserted upside down, if the disc is not readable,
or if the format is not compatible with the DVD player.
Load/Eject Error:This message will be displayed if the
disc is not properly loaded or ejected.
Disc Play Error:This message will be displayed if the
DVD player cannot play the disc. Scratched or
damaged discs will cause this error.
Region Code Error:This message will be displayed if
the region code of the DVD is not compatible with
the region code of the DVD player.
No Disc:This message will be displayed if any of the
buttons on the DVD faceplate or remote control are
pressed and no disc is present in the DVD player.
3-128
Page 279 of 530
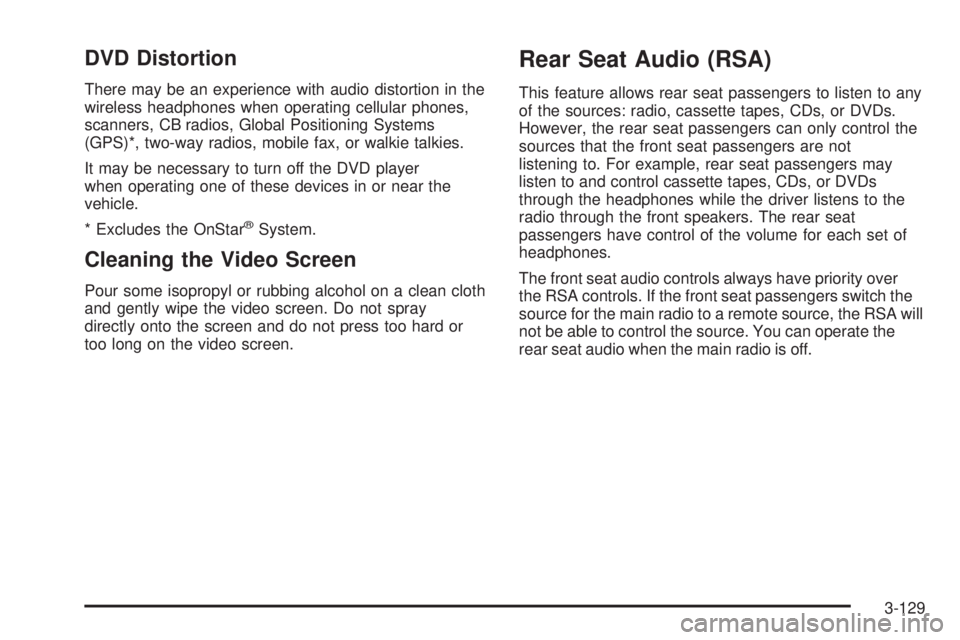
DVD Distortion
There may be an experience with audio distortion in the
wireless headphones when operating cellular phones,
scanners, CB radios, Global Positioning Systems
(GPS)*, two-way radios, mobile fax, or walkie talkies.
It may be necessary to turn off the DVD player
when operating one of these devices in or near the
vehicle.
* Excludes the OnStar
®System.
Cleaning the Video Screen
Pour some isopropyl or rubbing alcohol on a clean cloth
and gently wipe the video screen. Do not spray
directly onto the screen and do not press too hard or
too long on the video screen.
Rear Seat Audio (RSA)
This feature allows rear seat passengers to listen to any
of the sources: radio, cassette tapes, CDs, or DVDs.
However, the rear seat passengers can only control the
sources that the front seat passengers are not
listening to. For example, rear seat passengers may
listen to and control cassette tapes, CDs, or DVDs
through the headphones while the driver listens to the
radio through the front speakers. The rear seat
passengers have control of the volume for each set of
headphones.
The front seat audio controls always have priority over
the RSA controls. If the front seat passengers switch the
source for the main radio to a remote source, the RSA will
not be able to control the source. You can operate the
rear seat audio when the main radio is off.
3-129
Page 283 of 530
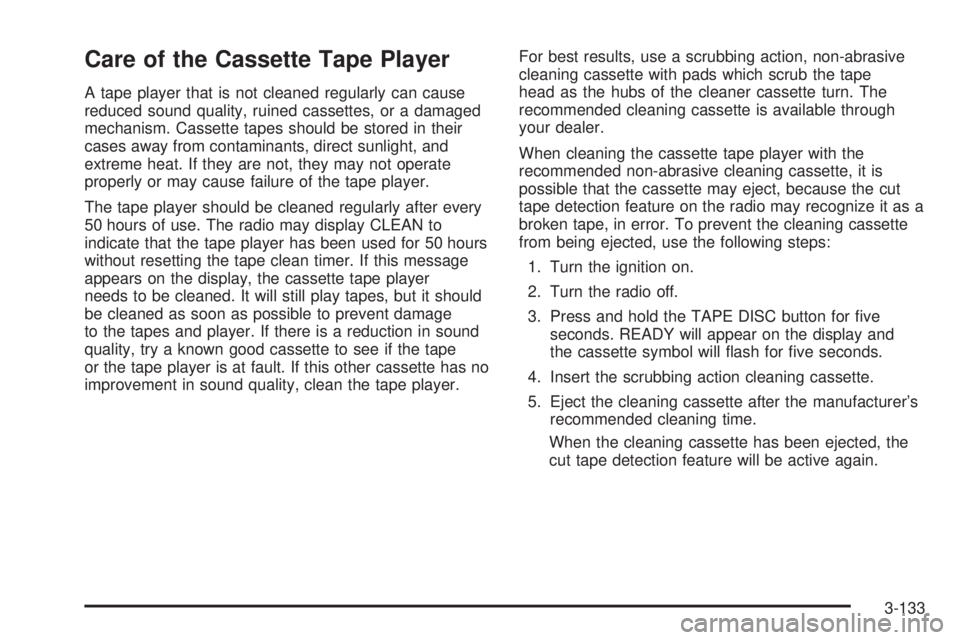
Care of the Cassette Tape Player
A tape player that is not cleaned regularly can cause
reduced sound quality, ruined cassettes, or a damaged
mechanism. Cassette tapes should be stored in their
cases away from contaminants, direct sunlight, and
extreme heat. If they are not, they may not operate
properly or may cause failure of the tape player.
The tape player should be cleaned regularly after every
50 hours of use. The radio may display CLEAN to
indicate that the tape player has been used for 50 hours
without resetting the tape clean timer. If this message
appears on the display, the cassette tape player
needs to be cleaned. It will still play tapes, but it should
be cleaned as soon as possible to prevent damage
to the tapes and player. If there is a reduction in sound
quality, try a known good cassette to see if the tape
or the tape player is at fault. If this other cassette has no
improvement in sound quality, clean the tape player.For best results, use a scrubbing action, non-abrasive
cleaning cassette with pads which scrub the tape
head as the hubs of the cleaner cassette turn. The
recommended cleaning cassette is available through
your dealer.
When cleaning the cassette tape player with the
recommended non-abrasive cleaning cassette, it is
possible that the cassette may eject, because the cut
tape detection feature on the radio may recognize it as a
broken tape, in error. To prevent the cleaning cassette
from being ejected, use the following steps:
1. Turn the ignition on.
2. Turn the radio off.
3. Press and hold the TAPE DISC button for �ve
seconds. READY will appear on the display and
the cassette symbol will �ash for �ve seconds.
4. Insert the scrubbing action cleaning cassette.
5. Eject the cleaning cassette after the manufacturer’s
recommended cleaning time.
When the cleaning cassette has been ejected, the
cut tape detection feature will be active again.
3-133
Page 284 of 530
A non-scrubbing action, wet-type cleaner which uses a
cassette with a fabric belt to clean the tape head
can be used. This type of cleaning cassette will not
eject on its own. A non-scrubbing action cleaner may not
clean as thoroughly as the scrubbing type cleaner.
The use of a non-scrubbing action, dry-type cleaning
cassette is not recommended.
After the player is cleaned, press and hold the eject
button for �ve seconds to reset the CLEAN indicator.
The radio will display --- or CLEANED to show the
indicator was reset.
Cassettes are subject to wear and the sound quality
may degrade over time. Always make sure the cassette
tape is in good condition before the tape player is
serviced.Care of Your CDs and DVDs
Handle discs carefully. Store them in their original cases
or other protective cases and away from direct sunlight
and dust. If the surface of a disc is soiled, dampen
a clean, soft cloth in a mild, neutral detergent solution
and clean it, wiping from the center to the edge.
Be sure never to touch the side without writing when
handling discs. Pick up discs by grasping the outer
edges or the edge of the hole and the outer edge.
Care of the CD and DVD Player
The use of CD lens cleaners for CDs is not advised,
due to the risk of contaminating the lens of the CD optics
with lubricants internal to the CD mechanism.
3-134
Page 516 of 530
Audio System(s).............................................3-74
AM-FM Radio.............................................3-76
Audio Steering Wheel Controls....................3-131
Care of Your Cassette Tape Player...............3-133
Care of Your CD and DVD Player................3-134
Care of Your CDs and DVDs.......................3-134
Chime Level Adjustment.............................3-135
Fixed Mast Antenna...................................3-135
Navigation/Radio System, see Navigation
Manual.................................................3-118
Radio with Cassette and CD.........................3-89
Radio with CD............................................3-78
Radio with Six-Disc CD..............................3-103
Rear Seat Audio (RSA)...............................3-129
Setting the Time for Radios with Radio Data
Systems (RDS)........................................3-75
Setting the Time for Radios without Radio
Data Systems (RDS)................................3-75
Theft-Deterrent Feature...............................3-131
Understanding Radio Reception...................3-132
XM™ Satellite Radio Antenna System...........3-135
Automatic Headlamp System............................3-16
Automatic Transmission
Fluid..........................................................5-21
Operation...................................................2-23
Autoride
®™ ....................................................4-66
Auxiliary Roof Mounted Lamp Switch.................3-17
B
Battery..........................................................5-40
Run-Down Protection...................................3-19
Battery Warning Light......................................3-42
Before Leaving on a Long Trip.........................4-42
Bench Seat....................................................1-15
Bench Seat Split (50/50)..................................1-11
Bench Seat, Split (60/40)................................... 1-8
Brake
Anti-Lock Brake System (ABS)........................ 4-6
Emergencies................................................ 4-8
Parking......................................................2-35
System Warning Light..................................3-43
Brake Pedal, Throttle.......................................2-22
Brakes..........................................................5-37
Braking........................................................... 4-5
Braking in Emergencies..................................... 4-8
Break-In, New Vehicle.....................................2-19
Bucket Seats, Rear.........................................1-19
Bulb Replacement...........................................5-49
Front Turn Signal, Sidemarker and Daytime
Running Lamps........................................5-51
Halogen Bulbs............................................5-49
Headlamps.................................................5-50
Replacement Bulbs......................................5-56
2