buttons GMC YUKON 2006 Owner's Manual
[x] Cancel search | Manufacturer: GMC, Model Year: 2006, Model line: YUKON, Model: GMC YUKON 2006Pages: 540, PDF Size: 3.14 MB
Page 11 of 540
Heated Seats
If your vehicle has this
feature, the buttons are
located on the front doors.
The engine must be
running for the heated
seats to work.
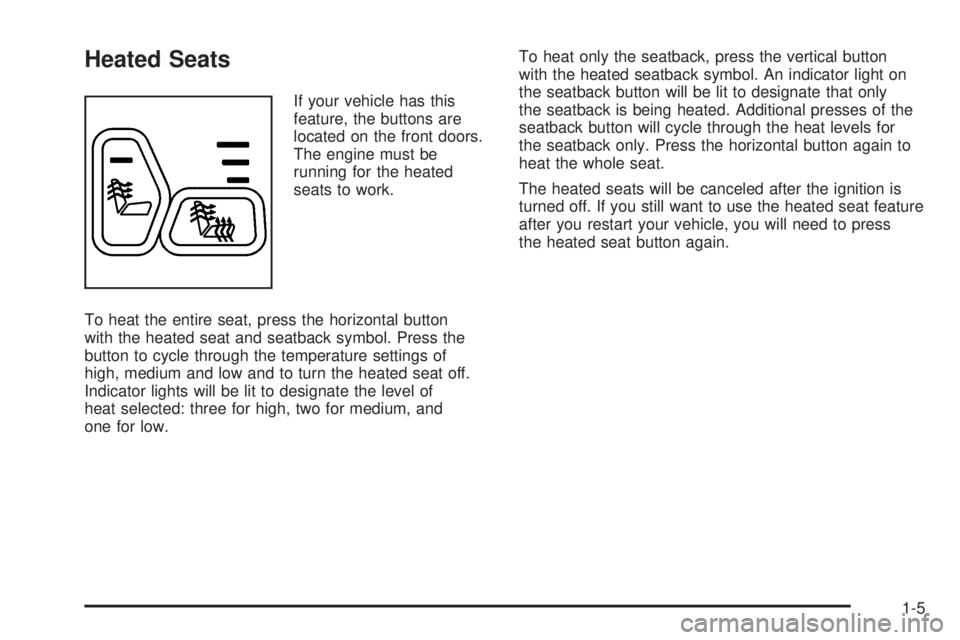
To heat the entire seat, press the horizontal button
with the heated seat and seatback symbol. Press the
button to cycle through the temperature settings of
high, medium and low and to turn the heated seat off.
Indicator lights will be lit to designate the level of
heat selected: three for high, two for medium, and
one for low.To heat only the seatback, press the vertical button
with the heated seatback symbol. An indicator light on
the seatback button will be lit to designate that only
the seatback is being heated. Additional presses of the
seatback button will cycle through the heat levels for
the seatback only. Press the horizontal button again to
heat the whole seat.
The heated seats will be canceled after the ignition is
turned off. If you still want to use the heated seat feature
after you restart your vehicle, you will need to press
the heated seat button again.
1-5
Page 103 of 540

To replace the battery in the keyless entry transmitter,
do the following:
1. Insert a thin object, such as a coin, in the slot
between the covers of the transmitter housing
near the key ring hole. Remove the bottom
by twisting the coin.
2. Remove and replace the battery with a
three-volt CR2032 or equivalent battery,
positive (+) side up.3. Align the covers and snap them together.
4. Resynchronize the transmitter. See
“Resynchronization” following this information.
5. Check the operation of the transmitter.
Resynchronization
Resynchronization may be necessary due to the
security method used by this system. The transmitter
does not send the same signal twice to the receiver.
The receiver will not respond to a signal that has been
sent previously. This prevents anyone from recording
and playing back the signal from the transmitter.
To resynchronize your transmitter, stand close to
your vehicle and press and hold the lock and unlock
buttons on the transmitter at the same time for
15 seconds. The door locks should cycle to con�rm
synchronization. If the locks do not cycle, see your
dealer for service.
2-7
Page 122 of 540
When Tow/Haul mode
is selected the
Tow/Haul indicator
light will illuminate.
The Tow/Haul mode also interacts with the Autoride
®
feature, if equipped, to enhance the ride when trailering
or with a loaded vehicle. SeeAutoride®on page 4-60.
Four-Wheel Drive
If your vehicle has four-wheel drive, you will see the
buttons shown below. You can send your engine’s
driving power to all four wheels for extra traction.
To get the most satisfaction out of four-wheel drive,
you must be familiar with its operation. Read the
part that follows before using four-wheel drive.
Notice:Driving on clean, dry pavement in
Four-Wheel-Drive High or Four-Wheel-Drive Low for
an extended period of time may cause premature
wear on your vehicle’s powertrain. Do not drive on
clean, dry pavement in Four-Wheel Drive High or
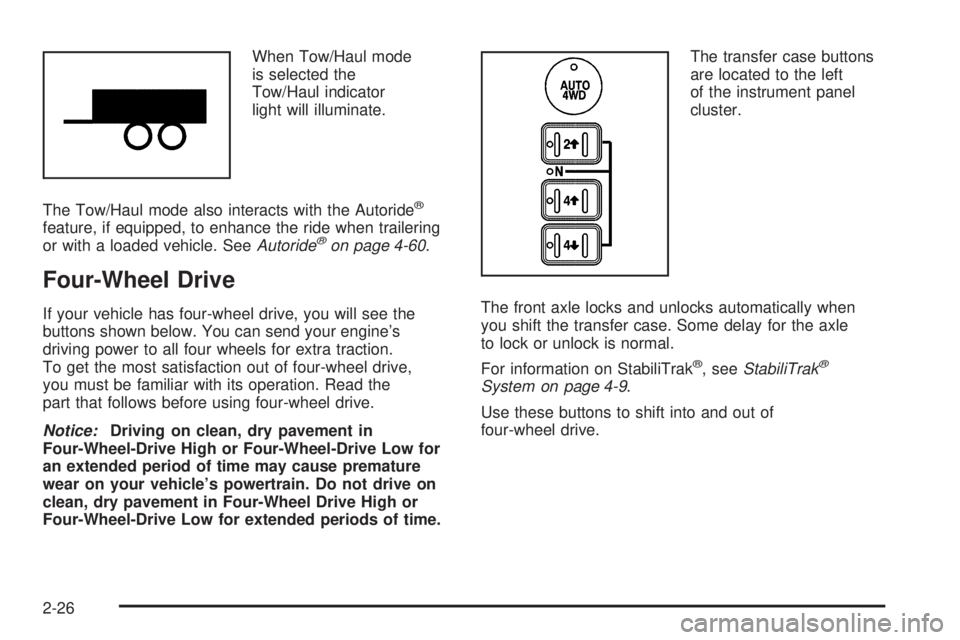
Four-Wheel-Drive Low for extended periods of time.The transfer case buttons
are located to the left
of the instrument panel
cluster.
The front axle locks and unlocks automatically when
you shift the transfer case. Some delay for the axle
to lock or unlock is normal.
For information on StabiliTrak
®, seeStabiliTrak®
System on page 4-9.
Use these buttons to shift into and out of
four-wheel drive.
2-26
Page 126 of 540

Shifting into NEUTRAL
To shift the transfer case to NEUTRAL do the following:
1. Make sure the vehicle is parked so that it will
not roll.
2. Set the parking brake. SeeParking Brake on
page 2-31for more information.
3. Start the vehicle or turn the ignition to RUN.
4. Put the transmission in NEUTRAL (N).
5. Shift the transfer case to Two-Wheel High.
6. Simultaneously press and hold the Two-Wheel High
and Four-Wheel Low buttons for 10 seconds.
The NEUTRAL light will come on when the transfer
case shift to NEUTRAL is complete.
7. If the engine is running, verify that the transmission
is in NEUTRAL (N) by shifting the transmission
to REVERSE (R) for one second, then shift
the transmission to DRIVE (D) for one second.
8. Turn the ignition to ACCESSORY, which will turn
the engine off.
9. Place the transmission shift lever in PARK (P).
10. Turn the ignition to LOCK.
Shifting Out of NEUTRAL
To shift out of NEUTRAL do the following:
1. Set the parking brake and apply the regular
brake pedal.
2. Shift the transmission to NEUTRAL (N) and turn
the ignition to RUN with the engine off.
3. Press the button for the desired transfer case
shift position (Two-Wheel High, Four-Wheel High,
AUTO 4WD, or Four-Wheel Low).
After the transfer case has shifted out of
NEUTRAL the NEUTRAL light will go out.
4. Release the parking brake.
Notice:Shifting the transmission into gear
before the Four-Wheel Low indicator light has
stopped �ashing could damage the transfer case.
To help avoid damaging your vehicle, always
wait for the Four-Wheel Low indicator light to stop
�ashing before shifting the transmission into gear.
5. Start the engine and shift the transmission to
the desired position.
Excessively shifting the transfer case into or out of
the different modes may cause the transfer case to enter
the shift protection mode. This will protect the transfer
case from possible damage and will only allow the
transfer case to respond to one shift per 10 seconds.
The transfer case may stay in this mode for up to
three minutes.
2-30
Page 133 of 540
{CAUTION:
Four-wheel drive vehicles with the transfer
case in NEUTRAL will allow the vehicle to roll,
even if your shift lever is in PARK (P). So, be
sure the transfer case is in a drive gear — not
in NEUTRAL. Always set your parking brake.
Follow the proper steps to be sure your vehicle will
not move. SeeShifting Into Park (P) on page 2-32.
If you are pulling a trailer, seeTowing a Trailer
on page 4-60.
Mirrors
Manual Rearview Mirror
Pull the tab under the mirror toward you to reduce glare
from headlamps behind you after dark. Push the tab
away from you for normal daytime operation.
Automatic Dimming Rearview Mirror
with OnStar
®and Compass
Your vehicle may have an automatic-dimming rearview
mirror with a compass and the OnStar®system.
There are three additional buttons for the OnStar
®
system. See your dealer for more information on
the system and how to subscribe to OnStar®.
SeeOnStar®System on page 2-50for more
information about the services OnStar®provides.
2-37
Page 135 of 540

To adjust for compass variance, do the following:
1. Find your current location and variance zone
number on the map.
2. Press and hold the on/off button for six seconds.
Release the button when ZONE is displayed.
The number shown is the current zone number.3. Scroll through the zone numbers that appear in
the compass/temperature window on the mirror
by pressing the on/off button. Once you �nd your
zone number, release the button. After about
four seconds, the mirror will return to the compass
display, and the new zone number will be set.
Automatic Dimming Rearview Mirror
with OnStar
®, Compass and
Temperature Display
Your vehicle may have this feature. When on, the
automatic dimming mirror dims to the proper level to
minimize glare from lights behind you after dark.
The mirror has a dual display in the upper right corner
of the mirror face that shows the compass reading
and the outside temperature.
Control buttons for the OnStar
®system are at the
bottom of the mirror. SeeOnStar®System on page 2-50
for more information about the services OnStar®
provides.
P(On/Off):This is the on/off button.
2-39
Page 138 of 540
Compass Calibration
The compass may need calibration if one of the
following occurs:
After approximately �ve seconds, the display does
not show a compass heading, N for North, for
example, there may be a strong magnetic �eld
interfering with the compass. Such interference may
be caused by a magnetic antenna mount, magnetic
note pad holder, or a similar magnetic item.
The compass does not display the correct heading
and the compass zone variance is set correctly.
In order to calibrate, CAL must be displayed in the
mirror compass windows. If CAL is not displayed,
push the on/off button for approximately 12 seconds
or until CAL is displayed.
The compass can be calibrated by driving the vehicle
in circles at 5 mph (8 km/h) or less until the display
reads a direction.
Passenger Airbag Indicator
The vehicle may be equipped with a passenger airbag
indicator, on the mirror glass, just above the buttons.
For more information, seePassenger Sensing System
on page 1-82andPassenger Airbag Status Indicator
on page 3-38.
Cleaning the Mirror
When cleaning the mirror, use a paper towel or similar
material dampened with glass cleaner. Do not spray
glass cleaner directly on the mirror as that may cause
the liquid cleaner to enter the mirror housing.
Automatic Dimming Rearview Mirror
with Compass
Your vehicle may have an automatic-dimming rearview
mirror with a compass.
Mirror Operation
When turned on, this mirror automatically dims to the
proper level to minimize glare from any headlamps
behind you after dark.
O(On/Off):This is the on/off button for the automatic
dimming feature and compass. Press the far left button,
located below the mirror face, for up to three seconds to
turn the feature on and off. A light on the mirror will be lit
while the feature is turned on.
Compass Operation
Press the on/off button once to turn the compass
on or off.
There is a compass display in the window in the
upper right corner of the mirror face. The compass
displays a maximum of two characters. For example,
“NE” is displayed for north-east.
2-42
Page 142 of 540

Passenger Airbag Indicator
The mirror may be equipped with a passenger airbag
indicator on the mirror glass, just above the buttons.
If the vehicle has this feature, the mirror will display the
word ON, or an airbag symbol in Canada, when the
passenger airbag is enabled. SeePassenger Sensing
System on page 1-82for more information.
Cleaning the Mirror
Use a paper towel or similar material dampened with
glass cleaner. Do not spray glass cleaner directly on
the mirror as that may cause the liquid cleaner to enter
the mirror housing.
Outside Manual Mirrors
Adjust your outside mirrors so you can just see the
side of your vehicle and have a clear view of objects
behind you. The mirrors can be folded in to enter
narrow areas.
The use of hood-mounted air de�ectors and add-on
convex mirror attachments may adversely affect mirror
performance.
Outside Camper-Type Mirrors
If your vehicle is equipped with camper-type mirrors,
they can be adjusted so you can have a clear view
of the objects behind you.
2-46
Page 149 of 540
Universal Home Remote System
Operation
Do not use the Universal Home Remote with any
garage door opener that does not have the “stop
and reverse” feature. This includes any garage door
opener model manufactured before April 1, 1982.
If you have a newer garage door opener with rolling
codes, please be sure to follow Steps 6 through 8
to complete the programming of your Universal
Home Remote Transmitter.
Read the instructions completely before attempting to
program the Universal Home Remote. Because of
the steps involved, it may be helpful to have another
person available to assist you in the programming steps.
Keep the original hand-held transmitter for use in
other vehicles as well as for future Universal Home
Remote programming. It is also recommended that
upon the sale of the vehicle, the programmed Universal
Home Remote buttons should be erased for security
purposes. See “Erasing Universal Home Remote
Buttons” later in this section or, for assistance,
seeCustomer Assistance Offices on page 7-4.Be sure that people and objects are clear of the
garage door or gate operator you are programming.
When programming a garage door, it is advised to
park outside of the garage.
It is recommended that a new battery be installed
in your hand-held transmitter for quicker and more
accurate transmission of the radio-frequency signal.
Programming Universal Home Remote
Follow these steps to program up to three channels:
1. Press and hold down the two outside Universal
Home Remote buttons, releasing only when the
Universal Home Remote indicator light begins
to �ash, after 20 seconds. Do not hold down the
buttons for longer than 30 seconds and do not
repeat this step to program a second and/or third
hand-held transmitter to the remaining two Universal
Home Remote buttons.
2. Position the end of your hand-held transmitter
about 1 to 3 inches (3 to 8 cm) away from the
Universal Home Remote buttons while keeping
the indicator light in view.
2-53
Page 150 of 540

3. Simultaneously press and hold both the desired
Universal Home Remote button and the hand-held
transmitter button. Do not release the buttons
until Step 4 has been completed.
Some entry gates and garage door openers
may require you to substitute Step 3 with the
procedure noted in “Gate Operator and Canadian
Programming” later in this section.
4. The indicator light will �ash slowly at �rst and then
rapidly after Universal Home Remote successfully
receives the frequency signal from the hand-held
transmitter. Release both buttons.
5. Press and hold the newly-trained Universal Home
Remote button and observe the indicator light.
If the indicator light stays on constantly,
programming is complete and your device should
activate when the Universal Home Remote button
is pressed and released.
To program the remaining two Universal
Home Remote buttons, begin with Step 2 under
“Programming Universal Home Remote.” Do
not repeat Step 1 as this will erase all of the
programmed channels.
If the indicator light blinks rapidly for two seconds
and then turns to a constant light, continue with
Steps 6 through 8 following to complete the
programming of a rolling-code equipped device,
most commonly, a garage door opener.6. Locate in the garage, the garage door opener
receiver (motor-head unit). Locate the “Learn”
or “Smart” button. This can usually be found
where the hanging antenna wire is attached to the
motor-head unit.
7. Firmly press and release the “Learn” or “Smart”
button. The name and color of the button may
vary by manufacturer.
You will have 30 seconds to start Step 8.
8. Return to the vehicle. Firmly press and hold the
programmed Universal Home Remote button for
two seconds, then release. Repeat the press/hold/
release sequence a second time, and depending
on the brand of the garage door opener, or
other rolling code device, repeat this sequence
a third time to complete the programming.
The Universal Home Remote should now activate
your rolling-code equipped device.
To program the remaining two Universal Home Remote
buttons, begin with Step 2 of “Programming Universal
Home Remote.” You do not want to repeat Step 1,
as this will erase all previous programming from
the Universal Home Remote buttons.
2-54