remote control GMC YUKON 2007 User Guide
[x] Cancel search | Manufacturer: GMC, Model Year: 2007, Model line: YUKON, Model: GMC YUKON 2007Pages: 608, PDF Size: 3.06 MB
Page 169 of 608
Do not use the this system with any garage door
opener that does not have the stop and reverse
feature. This includes any garage door opener
model manufactured before April 1, 1982.
Read the instructions completely before attempting
to program the transmitter. Because of the
steps involved, it may be helpful to have another
person available to assist you in programming
the transmitter.
Be sure to keep the original remote control
transmitter for use in other vehicles, as well as,
for future programming. You only need the
original remote control transmitter for �xed code
programming. It is also recommended that
upon the sale or lease termination of the vehicle,
the programmed buttons should be erased for
security purposes. See “Erasing your Universal
Home Remote Buttons” later in this section.
Be sure that people and objects are clear of
the garage door or security device you are
programming. When programming a garage door,
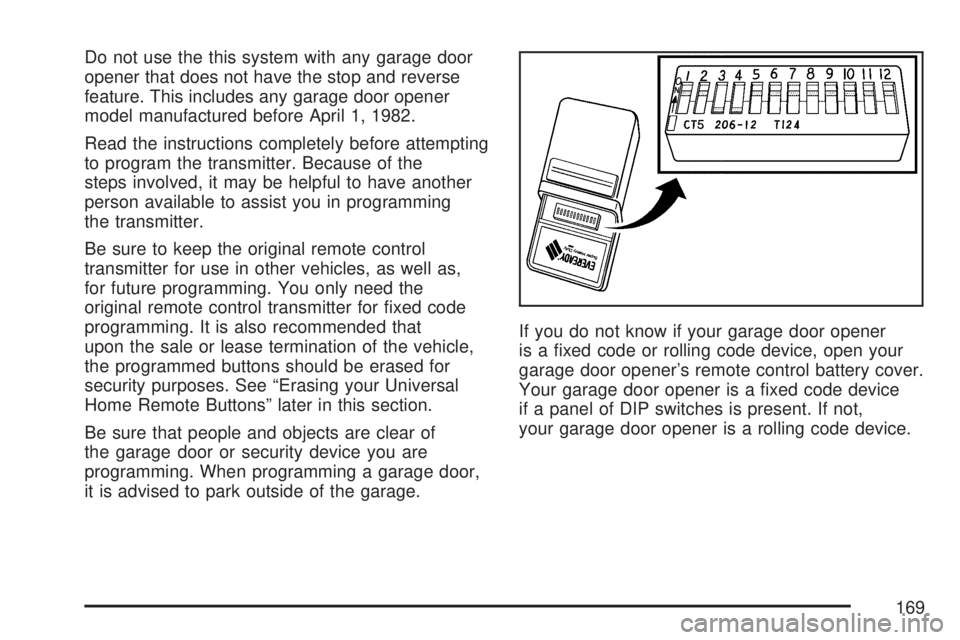
it is advised to park outside of the garage.If you do not know if your garage door opener
is a �xed code or rolling code device, open your
garage door opener’s remote control battery cover.
Your garage door opener is a �xed code device
if a panel of DIP switches is present. If not,
your garage door opener is a rolling code device.
169
Page 171 of 608

5. The indicator light will blink slowly. In order
from left to right, and within two and one-half
minutes, enter each switch setting into the
Universal Home Remote System. Push
one button for each switch as follows:
Left button = “on” switch position.
Right button = “off” switch position.
Middle button = “middle” switch position.6. After programming the switch settings, press
and release all three buttons at the same
time. The indicator lights will turn on.
7. Press and hold the button you would like to
use to control the garage door until the
garage door moves. The indicator light above
the selected button should slowly blink.
You may need to hold the button from
�ve to 55 seconds.
8. Immediately release the button when the
garage door moves. The indicator light will
blink rapidly until programming is complete.
9. Press and release the button again. The
garage door should move, con�rming that
programming is successful and complete.
To program another device such as an additional
garage door opener, a security device, or
home lighting, repeat Steps 1 through 8, choosing
a different function button in Step 7 than what
you used for the garage door opener.
171
Page 172 of 608

Programming Universal Home
Remote — Rolling Code
Rolling code garage door openers are used for
garage doors produced after 1996 and are
code protected. Rolling code means the coded
signal is changed every time your remote control
garage door opener is used.
Programming a rolling code garage door opener
involves time-sensitive actions, so read the
entire procedure before you begin. If you do not
follow these actions, the device will time out
and you will have to repeat the procedure.
Follow these steps to program up to
three channels:
1. Make sure that your key is in the
ACCESSORY position and the engine is off
while programming the transmitter.
2. Press the two outside buttons at the same
time for one to two seconds, and immediately
release them.3. Go to the garage. Locate the garage door
motor head and press and release the
“learn” button.
After pressing the “learn” button, you have
10 to 30 seconds to complete Step 4
depending on your garage control unit. If you
cannot locate the “learn” button, refer to
the owners guide for your garage door opener.
172
Page 173 of 608
4. Press and hold the button you would like to
use to control the garage door until the
garage door moves. The indicator light, above
the selected button, should slowly blink.
You may need to hold the button from
�ve to 20 seconds.
5. Immediately release the button when the
garage door moves. The indicator light will
blink rapidly until programming is complete.
6. Press and release the button again. The
garage door should move, con�rming that
programming is successful and complete.
To program another device such as an additional
garage door opener, a security device, or
home lighting, repeat Steps 1 through 6, choosing
a different function button in Step 4 than what
you used for the garage door opener.
Using Universal Home Remote
Press and hold the appropriate button for at least
half of a second. The indicator light will come
on while the signal is being transmitted.
Reprogramming Universal Home
Remote Buttons
You can reprogram any of the three buttons by
repeating the instructions.
Erasing Universal Home Remote
Buttons
You should erase the programmed buttons when
you sell the vehicle or terminate your lease.
To erase either rolling code or �xed code on the
Universal Home Remote device, do the following:
1. Press and hold the two outside buttons at
the same time for approximately 20 seconds,
until the indicator lights, located directly
above the buttons, begin to blink rapidly.
2. Once the indicator lights begin to blink,
release both buttons. The codes from all
button will be erased.
For additional information on Universal Home
Remote, seeCustomer Assistance Offices
on page 574.
173
Page 303 of 608

DVD/CD AUX (Auxiliary):Press this button to
cycle through DVD, CD, or Auxiliary when listening
to the radio. The DVD/CD text label and a message
showing track or chapter number will appear on
display when a disc is in either slot. Press this
button again and the system will automatically
search for an auxiliary input device, such as a
portable audio player. If a portable audio player
is not connected, “no aux input device” will be
displayed. If a disc is in both the DVD slot and the
CD slot the DVD/CD AUX button will cycle between
the two sources and not indicate “no aux input
device”. If a front auxiliary device is connected, the
DVD/CD AUX button will cycle through all available
options, such as: DVD slot, CD slot, Front AUX, and
Rear AUX (if available). See “Using the Auxiliary
Input Jack(s)” later in this section, orRear Seat
Entertainment System on page 321, “Audio/Video
(A/V) Jacks” for more information.
If a disc is inserted into top DVD slot, the rear seat
operator can turn on the video screen and use the
remote control to navigate the CD (tracks only)
through the remote control.Audio Output
Only one audio source can be heard through
the speakers at one time. An audio source
is de�ned as DVD slot, CD slot, XM™, FM/AM,
Front Aux Jack, or Rear Aux Jack.
Press the power button to turn the radio on.
The radio can be heard through all of the vehicle
speakers.
Front seat passengers can listen to the radio (AM,
FM, or XM) by pressing the BAND button or the
DVD/CD AUX button to select CD slot, DVD
slot, front or rear auxiliary input (if available).
If a playback device is plugged into the radio’s
front auxiliary input jack or the rear auxiliary jack,
the front seat passengers will be able to listen
to playback from this source through the vehicle
speakers. See “Using the Auxiliary Input Jack(s)”
later in this section, orRear Seat Entertainment
System on page 321, “Audio/Video (A/V) Jacks” for
more information.
In some vehicles, depending on audio options,
the rear speakers can be muted when the
RSA power is turned on. SeeRear Seat Audio
(RSA) on page 333for more information.
303
Page 311 of 608

DVD/CD AUX (Auxiliary):Press this button to
cycle through DVD, CD, or Auxiliary when listening
to the radio. The DVD/CD text label and a message
showing track or chapter number will appear on
display when a disc is in either slot. Press this
button again and the system will automatically
search for an auxiliary input device, such as a
portable audio player. If a portable audio player is
not connected, “no aux input device” will be
displayed. If a disc is in both the DVD slot and the
CD slot the DVD/CD AUX button will cycle between
the two sources and not indicate “no aux input
device”. If a front auxiliary device is connected, the
DVD/CD AUX button will cycle through all available
options, such as: DVD slot, CD slot, Front AUX, and
Rear AUX (if available). See “Using the Auxiliary
Input Jack(s)” later in this section, orRear Seat
Entertainment System on page 321, “Audio/Video
(A/V) Jacks” for more information.
If a MP3 is inserted into top DVD slot, the rear seat
operator can turn on the video screen and use the
remote control to navigate the CD (tracks only)
through the remote control.CD Messages
If these messages appear on the display and/or
the CD comes out, it could be for one of the
following reasons:
Optical Error:If the disc was inserted
upside down.
Disk Read Error:If a disc was inserted with an
invalid or unknown format.
Player Error:If there are disc LOAD or disc
EJECT problems.
It is very hot. When the temperature returns to
normal, the CD should play.
You are driving on a very rough road.
When the road becomes smoother, the CD
should play.
The CD is dirty, scratched, wet, or
upside down.
The air is very humid. If so, wait about an
hour and try again.
There may have been a problem while
burning the CD.
The label may be caught in the CD player.
311
Page 312 of 608

If the CD is not playing correctly, for any other
reason, try a known good CD.
If any error occurs repeatedly or if an error cannot
be corrected, contact your dealer. If the radio
displays an error message, write it down
and provide it to your dealer when reporting the
problem.
Using the DVD Player
The DVD player is controlled by the buttons on
the remote control, or by the RSA system,
or by the buttons on the radio faceplate. See
“Remote Control”, underRear Seat Entertainment
System on page 321andRear Seat Audio
(RSA) on page 333for more information.
The DVD player is only compatible with DVDs of
the appropriate region code that is printed on
the jacket of most DVDs.
The DVD slot of the radio is compatible with
most audio CDs, CD-R, CD-RW, DVD-Video,
DVD-Audio, DVD-R/RW, DVD+R/RW media along
with MP3 and WMA formats.If an error message appears on the video screen
or the radio, see “DVD Display Error Messages”
under,Rear Seat Entertainment System on
page 321and “DVD Radio Error Messages” in this
section for more information.
Playing a DVD
DVD/CD AUX (Auxiliary):Press this button to
cycle through DVD, CD, or Auxiliary when listening
to the radio. The DVD/CD text label and a message
showing track or chapter number will appear on
display when a disc is in either slot. Press this
button again and the system will automatically
search for an auxiliary input device, such as a
portable audio player. If a portable audio player is
not connected, “no aux input device” will be
displayed. If a disc is in both the DVD slot and the
CD slot the DVD/CD AUX button will cycle between
the two sources and not indicate “no aux input
device”. If a front auxiliary device is connected, the
DVD/CD AUX button will cycle through all available
options, such as: DVD slot, CD slot, Front AUX, and
Rear AUX (if available). See “Using the Auxiliary
Input Jack(s)” later in this section, orRear Seat
Entertainment System on page 321, “Audio/Video
(A/V) Jacks” for more information.
312
Page 313 of 608
O(Power):Press this knob to turn the radio on.
Turn this knob clockwise to increase the volume
or counterclockwise to decrease the volume.
A single press turns the radio off, a press and hold
for more than two seconds turns off the entire
radio and rear seat entertainment system
and starts the parental control feature which
prevents the rear seat occupant from operating
the Rear Seat Audio (RSA) system or remote
control.
A lock symbol will appear next to the clock
display. The parental control feature will remain on
until a subsequent press and hold of the power
button is performed (more than two seconds),
or until the driver turns the ignition off and exits the
vehicle.
f(Tune):Turn this knob to change tracks on a
CD or DVD, to manually tune a radio station, or to
change clock or date settings, while in the clock
or date setting mode. See the information
given earlier in this section speci�c to the radio,
CD, and the DVD. Also, seeSetting the Time
(Radio with a Six-Disc CD Player) on page 274or
Setting the Time (Radio with a Single CD and
DVD Player) on page 275, for setting the clock
and date.
©SEEK (Previous Track/Chapter):Press this
button to return to the start of the current track
or chapter. Press this button again to go to
the previous track or chapter. This button may not
work when the DVD is playing the copyright
information or the previews.
SEEK
¨(Next Track/Chapter):Press this
button to go to the next track or chapter. This
button may not work when the DVD is playing the
copyright information or the previews.
sREV (Reverse):Press this button to fast
reverse the CD or DVD, �ve times the normal
speed. The radio will display the elapsed
time while in fast reverse. To stop fast reversing,
press this button again. This button may not
work when the DVD is playing the copyright
information or the previews.
\FWD (Fast Forward):Press this button to
fast forward the CD or DVD. The radio will display
the elapsed time and will fast forward �ve times
the normal speed. To stop fast forwarding,
press this button again. This button may not work
when the DVD is playing the copyright information
or the previews.
313
Page 314 of 608
Z(Eject):Press this button to eject a CD or
DVD. If a CD or DVD is ejected, but not removed,
the player will automatically pull it back in after
15 seconds.
If loading and reading of a CD cannot be
completed, such as unknown format, etc., and the
disc fails to eject, press and hold the CD eject
button for more than �ve seconds to force the disc
to eject.
DVD-V (Video) Display Buttons
Once a DVD-V is inserted, the radio display menu
will show several tag options for DVD playing.
Press the pushbuttons located under any desired
tag option during DVD playback. See the tag
options listed below for more information.
The rear seat passenger can navigate the DVD-V
menus and controls through the remote control.
See “Remote Control”, underRear Seat
Entertainment System on page 321for more
information. The Video Screen automatically
turns on when the DVD-V is inserted into the
DVD slot.
r/j(Play/Pause):Press either the play or
pause icon displayed on the radio system,
to toggle between pausing or restarting playback
of a DVD. If the forward arrow is showing on
display, the system is in pause mode. If the pause
icon is showing on display, the system is in
playback mode. If the DVD screen is off, press the
play button to turn the screen on.
Some DVDs will begin playing after the previews
have �nished, although there may be a delay
of up to 30 seconds. If the DVD does not begin
playing the movie automatically, press the
pushbutton located under the play/pause symbol
tag displayed on the radio. If the DVD still does not
play, refer to the on-screen instructions, if
available.
c(Stop):Press this button to stop playing,
rewinding, or fast forwarding a DVD.
r(Enter):Press this button to select the
choices that are highlighted in any menu.
314
Page 315 of 608
y(Menu):Press this button to access the DVD
menu. The DVD menu is different on every
DVD. Use the pushbuttons located under the
navigation arrows to navigate the cursor through
the DVD menu. After making a selection press the
enter button. This button only operates when
using a DVD.
Nav (Navigate):Press this button to display
directional arrows for navigating through the
menus.
q(Return):Press this button to exit the current
active menu and return to the previous menu.
This button will operate only when a DVD is
playing and a menu is active.
DVD-A (Audio) Display Buttons
Once a DVD-A is inserted, radio display menu
will show several tag options for DVD playing.
Press the pushbuttons located under any desired
tag option during DVD playback. See the tag
options listed below for more information.The rear seat operator can navigate the DVD-A
menus and controls through the remote control.
See “Remote Control”, underRear Seat
Entertainment System on page 321for more
information. The Video Screen does not
automatically power on when the DVD-A is
inserted into the DVD slot. It must be manually
turned on by the rear seat occupant through
the remote control power button.
r/j(Play/Pause):Press either the play or
pause icon displayed on the radio system,
to toggle between pausing or restarting playback
of a DVD. If the forward arrow is showing on
display, the system is in pause mode. If the pause
icon is showing on display, the system is in
playback mode.
qGroupr:Press this button to cycle through
musical groupings on the DVD-A disc.
Nav (Navigate):Press this button to display
directional arrows for navigating through the
menus.
315