ESP GMC YUKON 2010 User Guide
[x] Cancel search | Manufacturer: GMC, Model Year: 2010, Model line: YUKON, Model: GMC YUKON 2010Pages: 614, PDF Size: 3.55 MB
Page 165 of 614

Theft-Deterrent Systems
Vehicle theft is big business, especially in some cities.
This vehicle has theft-deterrent features, however, they
do not make it impossible to steal.
Content Theft-Deterrent
Your vehicle may have a content theft-deterrent alarm
system.
This is the security light.To arm the theft-deterrent system:
1. Open the door.
2. Lock the door with the Remote Keyless Entry (RKE) transmitter or the power door lock switch.
The security light will come on to inform the driver
the system is arming. If a door is open when the
doors are locked, the security light will flash.
If the delayed locking feature is turned on, the
theft‐deterrent system will not start the arming
process until the last door is closed and the delay
timer has expired. See Delayed Locking
on
page 3‑11.
3. Close all doors. The security light should go off after about 30 seconds. The alarm is not armed
until the security light goes off.
If a locked driver door is opened without using the RKE
transmitter, a ten second pre-alarm will occur. The horn
will chirp and the lights will flash. If the key is not placed
in the ignition and turned to START or the door is not
unlocked by pressing the unlock button on the RKE
transmitter during the ten second pre-alarm, the alarm
will go off. Your vehicle's headlamps will flash and the
horn will sound for about 30 seconds, then will turn off
to save the battery power.
3-23
Page 172 of 614
Starting Procedure
1. With your foot off the accelerator pedal, turn theignition key to START. When the engine starts, let
go of the key. The idle speed will go down as the
engine gets warm. Do not race the engine
immediately after starting it. Operate the engine
and transmission gently to allow the oil to warm up
and lubricate all moving parts.
The vehicle has a Computer-Controlled Cranking
System. This feature assists in starting the engine
and protects components. If the ignition key is
turned to the START position, and then released
when the engine begins cranking, the engine will
continue cranking for a few seconds or until the
vehicle starts. If the engine does not start and the
key is held in START for many seconds, cranking
will be stopped after 15 seconds to prevent
cranking motor damage. To prevent gear damage,
this system also prevents cranking if the engine is
already running. Engine cranking can be stopped
by turning the ignition switch to the ACC/
ACCESSORY or LOCK/OFF position.
Notice: Cranking the engine for long periods of
time, by returning the key to the START position
immediately after cranking has ended, can overheat
and damage the cranking motor, and drain the
battery. Wait at least 15 seconds between each try,
to let the cranking motor cool down. 2. If the engine does not start after 5‐10 seconds,
especially in very cold weather (below 0°F or
−18°C), it could be flooded with too much gasoline.
Try pushing the accelerator pedal all the way to
the floor and holding it there as you hold the key
in START for up to a maximum of 15 seconds.
Wait at least 15 seconds between each try, to allow
the cranking motor to cool down. When the engine
starts, let go of the key and accelerator. If the
vehicle starts briefly but then stops again, do the
same thing. This clears the extra gasoline from the
engine. Do not race the engine immediately after
starting it. Operate the engine and transmission
gently until the oil warms up and lubricates all
moving parts.
Notice: The engine is designed to work with the
electronics in the vehicle. If you add electrical
parts or accessories, you could change the
way the engine operates. Before adding electrical
equipment, check with your dealer. If you do
not, the engine might not perform properly.
Any resulting damage would not be covered
by the vehicle warranty.
3-30
Page 176 of 614

Heavy Duty 6-Speed Automatic Transmission Shown(Light Duty Similar)
See “Range Selection Mode” later in this section.
P (Park): This position locks the rear wheels. It is the
best position to use when starting the engine because
the vehicle cannot move easily. When parked on a hill,
especially when the vehicle has a heavy load, you
might notice an increase in the effort to shift out of
P (Park). See Torque Lock (Automatic Transmission)
under Shifting Into Park
on page 3‑49for more
information.
{WARNING:
It is dangerous to get out of the vehicle if the shift
lever is not fully in P (Park) with the parking brake
firmly set. The vehicle can roll.
Do not leave the vehicle when the engine is
running unless you have to. If you have left the
engine running, the vehicle can move suddenly.
You or others could be injured. To be sure the
vehicle will not move, even when you are on fairly
level ground, always set the parking brake and
move the shift lever to P (Park). See Shifting Into
Park
on page 3‑49. If you are pulling a trailer,
see Towing a Trailer on page 5‑49.
3-34
Page 188 of 614

4. Release the parking brake prior to moving thevehicle.
Notice: Shifting the transmission into gear before
the Four-Wheel Drive Low indicator light has
stopped flashing could damage the transfer case.
To help avoid damaging the vehicle, always wait for
the Four-Wheel Drive Low indicator light to stop
flashing before shifting the transmission into gear.
5. Start the engine and shift the transmission to the desired position.
Excessively shifting the transfer case into or out of the
different modes may cause the transfer case to enter
the shift protection mode. This will protect the transfer
case from possible damage and will only allow the
transfer case to respond to one shift per 10 seconds.
The transfer case may stay in this mode for up to
three minutes.Four-Wheel Drive (Single Speed
Automatic Transfer Case)
If the vehicle has four-wheel drive, you can send the
engine's driving power to all four wheels for extra
traction. Read the following before using four-wheel
drive.
Notice: Driving on clean, dry pavement in
Four-Wheel Drive High for an extended period of
time may cause premature wear on the vehicle's
powertrain. Do not drive on clean, dry pavement in
Four-Wheel Drive High for extended periods of time.
While driving on clean dry pavement and during tight
turns, you may experience a vibration in the steering
system.
Front Axle
The front axle engages and disengages automatically
when you shift the transfer case. Some delay for the
axle to engage or disengage is normal.
3-46
Page 190 of 614
Service Four Wheel Drive
If the SERVICE 4 WHEEL DRIVE message stays on,
you should take the vehicle to your dealer for service.
See“SERVICE 4 WHEEL DRIVE message” underDIC
Warnings and Messages on page 4‑61.
Shifting Into Four-Wheel Drive High or
AUTO (Automatic Four-Wheel Drive)
Turn the knob to the Four-Wheel High or AUTO
position. This can be done at any speed. The indicator
light will flash while shifting. It will remain on when the
shift is completed.
Shifting Into Two-Wheel Drive High
Turn the knob to the Two-Wheel High position. This can
be done at any speed. The indicator light will flash while
shifting. It will remain on when the shift is completed.
Excessively shifting the transfer case into or out of the
different modes may cause the transfer case to enter
the shift protection mode. This will protect the transfer
case from possible damage and will only allow the
transfer case to respond to one shift per 10 seconds.
The transfer case may stay in this mode for up to
three minutes.
Parking Brake
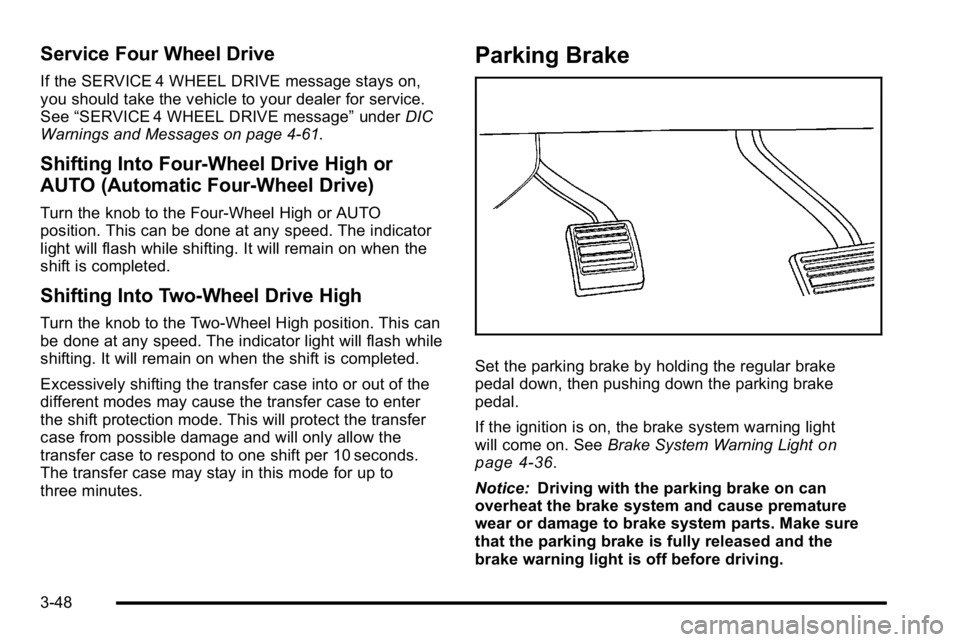
Set the parking brake by holding the regular brake
pedal down, then pushing down the parking brake
pedal.
If the ignition is on, the brake system warning light
will come on. See Brake System Warning Light
on
page 4‑36.
Notice: Driving with the parking brake on can
overheat the brake system and cause premature
wear or damage to brake system parts. Make sure
that the parking brake is fully released and the
brake warning light is off before driving.
3-48
Page 205 of 614

SBZA Error Messages
The following messages may appear in the DIC:
SIDE BLIND ZONE ALERT SYSTEM OFF:This
message indicates that the driver has turned the
system off.
SIDE BLIND ZONE SYS. UNAVAILABLE: This
message indicates that the SBZA system is disabled
either because the sensor is blocked and cannot
detect vehicles in your blind zone, or the vehicle is
passing through an open field of view area, such as the
desert, where there is insufficient data for operation.
The sensor may be blocked by mud, dirt, snow, ice,
slush, or even heavy rainstorms. This message may
also activate during heavy rain or due to road spray.
The vehicle does not need service. For cleaning, see
Washing Your Vehicle on page 6‑112.
SERVICE SIDE BLIND ZONE ALERT SYSTEM: If this
message appears, both SBZA displays will remain on
indicating there is a problem with the SBZA system.
If these displays remain on after continued driving, the
system needs service. Take the vehicle to your dealer.
FCC Information
See Radio Frequency Statementon page 8‑19for FCC
information.
Frequency of operation: 24.05GHz –24.25GHz
Field Strength: Not greater than 2.5V/m peak
(0.25V/m average) at a distance of 3m
The manufacturer is not responsible for any radio or TV
interference caused by unauthorized modifications to
this equipment. Such modifications could void the user's
authority to operate the equipment.
3-63
Page 277 of 614
Language
This display allows you to select the language in which
the DIC messages will appear. To select a language:1. Press the trip odometer reset stem until ODOMETER displays.
2. While in the ODOMETER display, press and hold the trip odometer reset stem for three seconds until
the currently set language displays.
3. Continue to press and hold the trip odometer reset stem to scroll through all of the available
languages.
The available selections are ENGLISH (default),
FRANCAIS (French), ESPANOL (Spanish), and
NO CHANGE.
4. Once the desired language is displayed, release the trip odometer reset stem to set your choice.
Engine Hours
To display the ENGINE HOURS, place the ignition in
LOCK/OFF or ACC/ACCESSORY, then press and hold
the trip odometer reset stem for four seconds while
viewing the ODOMETER. This display shows the total
number of hours the engine has run.
DIC Operation and Displays
(Without DIC Buttons)
If your vehicle does not have DIC buttons, the
information below explains the operation of this system.
The DIC has different displays which can be accessed
by pressing the trip odometer reset stem located on the
instrument panel cluster. Pressing the trip odometer
reset stem will also turn off, or acknowledge, DIC
messages.
The DIC displays trip and vehicle system information,
and warning messages if a system problem is detected.
If your vehicle does not have DIC buttons, you
can use the trip odometer reset stem to view the
following displays: language selection, trip odometer,
transmission temperature, trailer brake gain and output
information for vehicles with the Integrated Trailer Brake
Control (ITBC) system, compass zone setting, compass
recalibration, oil life, Tire Pressure Monitor System
(TPMS) programming for vehicles with the TPMS, and
Remote Keyless Entry (RKE) transmitter programming.
4-55
Page 278 of 614
Trip Odometer Reset Stem Menu Items
Language
This display allows you to select the language in which
the DIC messages will appear. To select a language:1. Press the trip odometer reset stem until ODOMETER displays.
2. While in the ODOMETER display, press and hold the trip odometer reset stem for three seconds until
the currently set language displays.
3. Continue to press and hold the trip odometer reset stem to scroll through all of the available
languages.
The available languages are ENGLISH (default),
FRANCAIS (French), ESPANOL (Spanish), and
NO CHANGE.
4. Once the desired language is displayed, release the trip odometer reset stem to set your choice.
Trip Odometer
Press the trip odometer reset stem until TRIP displays.
This display shows the current distance traveled in
either miles (mi) or kilometers (km) since the last reset
for the trip odometer.
The trip odometer can be reset to zero by pressing
and holding the trip odometer reset stem while the trip
odometer is displayed. The trip odometer has a feature called the retro-active
reset. This can be used to set the trip odometer to the
number of miles (kilometers) driven since the ignition
was last turned on. This can be used if the trip
odometer is not reset at the beginning of the trip.
To use the retro-active reset feature, press and hold
the trip odometer reset stem for at least four seconds.
The trip odometer will display the number of miles (mi)
or kilometers (km) driven since the ignition was last
turned on and the vehicle was moving. Once the vehicle
begins moving, the trip odometer will accumulate
mileage. For example, if the vehicle was driven
5 miles (8 km) before it is started again, and then the
retro-active reset feature is activated, the display will
show 5 miles (8 km). As the vehicle begins moving, the
display will then increase to 5.1 miles (8.2 km), 5.2 miles
(8.4 km), etc.
Transmission Temperature
Press the trip odometer reset stem until TRANS TEMP
displays. This display shows the temperature of the
automatic transmission fluid in either degrees
Fahrenheit (°F) or degrees Celsius (°C).
4-56
Page 295 of 614
DISPLAY LANGUAGE
This feature allows you to select the language in which
the DIC messages will appear.
Press the customization button until the DISPLAY
LANGUAGE screen appears on the DIC display. Press
the set/reset button once to access the settings for this
feature. Then press the customization button to scroll
through the following settings:
ENGLISH (default):All messages will appear in
English.
FRANCAIS: All messages will appear in French.
ESPANOL: All messages will appear in Spanish.
NO CHANGE: No change will be made to this feature.
The current setting will remain.
To select a setting, press the set/reset button while the
desired setting is displayed on the DIC.
You can also change the language by pressing the
trip odometer reset stem. See “Language”under DIC
Operation and Displays (Without DIC Buttons) earlier in
this section for more information.
AUTO DOOR LOCK
This feature allows you to select when the vehicle's
doors will automatically lock. See Programmable
Automatic Door Locks
on page 3‑11for more
information.
Press the customization button until AUTO DOOR
LOCK appears on the DIC display. Press the set/reset
button once to access the settings for this feature.
Then press the customization button to scroll through
the following settings:
SHIFT OUT OF PARK (default): The doors will
automatically lock when the vehicle is shifted out of
P (Park).
AT VEHICLE SPEED: The doors will automatically lock
when the vehicle speed is above 8 mph (13 km/h) for
three seconds.
NO CHANGE: No change will be made to this feature.
The current setting will remain.
To select a setting, press the set/reset button while the
desired setting is displayed on the DIC.
4-73
Page 337 of 614
Voice Recognition
The Bluetooth system uses voice recognition to
interpret voice commands to dial phone numbers
and name tags.
Noise:Keep interior noise levels to a minimum.
The system may not recognize voice commands if
there is too much background noise.
When to Speak: A short tone sounds after the system
responds indicating when it is waiting for a voice
command. Wait until the tone and then speak.
How to Speak: Speak clearly in a calm and natural
voice.
Audio System
When using the in‐vehicle Bluetooth system, sound
comes through the vehicle's front audio system
speakers and overrides the audio system. Use the
audio system volume knob, during a call, to change
the volume level. The adjusted volume level remains
in memory for later calls. To prevent missed calls, a
minimum volume level is used if the volume is turned
down too low.
Bluetooth Controls
Use the buttons located on the steering wheel to
operate the in‐vehicle Bluetooth system. See Audio
Steering Wheel Controls
on page 4‑136for more
information.
b g(Push To Talk): Press to answer incoming calls,
to confirm system information, and to start speech
recognition.
c x(Phone On Hook): Press to end a call, reject a
call, or to cancel an operation.
Pairing
A Bluetooth enabled cell phone must be paired to the
in‐vehicle Bluetooth system first and then connected
to the vehicle before it can be used. See the cell
phone manufacturers user guide for Bluetooth functions
before pairing the cell phone. If a Bluetooth phone
is not connected, calls will be made using OnStar
®
Hands‐Free Calling, if available. Refer to the OnStar
owner's guide for more information.
4-115