climate control GMC YUKON 2010 Owner's Guide
[x] Cancel search | Manufacturer: GMC, Model Year: 2010, Model line: YUKON, Model: GMC YUKON 2010Pages: 614, PDF Size: 3.55 MB
Page 243 of 614
O(On/Off):Press to turn the climate control
system on or off. Outside air still enters the vehicle,
and is directed to the floor. This direction can be
changed by pressing the mode button. Recirculation
can be selected once you have selected vent or bi-level
mode. The temperature can also be adjusted using
either temperature button. If the air delivery mode or
temperature settings are adjusted with the system off,
the display illuminates briefly to show the settings and
then returns to off. The system can be turned back on
by pressing either
O,D,C,#, the defrost or the AUTO
button.
Driver and Passenger Side Temperature
Control
The driver and passenger side temperature buttons
are used to adjust the temperature of the air coming
through the system on the driver or passenger's side of
the vehicle. The temperature can be adjusted even if the system is turned off. This is possible since outside
air always flows through the system as the vehicle is
moving forward unless it is set to recirculation mode.
See
“Recirculation” later in this section.
Press the + or −buttons to increase or decrease the
cabin temperature. The driver side or passenger side
temperature display shows the temperature setting
decreasing or increasing.
The passenger's temperature setting can be set to
match the driver's temperature setting by pressing the
PASS button and turning off the PASS indicator. When
the passenger's temperature setting is set different than
the driver's setting, the indicator on the PASS button
illuminates and both the driver side and passenger side
temperature displays are shown.
When in defrost mode the passenger temperature
setting cannot be changed.
4-21
Page 245 of 614
Manual Operation
D C(Fan Control):Press these buttons to increase or
decrease the fan speed.
Pressing either fan button while in automatic control
places the fan under manual control. The fan setting
remains displayed and the AUTO light turns off. The air
delivery mode remains under automatic control.
H G(Air Delivery Mode Control): Press these buttons
to change the direction of the airflow in the vehicle.
Repeatedly press either button until the desired mode
appears on the display. Pressing either mode button
while the system is off changes the air delivery mode
without turning the system on. Pressing either mode
button while in automatic control places the mode
under manual control.
The air delivery mode setting is displayed and the
AUTO light turns off. The fan remains under automatic
control.
H(Vent): Air is directed to the instrument panel
outlets.
)(Bi-Level): Air is divided between the instrument
panel and floor outlets. Some air is directed towards the
windshield and side window outlets.
6(Floor): Air is directed to the floor outlets, with some
to the windshield, side window outlets, and second row
floor outlets. In this mode, the system automatically
selects outside air.
-(Defog): This mode clears the windows of fog or
moisture. Air is directed to the windshield, floor outlets,
and side window vents. In this mode, the system
turns off recirculation and runs the air conditioning
compressor unless the outside temperature is close
to freezing. The recirculation mode cannot be selected
while in the defog mode.
0(Defrost): This mode removes fog or frost from
the windshield more quickly. Air is directed to the
windshield and side window vents, with some
directed to the floor vents. In this mode, the system
automatically forces outside air into the vehicle and
runs the air conditioning compressor unless the outside
temperature is close to freezing. The recirculation mode
cannot be selected while in the defrost mode.
The passenger temperature control cannot be activated
while in defrost mode. If the PASS button is pressed,
the button indicator flashes three times and will not
work. If the passenger temperature buttons are
adjusted, the driver temperature indicator changes.
The passenger temperature will not be displayed.
If vent, bi-level, or floor mode is selected again,
the climate control system displays the previous
temperature settings.
Do not drive the vehicle until all the windows are clear.
4-23
Page 246 of 614

#(Air Conditioning):Press to turn the air
conditioning (A/C) compressor on and off. An indicator
light comes on to show that the air conditioning is on.
If this button is pressed when the air conditioning
compressor is unavailable, the indicator flashes three
times and then turns off. If the air conditioning is on
and the outside temperature drops below a temperature
which is too cool for air conditioning to be effective,
the air conditioning light turns off to show that the air
conditioning mode has been canceled.
On hot days, open the windows long enough to let hot
inside air escape. This helps to reduce the time it takes
for the vehicle to cool down. It also helps the system to
operate more efficiently.
The air conditioning system removes moisture from
the air, so a small amount of water might drip under
the vehicle while idling or after turning off the engine.
This is normal.@(Recirculation): Press to turn the recirculation
mode on or off. An indicator light comes on to show that
the recirculation is on.
This mode recirculates and helps to quickly cool the
air inside the vehicle. It can be used to help prevent
outside air and odors from entering the vehicle.
The recirculation mode cannot be used with floor, defog,
or defrost modes. If recirculation is selected with one
of those modes, the indicator light flashes three times
and then turns off. The air conditioning compressor
also comes on when this mode is activated. While in
recirculation mode the windows may fog when the
weather is cold and damp. To clear the fog, select either
the defog or defrost mode and increase the fan speed.
The recirculation mode can also be turned off by turning
off the ignition.
REAR: For vehicles with the rear heat and air
conditioning controls. Press to turn the rear climate
control system on or off. See Rear Air Conditioning and
Heating System and Electronic Climate Controls
on
page 4‑28.
4-24
Page 248 of 614

The interior temperature sensors located in the
headliner above the driver side seat and if equipped, in
the headliner above the second row seats measure the
temperature of the air inside the vehicle.
There is also an exterior temperature sensor located
behind the front grille. This sensor reads the outside air
temperature and helps maintain the temperature inside
the vehicle. Any cover on the front of the vehicle could
cause a false reading in the displayed temperature.
The climate control system uses the information from
these sensors to maintain your comfort setting by
adjusting the outlet temperature, fan speed, and
the air delivery mode. The system may also supply
cooler air to the side of the vehicle facing the sun.
The recirculation mode will also be used as needed
to maintain cool outlet temperatures.
Outlet Adjustment
Use the air outlets located in the center and on the side
of the instrument panel to direct the airflow.
Operation Tips
.Keep the hood and front air inlets free of ice,
snow, or any other obstruction (such as leaves).
The heater and defroster will work far better,
reducing the chance of fogging the inside of the
windows.
.When you enter a vehicle in cold weather, press
the fan up button to the maximum fan level before
driving. This helps clear the intake ducts of snow
and moisture, and reduces the chance of fogging
the inside of the window.
.Keep the air path under the front seats clear of
objects. This helps air to circulate throughout the
vehicle.
.Adding outside equipment to the front of the
vehicle, such as hood-air deflectors, may affect the
performance of the heating and air conditioning
system. Check with your dealer before adding
equipment to the outside of the vehicle.
4-26
Page 249 of 614
Rear Air Conditioning and Heating
System
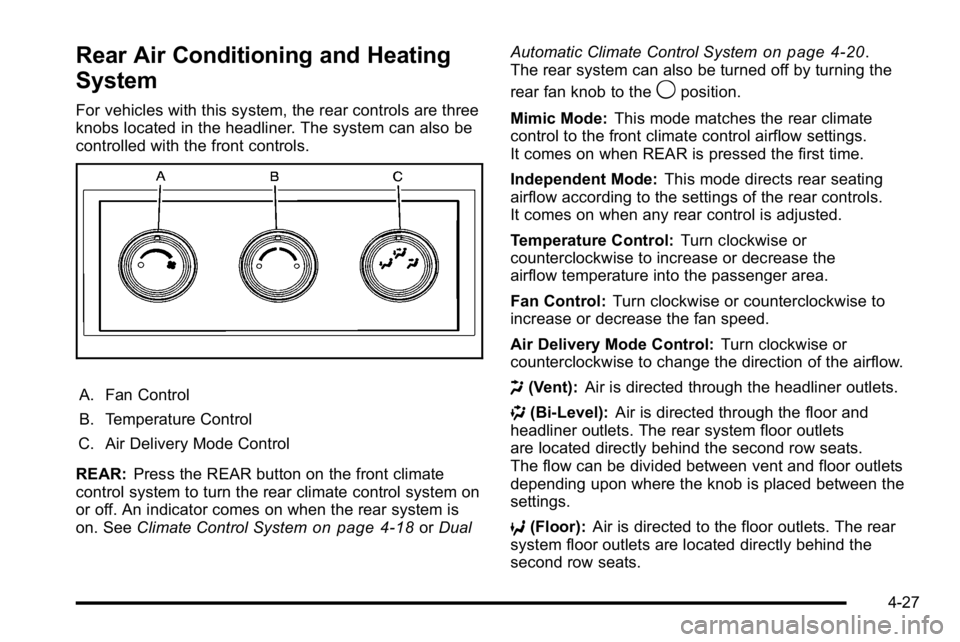
For vehicles with this system, the rear controls are three
knobs located in the headliner. The system can also be
controlled with the front controls.
A. Fan Control
B. Temperature Control
C. Air Delivery Mode Control
REAR: Press the REAR button on the front climate
control system to turn the rear climate control system on
or off. An indicator comes on when the rear system is
on. See Climate Control System
on page 4‑18orDual Automatic Climate Control System
on page 4‑20.
The rear system can also be turned off by turning the
rear fan knob to the
9position.
Mimic Mode: This mode matches the rear climate
control to the front climate control airflow settings.
It comes on when REAR is pressed the first time.
Independent Mode: This mode directs rear seating
airflow according to the settings of the rear controls.
It comes on when any rear control is adjusted.
Temperature Control: Turn clockwise or
counterclockwise to increase or decrease the
airflow temperature into the passenger area.
Fan Control: Turn clockwise or counterclockwise to
increase or decrease the fan speed.
Air Delivery Mode Control: Turn clockwise or
counterclockwise to change the direction of the airflow.
H (Vent): Air is directed through the headliner outlets.
) (Bi-Level): Air is directed through the floor and
headliner outlets. The rear system floor outlets
are located directly behind the second row seats.
The flow can be divided between vent and floor outlets
depending upon where the knob is placed between the
settings.
6 (Floor): Air is directed to the floor outlets. The rear
system floor outlets are located directly behind the
second row seats.
4-27
Page 250 of 614
Rear Air Conditioning and Heating
System and Electronic Climate
Controls
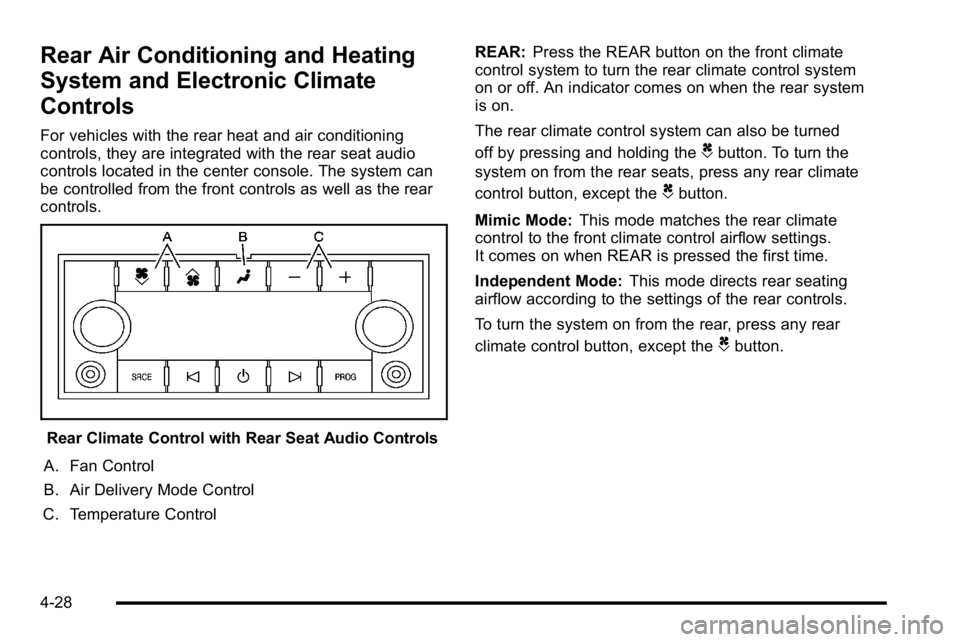
For vehicles with the rear heat and air conditioning
controls, they are integrated with the rear seat audio
controls located in the center console. The system can
be controlled from the front controls as well as the rear
controls.
Rear Climate Control with Rear Seat Audio Controls
A. Fan Control
B. Air Delivery Mode Control
C. Temperature Control REAR:
Press the REAR button on the front climate
control system to turn the rear climate control system
on or off. An indicator comes on when the rear system
is on.
The rear climate control system can also be turned
off by pressing and holding the
Cbutton. To turn the
system on from the rear seats, press any rear climate
control button, except the
Cbutton.
Mimic Mode: This mode matches the rear climate
control to the front climate control airflow settings.
It comes on when REAR is pressed the first time.
Independent Mode: This mode directs rear seating
airflow according to the settings of the rear controls.
To turn the system on from the rear, press any rear
climate control button, except the
Cbutton.
4-28
Page 251 of 614
Automatic Operation, If Equipped.
AUTO:Press the air delivery mode button until this
setting is selected to control the inside temperature, air
delivery, and fan speed. AUTO appears in the display
when automatic operation is active.
+/− (Increase/Decrease Temperature) : Press
the + or −buttons to increase or decrease the cabin
temperature. The rear control temperature display will
show the temperature setting increasing or decreasing.
The display only indicates climate control functions
when the system is in rear independent mode.
Manual Operation
D C(Fan Control): Press these buttons on the rear
seat audio control panel to increase or decrease the
airflow. Pressing the fan up button when the system is
off will turn the system on. The air delivery mode will
remain under automatic control.
+/− (Temperature Control): Press these buttons
to adjust the temperature of the air flowing into the
passenger area. Press the + button for warmer air
and press the −button for cooler air.
N(Air Delivery Mode Control): Press the mode
button to change the direction of the airflow in the
vehicle. Repeatedly press the button until the desired
mode appears on the display. Multiple presses will cycle
through the delivery selections.
Warning Lights, Gauges, and
Indicators
Warning lights and gauges can signal that something is
wrong before it becomes serious enough to cause an
expensive repair or replacement. Paying attention to the
warning lights and gauges could prevent injury.
Warning lights come on when there might be or there
is a problem with one of the vehicle's functions. Some
warning lights come on briefly when the engine is
started to indicate they are working.
Gauges can indicate when there might be or there is
a problem with one of the vehicle's functions. Often
gauges and warning lights work together to indicate
a problem with the vehicle.
When one of the warning lights comes on and stays on
while driving, or when one of the gauges shows there
could be a problem, check the section that explains
what to do. Follow this manual's advice. Waiting to do
repairs can be costly and even dangerous.
4-29
Page 282 of 614
4. Press the trip/fuel button until the vehicle heading,for example, N for North, is displayed in the DIC.
Or, if the vehicle does not have DIC buttons,
press and hold the trip odometer reset stem for
two seconds to select the next available variance
zone. Repeat this step until the appropriate
variance zone is displayed.
5. If calibration is necessary, calibrate the compass. See “Compass Calibration Procedure” following.
Compass Calibration
The compass can be manually calibrated. Only calibrate
the compass in a magnetically clean and safe location,
such as an open parking lot, where driving the vehicle
in circles is not a danger. It is suggested to calibrate
away from tall buildings, utility wires, manhole covers,
or other industrial structures, if possible.
If CAL should ever appear in the DIC display, the
compass should be calibrated.
If the DIC display does not show a heading, for
example, N for North, or the heading does not change
after making turns, there may be a strong magnetic field
interfering with the compass. Such interference may be
caused by a magnetic CB or cell phone antenna mount,
a magnetic emergency light, magnetic note pad holder,
or any other magnetic item. Turn off the vehicle, move
the magnetic item, then turn on the vehicle and calibrate
the compass. To calibrate the compass, use the following procedure:
Compass Calibration Procedure
1. Before calibrating the compass, make sure the
compass zone is set to the variance zone in which
the vehicle is located. See “Compass Variance
(Zone) Procedure” earlier in this section.
Do not operate any switches such as window,
sunroof, climate controls, seats, etc. during the
calibration procedure.
2. Press the vehicle information button until PRESS
VTO CALIBRATE COMPASS displays. Or, if the
vehicle does not have DIC buttons, press the trip
odometer reset stem until CALIBRATE COMPASS
displays.
3. Press the set/reset button to start the compass calibration. Or, if the vehicle does not have DIC
buttons, press and hold the trip odometer reset
stem for two seconds to start the compass
calibration.
4. The DIC will display CALIBRATING: DRIVE IN CIRCLES. Drive the vehicle in tight circles at less
than 5 mph (8 km/h) to complete the calibration.
The DIC will display CALIBRATION COMPLETE
for a few seconds when the calibration is complete.
The DIC display will then return to the
previous menu.
4-60
Page 283 of 614
DIC Warnings and Messages
Messages are displayed on the DIC to notify the driver
that the status of the vehicle has changed and that
some action may be needed by the driver to correct the
condition. Multiple messages may appear one after
another.
Some messages may not require immediate action, but
you can press any of the DIC buttons on the instrument
panel or the trip odometer reset stem on the instrument
panel cluster to acknowledge that you received the
messages and to clear them from the display.
Some messages cannot be cleared from the DIC
display because they are more urgent. These
messages require action before they can be cleared.
You should take any messages that appear on the
display seriously and remember that clearing the
messages will only make the messages disappear,
not correct the problem.
The following are the possible messages that can be
displayed and some information about them.
If your vehicle is a Two-mode Hybrid, see the
Two-mode Hybrid manual for more information.
BATTERY LOW START VEHICLE
When the vehicle’s battery is severely discharged, this
message will display and four chimes will sound. Start
the vehicle immediately. If the vehicle is not started and
the battery continues to discharge, the climate controls,
heated seats, and audio systems will shut off and the
vehicle may require a jump start. These systems will
function again after the vehicle is started.
CHANGE ENGINE OIL SOON
This message displays when the engine oil needs to
be changed. When you change the engine oil, be sure
to reset the CHANGE ENGINE OIL SOON message.
See Engine Oil Life System
on page 6‑20for
information on how to reset the message. See Engine
Oil
on page 6‑18and Scheduled Maintenanceon
page 7‑3for more information.
4-61
Page 369 of 614
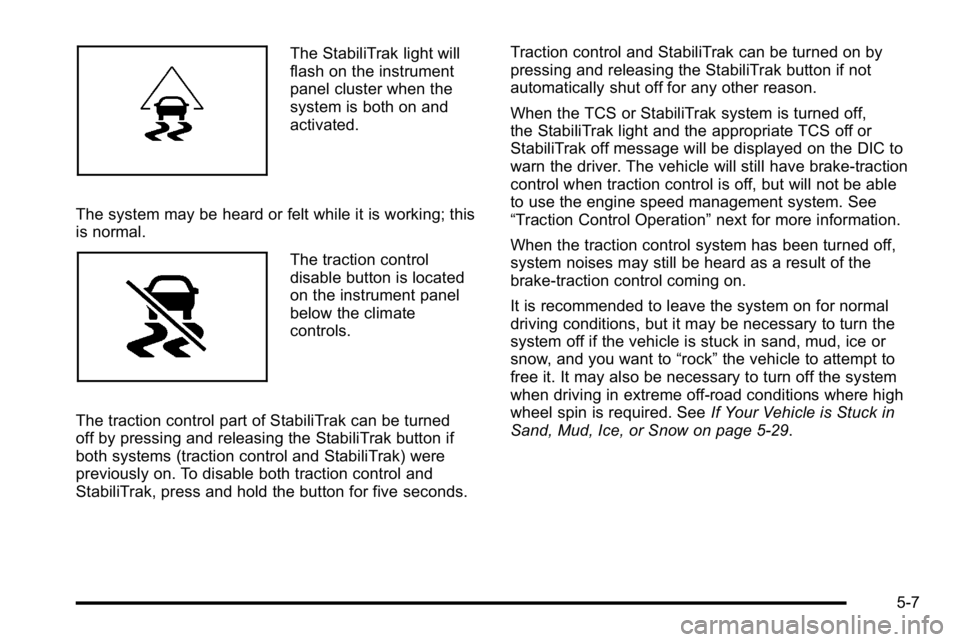
The StabiliTrak light will
flash on the instrument
panel cluster when the
system is both on and
activated.
The system may be heard or felt while it is working; this
is normal.
The traction control
disable button is located
on the instrument panel
below the climate
controls.
The traction control part of StabiliTrak can be turned
off by pressing and releasing the StabiliTrak button if
both systems (traction control and StabiliTrak) were
previously on. To disable both traction control and
StabiliTrak, press and hold the button for five seconds. Traction control and StabiliTrak can be turned on by
pressing and releasing the StabiliTrak button if not
automatically shut off for any other reason.
When the TCS or StabiliTrak system is turned off,
the StabiliTrak light and the appropriate TCS off or
StabiliTrak off message will be displayed on the DIC to
warn the driver. The vehicle will still have brake-traction
control when traction control is off, but will not be able
to use the engine speed management system. See
“Traction Control Operation”
next for more information.
When the traction control system has been turned off,
system noises may still be heard as a result of the
brake-traction control coming on.
It is recommended to leave the system on for normal
driving conditions, but it may be necessary to turn the
system off if the vehicle is stuck in sand, mud, ice or
snow, and you want to “rock”the vehicle to attempt to
free it. It may also be necessary to turn off the system
when driving in extreme off-road conditions where high
wheel spin is required. See If Your Vehicle is Stuck in
Sand, Mud, Ice, or Snow on page 5‑29.
5-7