buttons GMC YUKON 2010 Repair Manual
[x] Cancel search | Manufacturer: GMC, Model Year: 2010, Model line: YUKON, Model: GMC YUKON 2010Pages: 614, PDF Size: 3.55 MB
Page 333 of 614
Using the Radio to Control a USB
Storage Device or iPod
The radio can control a USB storage device or an iPod
using the radio buttons and knobs and display song
information on the radio’s display.
f(Tune):Turn to select files.
©SEEK:Press to go to the start of the track, if more
than ten seconds have played. Press and hold or press
multiple times to continue moving backward through
tracks.
¨SEEK: Press to go to the next track. Press and hold
or press multiple times to continue moving forward
through tracks.
sREV (Reverse): Press and hold to reverse
playback quickly. Sound is heard at a reduced volume.
Release
sREV to resume playing. The elapsed time
of the file displays.
\FWD (Fast Forward): Press and hold to advance
playback quickly. Sound is heard at a reduced volume.
Release
\FWD to resume playing. The elapsed time
of the file displays.
4(Information): Press to display additional information
about the selected track.
Using Softkeys to Control a USB
Storage Device or iPod
The five softkeys below the radio display are used to
control the functions listed below.
To use the softkeys:
1. Press the first or fifth softkey below the radio display to display the functions listed below,
or press the softkey below the function if it is
currently displayed.
2. Press the softkey below the tab with the function on it to use that function.
j(Pause): Press the softkey belowjto pause the
track. The tab appears raised when pause is being
used. Press the softkey below
jagain to resume
playback.
Back: Press the softkey below the back tab to go back
to the main display screen on an iPod, or the root
directory on a USB storage device.
c(Folder View): Press the softkey belowcto view
the contents of the current folder on the USB drive.
To browse and select files:
1. Press the softkey below
c.
2. Turn
fto scroll through the list of folders.
4-111
Page 337 of 614
Voice Recognition
The Bluetooth system uses voice recognition to
interpret voice commands to dial phone numbers
and name tags.
Noise:Keep interior noise levels to a minimum.
The system may not recognize voice commands if
there is too much background noise.
When to Speak: A short tone sounds after the system
responds indicating when it is waiting for a voice
command. Wait until the tone and then speak.
How to Speak: Speak clearly in a calm and natural
voice.
Audio System
When using the in‐vehicle Bluetooth system, sound
comes through the vehicle's front audio system
speakers and overrides the audio system. Use the
audio system volume knob, during a call, to change
the volume level. The adjusted volume level remains
in memory for later calls. To prevent missed calls, a
minimum volume level is used if the volume is turned
down too low.
Bluetooth Controls
Use the buttons located on the steering wheel to
operate the in‐vehicle Bluetooth system. See Audio
Steering Wheel Controls
on page 4‑136for more
information.
b g(Push To Talk): Press to answer incoming calls,
to confirm system information, and to start speech
recognition.
c x(Phone On Hook): Press to end a call, reject a
call, or to cancel an operation.
Pairing
A Bluetooth enabled cell phone must be paired to the
in‐vehicle Bluetooth system first and then connected
to the vehicle before it can be used. See the cell
phone manufacturers user guide for Bluetooth functions
before pairing the cell phone. If a Bluetooth phone
is not connected, calls will be made using OnStar
®
Hands‐Free Calling, if available. Refer to the OnStar
owner's guide for more information.
4-115
Page 352 of 614
Remote Control
To use the remote control, aim it at the transmitter
window at the rear of the overhead console and press
the desired button. Direct sunlight or very bright light
could affect the ability of the RSE transmitter to receive
signals from the remote control. If the remote control
does not seem to be working, the batteries might need
to be replaced. See“Battery Replacement” later in this
section. Objects blocking the line of sight could also
affect the function of the remote control.
If a CD or DVD is in the Radio DVD slot, the remote
control power button can be used to turn on the video
screen display and start the disc. The radio can also
turn on the video screen display. See Radio(s)
on
page 4‑82for more information.
Notice: Storing the remote control in a hot area or
in direct sunlight can damage it, and the repairs will
not be covered by the warranty. Storage in extreme
cold can weaken the batteries. Keep the remote
control stored in a cool, dry place.
Remote Control Buttons
O(Power): Press this button to turn the video screen
on and off.
P(Illumination): Press this button to turn the remote
control backlight on. The backlight automatically turns
off after seven to ten seconds if no other button is
pressed while the backlight is on.
v(Title): Press this button to return the DVD to the
main menu of the DVD. This function may vary for
each disc.
y(Main Menu): Press this button to access the DVD
menu. The DVD menu is different on every DVD. Use
the navigation arrows to move the cursor around the
DVD menu. After making a selection press the enter
button. This button only operates when using a DVD.
n,q,p,o(Menu Navigation Arrows): Use the
arrow buttons to navigate through a menu.
r(Enter): Press this button to select the choice that
is highlighted in any menu.
4-130
Page 357 of 614

Audio can be heard through wired headphones (not
included) plugged into the jacks on the RSA. If the
vehicle has this feature, audio can also be heard on
Channel 2 of the wireless headphones.
The audio system mutes the rear speakers when the
RSA audio is active through the headphones.
P(Power):Press thePbutton to turn the RSA on
or off.
Volume: Turn this knob to increase or to decrease the
volume of the wired headphones. The left knob controls
the left headphones and the right knob controls the right
headphones. SRCE (Source):
Press this button to switch between
the radio (AM/FM), XM™ (if equipped), CD, and if the
vehicle has these features, DVD, front auxiliary, and
rear auxiliary.
© ¨(Seek): When listening to FM, AM, or XM™
(if equipped), press the left
©or right¨seek arrow to
go to the previous or to the next station or channel and
stay there. This function is inactive, with some radios,
if the front seat passengers are listening to the radio.
Press and hold the left
©or right¨seek arrow until
the display flashes, to tune to an individual station.
The display stops flashing after the buttons have not
been pushed for more than two seconds. This function
is inactive, with some radios, if the front seat
passengers are listening to the radio.
While listening to a disc, press the left
©seek arrow
to go back to the start of the current track or chapter
(if more than ten seconds have played). Press the
right
¨seek arrow to go to the next track or chapter
on the disc. This function is inactive, with some radios,
if the front seat passengers are listening to the disc.
When a DVD video menu is being displayed, press the
left
©or right¨seek arrow to perform a cursor up or
down on the menu. Hold the left
©or right¨arrow to
perform a cursor left or right on the menu.
4-135
Page 421 of 614
Trailer Brake Control Panel
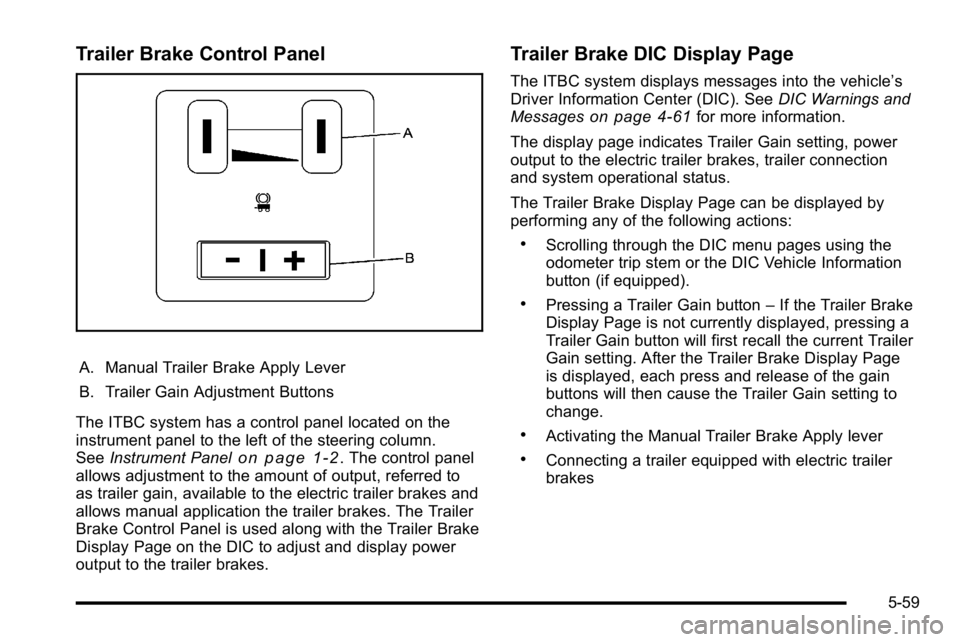
A. Manual Trailer Brake Apply Lever
B. Trailer Gain Adjustment Buttons
The ITBC system has a control panel located on the
instrument panel to the left of the steering column.
See Instrument Panel
on page 1‑2. The control panel
allows adjustment to the amount of output, referred to
as trailer gain, available to the electric trailer brakes and
allows manual application the trailer brakes. The Trailer
Brake Control Panel is used along with the Trailer Brake
Display Page on the DIC to adjust and display power
output to the trailer brakes.
Trailer Brake DIC Display Page
The ITBC system displays messages into the vehicle’s
Driver Information Center (DIC). See DIC Warnings and
Messages
on page 4‑61for more information.
The display page indicates Trailer Gain setting, power
output to the electric trailer brakes, trailer connection
and system operational status.
The Trailer Brake Display Page can be displayed by
performing any of the following actions:
.Scrolling through the DIC menu pages using the
odometer trip stem or the DIC Vehicle Information
button (if equipped).
.Pressing a Trailer Gain button –If the Trailer Brake
Display Page is not currently displayed, pressing a
Trailer Gain button will first recall the current Trailer
Gain setting. After the Trailer Brake Display Page
is displayed, each press and release of the gain
buttons will then cause the Trailer Gain setting to
change.
.Activating the Manual Trailer Brake Apply lever
.Connecting a trailer equipped with electric trailer
brakes
5-59
Page 422 of 614
All DIC warning and service messages must first
be acknowledged by the driver by pressing the
odometer trip stem or the DIC Vehicle Information
button (if equipped) before the Trailer Brake Display
Page can be displayed and Trailer Gain can be
adjusted.
TRAILER GAIN–This setting is displayed anytime the
Trailer Brake Display Page is active. This setting can be
adjusted from 0.0 to 10.0 with either a trailer connected
or disconnected. To adjust the Trailer Gain, press one
of the Trailer Gain adjustment buttons located on the
Trailer Brake Control Panel. Press and hold a gain
button to cause the Trailer Gain to continuously adjust.
To turn the output to the trailer off, adjust the Trailer
Gain setting to 0.0 (zero).
0.0 (zero) gain is the factory default setting. To properly
adjust trailer gain, see the Trailer Gain Adjustment
Procedure later in this section. TRAILER OUTPUT
–This is displayed any time a trailer
with electric brakes is connected. Output to the electric
brakes is based on the amount of vehicle braking
present and relative to the Trailer Gain setting. Output
is displayed from 0 to 10 bars for each gain setting.
The Trailer Output will indicate “- - - - - -“on the Trailer
Brake Display Page whenever the following occur:
.No trailer is connected.
.A trailer without electric brakes is connected
(no DIC message is displayed).
.A trailer with electric brakes has become
disconnected (a CHECK TRAILER WIRING
message will also be displayed on the DIC).
.There is a fault present in the wiring to the electric
trailer brakes (a CHECK TRAILER WIRING
message will also be displayed on the DIC).
.There is a fault in the ITBC system (a SERVICE
TRAILER BRAKE SYSTEM message will also be
displayed in the DIC).
5-60
Page 423 of 614
Manual Trailer Brake Apply
The Manual Trailer Brake Apply Lever is located on the
Trailer Brake Control Panel and is used to apply the
trailer’s electric brakes independent of the vehicle’ s
brakes. This lever is used in the Trailer Gain Adjustment
Procedure to properly adjust the power output to the
trailer brakes. Sliding the lever to the left will apply only
the trailer brakes. The power output to the trailer is
indicated in the Trailer Brake Display Page in the DIC.
If the vehicle’s service brakes are applied while using
the Manual Trailer Brake Apply Lever, the trailer output
power will be the greater of the two.
The trailer and the vehicle's brake lamps will come on
when either vehicle braking or manual trailer brakes are
applied.
Trailer Gain Adjustment Procedure
Trailer Gain should be set for a specific trailering
condition and must be adjusted any time vehicle
loading, trailer loading or road surface conditions
change.
Setting the Trailer Gain properly is needed for the
best trailer stopping performance. A trailer that is
over-gained may result in locked trailer brakes. A trailer
that is under-gained may result in not enough trailer
braking. Both of these conditions may result in poorer
stopping and stability of the vehicle and trailer. Use the following procedure to correctly adjust Trailer
Gain for each towing condition:
1. Make sure the trailer brakes are in proper working condition.
2. Connect a properly loaded trailer to the vehicle and make all necessary mechanical and electrical
connections. See Loading the Vehicle
on
page 5‑31for more information.
3. After the electrical connection is made to a trailer equipped with electric brakes:
.A TRAILER CONNECTED message will be
briefly displayed on the DIC display.
.The Trailer Brake Display Page will appear
on the DIC showing TRAILER GAIN and
TRAILER OUTPUT.
.In the Trailer Output display on the DIC,
“- - - - - -“ will disappear if there is no error
present. Connecting a trailer without electric
brakes will not clear the six dashed lines.
4. Adjust the Trailer Gain by using the gain adjustment (+ / -) buttons on the Trailer Brake
Control Panel.
5-61
Page 453 of 614
How to Reset the Engine Oil Life
System
The Engine Oil Life System calculates when to
change the engine oil and filter based on vehicle use.
Whenever the oil is changed, reset the system so it
can calculate when the next oil change is required.
If a situation occurs where the oil is changed prior to
a CHANGE ENGINE OIL SOON message coming on,
reset the system.
Always reset the engine oil life to 100% after every oil
change. It will not reset itself. To reset the Engine Oil
Life System on most vehicles:1. Display the OIL LIFE REMAINING on the DIC. If the vehicle does not have DIC buttons, the
vehicle must be in P (Park) to access this display.
See DIC Operation and Displays (With DIC
Buttons)
on page 4‑48or DIC Operation and
Displays (Without DIC Buttons) on page 4‑55.
2. Press and hold the SET/RESET button on the DIC, or the trip odometer reset stem if the vehicle does
not have DIC buttons, for more than five seconds.
The oil life will change to 100%. On all vehicles, the Engine Oil Life System can be reset
as follows:
1. Turn the ignition to ON/RUN with the engine off
2. Fully press the accelerator pedal slowly three times within five seconds.
3. Display the OIL LIFE REMAINING on the DIC. If the display shows 100%, the system is reset.
See DIC Operation and Displays (With DIC
Buttons)
on page 4‑48or DIC Operation and
Displays (Without DIC Buttons) on page 4‑55.
If the vehicle has a CHANGE ENGINE OIL SOON
message and it comes back on when the vehicle is
started and/or the OIL LIFE REMAINING is near 0%,
the Engine Oil Life System has not reset. Repeat the
procedure.
6-21
Page 507 of 614

Tire Pressure Monitor Operation
If your vehicle is a Two‐mode Hybrid, see the
Two‐mode Hybrid manual for more information.
This vehicle may have a Tire Pressure Monitor System
(TPMS). The TPMS is designed to warn the driver when
a low tire pressure condition exists. TPMS sensors are
mounted onto each tire and wheel assembly, excluding
the spare tire and wheel assembly. The TPMS sensors
monitor the air pressure in the vehicle's tires and
transmit the tire pressure readings to a receiver located
in the vehicle.
When a low tire pressure
condition is detected, the
TPMS illuminates the low
tire pressure warning light
located on the instrument
panel cluster.
At the same time a message to check the pressure in a
specific tire appears on the Driver Information Center
(DIC) display. The low tire pressure warning light and
the DIC warning message come on at each ignition
cycle until the tires are inflated to the correct inflation
pressure. Using the DIC, tire pressure levels can be viewed by the driver. For additional information and
details about the DIC operation and displays see
DIC
Operation and Displays (With DIC Buttons)
on
page 4‑48or DIC Operation and Displays (Without DIC
Buttons)on page 4‑55and DIC Warnings and
Messages on page 4‑61.
The low tire pressure warning light may come on in cool
weather when the vehicle is first started, and then turn
off as you start to drive. This could be an early indicator
that the air pressure in the tire(s) are getting low and
need to be inflated to the proper pressure.
A Tire and Loading Information label, attached to your
vehicle, shows the size of your vehicle's original
equipment tires and the correct inflation pressure for
your vehicle's tires when they are cold. See Loading the
Vehicle
on page 5‑31, for an example of the Tire and
Loading Information label and its location on your
vehicle. Also see Inflation - Tire Pressure on page 6‑72.
Your vehicle's TPMS can warn you about a low tire
pressure condition but it does not replace normal tire
maintenance. See Tire Inspection and Rotation
on
page 6‑78and Tires on page 6‑63.
Notice: Liquid tire sealants could damage the Tire
Pressure Monitor System (TPMS) sensors. Sensor
damage caused by using a tire sealant is not
covered by your warranty. Do not use liquid tire
sealants.
6-75
Page 540 of 614
Appearance Care
Interior Cleaning
The vehicle's interior will continue to look its best if
it is cleaned often. Although not always visible, dust
and dirt can accumulate on the upholstery. Dirt can
damage carpet, fabric, leather, and plastic surfaces.
Regular vacuuming is recommended to remove
particles from the upholstery. It is important to keep
the upholstery from becoming and remaining heavily
soiled. Soils should be removed as quickly as possible.
The vehicle's interior may experience extremes of heat
that could cause stains to set rapidly.
Lighter colored interiors may require more frequent
cleaning. Use care because newspapers and garments
that transfer color to home furnishings may also transfer
color to the vehicle's interior.
When cleaning the vehicle's interior, only use cleaners
specifically designed for the surfaces being cleaned.
Permanent damage may result from using cleaners onsurfaces for which they were not intended. Use glass
cleaner only on glass. Remove any accidental
over-spray from other surfaces immediately. To prevent
over-spray, apply cleaner directly to the cleaning cloth.
Notice:
Using abrasive cleaners when cleaning
glass surfaces on the vehicle, could scratch the
glass and/or cause damage to the rear window
defogger. When cleaning the glass on the vehicle,
use only a soft cloth and glass cleaner.
Many cleaners contain solvents that may become
concentrated in the vehicle's breathing space.
Before using cleaners, read and adhere to all safety
instructions on the label. While cleaning the vehicle's
interior, maintain adequate ventilation by opening the
vehicle's doors and windows.
Dust may be removed from small buttons and knobs
using a small brush with soft bristles.
Products that remove odors from the vehicle's
upholstery and clean the vehicle's glass can be
obtained from your dealer.
6-108