radio controls GMC YUKON 2010 Owner's Manual
[x] Cancel search | Manufacturer: GMC, Model Year: 2010, Model line: YUKON, Model: GMC YUKON 2010Pages: 614, PDF Size: 3.55 MB
Page 7 of 614
Section 1 In Brief
Instrument Panel. . . . . . . . . . . . . . . . . . . . . . . . . . . . . . . . . . . 1-2
Initial Drive Information . . . . . . . . . . . . . . . . . . . . . . . . . . . 1-4
Remote Keyless Entry (RKE) System . . . . . . . . . . . 1-4
Remote Vehicle Start . . . . . . . . . . . . . . . . . . . . . . . . . . . 1-5
Door Locks . . . . . . . . . . . . . . . . . . . . . . . . . . . . . . . . . . . . . 1-5
Liftgate . . . . . . . . . . . . . . . . . . . . . . . . . . . . . . . . . . . . . . . . . . 1-6
Windows . . . . . . . . . . . . . . . . . . . . . . . . . . . . . . . . . . . . . . . . 1-7
Seat Adjustment . . . . . . . . . . . . . . . . . . . . . . . . . . . . . . . . 1-7
Second Row Seats . . . . . . . . . . . . . . . . . . . . . . . . . . . . 1-11
Third Row Seats . . . . . . . . . . . . . . . . . . . . . . . . . . . . . . . 1-11
Heated Seats . . . . . . . . . . . . . . . . . . . . . . . . . . . . . . . . . . 1-12
Head Restraint Adjustment . . . . . . . . . . . . . . . . . . . . 1-12
Safety Belt . . . . . . . . . . . . . . . . . . . . . . . . . . . . . . . . . . . . . 1-13
Sensing System for Passenger Airbag . . . . . . . . . 1-13
Mirror Adjustment . . . . . . . . . . . . . . . . . . . . . . . . . . . . . . 1-14
Steering Wheel Adjustment . . . . . . . . . . . . . . . . . . . . 1-15
Interior Lighting . . . . . . . . . . . . . . . . . . . . . . . . . . . . . . . . 1-16
Exterior Lighting . . . . . . . . . . . . . . . . . . . . . . . . . . . . . . . 1-16
Windshield Wiper/Washer . . . . . . . . . . . . . . . . . . . . . . 1-17
Climate Controls . . . . . . . . . . . . . . . . . . . . . . . . . . . . . . . 1-18
Transmission . . . . . . . . . . . . . . . . . . . . . . . . . . . . . . . . . . 1-19
Four-Wheel Drive . . . . . . . . . . . . . . . . . . . . . . . . . . . . . . 1-20 Vehicle Features
. . . . . . . . . . . . . . . . . . . . . . . . . . . . . . . . . . 1-21
Radio(s) . . . . . . . . . . . . . . . . . . . . . . . . . . . . . . . . . . . . . . . 1-21
Satellite Radio . . . . . . . . . . . . . . . . . . . . . . . . . . . . . . . . . 1-22
Portable Audio Devices . . . . . . . . . . . . . . . . . . . . . . . . 1-22
Steering Wheel Controls . . . . . . . . . . . . . . . . . . . . . . . 1-23
Bluetooth
®. . . . . . . . . . . . . . . . . . . . . . . . . . . . . . . . . . . . . 1-23
Navigation System . . . . . . . . . . . . . . . . . . . . . . . . . . . . . 1-23
Cruise Control . . . . . . . . . . . . . . . . . . . . . . . . . . . . . . . . . 1-24
Side Blind Zone Alert (SBZA) . . . . . . . . . . . . . . . . . . 1-24
Rear Vision Camera (RVC) . . . . . . . . . . . . . . . . . . . . 1-24
Ultrasonic Parking Assist . . . . . . . . . . . . . . . . . . . . . . 1-25
Power Outlets . . . . . . . . . . . . . . . . . . . . . . . . . . . . . . . . . 1-25
Universal Remote System . . . . . . . . . . . . . . . . . . . . . 1-25
Sunroof . . . . . . . . . . . . . . . . . . . . . . . . . . . . . . . . . . . . . . . . 1-26
Performance and Maintenance . . . . . . . . . . . . . . . . . .1-27
StabiliTrak
®. . . . . . . . . . . . . . . . . . . . . . . . . . . . . . . . . . . . 1-27
Tire Pressure Monitor . . . . . . . . . . . . . . . . . . . . . . . . . . 1-27
Engine Oil Life System . . . . . . . . . . . . . . . . . . . . . . . . 1-28
Fuel E85 (85% Ethanol) . . . . . . . . . . . . . . . . . . . . . . . 1-28
Driving for Better Fuel Economy . . . . . . . . . . . . . . . 1-29
Roadside Assistance Program . . . . . . . . . . . . . . . . . 1-29
OnStar
®. . . . . . . . . . . . . . . . . . . . . . . . . . . . . . . . . . . . . . . 1-30
1-1
Page 29 of 614
Steering Wheel Controls
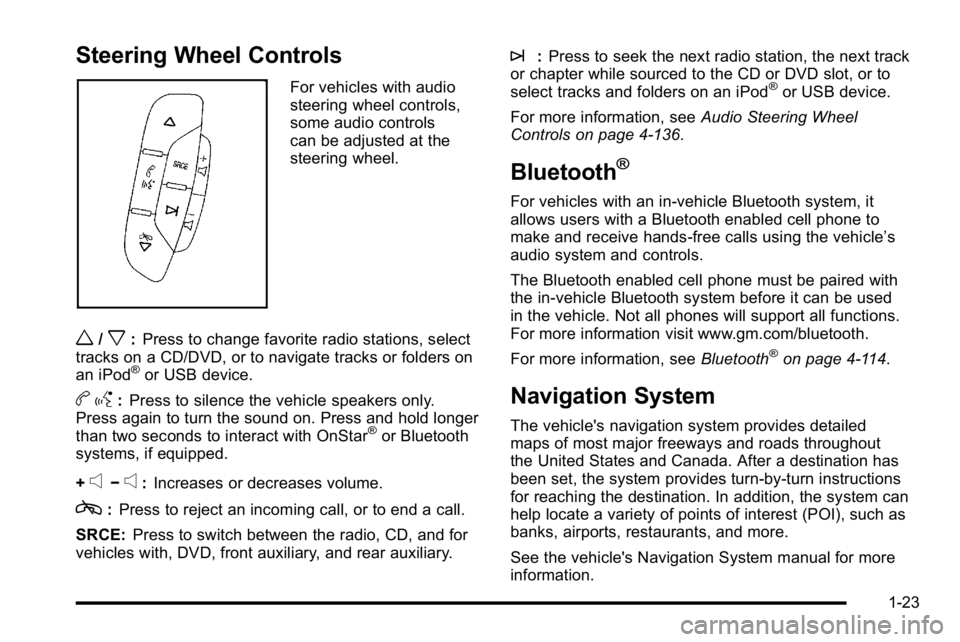
For vehicles with audio
steering wheel controls,
some audio controls
can be adjusted at the
steering wheel.
w/x:Press to change favorite radio stations, select
tracks on a CD/DVD, or to navigate tracks or folders on
an iPod
®or USB device.
b g:Press to silence the vehicle speakers only.
Press again to turn the sound on. Press and hold longer
than two seconds to interact with OnStar
®or Bluetooth
systems, if equipped.
+
e−e: Increases or decreases volume.
c:Press to reject an incoming call, or to end a call.
SRCE: Press to switch between the radio, CD, and for
vehicles with, DVD, front auxiliary, and rear auxiliary.
¨: Press to seek the next radio station, the next track
or chapter while sourced to the CD or DVD slot, or to
select tracks and folders on an iPod
®or USB device.
For more information, see Audio Steering Wheel
Controls on page 4‑136.
Bluetooth®
For vehicles with an in-vehicle Bluetooth system, it
allows users with a Bluetooth enabled cell phone to
make and receive hands-free calls using the vehicle’s
audio system and controls.
The Bluetooth enabled cell phone must be paired with
the in-vehicle Bluetooth system before it can be used
in the vehicle. Not all phones will support all functions.
For more information visit www.gm.com/bluetooth.
For more information, see Bluetooth
®on page 4‑114.
Navigation System
The vehicle's navigation system provides detailed
maps of most major freeways and roads throughout
the United States and Canada. After a destination has
been set, the system provides turn-by-turn instructions
for reaching the destination. In addition, the system can
help locate a variety of points of interest (POI), such as
banks, airports, restaurants, and more.
See the vehicle's Navigation System manual for more
information.
1-23
Page 31 of 614
Ultrasonic Parking Assist
This feature uses sensors on the rear bumper to
detect objects while parking the vehicle. URPA comes
on automatically when the shift lever is moved into
R (Reverse) and operates at speeds less than 8 km/h
(5 mph). URPA uses audio beeps to provide distance
and system information.
Keep the sensors on the vehicle's rear bumper clean to
ensure proper operation.
The system can be disabled by pressing the rear park
aid disable button located next to the radio.
SeeUltrasonic Rear Parking Assist (URPA)
on
page 3‑58for more information.
Power Outlets
Accessory power outlets can be used to connect
auxiliary electrical equipment, such as a cellular
telephone.
There are two under the climate controls, one inside the
center floor console, one on the rear of the center floor
console and one accessory power outlet in the rear
cargo area on the passenger side. The accessory power outlets are powered, even with
the ignition off. Continuing to use accessory power
outlets while the ignition is in LOCK/OFF may cause
the vehicle's battery to run down.
Universal Remote System
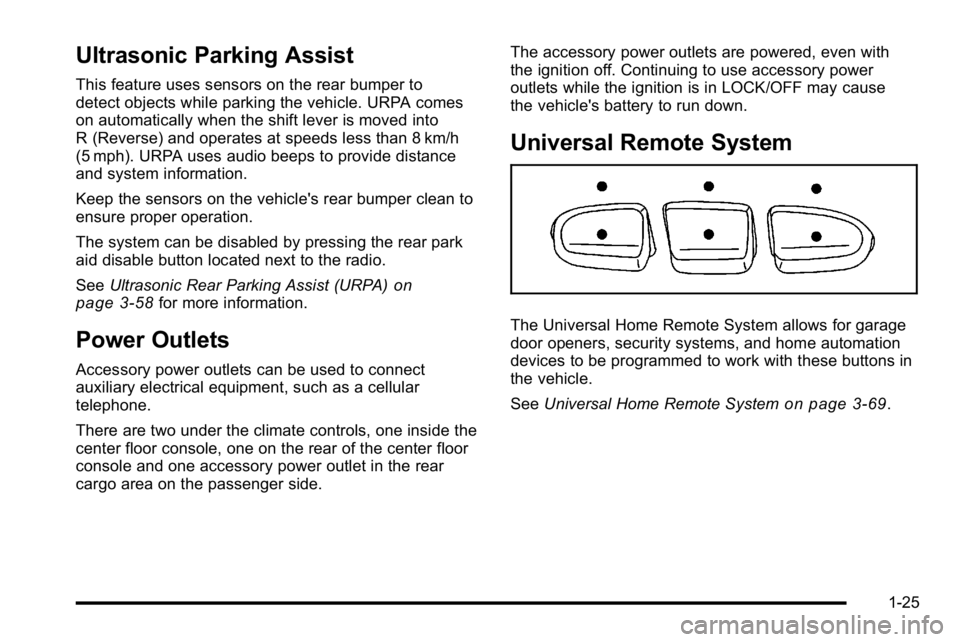
The Universal Home Remote System allows for garage
door openers, security systems, and home automation
devices to be programmed to work with these buttons in
the vehicle.
See
Universal Home Remote System
on page 3‑69.
1-25
Page 37 of 614
![GMC YUKON 2010 Owners Manual The OnStar system can record and transmit vehicle
information. This information is automatically sent to an
OnStar call center when
Qis pressed,]is pressed,
or if the airbags or ACR system deploy. Thi GMC YUKON 2010 Owners Manual The OnStar system can record and transmit vehicle
information. This information is automatically sent to an
OnStar call center when
Qis pressed,]is pressed,
or if the airbags or ACR system deploy. Thi](/img/44/35525/w960_35525-36.png)
The OnStar system can record and transmit vehicle
information. This information is automatically sent to an
OnStar call center when
Qis pressed,]is pressed,
or if the airbags or ACR system deploy. This information
usually includes the vehicle's GPS location and, in the
event of a crash, additional information regarding the
crash that the vehicle was involved in (e.g. the direction
from which the vehicle was hit). When the virtual
advisor feature of OnStar hands-free calling is used, the
vehicle also sends OnStar the vehicle's GPS location
so they can provide services where it is located.
Location information about the vehicle is only available
if the GPS satellite signals are unobstructed and
available.
The vehicle must have a working electrical system,
including adequate battery power, for the OnStar
equipment to operate. There are other problems OnStar
cannot control that may prevent OnStar from providing
OnStar service at any particular time or place. Some
examples are damage to important parts of the vehicle
in a crash, hills, tall buildings, tunnels, weather or
wireless phone network congestion.
OnStar Steering Wheel Controls
This vehicle may have a Talk/Mute button that can
be used to interact with OnStar hands-free calling.
See Audio Steering Wheel Controls
on page 4‑136for more information.
On some vehicles, the mute button can be used to
dial numbers into voice mail systems, or to dial phone
extensions. See the OnStar Owner's Guide for more
information.
Your Responsibility
Increase the volume of the radio if the OnStar advisor
cannot be heard.
If the light next to the OnStar buttons is red, the system
may not be functioning properly. Press
Qand request a
vehicle diagnostic. If the light appears clear (no light is
appearing), your OnStar subscription has expired and
all services have been deactivated. Press
Qto confirm
that the OnStar equipment is active.
1-31
Page 224 of 614
Section 4 Instrument Panel
Tire Pressure Light . . . . . . . . . . . . . . . . . . . . . . . . . . . . 4-39
Malfunction Indicator Lamp . . . . . . . . . . . . . . . . . . . . 4-39
Oil Pressure Gauge . . . . . . . . . . . . . . . . . . . . . . . . . . . . 4-43
Oil Pressure Light . . . . . . . . . . . . . . . . . . . . . . . . . . . . . 4-44
Security Light . . . . . . . . . . . . . . . . . . . . . . . . . . . . . . . . . . 4-44
Fog Lamp Light . . . . . . . . . . . . . . . . . . . . . . . . . . . . . . . . 4-45
Cruise Control Light . . . . . . . . . . . . . . . . . . . . . . . . . . . 4-45
Highbeam On Light . . . . . . . . . . . . . . . . . . . . . . . . . . . . 4-45
Tow/Haul Mode Light . . . . . . . . . . . . . . . . . . . . . . . . . . 4-45
Fuel Gauge . . . . . . . . . . . . . . . . . . . . . . . . . . . . . . . . . . . . 4-46
Low Fuel Warning Light . . . . . . . . . . . . . . . . . . . . . . . . 4-47
Driver Information Center (DIC) . . . . . . . . . . . . . . . . . .4-47
DIC Operation and Displays (With DIC Buttons) . . . . . . . . . . . . . . . . . . . . . . . . . . . . . . . . . . . . . 4-48
DIC Operation and Displays (Without DIC Buttons) . . . . . . . . . . . . . . . . . . . . . . . . . . . . . . . . . . . . . 4-55
DIC Compass . . . . . . . . . . . . . . . . . . . . . . . . . . . . . . . . . . 4-58
DIC Warnings and Messages . . . . . . . . . . . . . . . . . . 4-61
DIC Vehicle Customization (With DIC Buttons) . . . . . . . . . . . . . . . . . . . . . . . . . . . . . . . . . . . . . 4-72 Audio System(s)
. . . . . . . . . . . . . . . . . . . . . . . . . . . . . . . . . . 4-80
Setting the Clock . . . . . . . . . . . . . . . . . . . . . . . . . . . . . . 4-81
Radio(s) . . . . . . . . . . . . . . . . . . . . . . . . . . . . . . . . . . . . . . . 4-82
Using an MP3 (Radios with CD) . . . . . . . . . . . . . . . 4-99
Using an MP3 (Radios with CD and DVD) . . . . 4-106
XM Radio Messages . . . . . . . . . . . . . . . . . . . . . . . . . 4-113
Navigation/Radio System . . . . . . . . . . . . . . . . . . . . . 4-114
Bluetooth
®. . . . . . . . . . . . . . . . . . . . . . . . . . . . . . . . . . . . 4-114
Rear Seat Entertainment (RSE) System . . . . . . 4-125
Rear Seat Audio (RSA) . . . . . . . . . . . . . . . . . . . . . . . 4-134
Theft-Deterrent Feature . . . . . . . . . . . . . . . . . . . . . . 4-136
Audio Steering Wheel Controls . . . . . . . . . . . . . . . 4-136
Radio Reception . . . . . . . . . . . . . . . . . . . . . . . . . . . . . . 4-139
Rear Side Window Antenna . . . . . . . . . . . . . . . . . . 4-140
XM™ Satellite Radio Antenna System . . . . . . . . 4-140
4-2
Page 303 of 614
To minimize taking your eyes off the road while driving,
do the following while the vehicle is parked:
.Become familiar with the operation and controls of
the audio system.
.Set up the tone, speaker adjustments, and preset
radio stations.
For more information, see Defensive Driving
on
page 5‑2.
Notice: Contact your dealer before adding any
equipment.
Adding audio or communication equipment could
interfere with the operation of the vehicle's engine,
radio, or other systems, and could damage them.
Follow federal rules covering mobile radio and
telephone equipment.
The vehicle has Retained Accessory Power (RAP).
With RAP, the audio system can be played even after
the ignition is turned off. See Retained Accessory
Power (RAP)
on page 3‑29for more information.
Setting the Clock
To set the time and date:
1. Turn the ignition key to ACC/ACCESSORY or ON/RUN, then press the
Obutton to turn the
radio on.
2. Press the
Hbutton to display HR, MIN, MM, DD,
YYYY (hour, minute, month, day, and year).
3. Press the softkey located under any one of the tabs to change that setting.
4. To increase the time or date, do one of the following:
.Press the softkey below the selected tab.
.Press the¨SEEK button.
.Press the\FWD button.
.Turn thefknob clockwise.
4-81
Page 307 of 614
Storing a Radio Station as a Favorite
Drivers are encouraged to set up their radio station
favorites while the vehicle is stopped. Tune to favorite
stations using the softkeys, favorites button, and
steering wheel controls, if the vehicle has this feature.
SeeDefensive Driving on page 5‑2.
FAV (Favorites): A maximum of 36 stations can be
programmed as favorites using the six softkeys below
the radio station frequency tabs and by using the radio
favorites page button (FAV button). Press the FAV
button to go through up to six pages of favorites, each
having six favorite stations available per page. Each
page of favorites can contain any combination of AM,
FM, or XM, if equipped, stations.
The balance/fade and tone settings that were previously
adjusted, are stored with the favorite stations. To store a station as a favorite:
1. Tune to the radio station.
2. Press the FAV button to display the page where the station is to be stored.
3. Press and hold one of the six softkeys until a beep sounds. When that softkey is pressed and
released, the station that was set, returns.
4. Repeat the steps for each softkey radio station to be stored as a favorite.
The number of favorites pages can be setup using the
MENU button. To setup the number of favorites pages: 1. Press the MENU button.
2. Press the softkey located below the FAV 1-6 label.
3. Select the number of favorites pages by pressing the softkey below the displayed page numbers.
4. Press the FAV button, or let the menu time out, to return to the original main radio screen showing
the radio station frequency tabs and to begin the
process of programming favorites for the chosen
amount of numbered pages.
4-85
Page 308 of 614
Setting the Tone (Bass/Midrange/Treble)
BASS/MID/TREB (Bass, Midrange, or Treble):To
adjust bass, midrange, or treble, press the
fknob until
the tone control tabs display. Continue pressing to
highlight the desired tab, or press the softkey below the
tab. Turn the
fknob clockwise or counterclockwise to
adjust the highlighted setting. Adjust the highlighted
setting by pressing either SEEK arrow,
\FWD
(forward), or
sREV (reverse) button until the desired
levels are obtained. If a station's frequency is weak or if
there is static, decrease the treble.
To quickly adjust bass, midrange, or treble to the
middle position, press the softkey under the BASS,
MID, or TREB tab for more than two seconds. A beep
sounds and the level adjusts to the middle position.
To quickly adjust all tone and speaker controls to the
middle position, press the
fknob for more than
two seconds.
EQ (Equalization): Press this button to choose bass
and treble equalization settings designed for different
types of music. The choices are pop, rock, country, talk,
jazz, and classical. Selecting MANUAL or changing
bass or treble, returns the EQ to the manual bass and
treble settings. Unique EQ settings can be saved for each source.
If the radio has a Bose
®audio system, the EQ settings
are either MANUAL or TALK.
Adjusting the Speakers (Balance/Fade)
BAL/FADE (Balance/Fade): To adjust balance or fade,
press the
fknob until the speaker control tabs display.
Continue pressing to highlight the desired tab, or press
the softkey under the tab. Turn the
fknob clockwise
or counterclockwise to adjust the highlighted setting.
Adjust the highlighted setting by pressing either SEEK
arrow,
\FWD, orsREV button until the desired
levels are obtained.
To quickly adjust balance or fade to the middle position,
press the softkey under the BAL or FADE tab for more
than two seconds. A beep sounds and the level adjusts
to the middle position.
To quickly adjust all speaker and tone controls to
the middle position, press the
fknob for more than
two seconds.
If the Rear Seat Audio (RSA) is turned on, the radio
disables FADE and the rear speakers mute.
4-86
Page 317 of 614
A lock symbol displays next to the clock display.
The parental control feature remains on until this knob
is pressed and held for more than two seconds again,
or until the driver turns the ignition off and exits the
vehicle.
f(Tune):Turn to change tracks on a CD or DVD.
©SEEK (Previous Track/Chapter): Press the left
arrow to return to the start of the current track or
chapter. Press the left arrow again to go to the previous
track or chapter. This button might not work when
the DVD is playing the copyright information or the
previews.
SEEK
¨(Next Track/Chapter): Press the right arrow
to go to the next track or chapter. This button might not
work when the DVD is playing the copyright information
or the previews.
sREV (Fast Reverse): Press to quickly reverse the
CD or DVD at five times the normal speed. The radio
displays the elapsed time while in fast reverse. To stop
fast reversing, press again. This button might not work
when the DVD is playing the copyright information or
the previews.
\FWD (Fast Forward): Press to fast forward the CD
or DVD. The radio displays the elapsed time and fast
forwards five times the normal speed. To stop fast
forwarding, press again. This button might not work
when the DVD is playing the copyright information or
the previews.
Z(Eject): Press this button to eject a CD or DVD.
If a CD or DVD is ejected, but not removed, the player
automatically pulls it back in after 15 seconds.
If loading and reading of a CD cannot be completed,
because of an unknown format, etc., and the disc fails
to eject, press and hold this button for more than
five seconds to force the disc to eject.
DVD-V (Video) Display Buttons
Once a DVD-V is inserted, the radio display menu
shows several tab options for DVD playing. Press
the pushbuttons located under any desired tab option
during DVD playback. See the tab options listed after,
for more information.
The rear seat passenger can navigate the DVD-V
menus and controls through the remote control.
See “Remote Control”, under Rear Seat Entertainment
(RSE) System
on page 4‑125for more information.
The Video Screen automatically turns on when the
DVD-V is inserted into the DVD slot.
r/j(Play/Pause): Press either the play or pause
tab displayed on the radio system, to toggle between
pausing or restarting playback of a DVD. If the forward
arrow is showing on display, the system is in pause
mode. If the pause icon is showing on display, the
system is in playback mode. If the DVD screen is off,
press the play button to turn the screen on.
4-95
Page 318 of 614
Some DVDs begin playing after the previews have
finished, although there could be a delay of up to
30 seconds. If the DVD does not begin playing the
movie automatically, press the softkey under the
play/pause tab on the radio. If the DVD still does not
play, refer to the on-screen instructions, if available.
c(Stop):Press to stop playing, rewinding, or fast
forwarding a DVD.
r(Enter): Press to select the choices that are
highlighted in any menu.
y(Menu): Press to access the DVD menu. The DVD
menu is different on every DVD. Use the softkey under
the navigation arrows to navigate the cursor through the
DVD menu. After making a selection press this button.
This button only operates when using a DVD.
Nav (Navigate): Press to display directional arrows for
navigating through the menus.
q(Return): Press to exit the current active menu and
return to the previous menu. This tab operates only
when a DVD is playing and a menu is active.
DVD-A (Audio) Display Buttons
Once a DVD-A is inserted, radio display menu shows
several tab options for DVD playing. Press the softkeys
under any desired tab option during DVD playback.
See the tab options listed after, for more information.
The rear seat operator can navigate the DVD-A menus
and controls through the remote control. See “Remote
Control”, under Rear Seat Entertainment (RSE) System
on page 4‑125for more information. The Video Screen
does not automatically power on when the DVD-A is
inserted into the DVD slot. It must be manually turned
on by the rear seat occupant through the remote control
power button.
r/j(Play/Pause): Press either the play or pause
icon displayed on the radio system, to toggle between
pausing or restarting playback of a DVD. If the forward
arrow is showing on the display, the system is in pause
mode. If the pause icon is showing on the display, the
system is in playback mode.
qGroupr: Press to cycle through musical
groupings on the DVD-A disc.
Nav (Navigate): Press to display directional arrows for
navigating through the menus.
e(Audio Stream): Press to cycle through audio
stream formats located on the DVD-A disc. The video
screen shows the audio stream changing.
4-96