driver seat adjustment GMC YUKON 2011 Owner's Manual
[x] Cancel search | Manufacturer: GMC, Model Year: 2011, Model line: YUKON, Model: GMC YUKON 2011Pages: 528, PDF Size: 6.36 MB
Page 16 of 528
Black plate (10,1)GMC Yukon/Yukon XL Owner Manual - 2011
1-10 In Brief
Storing Memory Positions
To save into memory:
1. Adjust the driver seat andseatback recliner, both outside
mirrors, and the throttle and
brake pedals, if available.
See Power Mirrors on page 2‑18
and Adjustable Throttle and
Brake Pedal on page 9‑28 for
more information.
Not all mirrors and adjustable
throttles and brake pedals will
have the ability to save and
recall their positions.
2. Press and hold “1”until
two beeps sound.
3. Repeat for a second driver position using “2.” To recall, press and release
“1”
or “2.” The vehicle must be in
P (Park). A single beep will sound.
The seat, outside mirrors, and
adjustable throttle and brake pedals,
if available, will move to the position
previously stored for the identified
driver.
See “Memory Seat, Mirrors,
and Pedals” underPower Seat
Adjustment on page 3‑4 andVehicle
Personalization (With DIC Buttons)
on page 5‑47 for more information.
Easy Exit Driver Seat
This feature can move the seat
rearward to allow extra room to exit
the vehicle.
B: Press to recall the easy exit
seat position. The vehicle must be
in P (Park).
See “Memory Seat, Mirrors,
and Pedals” underPower Seat
Adjustment on page 3‑4 andVehicle
Personalization (With DIC Buttons)
on page 5‑47 for more information.
Second Row Seats
On vehicles with a 60/40 split bench
or buckets seats, the seatbacks can
be folded for additional cargo space,
or the seats can be folded and
tumbled for easy entry/exit to the
third row seats, if equipped. On
vehicles with bucket seats, the
seatbacks also recline.
SeeSecond Row Seats on
page 3‑12 for more information.
Third Row Seats
On vehicles with third row seats, the
seatbacks can be folded, and the
entire seat can be tumbled or
removed from the vehicle.
For detailed instructions, see Third
Row Seats on page 3‑17.
Page 18 of 528
Black plate (12,1)GMC Yukon/Yukon XL Owner Manual - 2011
1-12 In Brief
Press the button once for the
highest setting. With each press of
the button, the seat will change to
the next lower setting, and then to
the off setting. The lights indicate
three for the highest setting and one
for the lowest.
SeeHeated and Ventilated Front
Seats on page 3‑10.
Head Restraint
Adjustment
Do not drive until the head restraints
for all occupants are installed and
adjusted properly.
To achieve a comfortable seating
position, change the seatback
recline angle as little as necessary
while keeping the seat and the
head restraint height in the proper
position.
For more information see Head
Restraints on page 3‑2 andSeat
Adjustment on page 3‑3.
Safety Belts
Refer to the following sections for
important information on how to use
safety belts properly.
.Safety Belts on page 3‑21.
.How to Wear Safety Belts
Properly on page 3‑25.
.Lap-Shoulder Belt on page 3‑30.
.Lower Anchors and Tethers for
Children (LATCH System) on
page 3‑62.
Sensing System for
Passenger Airbag
The passenger sensing system,
if equipped, will turn off the right
front passenger frontal airbag
under certain conditions. The driver
airbags, seat‐mounted side impact
airbags (if equipped), and roof‐rail
airbags are not affected by this.
If the vehicle has one of the
indicators pictured in the following
illustrations, then the vehicle has a
passenger sensing system for the
right front passenger position.
The passenger airbag status
indicator, if equipped, will be visible
on the overhead console when the
vehicle is started.
Page 19 of 528
Black plate (13,1)GMC Yukon/Yukon XL Owner Manual - 2011
In Brief 1-13
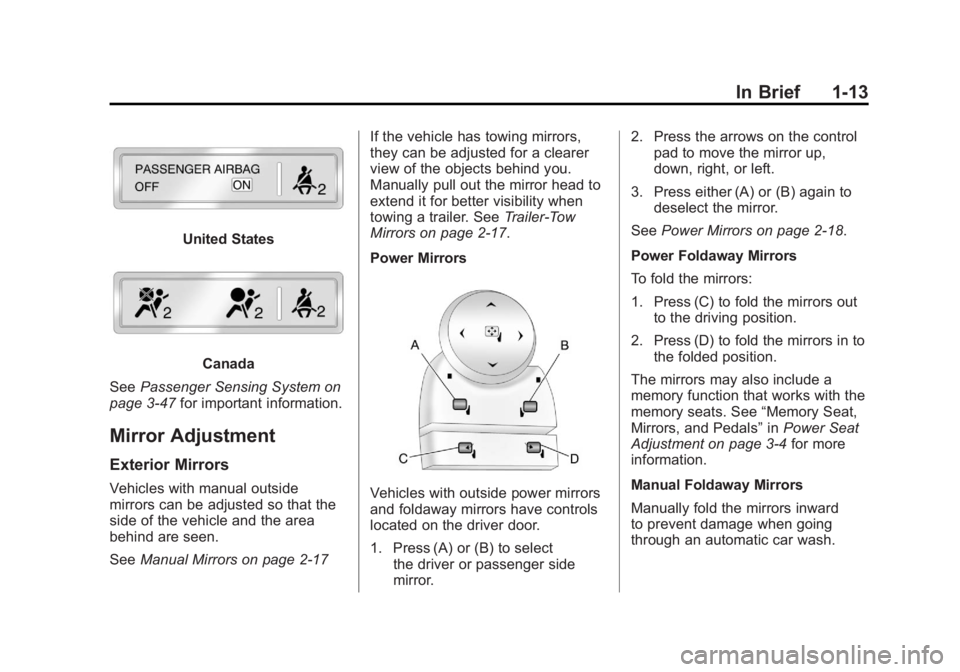
United States
Canada
See Passenger Sensing System on
page 3‑47 for important information.
Mirror Adjustment
Exterior Mirrors
Vehicles with manual outside
mirrors can be adjusted so that the
side of the vehicle and the area
behind are seen.
SeeManual Mirrors on page 2‑17 If the vehicle has towing mirrors,
they can be adjusted for a clearer
view of the objects behind you.
Manually pull out the mirror head to
extend it for better visibility when
towing a trailer. See
Trailer-Tow
Mirrors on page 2‑17.
Power MirrorsVehicles with outside power mirrors
and foldaway mirrors have controls
located on the driver door.
1. Press (A) or (B) to select the driver or passenger side
mirror. 2. Press the arrows on the control
pad to move the mirror up,
down, right, or left.
3. Press either (A) or (B) again to deselect the mirror.
See Power Mirrors on page 2‑18.
Power Foldaway Mirrors
To fold the mirrors:
1. Press (C) to fold the mirrors out to the driving position.
2. Press (D) to fold the mirrors in to the folded position.
The mirrors may also include a
memory function that works with the
memory seats. See “Memory Seat,
Mirrors, and Pedals” inPower Seat
Adjustment on page 3‑4 for more
information.
Manual Foldaway Mirrors
Manually fold the mirrors inward
to prevent damage when going
through an automatic car wash.
Page 40 of 528
Black plate (4,1)GMC Yukon/Yukon XL Owner Manual - 2011
2-4 Keys, Doors and Windows
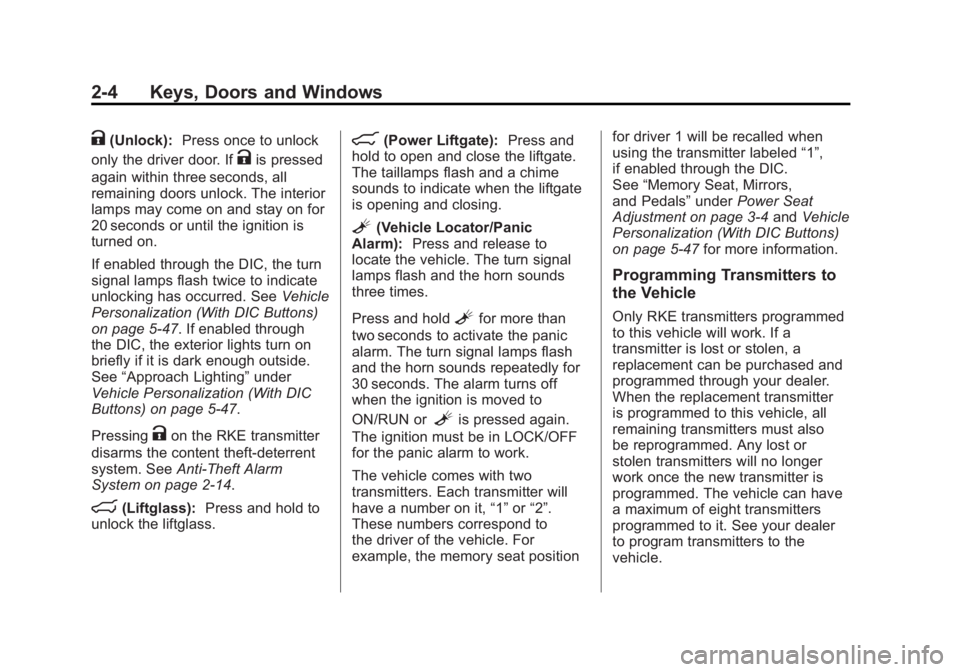
K(Unlock):Press once to unlock
only the driver door. If
Kis pressed
again within three seconds, all
remaining doors unlock. The interior
lamps may come on and stay on for
20 seconds or until the ignition is
turned on.
If enabled through the DIC, the turn
signal lamps flash twice to indicate
unlocking has occurred. See Vehicle
Personalization (With DIC Buttons)
on page 5‑47. If enabled through
the DIC, the exterior lights turn on
briefly if it is dark enough outside.
See “Approach Lighting” under
Vehicle Personalization (With DIC
Buttons) on page 5‑47.
Pressing
Kon the RKE transmitter
disarms the content theft‐deterrent
system. See Anti-Theft Alarm
System on page 2‑14.
m(Liftglass): Press and hold to
unlock the liftglass.
&(Power Liftgate): Press and
hold to open and close the liftgate.
The taillamps flash and a chime
sounds to indicate when the liftgate
is opening and closing.
L(Vehicle Locator/Panic
Alarm): Press and release to
locate the vehicle. The turn signal
lamps flash and the horn sounds
three times.
Press and hold
Lfor more than
two seconds to activate the panic
alarm. The turn signal lamps flash
and the horn sounds repeatedly for
30 seconds. The alarm turns off
when the ignition is moved to
ON/RUN or
Lis pressed again.
The ignition must be in LOCK/OFF
for the panic alarm to work.
The vehicle comes with two
transmitters. Each transmitter will
have a number on it, “1”or“2”.
These numbers correspond to
the driver of the vehicle. For
example, the memory seat position for driver 1 will be recalled when
using the transmitter labeled
“1”,
if enabled through the DIC.
See “Memory Seat, Mirrors,
and Pedals” underPower Seat
Adjustment on page 3‑4 andVehicle
Personalization (With DIC Buttons)
on page 5‑47 for more information.
Programming Transmitters to
the Vehicle
Only RKE transmitters programmed
to this vehicle will work. If a
transmitter is lost or stolen, a
replacement can be purchased and
programmed through your dealer.
When the replacement transmitter
is programmed to this vehicle, all
remaining transmitters must also
be reprogrammed. Any lost or
stolen transmitters will no longer
work once the new transmitter is
programmed. The vehicle can have
a maximum of eight transmitters
programmed to it. See your dealer
to program transmitters to the
vehicle.
Page 54 of 528
Black plate (18,1)GMC Yukon/Yukon XL Owner Manual - 2011
2-18 Keys, Doors and Windows
The lower portion of the mirror is
convex. A convex mirror's surface is
curved to see more from the driver
seat. The convex mirror can be
adjusted manually to the driver
preferred position for better vision.
The mirror may have a turn signal
arrow that flashes in the direction of
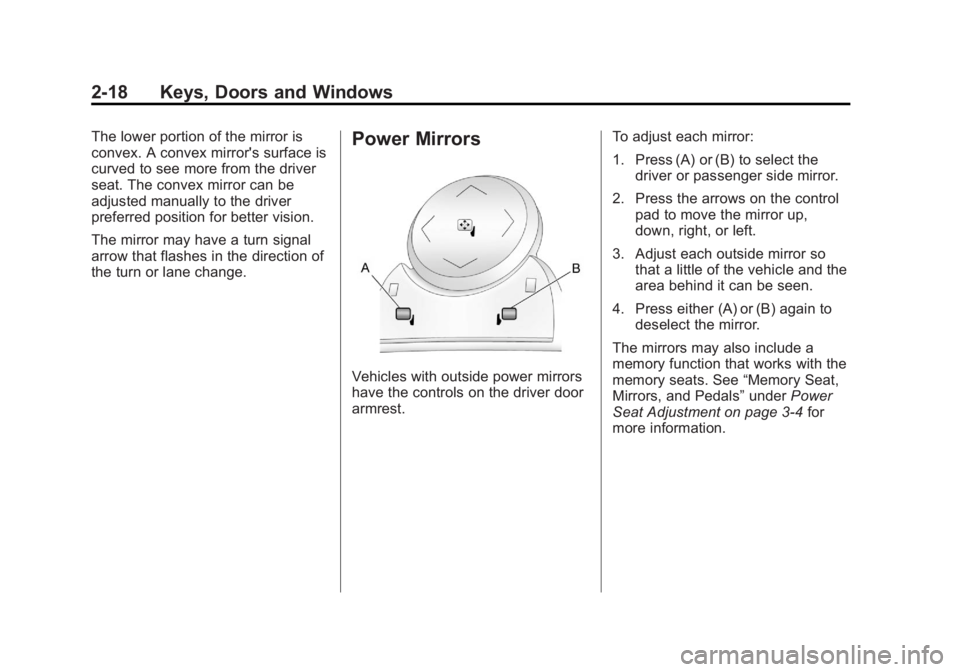
the turn or lane change.Power Mirrors
Vehicles with outside power mirrors
have the controls on the driver door
armrest.To adjust each mirror:
1. Press (A) or (B) to select the
driver or passenger side mirror.
2. Press the arrows on the control pad to move the mirror up,
down, right, or left.
3. Adjust each outside mirror so that a little of the vehicle and the
area behind it can be seen.
4. Press either (A) or (B) again to deselect the mirror.
The mirrors may also include a
memory function that works with the
memory seats. See “Memory Seat,
Mirrors, and Pedals” underPower
Seat Adjustment on page 3‑4 for
more information.
Page 63 of 528

Black plate (3,1)GMC Yukon/Yukon XL Owner Manual - 2011
Seats and Restraints 3-3
Push down on the head restraint
after the button is released to make
sure that it is locked in place.
The head restraints are not
designed to be removed.
The vehicle's 2nd-row seats have
head restraints in the outboard
seating positions that cannot be
adjusted.
The vehicle's 3rd-row seat,
if equipped, has headrests that
can be adjusted up and down.Front Seats
Seat Adjustment
{WARNING
You can lose control of the
vehicle if you try to adjust a
manual driver seat while the
vehicle is moving. The sudden
movement could startle and
confuse you, or make you push a
pedal when you do not want to.
Adjust the driver seat only when
the vehicle is not moving.
To adjust the seat:
1. Lift the bar under the front edgeof the seat cushion to unlock
the seat.
2. Slide the seat to the desired position and release the bar.
3. Try to move the seat back and forth to be sure the seat is
locked in place.
Page 64 of 528

Black plate (4,1)GMC Yukon/Yukon XL Owner Manual - 2011
3-4 Seats and Restraints
Center Seat
If equipped, the center front
seatback doubles as an armrest
and cupholder/storage area for the
driver and passenger when the
center front seat is not used. Do not
use it as a seating position when
the seatback is folded down.
Power Seat Adjustment
To adjust a power seat, if equipped:
.Move the seat forward or
rearward by sliding the control
forward or rearward.
.If available, raise or lower the
front or rear part of the seat
cushion by moving the front or
rear of the control up or down.
.If available, raise or lower the
entire seat by moving the entire
control up or down.To adjust the seatback, see
“Power Reclining Seatbacks”
under
Reclining Seatbacks on page 3‑7.
Memory Seat, Mirrors, and
Pedals
On vehicles with the memory
feature, the controls on the driver
door are used to program and
recall memory settings for the
driver seat, outside mirrors, and the
adjustable throttle and brake pedals,
if equipped.
Page 66 of 528
Black plate (6,1)GMC Yukon/Yukon XL Owner Manual - 2011
3-6 Seats and Restraints
Easy Exit Driver Seat
This feature can move the seat
rearward to allow extra room to exit
the vehicle.
B(Easy Exit Driver Seat):Press
to recall the easy exit seat position.
The vehicle must be in P (Park).
If the easy exit seat feature is
programmed on in the vehicle
personalization menu, automatic
seat movement occurs when the
ignition key is removed.
A single beep sounds. The driver
seat moves back approximately
8 cm (3 in). To move the seat back
farther, press the easy exit seat
button again until the seat is all the
way back.
If something has blocked the driver
seat while recalling the exit position,
the recall may stop. Remove the
obstruction; then press and hold
the power seat control rearward for
two seconds. Try recalling the exit position again. If the exit position is
still not recalling, see the dealer for
service.
See
“Easy Exit Recall” and
“Easy Exit Setup” underVehicle
Personalization (With DIC Buttons)
on page 5‑47 for more information.
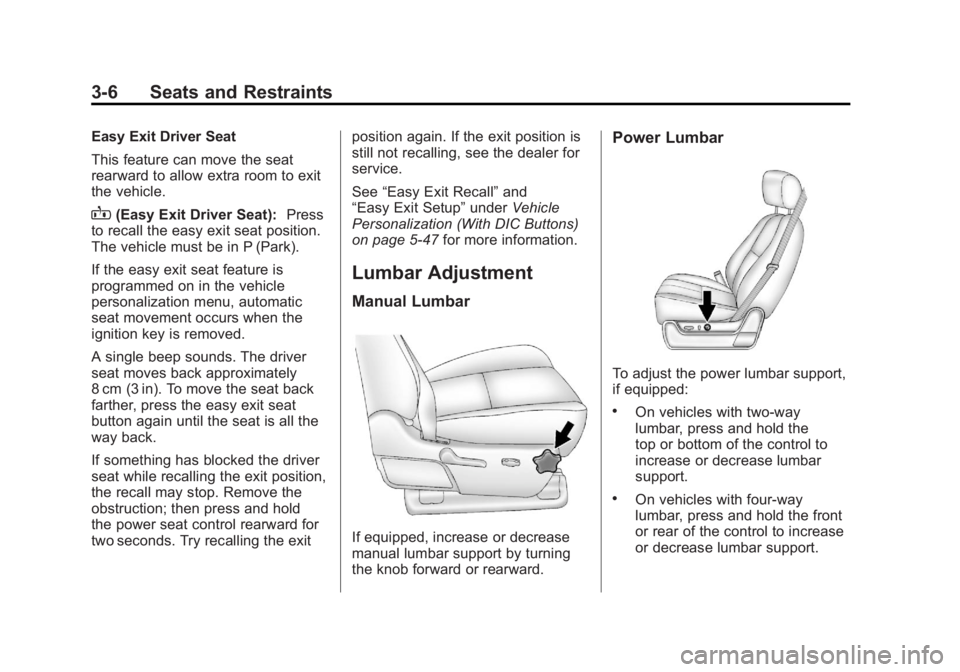
Lumbar Adjustment
Manual Lumbar
If equipped, increase or decrease
manual lumbar support by turning
the knob forward or rearward.
Power Lumbar
To adjust the power lumbar support,
if equipped:
.On vehicles with two-way
lumbar, press and hold the
top or bottom of the control to
increase or decrease lumbar
support.
.On vehicles with four-way
lumbar, press and hold the front
or rear of the control to increase
or decrease lumbar support.
Page 93 of 528
Black plate (33,1)GMC Yukon/Yukon XL Owner Manual - 2011
Seats and Restraints 3-33
To unlatch the belt, push the button
on the buckle. The belt should
return to its stowed position.
Before a door is closed, be sure
the safety belt is out of the way. If a
door is slammed against a safety
belt, damage can occur to both the
belt and the vehicle.
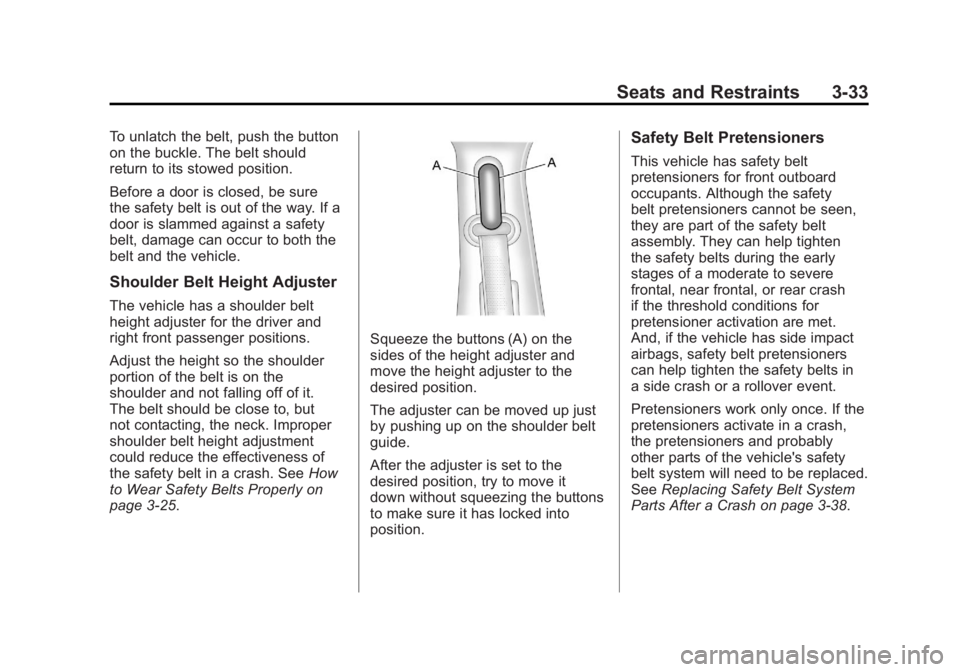
Shoulder Belt Height Adjuster
The vehicle has a shoulder belt
height adjuster for the driver and
right front passenger positions.
Adjust the height so the shoulder
portion of the belt is on the
shoulder and not falling off of it.
The belt should be close to, but
not contacting, the neck. Improper
shoulder belt height adjustment
could reduce the effectiveness of
the safety belt in a crash. SeeHow
to Wear Safety Belts Properly on
page 3‑25.
Squeeze the buttons (A) on the
sides of the height adjuster and
move the height adjuster to the
desired position.
The adjuster can be moved up just
by pushing up on the shoulder belt
guide.
After the adjuster is set to the
desired position, try to move it
down without squeezing the buttons
to make sure it has locked into
position.
Safety Belt Pretensioners
This vehicle has safety belt
pretensioners for front outboard
occupants. Although the safety
belt pretensioners cannot be seen,
they are part of the safety belt
assembly. They can help tighten
the safety belts during the early
stages of a moderate to severe
frontal, near frontal, or rear crash
if the threshold conditions for
pretensioner activation are met.
And, if the vehicle has side impact
airbags, safety belt pretensioners
can help tighten the safety belts in
a side crash or a rollover event.
Pretensioners work only once. If the
pretensioners activate in a crash,
the pretensioners and probably
other parts of the vehicle's safety
belt system will need to be replaced.
See Replacing Safety Belt System
Parts After a Crash on page 3‑38.
Page 193 of 528
Black plate (53,1)GMC Yukon/Yukon XL Owner Manual - 2011
Instruments and Controls 5-53
To select a setting, press the
set/reset button while the desired
setting is displayed on the DIC.
EASY EXIT RECALL
If your vehicle has this feature,
it allows you to select your
preference for the automatic easy
exit seat feature. See Memory Seat,
Mirrors, and Pedals inPower Seat
Adjustment on page 3‑4 for more
information.
Press the customization button until
EASY EXIT RECALL appears on
the DIC display. Press the set/reset
button once to access the settings
for this feature. Then press the
customization button to scroll
through the following settings:
DOOR BUTTON ONLY: No
automatic seat exit recall will occur.
The recall will only occur after
pressing the easy exit seat button. BUTTON & KEY OUT (default):
If
the features are enabled through
the EASY EXIT SETUP menu, the
driver seat will move back when the
key is removed from the ignition or
after pressing the easy exit seat
button.
The automatic easy exit seat
movement will only occur one time
after the key is removed from the
ignition. If the automatic movement
has already occurred, and you put
the key back in the ignition and
remove it again, the seat will stay in
the original exit position, unless a
memory recall took place prior to
removing the key again.
NO CHANGE: No change will be
made to this feature. The current
setting will remain.
To select a setting, press the set/
reset button while the desired
setting is displayed on the DIC. EASY EXIT SETUP
If your vehicle has this feature, it
allows you to select which areas will
recall with the automatic easy exit
seat feature. It also allows you to
turn off the automatic easy exit
feature. See Memory Seat, Mirrors,
and Pedals in
Power Seat
Adjustment on page 3‑4 and
“EASY EXIT RECALL” earlier for
more information.
Press the customization button until
EASY EXIT SETUP appears on the
DIC display. Press the set/reset
button once to access the settings
for this feature. Then press the
menu up/down button to scroll
through the following settings:
OFF: No automatic seat exit will
recall.
SEAT ONLY (Default): The driver
seat will recall.
NO CHANGE: No change will be
made to this feature. The current
setting will remain.