display GMC YUKON 2012 Owner's Manual
[x] Cancel search | Manufacturer: GMC, Model Year: 2012, Model line: YUKON, Model: GMC YUKON 2012Pages: 518, PDF Size: 6.2 MB
Page 321 of 518
Black plate (55,1)GMC Yukon/Yukon XL Owner Manual - 2012
Driving and Operating 9-55
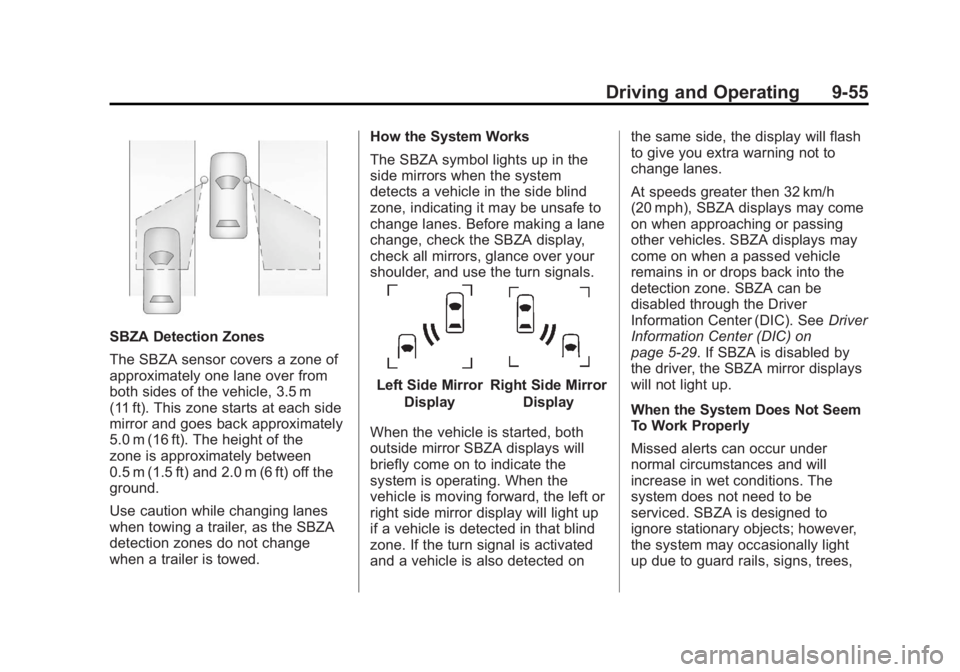
SBZA Detection Zones
The SBZA sensor covers a zone of
approximately one lane over from
both sides of the vehicle, 3.5 m
(11 ft). This zone starts at each side
mirror and goes back approximately
5.0 m (16 ft). The height of the
zone is approximately between
0.5 m (1.5 ft) and 2.0 m (6 ft) off the
ground.
Use caution while changing lanes
when towing a trailer, as the SBZA
detection zones do not change
when a trailer is towed.How the System Works
The SBZA symbol lights up in the
side mirrors when the system
detects a vehicle in the side blind
zone, indicating it may be unsafe to
change lanes. Before making a lane
change, check the SBZA display,
check all mirrors, glance over your
shoulder, and use the turn signals.
Left Side Mirror
DisplayRight Side Mirror Display
When the vehicle is started, both
outside mirror SBZA displays will
briefly come on to indicate the
system is operating. When the
vehicle is moving forward, the left or
right side mirror display will light up
if a vehicle is detected in that blind
zone. If the turn signal is activated
and a vehicle is also detected on the same side, the display will flash
to give you extra warning not to
change lanes.
At speeds greater then 32 km/h
(20 mph), SBZA displays may come
on when approaching or passing
other vehicles. SBZA displays may
come on when a passed vehicle
remains in or drops back into the
detection zone. SBZA can be
disabled through the Driver
Information Center (DIC). See
Driver
Information Center (DIC) on
page 5‑29. If SBZA is disabled by
the driver, the SBZA mirror displays
will not light up.
When the System Does Not Seem
To Work Properly
Missed alerts can occur under
normal circumstances and will
increase in wet conditions. The
system does not need to be
serviced. SBZA is designed to
ignore stationary objects; however,
the system may occasionally light
up due to guard rails, signs, trees,
Page 322 of 518
Black plate (56,1)GMC Yukon/Yukon XL Owner Manual - 2012
9-56 Driving and Operating
shrubs, and other stationary objects.
This is normal system operation, the
vehicle does not need service.
If the SBZA displays do not light up
when the system is on and vehicles
are in the blind zone, the system
may need service. Take the vehicle
to your dealer.
SBZA does not operate when the
SBZA sensors in the left or right
corners of the rear bumper are
covered with mud, dirt, snow, ice,
slush, or in heavy rainstorms. For
cleaning instructions, see“Washing
the Vehicle” underExterior Care on
page 10‑98. If the DIC still displays
the SIDE BLIND ZONE SYS.
UNAVAILABLE message after
cleaning the bumper, see your
dealer.
The SBZA displays may remain on
if a trailer is attached to the vehicle,
or a bicycle or object is extending
out to either side of the vehicle.
When SBZA is disabled for any
reason other than the driver turning
it off, it cannot be turned back on. The SIDE BLIND ZONE ALERT ON
option will not be selectable if the
conditions for normal system
operation are not met.
SBZA Error Messages
The following messages may
appear in the DIC:
SIDE BLIND ZONE ALERT
SYSTEM OFF:
This message
indicates that the driver has turned
the system off.
SIDE BLIND ZONE SYS.
UNAVAILABLE: This message
indicates that the SBZA system is
disabled either because the sensor
is blocked and cannot detect
vehicles in your blind zone, or the
vehicle is passing through an open
field of view area, such as the
desert, where there is insufficient
data for operation. This message
may also activate during heavy rain
or due to road spray. The vehicle
does not need service. For cleaning,
see “Washing the Vehicle” under
Exterior Care on page 10‑98. SERVICE SIDE BLIND ZONE
ALERT SYSTEM:
If this message
appears, both SBZA displays will
remain on indicating there is a
problem with the SBZA system.
If these displays remain on after
continued driving, the system needs
service. Take the vehicle to your
dealer.
FCC Information
See Radio Frequency Statement on
page 13‑16 for information
regarding Part 15 of the Federal
Communications Commission (FCC)
rules and Industry Canada
Standards RSS-GEN/210/220/310.
Frequency of operation:
24.05GHz –24.25GHz
Field Strength: Not greater than
2.5V/m peak (0.25V/m average) at a
distance of 3m
The manufacturer is not responsible
for any radio or TV interference
caused by unauthorized
modifications to this equipment.
Page 323 of 518
Black plate (57,1)GMC Yukon/Yukon XL Owner Manual - 2012
Driving and Operating 9-57
Such modifications could void the
user's authority to operate the
equipment.
Rear Vision
Camera (RVC)
If available, the Rear Vision Camera
(RVC) system displays part of the
scene behind the vehicle.
{WARNING
The RVC system does not display
pedestrians, bicyclists, animals,
or any other object located
outside the camera's field of view,
below the bumper, or under the
vehicle.
Do not back the vehicle using
only the RVC screen or by using
the screen during longer, higher
speed backing maneuvers,
or where there could be(Continued)
WARNING (Continued)
cross-traffic. Perceived distances
may be different from actual
distances.
Failure to use proper care before
backing may result in injury,
death, or vehicle damage. Always
check before backing by checking
behind and around the vehicle.
Vehicles without Navigation
System
The RVC system displays a view of
the area behind the vehicle. When
the vehicle is on and shifted into
R (Reverse) the video image
appears on the inside rearview
mirror. The video image disappears
after the vehicle is shifted out of
R (Reverse). Turning the RVC System On or Off
To turn off the RVC system, press
and hold
z, located on the inside
rearview mirror, until the left
indicator light turns off. The RVC
display is now disabled.
To turn the RVC system on, press
and hold
zuntil the left indicator
light comes on. The RVC system
display will appear in the mirror.
Vehicles with Navigation
System
The RVC system is designed to
help the driver when backing up by
displaying a view of the area behind
the vehicle. When the vehicle is
shifted into R (Reverse), the video
image appears on the navigation
screen. After a delay, the navigation
screen displays the last screen after
the vehicle is shifted out of
R (Reverse).
Page 324 of 518
Black plate (58,1)GMC Yukon/Yukon XL Owner Manual - 2012
9-58 Driving and Operating
Turning the RVC System On or Off
To turn the RVC system on or off:
1. Shift into P (Park).
2. Press MENU to enter theconfigure menu options. Turn
the Multifunction knob until the
Display feature is highlighted
and press the Multifunction
knob. Or press the Display
screen button
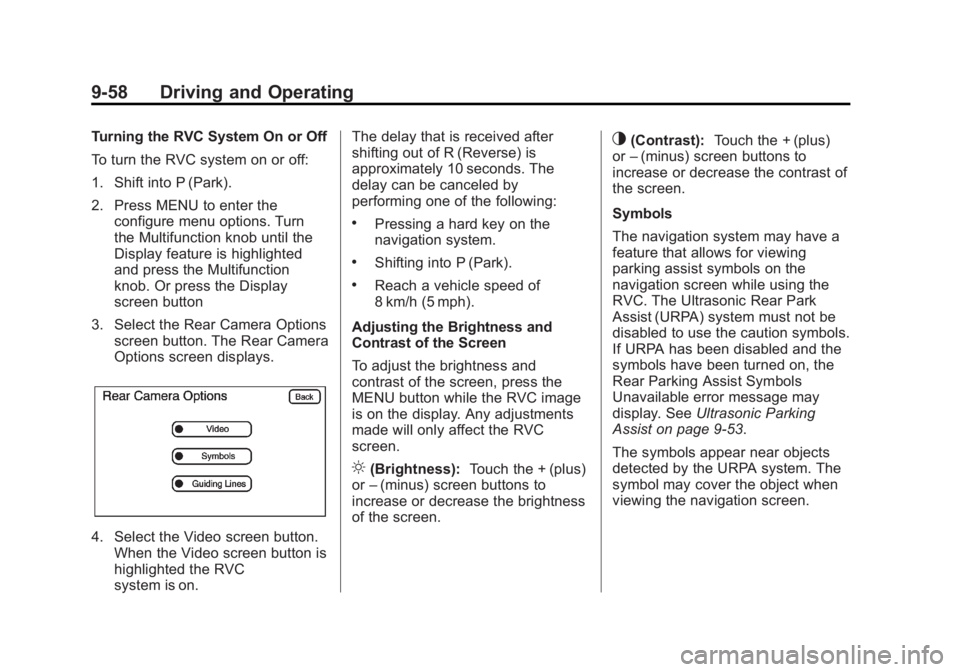
3. Select the Rear Camera Options screen button. The Rear Camera
Options screen displays.
4. Select the Video screen button.When the Video screen button is
highlighted the RVC
system is on. The delay that is received after
shifting out of R (Reverse) is
approximately 10 seconds. The
delay can be canceled by
performing one of the following:
.Pressing a hard key on the
navigation system.
.Shifting into P (Park).
.Reach a vehicle speed of
8 km/h (5 mph).
Adjusting the Brightness and
Contrast of the Screen
To adjust the brightness and
contrast of the screen, press the
MENU button while the RVC image
is on the display. Any adjustments
made will only affect the RVC
screen.
](Brightness): Touch the + (plus)
or –(minus) screen buttons to
increase or decrease the brightness
of the screen.
_(Contrast): Touch the + (plus)
or –(minus) screen buttons to
increase or decrease the contrast of
the screen.
Symbols
The navigation system may have a
feature that allows for viewing
parking assist symbols on the
navigation screen while using the
RVC. The Ultrasonic Rear Park
Assist (URPA) system must not be
disabled to use the caution symbols.
If URPA has been disabled and the
symbols have been turned on, the
Rear Parking Assist Symbols
Unavailable error message may
display. See Ultrasonic Parking
Assist on page 9‑53.
The symbols appear near objects
detected by the URPA system. The
symbol may cover the object when
viewing the navigation screen.
Page 325 of 518
Black plate (59,1)GMC Yukon/Yukon XL Owner Manual - 2012
Driving and Operating 9-59
To turn the symbols on or off:
1. Make sure that URPA has notbeen disabled.
2. Shift into P (Park).
3. Press MENU to enter the configure menu options. Turn
the Multifunction knob until the
Display feature is highlighted
and press the Multifunction
knob. Or press the Display
screen button
4. Select the Rear Camera Options screen button. The Rear Camera
Options screen displays.
5. Touch the Symbols screen button. The screen button will be
highlighted when on. Guidelines
The RVC system has a guideline
overlay that can help the driver align
the vehicle when backing into a
parking spot.
To turn the guidelines on or off:
1. Make sure that URPA has not
been disabled.
2. Shift into P (Park).
3. Press MENU to enter the configure menu options. Turn
the Multifunction knob until the
Display feature is highlighted
and press the Multifunction
knob. Or press the Display
screen button
4. Select the Rear Camera Options screen button. The Rear Camera
Options screen displays.
5. Touch the Guidelines screen button. The screen button will be
highlighted when on.RVC Location
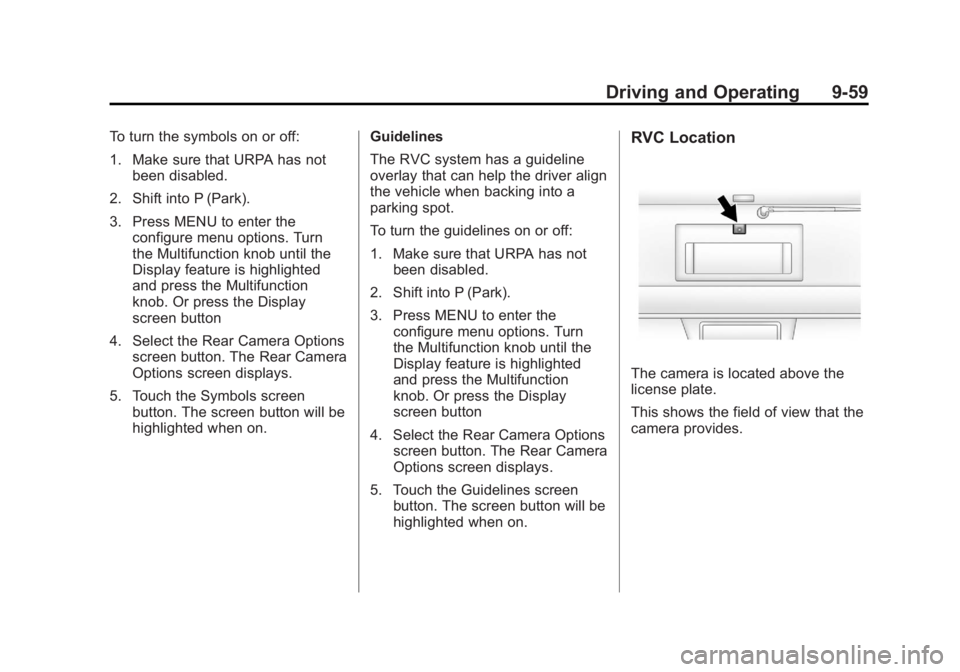
The camera is located above the
license plate.
This shows the field of view that the
camera provides.
Page 326 of 518

Black plate (60,1)GMC Yukon/Yukon XL Owner Manual - 2012
9-60 Driving and Operating
A. View displayed by the camera
A. View displayed by the camera
B. Corners of the rear bumperDisplayed images may be further or
closer than they appear. The area
displayed is limited and objects
which are close to either corner of
the bumper or under the bumper do
not display.
When the System Does Not
Seem To Work Properly
The RVC system might not work
properly or display a clear image if:
.The RVC is turned off. See
“Turning the RVC System On or
Off”
earlier in this section.
.It is dark.
.The sun or the beam of
headlamps is shining directly
into the camera lens.
.Ice, snow, mud, or anything else
builds up on the camera lens.
Clean the lens, rinse it with
water, and wipe it with a soft
cloth.
.The back of the vehicle is in an
accident, the position and
mounting angle of the camera
can change or the camera can
be affected. Be sure to have the
camera and its position and
mounting angle checked at your
dealer.
The RVC system display in the
rearview mirror may turn off or not
appear as expected due to one of
the following conditions. If this
occurs the left indicator light on the
mirror will flash.
.A slow flash may indicate a loss
of video signal, or no video
signal present during the reverse
cycle.
.A fast flash may indicate that the
display has been on for the
maximum allowable time during
a reverse cycle, or the display
has reached an Over
Temperature limit.
Page 327 of 518
Black plate (61,1)GMC Yukon/Yukon XL Owner Manual - 2012
Driving and Operating 9-61
The fast flash conditions are
used to protect the video device
from high temperature
conditions. Once conditions
return to normal the device will
reset and the green indicator will
stop flashing.
During any of these fault conditions,
the display will be blank and the
indicator will flash while the vehicle
is in R (Reverse) or until the
conditions return to normal.
Press and hold
zwhen the left
indicator light is flashing to turn off
the video display along with the left
indicator light.
Fuel
Use of the recommended fuel is an
important part of the proper
maintenance of this vehicle. To help
keep the engine clean and maintain
optimum vehicle performance, we
recommend the use of gasoline
advertised as TOP TIER Detergent
Gasoline.
Look for the TOP TIER label on the
fuel pump to ensure gasoline meets
enhanced detergency standards
developed by auto companies. A list
of marketers providing TOP TIER
Detergent Gasoline can be found at
www.toptiergas.com.
The eighth digit of the Vehicle
Identification Number (VIN) shows
the code letter or number that
identifies the vehicle's engine. The
VIN is at the top left of the
instrument panel. See Vehicle
Identification Number (VIN) on
page 12‑1.
Page 332 of 518

Black plate (66,1)GMC Yukon/Yukon XL Owner Manual - 2012
9-66 Driving and Operating
While refueling, hang the tethered
fuel cap from the hook on the
fuel door.
{WARNING
Fuel can spray out on you if you
open the fuel cap too quickly.
If you spill fuel and then
something ignites it, you could be
badly burned. This spray can
happen if the tank is nearly full,
and is more likely in hot weather.
Open the fuel cap slowly and wait
for any hiss noise to stop. Then
unscrew the cap all the way.
Be careful not to spill fuel. Do not
top off or overfill the tank and wait a
few seconds after you have finished
pumping before removing the
nozzle. Clean fuel from painted
surfaces as soon as possible. See
Exterior Care on page 10‑98. When replacing the fuel cap, insert
the tether in its hole before
tightening the cap. Turn the fuel cap
clockwise until it clicks. It will require
more effort to turn the fuel cap on
the last turn as you tighten it. Make
sure the cap is fully installed. The
diagnostic system can determine if
the fuel cap has been left off or
improperly installed. This would
allow fuel to evaporate into the
atmosphere. See
Malfunction
Indicator Lamp on page 5‑21.
If the vehicle has a Driver
Information Center (DIC), the
TIGHTEN GAS CAP message
displays if the fuel cap is not
properly installed.
{WARNING
If a fire starts while you are
refueling, do not remove the
nozzle. Shut off the flow of fuel by
shutting off the pump or by
notifying the station attendant.
Leave the area immediately.
Notice: If a new fuel cap is
needed, be sure to get the right
type of cap from your dealer. The
wrong type of fuel cap might not
fit properly, might cause the
malfunction indicator lamp to
light, and could damage the fuel
tank and emissions system. See
Malfunction Indicator Lamp on
page 5‑21.
Page 347 of 518
Black plate (81,1)GMC Yukon/Yukon XL Owner Manual - 2012
Driving and Operating 9-81
When trailering, make sure of the
following:
.The ITBC system is used only
with trailers that are equipped
with electric brakes.
.All applicable local and federal
laws and regulations are
followed.
.All electrical and mechanical
connections to the trailer are
made correctly.
.The trailer’s brakes are in proper
working condition.
.The trailer and vehicle are
properly loaded for the towing
condition.
The ITBC system is a factory
installed item. Out‐of‐factory
installation of this system should not
be attempted. GM is not responsible
for warranty or performance of the
system resulting from out‐of‐factory
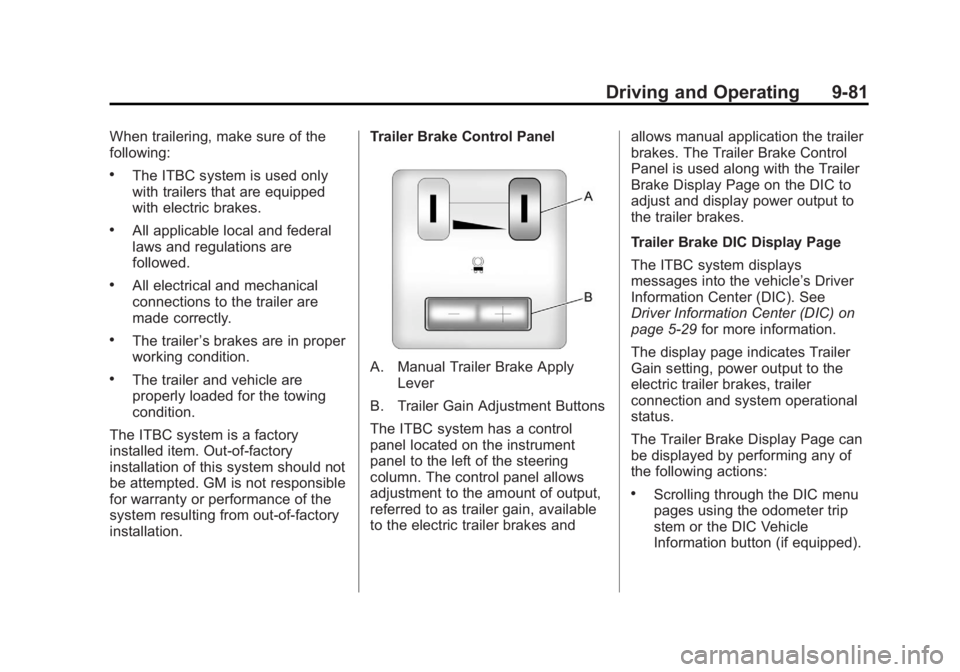
installation. Trailer Brake Control PanelA. Manual Trailer Brake Apply
Lever
B. Trailer Gain Adjustment Buttons
The ITBC system has a control
panel located on the instrument
panel to the left of the steering
column. The control panel allows
adjustment to the amount of output,
referred to as trailer gain, available
to the electric trailer brakes and allows manual application the trailer
brakes. The Trailer Brake Control
Panel is used along with the Trailer
Brake Display Page on the DIC to
adjust and display power output to
the trailer brakes.
Trailer Brake DIC Display Page
The ITBC system displays
messages into the vehicle’s Driver
Information Center (DIC). See
Driver Information Center (DIC) on
page 5‑29
for more information.
The display page indicates Trailer
Gain setting, power output to the
electric trailer brakes, trailer
connection and system operational
status.
The Trailer Brake Display Page can
be displayed by performing any of
the following actions:
.Scrolling through the DIC menu
pages using the odometer trip
stem or the DIC Vehicle
Information button (if equipped).
Page 348 of 518
Black plate (82,1)GMC Yukon/Yukon XL Owner Manual - 2012
9-82 Driving and Operating
.Pressing a Trailer Gain
button–If the Trailer Brake
Display Page is not currently
displayed, pressing a Trailer
Gain button will first recall the
current Trailer Gain setting. After
the Trailer Brake Display Page is
displayed, each press and
release of the gain buttons will
then cause the Trailer Gain
setting to change.
.Activating the Manual Trailer
Brake Apply lever
.Connecting a trailer equipped
with electric trailer brakes
All DIC warning and service
messages must first be
acknowledged by the driver by
pressing the odometer trip stem or
the DIC Vehicle Information button
(if equipped) before the Trailer
Brake Display Page can be
displayed and Trailer Gain can be
adjusted. TRAILER GAIN
–This setting is
displayed anytime the Trailer Brake
Display Page is active. This setting
can be adjusted from 0.0 to 10.0
with either a trailer connected or
disconnected. To adjust the Trailer
Gain, press one of the Trailer Gain
adjustment buttons located on the
Trailer Brake Control Panel. Press
and hold a gain button to cause the
Trailer Gain to continuously adjust.
To turn the output to the trailer off,
adjust the Trailer Gain setting to
0.0 (zero).
0.0 (zero) gain is the factory default
setting. To properly adjust trailer
gain, see the Trailer Gain
Adjustment Procedure later in this
section.
TRAILER OUTPUT –This is
displayed any time a trailer with
electric brakes is connected. Output
to the electric brakes is based on
the amount of vehicle braking
present and relative to the Trailer
Gain setting. Output is displayed
from 0 to 10 bars for each gain
setting. The Trailer Output will indicate
“- - -
- - -“ on the Trailer Brake Display
Page whenever the following occur:
.No trailer is connected.
.A trailer without electric brakes
is connected (no DIC message
is displayed).
.A trailer with electric brakes has
become disconnected (a
CHECK TRAILER WIRING
message will also be displayed
on the DIC).
.There is a fault present in the
wiring to the electric trailer
brakes (a CHECK TRAILER
WIRING message will also be
displayed on the DIC).
.There is a fault in the ITBC
system (a SERVICE TRAILER
BRAKE SYSTEM message will
also be displayed in the DIC).