climate control GMC YUKON 2013 User Guide
[x] Cancel search | Manufacturer: GMC, Model Year: 2013, Model line: YUKON, Model: GMC YUKON 2013Pages: 510, PDF Size: 6.36 MB
Page 40 of 510
Black plate (6,1)GMC Yukon/Yukon XL Owner Manual - 2013 - CRC 2nd edition - 8/15/12
2-6 Keys, Doors, and Windows
There are other conditions which
can affect the performance of the
transmitter. SeeRemote Keyless
Entry (RKE) System on page 2‑2 for
additional information.
/(Remote Start): This button will
be on the RKE transmitter if the
vehicle has remote start.
To start the vehicle using the remote
start feature:
1. Aim the RKE transmitter at the vehicle.
2. Press and release
Q. 3. Immediately press and hold
/
until the turn signal lamps flash.
If you cannot see the vehicle's
lamps, press and hold
/for at
least two seconds.
When the vehicle starts, the
parking lamps will turn on and
remain on while the vehicle is
running. The doors will be
locked and the climate control
system may come on.
The engine will continue to run
for 10 minutes. Repeat the steps
for a 10-minute time extension.
Remote start can be extended
only once.
After entering the vehicle during a
remote start, insert and turn the key
to ON/RUN to drive the vehicle.
To cancel a remote start:
.Aim the RKE transmitter at the
vehicle and press and hold
/
until the parking lamps turn off.
.Turn on the hazard warning
flashers.
.Turn the ignition on and then
back off.
The vehicle can be remote started
two separate times between driving
sequences. The engine will run for
10 minutes after each remote start.
Or, you can extend the engine run
time by another 10 minutes within
the first 10 minute remote start time
frame, and before the engine stops.
For example, if
Qand then/are
pressed again after the vehicle has
been running for 5 minutes,
10 minutes are added, allowing the
engine to run for 15 minutes.
The additional 10 minutes are
considered a second remote vehicle
start.
Once two remote starts, or a single
remote start with one time extension
has been done, the vehicle must be
started with the key. After the key is
removed from the ignition, the
vehicle can be remote started again.
Page 44 of 510
Black plate (10,1)GMC Yukon/Yukon XL Owner Manual - 2013 - CRC 2nd edition - 8/15/12
2-10 Keys, Doors, and Windows
WARNING (Continued)
.Adjust the climate control
system to a setting that
brings in only outside air and
set the fan speed to the
highest setting. See“Climate
Control Systems” in the
Index.
.If the vehicle is equipped with
a power liftgate, disable the
power liftgate function.
See Engine Exhaust on
page 9‑28.
Notice: If you open the liftgate
without checking for overhead
obstructions such as a garage
door, you could damage the
liftgate or the liftgate glass.
Always check to make sure the
area above and behind the liftgate
is clear before opening it.
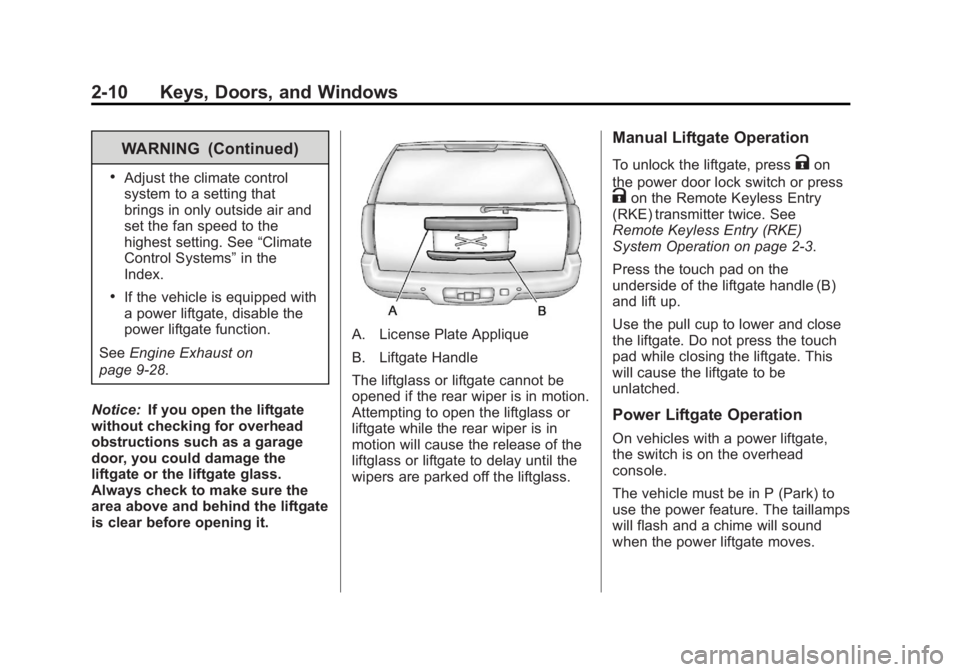
A. License Plate Applique
B. Liftgate Handle
The liftglass or liftgate cannot be
opened if the rear wiper is in motion.
Attempting to open the liftglass or
liftgate while the rear wiper is in
motion will cause the release of the
liftglass or liftgate to delay until the
wipers are parked off the liftglass.
Manual Liftgate Operation
To unlock the liftgate, pressKon
the power door lock switch or press
Kon the Remote Keyless Entry
(RKE) transmitter twice. See
Remote Keyless Entry (RKE)
System Operation on page 2‑3.
Press the touch pad on the
underside of the liftgate handle (B)
and lift up.
Use the pull cup to lower and close
the liftgate. Do not press the touch
pad while closing the liftgate. This
will cause the liftgate to be
unlatched.
Power Liftgate Operation
On vehicles with a power liftgate,
the switch is on the overhead
console.
The vehicle must be in P (Park) to
use the power feature. The taillamps
will flash and a chime will sound
when the power liftgate moves.
Page 53 of 510

Black plate (19,1)GMC Yukon/Yukon XL Owner Manual - 2013 - CRC 2nd edition - 8/15/12
Keys, Doors, and Windows 2-19
See“Rear Window Defogger” under
Dual Automatic Climate Control
System on page 8‑4 orClimate
Control Systems on page 8‑1 for
more information.
Automatic Dimming
Mirror
If the vehicle has the automatic
dimming mirror, the driver outside
mirror automatically adjusts for the
glare of the headlamps from behind.
This feature is controlled by the on
and off setting on the inside
rearview mirror. See Automatic
Dimming Rearview Mirror on
page 2‑20.
Park Tilt Mirrors
If the vehicle has the memory
package, the exterior mirrors tilt to a
preselected position when the
vehicle is in R (Reverse). This
feature lets the driver view the curb
when parallel parking. The mirrors
return to the original position when
the vehicle is shifted out of
R (Reverse), or the ignition is turned
off or to OFF/LOCK.
This feature can be programed
through the Driver Information
Center (DIC). See Vehicle
Personalization (With DIC Buttons)
on page 5‑45 for more information.
Interior Mirrors
Manual Rearview Mirror
To adjust the inside rearview mirror,
hold the rearview mirror in the
center and move it to view the area
behind the vehicle.
For vehicles with a manual rearview
mirror, push the tab forward for
daytime use and pull it rearward for
nighttime use to avoid glare from
the headlamps from behind.
Vehicles with OnStar
®have three
control buttons at the bottom of the
mirror. See a dealer for more
information about OnStar and how
to subscribe to it. See OnStar
Overview on page 14‑1.
Page 133 of 510
Black plate (7,1)GMC Yukon/Yukon XL Owner Manual - 2013 - CRC 2nd edition - 8/15/12
Instruments and Controls 5-7
strong magnetic field interfering with
the compass. Such interference
may be caused by a magnetic CB or
cell phone antenna mount, a
magnetic emergency light, magnetic
note pad holder, or any other
magnetic item. Turn off the vehicle,
move the magnetic item, then turn
on the vehicle and calibrate the
compass.
To calibrate the compass, use the
following procedure:
Compass Calibration Procedure
1. Before calibrating the compass,make sure the compass zone is
set to the variance zone in which
the vehicle is located. See
“Compass Variance (Zone)
Procedure” earlier in this
section.
Do not operate any switches
such as window, sunroof,
climate controls, or seats during
the calibration procedure. 2. Press the vehicle information
button until PRESS
VTO
CALIBRATE COMPASS
displays. Or, if the vehicle does
not have DIC buttons, press the
trip odometer reset stem until
CALIBRATE COMPASS
displays.
3. Press the set/reset button to start the compass calibration. Or,
if the vehicle does not have DIC
buttons, press and hold the trip
odometer reset stem for
two seconds to start the
compass calibration.
4. The DIC will display CALIBRATING: DRIVE IN
CIRCLES. Drive the vehicle in
tight circles at less than 8 km/h
(5 mph) to complete the
calibration. The DIC will display
CALIBRATION COMPLETE for a
few seconds when the
calibration is complete. The DIC
display will then return to the
previous menu.Clock
To set the time and date:
1. Turn the ignition key to ACC/ACCESSORY or ON/RUN, then
press the
Obutton to turn the
radio on.
2. Press the
Hbutton to display
HR, MIN, MM, DD, YYYY (hour,
minute, month, day, and year).
3. Press the softkey located under any one of the tabs to change
that setting.
4. To increase the time or date, do one of the following:
.Press the softkey below the
selected tab.
.Press the¨SEEK button.
.Press the\FWD button.
.Turn thefknob clockwise.
Page 134 of 510
Black plate (8,1)GMC Yukon/Yukon XL Owner Manual - 2013 - CRC 2nd edition - 8/15/12
5-8 Instruments and Controls
5. To decrease the time or date, doone of the following:
.Press the©SEEK button.
.Press thesREV button.
.Turn thefknob
counterclockwise.
To change the time default setting
from 12 hour to 24 hour or to change
the date default setting from month/
day/year to day/month/year:
1. Press the
Hbutton and then the
softkey located below the
forward arrow tab. 12H, 24H, the
date MM/DD (month and day),
and DD/MM/ (day and month)
displays.
2. Press the softkey located below the desired option.
3. Press the
Hbutton again to
apply the desired option, or let
the screen time out.
Power Outlets
The accessory power outlets can be
used to plug in electrical equipment,
such as a cell phone or MP3 player.
There are two under the climate
controls, one inside the center floor
console, one on the rear of the
center floor console and one
accessory power outlet in the rear
cargo area on the passenger side.
Remove the cover to access and
replace when not in use.
The accessory power outlets are
powered, even with the ignition off.
Continuing to use accessory power
outlets while the ignition is in LOCK/
OFF may cause the vehicle's
battery to run down.{WARNING
Power is always supplied to the
outlets. Do not leave electrical
equipment plugged in when the
vehicle is not in use because the
vehicle could catch fire and cause
injury or death.
Notice: Leaving electrical
equipment plugged in for an
extended period of time while the
vehicle is off will drain the
battery. Always unplug electrical
equipment when not in use and
do not plug in equipment that
exceeds the maximum 20 ampere
rating.
Certain accessory plugs may not be
compatible with the accessory
power outlet and could overload
adapter or vehicle fuses. If a
problem is experienced, see your
dealer.
Page 161 of 510
Black plate (35,1)GMC Yukon/Yukon XL Owner Manual - 2013 - CRC 2nd edition - 8/15/12
Instruments and Controls 5-35
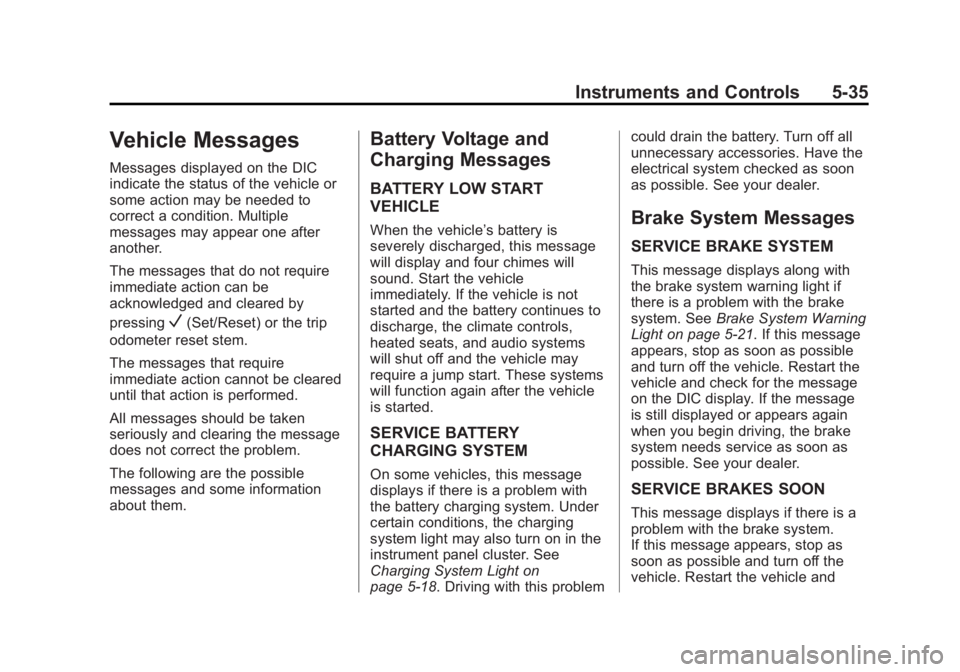
Vehicle Messages
Messages displayed on the DIC
indicate the status of the vehicle or
some action may be needed to
correct a condition. Multiple
messages may appear one after
another.
The messages that do not require
immediate action can be
acknowledged and cleared by
pressing
V(Set/Reset) or the trip
odometer reset stem.
The messages that require
immediate action cannot be cleared
until that action is performed.
All messages should be taken
seriously and clearing the message
does not correct the problem.
The following are the possible
messages and some information
about them.
Battery Voltage and
Charging Messages
BATTERY LOW START
VEHICLE
When the vehicle’ s battery is
severely discharged, this message
will display and four chimes will
sound. Start the vehicle
immediately. If the vehicle is not
started and the battery continues to
discharge, the climate controls,
heated seats, and audio systems
will shut off and the vehicle may
require a jump start. These systems
will function again after the vehicle
is started.
SERVICE BATTERY
CHARGING SYSTEM
On some vehicles, this message
displays if there is a problem with
the battery charging system. Under
certain conditions, the charging
system light may also turn on in the
instrument panel cluster. See
Charging System Light on
page 5‑18. Driving with this problem could drain the battery. Turn off all
unnecessary accessories. Have the
electrical system checked as soon
as possible. See your dealer.
Brake System Messages
SERVICE BRAKE SYSTEM
This message displays along with
the brake system warning light if
there is a problem with the brake
system. See
Brake System Warning
Light on page 5‑21. If this message
appears, stop as soon as possible
and turn off the vehicle. Restart the
vehicle and check for the message
on the DIC display. If the message
is still displayed or appears again
when you begin driving, the brake
system needs service as soon as
possible. See your dealer.
SERVICE BRAKES SOON
This message displays if there is a
problem with the brake system.
If this message appears, stop as
soon as possible and turn off the
vehicle. Restart the vehicle and
Page 193 of 510
Black plate (9,1)GMC Yukon/Yukon XL Owner Manual - 2013 - CRC 2nd edition - 8/15/12
Lighting 6-9
The battery can be discharged at
idle if the electrical loads are very
high. This is true for all vehicles.
This is because the generator
(alternator) may not be spinning fast
enough at idle to produce all the
power that is needed for very high
electrical loads.
A high electrical load occurs when
several of the following are on, such
as: headlamps, high beams, fog
lamps, rear window defogger,
climate control fan at high speed,
heated seats, engine cooling fans,
trailer loads, and loads plugged into
accessory power outlets.EPM works to prevent excessive
discharge of the battery. It does this
by balancing the generator's output
and the vehicle's electrical needs.
It can increase engine idle speed to
generate more power, whenever
needed. It can temporarily reduce
the power demands of some
accessories.
Normally, these actions occur in
steps or levels, without being
noticeable. In rare cases at the
highest levels of corrective action,
this action may be noticeable to the
driver. If so, a Driver Information
Center (DIC) message might be
displayed, such as BATTERY LOW
START VEHICLE. If this message
displays, it is recommended that the
driver reduce the electrical loads as
much as possible and restart the
vehicle. See
Battery Voltage and
Charging Messages on page 5‑35.Battery Power Protection
This feature shuts off the dome and
reading lamps if they are left on for
more than 10 minutes when the
ignition is off. This will keep the
battery from running down.
Page 251 of 510
Black plate (1,1)GMC Yukon/Yukon XL Owner Manual - 2013 - CRC 2nd edition - 8/15/12
Climate Controls 8-1
Climate Controls
Climate Control Systems
Climate Control Systems . . . . . . 8-1
Dual Automatic Climate ControlSystem . . . . . . . . . . . . . . . . . . . . . . 8-4
Rear Climate Control System (Rear Climate
Control Only) . . . . . . . . . . . . . . . 8-10
Rear Climate Control System (Rear Climate with Rear Seat
Audio) . . . . . . . . . . . . . . . . . . . . . . 8-11
Air Vents
Air Vents . . . . . . . . . . . . . . . . . . . . . 8-13
Climate Control Systems
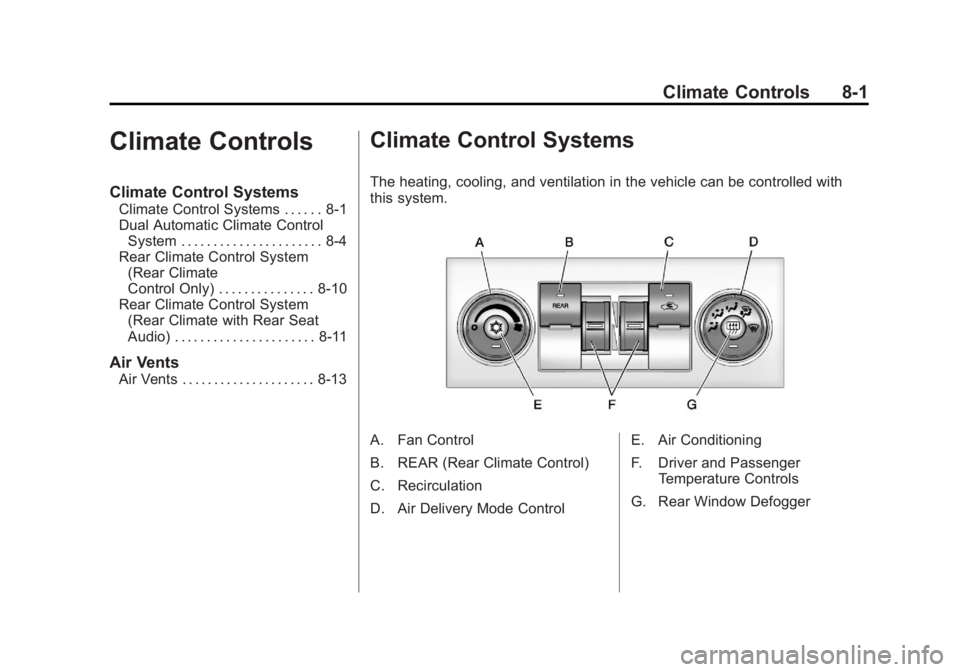
The heating, cooling, and ventilation in the vehicle can be controlled with
this system.
A. Fan Control
B. REAR (Rear Climate Control)
C. Recirculation
D. Air Delivery Mode Control E. Air Conditioning
F. Driver and Passenger
Temperature Controls
G. Rear Window Defogger
Page 252 of 510
Black plate (2,1)GMC Yukon/Yukon XL Owner Manual - 2013 - CRC 2nd edition - 8/15/12
8-2 Climate Controls
Temperature Control:Move the
thumbwheels up or down to
increase or decrease the
temperature on the driver side or
the passenger side of the vehicle for
the dual zone system.
9(Fan Control): Turn the left
knob clockwise or counterclockwise
to increase or decrease the fan
speed. Turn the knob all the way
counterclockwise to turn the front
system off.
Air Delivery Mode Control: Turn
clockwise or counterclockwise to
change the airflow direction inside
the vehicle. By positioning the knob
between two modes, a combination
of those modes is selected.
Select from the following modes:
H(Vent): Air is directed to the
instrument panel outlets.
)(Bi-Level): Air is divided
between the instrument panel and
floor outlets. Some air is directed
towards the windshield and side window outlets. Cooler air is
directed to the upper outlets and
warmer air to the floor outlets.
6(Floor):
Air is directed to the
floor outlets, with some of the air
directed to the windshield, side
window, and second row floor
outlets. In this mode, the system
automatically selects outside air.
Recirculation cannot be selected
when in Floor Mode.
-(Defog): The defog mode is
used to clear the windows of fog or
moisture. Air is directed to the
windshield, floor outlets, and side
window vents. In this mode, the
system turns off recirculation and
runs the air conditioning compressor
unless the outside temperature is
close to freezing. The recirculation
mode cannot be selected while in
the defog mode.
0(Defrost): The defrost mode is
used to remove fog or frost from the
windshield more quickly. Air is
directed to the windshield and side
window vents, with some directed to the floor vents. In this mode, the
system automatically forces outside
air into the vehicle. The recirculation
mode cannot be selected while in
the defrost mode. The air
conditioning compressor runs
automatically in this setting, unless
the outside temperature is close to
freezing.
Do not drive the vehicle until all the
windows are clear.
#(Air Conditioning):
Press this
button to turn the air conditioning
system on or off. An indicator light
comes on to show that the air
conditioning is on. The air
conditioning can be selected in any
mode as long as the fan switch
is on.
On hot days, open the windows to
let hot inside air escape; then close
them. This helps to reduce the time
it takes for the vehicle to cool down.
It also helps the system to operate
more efficiently.
Page 253 of 510
Black plate (3,1)GMC Yukon/Yukon XL Owner Manual - 2013 - CRC 2nd edition - 8/15/12
Climate Controls 8-3
The air conditioning system
removes moisture from the air, so a
small amount of water might drip
under the vehicle while idling or
after turning off the engine. This is
normal.
h(Recirculation):Press this
button to turn the recirculation mode
on or off. An indicator light comes
on to show that recirculation is on.
This mode recirculates and helps to
quickly cool the air inside the
vehicle. It can be used to help
prevent outside air and odors from
entering the vehicle.
The recirculation mode cannot be
used with floor, defrost, or defogging
modes. If recirculation is selected
while in one of those modes, the
indicator flashes three times and
turns off. The air conditioning
compressor will also come on when
this mode is activated. While in
recirculation mode the windows may
fog when the weather is cold and
damp. To clear the fog, select either
the defog or defrost mode and increase the fan speed. The
recirculation mode can also be
turned off by turning off the engine.
REAR:
Press to turn the rear
heating and air conditioning on. See
Rear Climate Control System (Rear
Climate Control Only) on page 8‑10
or Rear Climate Control System
(Rear Climate with Rear Seat Audio)
on page 8‑11 for more information.
Rear Window Defogger
The rear window defogger uses a
warming grid to remove fog from the
rear window.
1(Rear Window Defogger):
Press this button to turn the rear
window defogger on or off. The
system automatically turns off
several minutes after it has been
activated. The defogger can also be
turned off by turning off the engine.
Do not drive the vehicle until all the
windows are clear. For vehicles with heated outside
rearview mirrors, the mirrors will
heat to help clear fog or frost from
the surface of the mirror when the
rear window defog button is
pressed.
Notice:
Do not use anything
sharp on the inside of the rear
window. If you do, you could cut
or damage the warming grid, and
the repairs would not be covered
by the vehicle warranty. Do not
attach a temporary vehicle
license, tape, a decal, or anything
similar to the defogger grid.