display GMC YUKON 2014 Owner's Manual
[x] Cancel search | Manufacturer: GMC, Model Year: 2014, Model line: YUKON, Model: GMC YUKON 2014Pages: 490, PDF Size: 7.46 MB
Page 306 of 490
Black plate (50,1)GMC Yukon/Yukon XL Owner Manual (GMNA-Localizing-U.S./Canada-
6081505) - 2014 - crc - 4/23/13
9-50 Driving and Operating
Warning (Continued)
all driving conditions. Failure to
use proper care when changing
lanes may result in injury, death,
or vehicle damage. Before
making a lane change, always
check mirrors, glance over your
shoulder, and use the turn
signals.
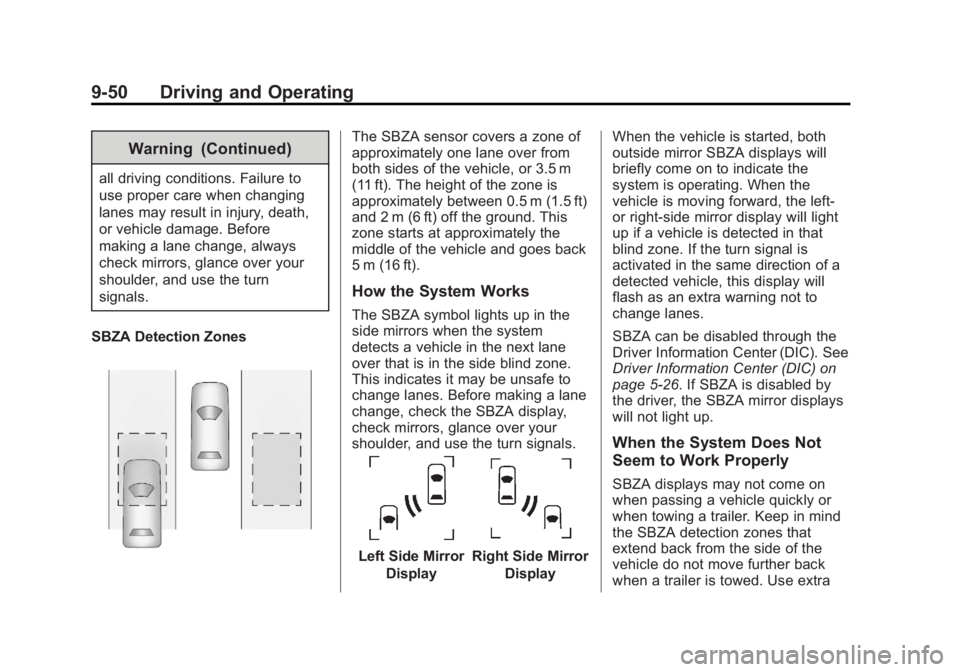
SBZA Detection Zones
The SBZA sensor covers a zone of
approximately one lane over from
both sides of the vehicle, or 3.5 m
(11 ft). The height of the zone is
approximately between 0.5 m (1.5 ft)
and 2 m (6 ft) off the ground. This
zone starts at approximately the
middle of the vehicle and goes back
5 m (16 ft).
How the System Works
The SBZA symbol lights up in the
side mirrors when the system
detects a vehicle in the next lane
over that is in the side blind zone.
This indicates it may be unsafe to
change lanes. Before making a lane
change, check the SBZA display,
check mirrors, glance over your
shoulder, and use the turn signals.
Left Side Mirror DisplayRight Side Mirror Display When the vehicle is started, both
outside mirror SBZA displays will
briefly come on to indicate the
system is operating. When the
vehicle is moving forward, the left-
or right-side mirror display will light
up if a vehicle is detected in that
blind zone. If the turn signal is
activated in the same direction of a
detected vehicle, this display will
flash as an extra warning not to
change lanes.
SBZA can be disabled through the
Driver Information Center (DIC). See
Driver Information Center (DIC) on
page 5-26. If SBZA is disabled by
the driver, the SBZA mirror displays
will not light up.
When the System Does Not
Seem to Work Properly
SBZA displays may not come on
when passing a vehicle quickly or
when towing a trailer. Keep in mind
the SBZA detection zones that
extend back from the side of the
vehicle do not move further back
when a trailer is towed. Use extra
Page 307 of 490

Black plate (51,1)GMC Yukon/Yukon XL Owner Manual (GMNA-Localizing-U.S./Canada-
6081505) - 2014 - crc - 4/23/13
Driving and Operating 9-51
caution while changing lanes when
towing a trailer. SBZA may alert you
to objects attached to the vehicle,
such as a trailer, bicycle, or object
extending out to either side of the
vehicle. This is normal system
operation; the vehicle does not need
service.
SBZA may not always alert the
driver to vehicles in the side blind
zone, especially in wet conditions.
The system does not need to be
serviced. The system may light up
due to guardrails, signs, trees,
shrubs, and other non-moving
objects. This is normal system
operation; the vehicle does not need
service.
SBZA may not operate when the
SBZA sensors in the left or right
corners of the rear bumper are
covered with mud, dirt, snow, ice,
or slush, or in heavy rainstorms. For
cleaning instructions, see "Washing
the Vehicle" underExterior Care on
page 10-86. If the DIC still displays
the SIDE BLIND ZONE SYSTEM
UNAVAILABLE message after cleaning both sides of the vehicle
toward the rear corners of the
vehicle, see your dealer.
If the SBZA displays do not light up
when vehicles are in the blind zone
and the system is clean, the system
may need service. Take the vehicle
to your dealer.
When SBZA is disabled for any
reason other than the driver turning
it off, the Side Blind Zone Alert ON
option will not be available on the
DIC menu.
FCC Information
See
Radio Frequency Statement on
page 13-15.
Rear Vision
Camera (RVC)
If available, the Rear Vision Camera
(RVC) system displays part of the
scene behind the vehicle.
{Warning
The RVC system does not display
children, pedestrians, bicyclists,
animals, or any other object
located outside the camera's field
of view, below the bumper,
or under the vehicle. Perceived
distances may be different from
actual distances. Do not back the
vehicle using only the RVC
screen, during longer, higher
speed backing maneuvers,
or where there could be cross
traffic. Failure to use proper care
before backing may result in
injury, death, or vehicle damage.
Always check behind and around
the vehicle before backing.
Vehicles without Navigation
System
The RVC system displays a view of
the area behind the vehicle. When
the vehicle is on and shifted into
R (Reverse) the video image
Page 308 of 490

Black plate (52,1)GMC Yukon/Yukon XL Owner Manual (GMNA-Localizing-U.S./Canada-
6081505) - 2014 - crc - 4/23/13
9-52 Driving and Operating
appears on the inside rearview
mirror. The video image disappears
after the vehicle is shifted out of
R (Reverse).
Turning the RVC System On or Off
To turn off the RVC system, press
and hold
z, located on the inside
rearview mirror, until the left
indicator light turns off. The RVC
display is now disabled.
To turn the RVC system on, press
and hold
zuntil the left indicator
light comes on. The RVC system
display will appear in the mirror.
Vehicles with Navigation
System
The RVC system is designed to
help the driver when backing up by
displaying a view of the area behind
the vehicle. When the vehicle is
shifted into R (Reverse), the video
image appears on the navigation
screen. After a delay, the navigation screen displays the last screen after
the vehicle is shifted out of
R (Reverse).
Turning the RVC System On or Off
To turn the RVC system on or off:
1. Shift into P (Park).
2. Press MENU to enter the
configure menu options. Turn
the Multifunction knob until the
Display feature is highlighted
and press the Multifunction
knob. Or press the Display
screen button
3. Select the Rear Camera Options screen button. The Rear Camera
Options screen displays.
4. Select the Video screen button. When the Video screen button is
highlighted the RVC
system is on. The delay that is received after
shifting out of R (Reverse) is
approximately 10 seconds. The
delay can be canceled by
performing one of the following:
.Pressing a hard key on the
navigation system.
.Shifting into P (Park).
.Reach a vehicle speed of
8 km/h (5 mph).
Symbols
The navigation system may have a
feature that allows for viewing
parking assist symbols on the
navigation screen while using the
RVC. The Ultrasonic Rear Park
Assist (URPA) system must not be
disabled to use the caution symbols.
If URPA has been disabled and the
symbols have been turned on, the
Rear Parking Assist Symbols
Unavailable error message may
display. See Ultrasonic Parking
Assist on page 9-48.
Page 309 of 490

Black plate (53,1)GMC Yukon/Yukon XL Owner Manual (GMNA-Localizing-U.S./Canada-
6081505) - 2014 - crc - 4/23/13
Driving and Operating 9-53
The symbols appear near objects
detected by the URPA system. The
symbol may cover the object when
viewing the navigation screen.
To turn the symbols on or off:
1. Make sure that URPA has notbeen disabled.
2. Shift into P (Park).
3. Press MENU to enter the configure menu options. Turn
the Multifunction knob until the
Display feature is highlighted
and press the Multifunction
knob. Or press the Display
screen button
4. Select the Rear Camera Options screen button. The Rear Camera
Options screen displays.
5. Touch the Symbols screen button. The screen button will be
highlighted when on. Guidelines
The RVC system has a guideline
overlay that can help the driver align
the vehicle when backing into a
parking spot.
To turn the guidelines on or off:
1. Make sure that URPA has not
been disabled.
2. Shift into P (Park).
3. Press MENU to enter the configure menu options. Turn
the Multifunction knob until the
Display feature is highlighted
and press the Multifunction
knob. Or press the Display
screen button
4. Select the Rear Camera Options screen button. The Rear Camera
Options screen displays.
5. Touch the Guidelines screen button. The screen button will be
highlighted when on.RVC Location
The camera is located above the
license plate.
This shows the field of view that the
camera provides.
Page 310 of 490

Black plate (54,1)GMC Yukon/Yukon XL Owner Manual (GMNA-Localizing-U.S./Canada-
6081505) - 2014 - crc - 4/23/13
9-54 Driving and Operating
A. View displayed by the camera
A. View displayed by the camera
B. Corners of the rear bumperDisplayed images may be further or
closer than they appear. The area
displayed is limited and objects
which are close to either corner of
the bumper or under the bumper do
not display.
When the System Does Not
Seem To Work Properly
The RVC system might not work
properly or display a clear image if:
.The RVC is turned off. See
“Turning the RVC System On or
Off”
earlier in this section.
.It is dark.
.The sun or the beam of
headlamps is shining directly
into the camera lens.
.Ice, snow, mud, or anything else
builds up on the camera lens.
Clean the lens, rinse it with
water, and wipe it with a soft
cloth.
.The back of the vehicle is in an
accident, the position and
mounting angle of the camera
can change or the camera can
be affected. Be sure to have the
camera and its position and
mounting angle checked at your
dealer.
The RVC system display in the
rearview mirror may turn off or not
appear as expected due to one of
the following conditions. If this
occurs the left indicator light on the
mirror will flash.
.A slow flash may indicate a loss
of video signal, or no video
signal present during the reverse
cycle.
.A fast flash may indicate that the
display has been on for the
maximum allowable time during
a reverse cycle, or the display
has reached an Over
Temperature limit.
Page 311 of 490

Black plate (55,1)GMC Yukon/Yukon XL Owner Manual (GMNA-Localizing-U.S./Canada-
6081505) - 2014 - crc - 4/23/13
Driving and Operating 9-55
The fast flash conditions are
used to protect the video device
from high temperature
conditions. Once conditions
return to normal the device will
reset and the green indicator will
stop flashing.
During any of these fault conditions,
the display will be blank and the
indicator will flash while the vehicle
is in R (Reverse) or until the
conditions return to normal.
Press and hold
zwhen the left
indicator light is flashing to turn off
the video display along with the left
indicator light.
Fuel
Use of the recommended fuel is an
important part of the proper
maintenance of this vehicle. To help
keep the engine clean and maintain
optimum vehicle performance, we
recommend using TOP TIER
Detergent Gasolines. See
www.toptiergas.com for a list of TOP
TIER Detergent Gasolines.
If the vehicle has a yellow fuel cap,
E85 or flex fuel can be used in the
vehicle. See E85 or FlexFuel on
page 9-57.
Recommended Fuel
Use regular unleaded gasoline with
a posted octane rating of 87 or
higher. If the octane rating is less
than 87, an audible knocking noise,
commonly referred to as spark
knock, might be heard when driving.
If this occurs, use a gasoline rated
at 87 octane or higher as soon as
possible. If heavy knocking is heard
when using gasoline rated at
87 octane or higher, the engine
needs service.
Use of Seasonal Fuels
Use summer and winter fuels in the
appropriate season. Driving or
starting could be affected if the
incorrect fuel is used. Drive the
vehicle with the engine running until
the fuel is a half tank or less, then
refuel with the current seasonal fuel.
Prohibited Fuels
Gasolines containing oxygenates,
such as ethers and ethanol, as well
as reformulated gasolines are
available in some cities. If these
Page 315 of 490
Black plate (59,1)GMC Yukon/Yukon XL Owner Manual (GMNA-Localizing-U.S./Canada-
6081505) - 2014 - crc - 4/23/13
Driving and Operating 9-59
nozzle. Clean fuel from painted
surfaces as soon as possible. See
Exterior Care on page 10-86.
When replacing the fuel cap, insert
the tether in its hole before
tightening the cap. Turn the fuel cap
clockwise until it clicks. It will require
more effort to turn the fuel cap on
the last turn as you tighten it. Make
sure the cap is fully installed. The
diagnostic system can determine if
the fuel cap has been left off or
improperly installed. This would
allow fuel to evaporate into the
atmosphere. SeeMalfunction
Indicator Lamp on page 5-19.
If the vehicle has a Driver
Information Center (DIC), the
TIGHTEN GAS CAP message
displays if the fuel cap is not
properly installed.{Warning
If a fire starts while you are
refueling, do not remove the
nozzle. Shut off the flow of fuel by
shutting off the pump or by
notifying the station attendant.
Leave the area immediately.
Notice: If a new fuel cap is
needed, be sure to get the right
type of cap from your dealer. The
wrong type of fuel cap might not
fit properly, might cause the
malfunction indicator lamp to
light, and could damage the fuel
tank and emissions system. See
Malfunction Indicator Lamp on
page 5-19.
Filling a Portable Fuel
Container
{Warning
Filling a portable fuel container
while it is in the vehicle can cause
fuel vapors that can ignite either
by static electricity or other
means. You or others could be
badly burned and the vehicle
could be damaged. Always:
.Use approved fuel
containers.
.Remove the container from
the vehicle, trunk, or pickup
bed before filling.
.Place the container on the
ground.
(Continued)
Page 328 of 490
Black plate (72,1)GMC Yukon/Yukon XL Owner Manual (GMNA-Localizing-U.S./Canada-
6081505) - 2014 - crc - 4/23/13
9-72 Driving and Operating
{Warning
Connecting a trailer that has a
surge, air,
or electric-over-hydraulic trailer
brake system may result in
reduced or complete loss of trailer
braking. There may be an
increase in stopping distance or
trailer instability which could
result in personal injury or
damage to the vehicle, trailer,
or other property. Use the ITBC
system only with electric brakes.Trailer Brake Control Panel
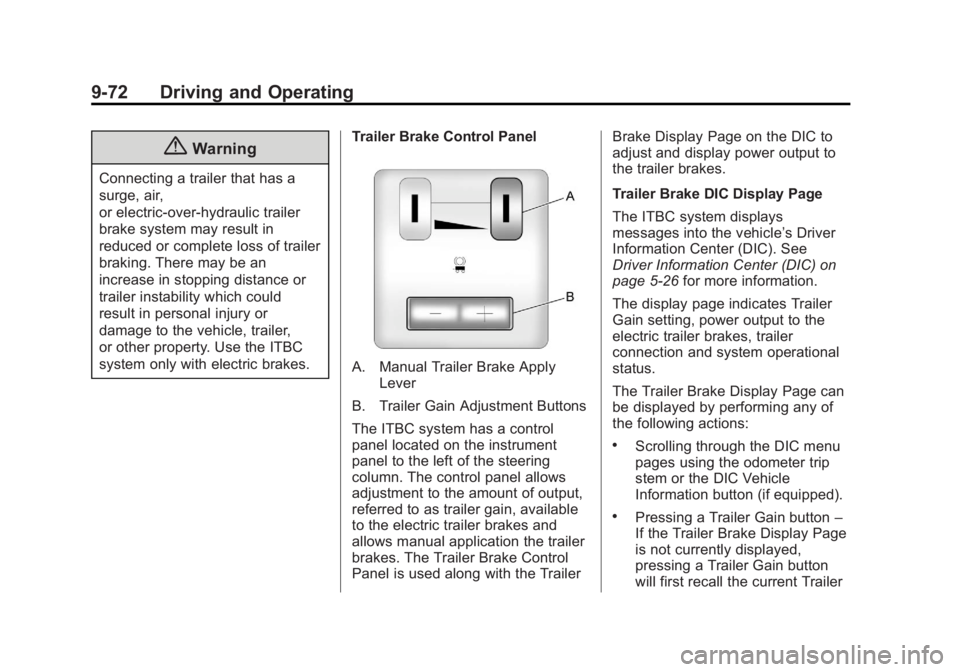
A. Manual Trailer Brake Apply
Lever
B. Trailer Gain Adjustment Buttons
The ITBC system has a control
panel located on the instrument
panel to the left of the steering
column. The control panel allows
adjustment to the amount of output,
referred to as trailer gain, available
to the electric trailer brakes and
allows manual application the trailer
brakes. The Trailer Brake Control
Panel is used along with the Trailer Brake Display Page on the DIC to
adjust and display power output to
the trailer brakes.
Trailer Brake DIC Display Page
The ITBC system displays
messages into the vehicle’s Driver
Information Center (DIC). See
Driver Information Center (DIC) on
page 5-26
for more information.
The display page indicates Trailer
Gain setting, power output to the
electric trailer brakes, trailer
connection and system operational
status.
The Trailer Brake Display Page can
be displayed by performing any of
the following actions:
.Scrolling through the DIC menu
pages using the odometer trip
stem or the DIC Vehicle
Information button (if equipped).
.Pressing a Trailer Gain button –
If the Trailer Brake Display Page
is not currently displayed,
pressing a Trailer Gain button
will first recall the current Trailer
Page 329 of 490
Black plate (73,1)GMC Yukon/Yukon XL Owner Manual (GMNA-Localizing-U.S./Canada-
6081505) - 2014 - crc - 4/23/13
Driving and Operating 9-73
Gain setting. After the Trailer
Brake Display Page is displayed,
each press and release of the
gain buttons will then cause the
Trailer Gain setting to change.
.Activating the Manual Trailer
Brake Apply lever
.Connecting a trailer equipped
with electric trailer brakes
All DIC warning and service
messages must first be
acknowledged by the driver by
pressing the odometer trip stem or
the DIC Vehicle Information button
(if equipped) before the Trailer
Brake Display Page can be
displayed and Trailer Gain can be
adjusted.
TRAILER GAIN –This setting is
displayed anytime the Trailer Brake
Display Page is active. This setting
can be adjusted from 0.0 to 10.0
with either a trailer connected or
disconnected. To adjust the Trailer
Gain, press one of the Trailer Gain
adjustment buttons located on the
Trailer Brake Control Panel. Press and hold a gain button to cause the
Trailer Gain to continuously adjust.
To turn the output to the trailer off,
adjust the Trailer Gain setting to
0.0 (zero).
0.0 (zero) gain is the factory default
setting. To properly adjust trailer
gain, see the Trailer Gain
Adjustment Procedure later in this
section.
TRAILER OUTPUT
–This is
displayed any time a trailer with
electric brakes is connected. Output
to the electric brakes is based on
the amount of vehicle braking
present and relative to the Trailer
Gain setting. Output is displayed
from 0 to 10 bars for each gain
setting.
Vehicles with Trailer Sway Control
(TSC) or Hill Start Assist (HSA),
output to the electric trailer brakes
may be displayed when the systems
are active. See Trailer Sway Control
(TSC) on page 9-76 andHill Start
Assist (HSA) on page 9-41. The Trailer Output will indicate
“- - - - - -“
on the Trailer Brake
Display Page whenever the
following occur:
.No trailer is connected.
.A trailer without electric brakes
is connected (no DIC message
is displayed).
.A trailer with electric brakes has
become disconnected (a
CHECK TRAILER WIRING
message will also be displayed
on the DIC).
.There is a fault present in the
wiring to the electric trailer
brakes (a CHECK TRAILER
WIRING message will also be
displayed on the DIC).
.There is a fault in the ITBC
system (a SERVICE TRAILER
BRAKE SYSTEM message will
also be displayed in the DIC).
Page 330 of 490
Black plate (74,1)GMC Yukon/Yukon XL Owner Manual (GMNA-Localizing-U.S./Canada-
6081505) - 2014 - crc - 4/23/13
9-74 Driving and Operating
Manual Trailer Brake Apply
The Manual Trailer Brake Apply
Lever is located on the Trailer Brake
Control Panel and is used to apply
the trailer’s electric brakes
independent of the vehicle’s brakes.
This lever is used in the Trailer Gain
Adjustment Procedure to properly
adjust the power output to the trailer
brakes. Sliding the lever to the left
will apply only the trailer brakes.
The power output to the trailer is
indicated in the Trailer Brake
Display Page in the DIC. If the
vehicle’s service brakes are applied
while using the Manual Trailer Brake
Apply Lever, the trailer output power
will be the greater of the two.
The trailer and the vehicle's brake
lamps will come on when either
vehicle braking or manual trailer
brakes are applied. Trailer Gain Adjustment Procedure
Trailer Gain should be set for a
specific trailering condition and must
be adjusted any time vehicle
loading, trailer loading or road
surface conditions change.
Setting the Trailer Gain properly is
needed for the best trailer stopping
performance. A trailer that is
over-gained may result in locked
trailer brakes. A trailer that is
under-gained may result in not
enough trailer braking. Both of these
conditions may result in poorer
stopping and stability of the vehicle
and trailer.
Use the following procedure to
correctly adjust Trailer Gain for each
towing condition:
1. Make sure the trailer brakes are
in proper working condition.
2. Connect a properly loaded trailer to the vehicle and make all
necessary mechanical and electrical connections. See
Vehicle Load Limits on
page 9-15
for more information.
3. After the electrical connection is made to a trailer equipped with
electric brakes:
.A TRAILER CONNECTED
message will be briefly
displayed on the DIC
display.
.The Trailer Brake Display
Page will appear on the
DIC showing TRAILER
GAIN and TRAILER
OUTPUT.
.In the Trailer Output display
on the DIC, “- - - - - -“will
disappear if there is no
error present. Connecting a
trailer without electric
brakes will not clear the six
dashed lines.
4. Adjust the Trailer Gain by using the gain adjustment (+ / -)
buttons on the Trailer Brake
Control Panel.