four wheel drive GMC YUKON 2015 Owner's Guide
[x] Cancel search | Manufacturer: GMC, Model Year: 2015, Model line: YUKON, Model: GMC YUKON 2015Pages: 455, PDF Size: 4.72 MB
Page 254 of 455
Black plate (45,1)GMC Yukon/Yukon XL Owner Manual (GMNA-Localizing-U.S./Canada/
Mexico-7063682) - 2015 - CRC - 6/5/14
Driving and Operating 9-45
SeeIf the Vehicle Is Stuck on
page 9-13 and“Turning the
Systems Off and On” later in this
section.
When the transfer case is in
Four-Wheel Drive Low, the stability
system is automatically disabled,
the StabiliTrak OFF light comes on,
and the appropriate message will
appear on the DIC. Both traction
control and StabiliTrak are
automatically disabled in this
condition.
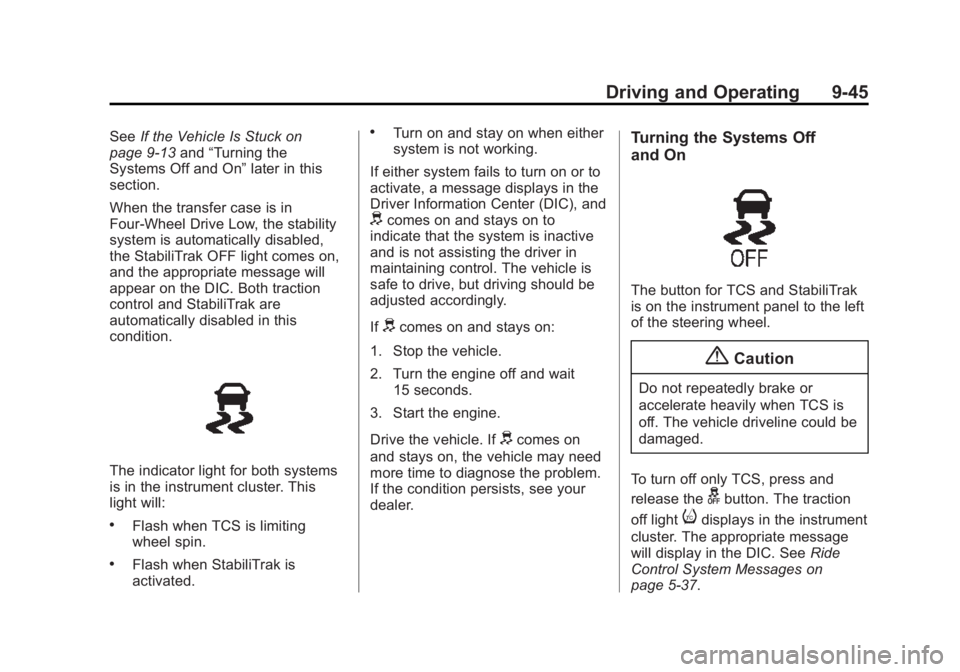
The indicator light for both systems
is in the instrument cluster. This
light will:
.Flash when TCS is limiting
wheel spin.
.Flash when StabiliTrak is
activated.
.Turn on and stay on when either
system is not working.
If either system fails to turn on or to
activate, a message displays in the
Driver Information Center (DIC), and
dcomes on and stays on to
indicate that the system is inactive
and is not assisting the driver in
maintaining control. The vehicle is
safe to drive, but driving should be
adjusted accordingly.
If
dcomes on and stays on:
1. Stop the vehicle.
2. Turn the engine off and wait 15 seconds.
3. Start the engine.
Drive the vehicle. If
dcomes on
and stays on, the vehicle may need
more time to diagnose the problem.
If the condition persists, see your
dealer.
Turning the Systems Off
and On
The button for TCS and StabiliTrak
is on the instrument panel to the left
of the steering wheel.
{Caution
Do not repeatedly brake or
accelerate heavily when TCS is
off. The vehicle driveline could be
damaged.
To turn off only TCS, press and
release the
gbutton. The traction
off light
idisplays in the instrument
cluster. The appropriate message
will display in the DIC. See Ride
Control System Messages on
page 5-37.
Page 300 of 455
Black plate (1,1)GMC Yukon/Yukon XL Owner Manual (GMNA-Localizing-U.S./Canada/
Mexico-7063682) - 2015 - crc - 6/5/14
Vehicle Care 10-1
Vehicle Care
General Information
General Information . . . . . . . . . . 10-2
California Proposition65 Warning . . . . . . . . . . . . . . . . . 10-2
California Perchlorate Materials Requirements . . . . 10-3
Accessories and Modifications . . . . . . . . . . . . . . . 10-3
Vehicle Checks
Doing Your OwnService Work . . . . . . . . . . . . . . . 10-3
Hood . . . . . . . . . . . . . . . . . . . . . . . . 10-4
Engine Compartment Overview . . . . . . . . . . . . . . . . . . . 10-5
Engine Oil . . . . . . . . . . . . . . . . . . . 10-6
Engine Oil Life System . . . . . . 10-9
Automatic Transmission Fluid . . . . . . . . . . . . . . . . . . . . . . 10-10
Engine Air Cleaner/Filter . . . . 10-13
Cooling System . . . . . . . . . . . . 10-14
Engine Coolant . . . . . . . . . . . . . 10-15
Engine Overheating . . . . . . . . 10-18
Engine Fan . . . . . . . . . . . . . . . . . 10-19
Washer Fluid . . . . . . . . . . . . . . . 10-20
Brakes . . . . . . . . . . . . . . . . . . . . . 10-20 Brake Fluid . . . . . . . . . . . . . . . . . 10-21
Battery . . . . . . . . . . . . . . . . . . . . . 10-23
Four-Wheel Drive . . . . . . . . . . . 10-24
Front Axle . . . . . . . . . . . . . . . . . . 10-24
Rear Axle . . . . . . . . . . . . . . . . . . 10-25
Noise Control System . . . . . . 10-26
Starter Switch Check . . . . . . . 10-27
Automatic Transmission Shift
Lock Control Function
Check . . . . . . . . . . . . . . . . . . . . . 10-27
Ignition Transmission Lock Check . . . . . . . . . . . . . . . . . . . . . 10-27
Park Brake and P (Park) Mechanism Check . . . . . . . . 10-28
Wiper Blade Replacement . . . . . . . . . . . . . . 10-28
Glass Replacement . . . . . . . . 10-29
Headlamp Aiming
Headlamp Aiming . . . . . . . . . . 10-29
Bulb Replacement
Bulb Replacement . . . . . . . . . . 10-30
Halogen Bulbs . . . . . . . . . . . . . . 10-30
High Intensity Discharge (HID) Lighting . . . . . . . . . . . . . 10-30
LED Lighting . . . . . . . . . . . . . . . 10-30
Headlamps . . . . . . . . . . . . . . . . . 10-30
Front Turn Signal Lamps . . . 10-31 Taillamps, Turn Signal,
Stoplamps, and Back-Up
Lamps . . . . . . . . . . . . . . . . . . . . 10-31
License Plate Lamp . . . . . . . . 10-32
Replacement Bulbs . . . . . . . . . 10-33
Electrical System
Electrical System Overload . . . . . . . . . . . . . . . . . . 10-33
Fuses . . . . . . . . . . . . . . . . . . . . . . 10-34
Engine Compartment Fuse Block . . . . . . . . . . . . . . . . . . . . . 10-34
Instrument Panel Fuse Block (Left) . . . . . . . . . . . . . . . 10-38
Instrument Panel Fuse Block (Right) . . . . . . . . . . . . . . . . . . . . 10-40
Rear Compartment Fuse
Block . . . . . . . . . . . . . . . . . . . . . 10-43
Wheels and Tires
Tires . . . . . . . . . . . . . . . . . . . . . . . . 10-44
All-Season Tires . . . . . . . . . . . . 10-45
Winter Tires . . . . . . . . . . . . . . . . 10-45
Low-Profile Tires . . . . . . . . . . . 10-46
All-Terrain Tires . . . . . . . . . . . . 10-46
Tire Sidewall Labeling . . . . . . 10-46
Tire Designations . . . . . . . . . . . 10-48
Tire Terminology andDefinitions . . . . . . . . . . . . . . . . 10-49
Page 323 of 455
Black plate (24,1)GMC Yukon/Yukon XL Owner Manual (GMNA-Localizing-U.S./Canada/
Mexico-7063682) - 2015 - crc - 6/5/14
10-24 Vehicle Care
Extended Storage: Remove the
black, negative (−) cable from the
battery or use a battery trickle
charger.
Four-Wheel Drive
Transfer Case
When to Check Lubricant
Refer toMaintenance Schedule on
page 11-2 to determine when to
check the lubricant. How to Check Lubricant
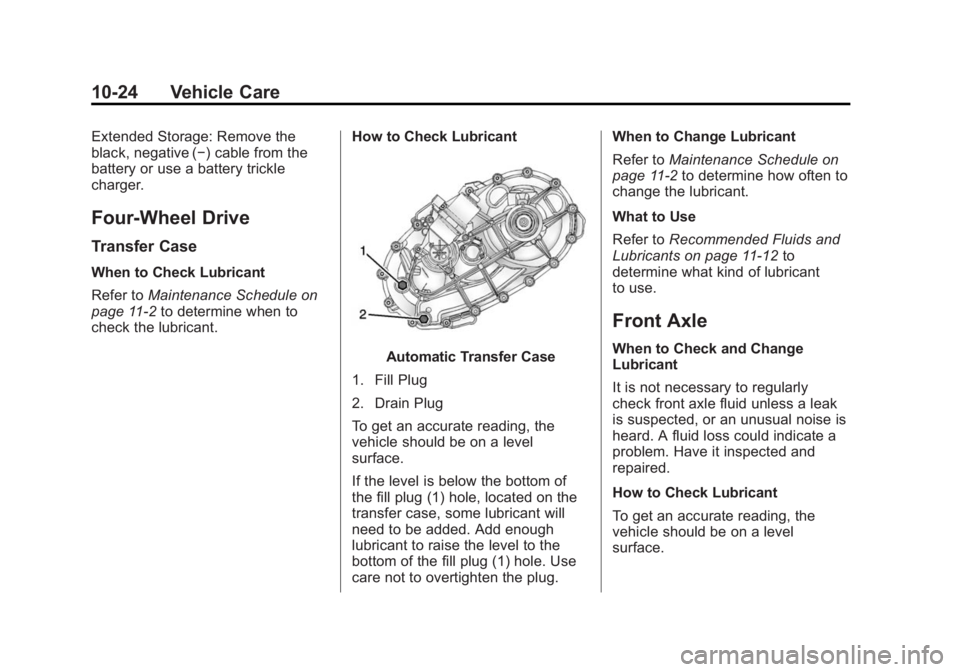
Automatic Transfer Case
1. Fill Plug
2. Drain Plug
To get an accurate reading, the
vehicle should be on a level
surface.
If the level is below the bottom of
the fill plug (1) hole, located on the
transfer case, some lubricant will
need to be added. Add enough
lubricant to raise the level to the
bottom of the fill plug (1) hole. Use
care not to overtighten the plug. When to Change Lubricant
Refer to
Maintenance Schedule on
page 11-2 to determine how often to
change the lubricant.
What to Use
Refer to Recommended Fluids and
Lubricants on page 11-12 to
determine what kind of lubricant
to use.
Front Axle
When to Check and Change
Lubricant
It is not necessary to regularly
check front axle fluid unless a leak
is suspected, or an unusual noise is
heard. A fluid loss could indicate a
problem. Have it inspected and
repaired.
How to Check Lubricant
To get an accurate reading, the
vehicle should be on a level
surface.
Page 355 of 455

Black plate (56,1)GMC Yukon/Yukon XL Owner Manual (GMNA-Localizing-U.S./Canada/
Mexico-7063682) - 2015 - crc - 6/5/14
10-56 Vehicle Care
.The TPMS sensor matching
process was not done or not
completed successfully after
rotating the tires. The
malfunction light and the DIC
message should go off after
successfully completing the
sensor matching process. See
"TPMS Sensor Matching
Process" later in this section.
.One or more TPMS sensors are
missing or damaged. The
malfunction light and the DIC
message should go off when the
TPMS sensors are installed and
the sensor matching process is
performed successfully. See
your dealer for service.
.Replacement tires or wheels do
not match the original equipment
tires or wheels. Tires and wheels
other than those recommended
could prevent the TPMS from
functioning properly. SeeBuying
New Tires on page 10-60.
.Operating electronic devices or
being near facilities using radio
wave frequencies similar to the
TPMS could cause the TPMS
sensors to malfunction.
If the TPMS is not functioning
properly, it cannot detect or signal a
low tire condition. See your dealer
for service if the TPMS malfunction
light and DIC message come on
and stay on.
TPMS Sensor Matching
Process
Each TPMS sensor has a unique
identification code. The identification
code needs to be matched to a new
tire/wheel position after rotating the
vehicle’s tires or replacing one or
more of the TPMS sensors. Also,
the TPMS sensor matching process
should be performed after replacing
a spare tire with a road tire
containing the TPMS sensor. The
malfunction light and the DIC
message should go off at the next
ignition cycle. The sensors are
matched to the tire/wheel positions, using a TPMS relearn tool, in the
following order: driver side front tire,
passenger side front tire, passenger
side rear tire, and driver side rear.
See your dealer for service or to
purchase a relearn tool. A TPMS
relearn tool can also be purchased.
See Tire Pressure Monitor Sensor
Activation Tool at
www.gmtoolsandequipment.com or
call 1-800-GM TOOLS
(1-800-468-6657).
There are two minutes to match the
first tire/wheel position, and
five minutes overall to match all four
tire/wheel positions. If it takes
longer, the matching process stops
and must be restarted.
The TPMS sensor matching
process is:
1. Set the parking brake.
2. Turn the ignition to ON/RUN with
the engine off or place the
vehicle power mode in ON/RUN/
START.
Page 356 of 455

Black plate (57,1)GMC Yukon/Yukon XL Owner Manual (GMNA-Localizing-U.S./Canada/
Mexico-7063682) - 2015 - crc - 6/5/14
Vehicle Care 10-57
3. Uplevel DIC Only: Make sure theTire Pressure info page option is
turned on. The info pages on the
DIC can be turned on and off
through the Settings menu. See
Driver Information Center (DIC)
on page 5-27.
4. If the vehicle has an uplevel DIC, use the DIC controls on the
right side of the steering wheel
to scroll to the Tire Pressure
screen under the DIC info page.
If the vehicle has a base level
DIC, use the trip odometer reset
stem to scroll to the Tire
Pressure screen. 5. If the vehicle has an uplevel
DIC, press and hold the
V(Set/
Reset) button located in the
center of the DIC controls.
If the vehicle has a base level
DIC, press and hold the trip
odometer reset stem for about
five seconds. A message asking
if the process should begin
should appear. Select yes and
press the trip odometer reset
stem to confirm the selection.
The horn sounds twice to signal
the receiver is in relearn mode
and the TIRE LEARNING
ACTIVE message displays on
the DIC screen.
6. Start with the driver side front tire.
7. Place the relearn tool against the tire sidewall, near the valve
stem. Then press the button to
activate the TPMS sensor.
A horn chirp confirms that the
sensor identification code has
been matched to this tire and
wheel position. 8. Proceed to the passenger side
front tire, and repeat the
procedure in Step 7.
9. Proceed to the passenger side rear tire, and repeat the
procedure in Step 7.
10. Proceed to the driver side rear tire, and repeat the procedure
in Step 7. The horn sounds two
times to indicate the sensor
identification code has been
matched to the driver side rear
tire, and the TPMS sensor
matching process is no longer
active. The TIRE LEARNING
ACTIVE message on the DIC
display screen goes off.
11. Turn the ignition switch to LOCK/OFF.
12. Set all four tires to the recommended air pressure
level as indicated on the Tire
and Loading Information label.
Page 360 of 455
Black plate (61,1)GMC Yukon/Yukon XL Owner Manual (GMNA-Localizing-U.S./Canada/
Mexico-7063682) - 2015 - crc - 6/5/14
Vehicle Care 10-61
If proper rotation and
maintenance have been done,
all four tires should wear out at
about the same time. SeeTire
Rotation on page 10-58 for
information on proper tire
rotation. However, if it is
necessary to replace only one
axle set of worn tires, place the
new tires on the rear axle.
{Warning
Tires could explode during
improper service. Attempting
to mount or dismount a tire
could cause injury or death.
Only your dealer or authorized
tire service center should
mount or dismount the tires.
{Warning
Mixing tires of different sizes,
brands, or types may cause
loss of control of the vehicle,
resulting in a crash or other
vehicle damage. Use the
correct size, brand, and type
of tires on all wheels.
This vehicle may have a
different size spare than the
road tires originally installed
on the vehicle. When new, the
vehicle included a spare tire
and wheel assembly with a
similar overall diameter as the
road tires and wheels, so it is
all right to drive on it. The
spare tire was developed for
use on this vehicle and will not
affect vehicle handling.{Warning
Using bias-ply tires on the
vehicle may cause the wheel
rim flanges to develop cracks
after many miles of driving.
A tire and/or wheel could fail
suddenly and cause a crash.
Use only radial-ply tires with
the wheels on the vehicle.
If the vehicle tires must be
replaced with a tire that does not
have a TPC Spec number, make
sure they are the same size,
load range, speed rating, and
construction (radial) as the
original tires.
Vehicles that have a tire
pressure monitoring system
could give an inaccurate
low-pressure warning if non-TPC
Spec rated tires are installed.
See Tire Pressure Monitor
System on page 10-53.
Page 366 of 455
Black plate (67,1)GMC Yukon/Yukon XL Owner Manual (GMNA-Localizing-U.S./Canada/
Mexico-7063682) - 2015 - crc - 6/5/14
Vehicle Care 10-67
{Warning
Changing a tire can be
dangerous. The vehicle can slip
off the jack and roll over or fall
causing injury or death. Find a
level place to change the tire. To
help prevent the vehicle from
moving:1. Set the parking brake firmly.
2. Put the shift lever in P (Park).
3. For vehicles with four-wheel-drive with a
N (Neutral) transfer case
position, be sure the
transfer case is in a drive
gear —not in N (Neutral).
4. Turn off the engine and do not restart while the vehicle
is raised.
5. Do not allow passengers to remain in the vehicle.
(Continued)
Warning (Continued)
6. Place wheel blocks on bothsides of the tire at the
opposite corner of the tire
being changed.
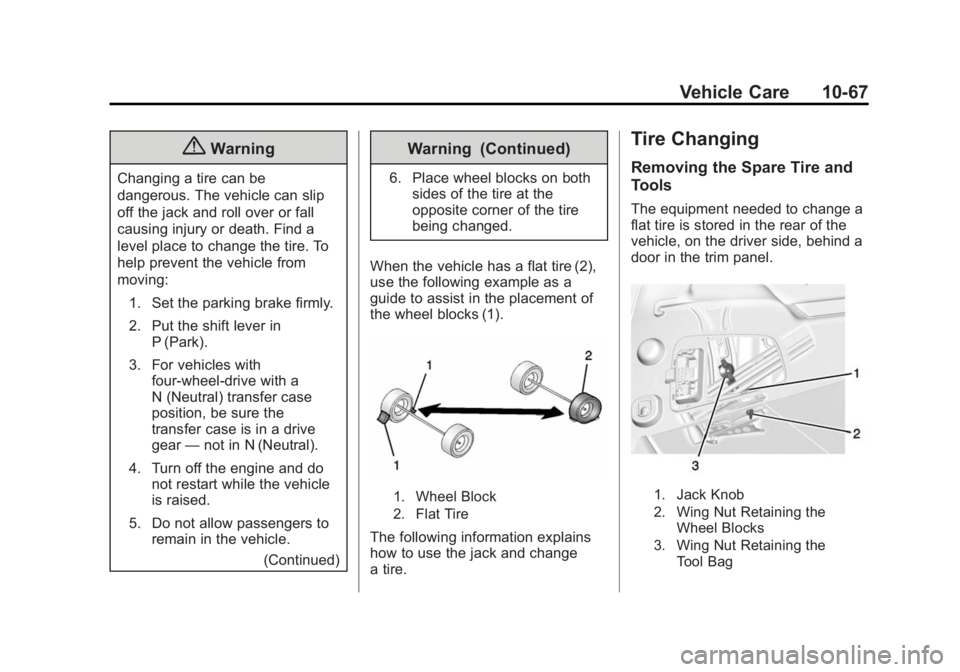
When the vehicle has a flat tire (2),
use the following example as a
guide to assist in the placement of
the wheel blocks (1).
1. Wheel Block
2. Flat Tire
The following information explains
how to use the jack and change
a tire.
Tire Changing
Removing the Spare Tire and
Tools
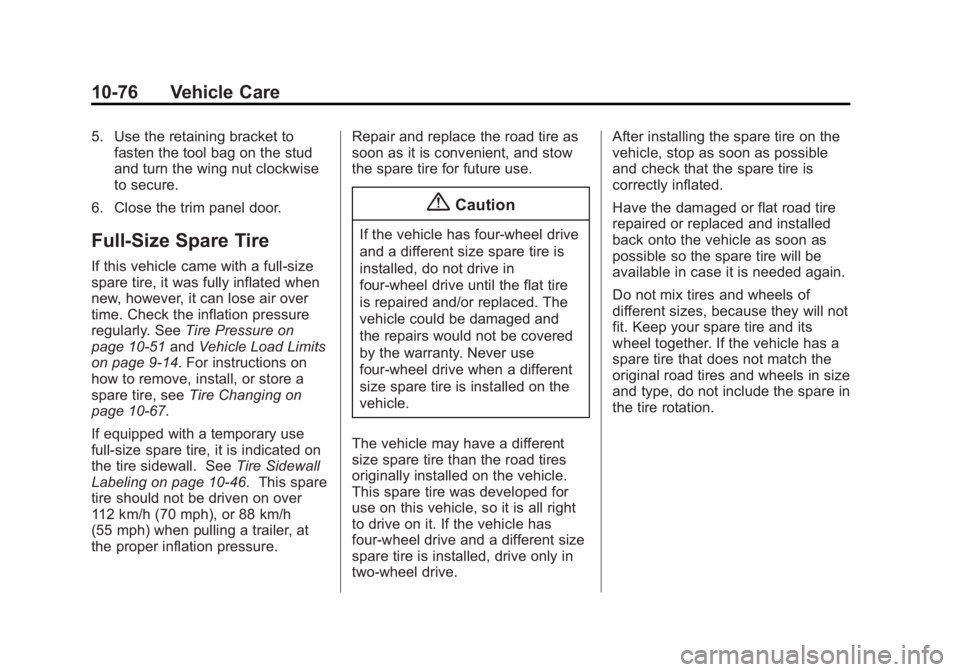
The equipment needed to change a
flat tire is stored in the rear of the
vehicle, on the driver side, behind a
door in the trim panel.
1. Jack Knob
2. Wing Nut Retaining the Wheel Blocks
3. Wing Nut Retaining the Tool Bag
Page 375 of 455
Black plate (76,1)GMC Yukon/Yukon XL Owner Manual (GMNA-Localizing-U.S./Canada/
Mexico-7063682) - 2015 - crc - 6/5/14
10-76 Vehicle Care
5. Use the retaining bracket tofasten the tool bag on the stud
and turn the wing nut clockwise
to secure.
6. Close the trim panel door.
Full-Size Spare Tire
If this vehicle came with a full-size
spare tire, it was fully inflated when
new, however, it can lose air over
time. Check the inflation pressure
regularly. See Tire Pressure on
page 10-51 andVehicle Load Limits
on page 9-14. For instructions on
how to remove, install, or store a
spare tire, see Tire Changing on
page 10-67.
If equipped with a temporary use
full-size spare tire, it is indicated on
the tire sidewall. See Tire Sidewall
Labeling on page 10-46. This spare
tire should not be driven on over
112 km/h (70 mph), or 88 km/h
(55 mph) when pulling a trailer, at
the proper inflation pressure. Repair and replace the road tire as
soon as it is convenient, and stow
the spare tire for future use.
{Caution
If the vehicle has four-wheel drive
and a different size spare tire is
installed, do not drive in
four-wheel drive until the flat tire
is repaired and/or replaced. The
vehicle could be damaged and
the repairs would not be covered
by the warranty. Never use
four-wheel drive when a different
size spare tire is installed on the
vehicle.
The vehicle may have a different
size spare tire than the road tires
originally installed on the vehicle.
This spare tire was developed for
use on this vehicle, so it is all right
to drive on it. If the vehicle has
four-wheel drive and a different size
spare tire is installed, drive only in
two-wheel drive. After installing the spare tire on the
vehicle, stop as soon as possible
and check that the spare tire is
correctly inflated.
Have the damaged or flat road tire
repaired or replaced and installed
back onto the vehicle as soon as
possible so the spare tire will be
available in case it is needed again.
Do not mix tires and wheels of
different sizes, because they will not
fit. Keep your spare tire and its
wheel together. If the vehicle has a
spare tire that does not match the
original road tires and wheels in size
and type, do not include the spare in
the tire rotation.
Page 376 of 455
Black plate (77,1)GMC Yukon/Yukon XL Owner Manual (GMNA-Localizing-U.S./Canada/
Mexico-7063682) - 2015 - crc - 6/5/14
Vehicle Care 10-77
Jump Starting
For more information about the
vehicle battery, seeBattery on
page 10-23.
If the vehicle's battery (or batteries)
has run down, you may want to use
another vehicle and some jumper
cables to start your vehicle. Be sure
to use the following steps to do it
safely.
{Warning
Batteries can hurt you. They can
be dangerous because:
.They contain acid that can
burn you.
.They contain gas that can
explode or ignite.
.They contain enough
electricity to burn you.
If you do not follow these steps
exactly, some or all of these
things can hurt you.
{Caution
Ignoring these steps could result
in costly damage to the vehicle
that would not be covered by the
vehicle warranty. Trying to start
the vehicle by pushing or pulling it
will not work, and it could damage
the vehicle.
1. Check the other vehicle. It must have a 12-volt battery with a
negative ground system.
{Caution
If the other vehicle does not have
a 12-volt system with a negative
ground, both vehicles can be
damaged. Only use a vehicle that
has a 12-volt system with a
negative ground for jump starting.
2. If the vehicle is equipped with dual batteries, using the battery
that is closer to the starter will reduce electrical resistance. This
is located on the passenger
side, in the rear of the engine
compartment.
3. Get the vehicles close enough so the jumper cables can reach,
but be sure the vehicles are not
touching each other. If they are,
it could cause an unwanted
ground connection. You would
not be able to start your vehicle,
and the bad grounding could
damage the electrical systems.
To avoid the possibility of the
vehicles rolling, set the parking
brake firmly on both vehicles
involved in the jump start
procedure. Put the automatic
transmission in P (Park) or a
manual transmission in Neutral
before setting the parking brake.
If you have a four-wheel-drive
vehicle, be sure the transfer
case is in a drive gear, not in
N (Neutral).
Page 380 of 455
Black plate (81,1)GMC Yukon/Yukon XL Owner Manual (GMNA-Localizing-U.S./Canada/
Mexico-7063682) - 2015 - crc - 6/5/14
Vehicle Care 10-81
{Caution
Use of a shield mounted in front
of the vehicle grille could restrict
airflow and cause damage to the
transmission. The repairs would
not be covered by the vehicle
warranty. If using a shield, only
use one that attaches to the
towing vehicle.
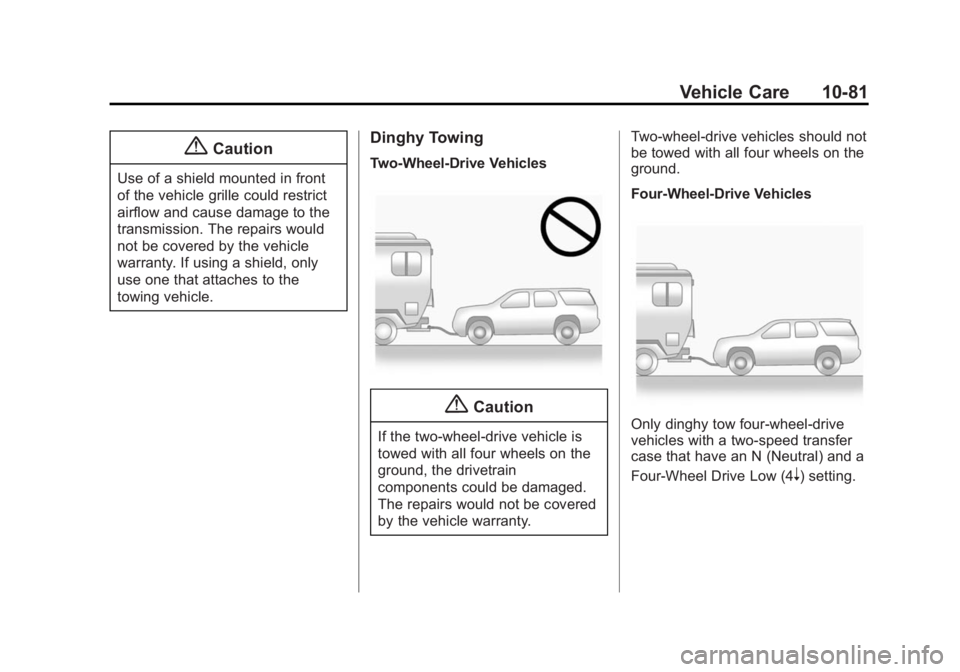
Dinghy Towing
Two-Wheel-Drive Vehicles
{Caution
If the two-wheel-drive vehicle is
towed with all four wheels on the
ground, the drivetrain
components could be damaged.
The repairs would not be covered
by the vehicle warranty.Two-wheel-drive vehicles should not
be towed with all four wheels on the
ground.
Four-Wheel-Drive VehiclesOnly dinghy tow four-wheel-drive
vehicles with a two-speed transfer
case that have an N (Neutral) and a
Four-Wheel Drive Low (4
n) setting.