fold seats GMC YUKON 2018 Owner's Manual
[x] Cancel search | Manufacturer: GMC, Model Year: 2018, Model line: YUKON, Model: GMC YUKON 2018Pages: 431, PDF Size: 6.08 MB
Page 14 of 431
GMC Yukon/Yukon XL/Denali Owner Manual (GMNA-Localizing-U.S./
Canada/Mexico-11349262) - 2018 - CRC - 11/3/17
In Brief 13
Before storing, adjust all available
memory feature positions. Turn the
ignition on and then press and
release SET; a beep will sound.
Then immediately press and hold 1,
2, or
B(Exit) on the driver door
until two beeps sound. To manually
recall these positions, press and
hold 1, 2, or
Buntil the saved
position is reached.
When Auto Memory Recall is
enabled in vehicle personalization,
positions previously stored to
memory buttons 1 and 2 are
recalled when the ignition is
changed from off to on or ACC/
ACCESSORY.
When Easy Exit Options is enabled
in vehicle personalization, the
feature automatically recalls the
previously stored exit position when
exiting the vehicle. See Memory
Seats 066.
Second Row Seats
The second row seatbacks can be
folded for additional cargo space,
or the seats can be folded and tumbled for easy entry/exit to the
third row seats. The seatbacks also
recline.
See
Second Row Seats 071.
Third Row Seats
Third row seatbacks can be folded.
See Third Row Seats 076.
Heated and Ventilated
Seats
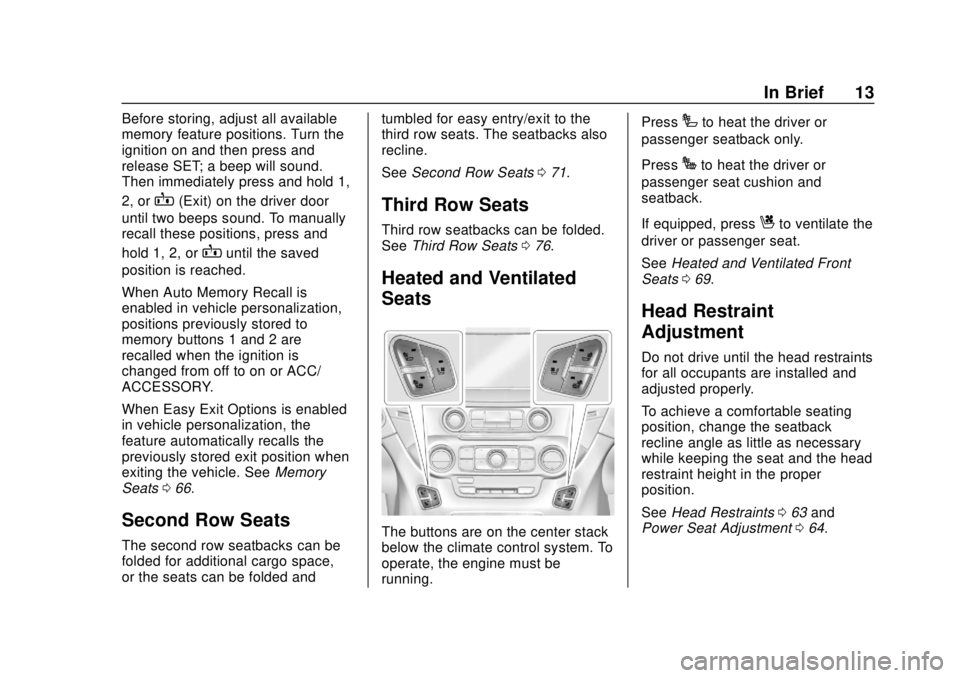
The buttons are on the center stack
below the climate control system. To
operate, the engine must be
running. Press
Ito heat the driver or
passenger seatback only.
Press
Jto heat the driver or
passenger seat cushion and
seatback.
If equipped, press
Cto ventilate the
driver or passenger seat.
See Heated and Ventilated Front
Seats 069.
Head Restraint
Adjustment
Do not drive until the head restraints
for all occupants are installed and
adjusted properly.
To achieve a comfortable seating
position, change the seatback
recline angle as little as necessary
while keeping the seat and the head
restraint height in the proper
position.
See Head Restraints 063 and
Power Seat Adjustment 064.
Page 37 of 431
GMC Yukon/Yukon XL/Denali Owner Manual (GMNA-Localizing-U.S./
Canada/Mexico-11349262) - 2018 - CRC - 11/3/17
36 Keys, Doors, and Windows
PressingKon the RKE transmitter
disarms the alarm system. See
Vehicle Alarm System 051.
If equipped with auto mirror folding,
pressing and holding
Kfor
one second will unfold the mirrors,
if enabled. See Vehicle
Personalization 0162.
Press and hold
Kuntil the windows
fully open, if remote window
operation is enabled. See Vehicle
Personalization 0162.
b:Press twice to open or close
the liftgate. Press once to stop the
liftgate from moving.
c: Press twice to open the
liftglass.
7: Press and release to initiate
vehicle locate. The turn signal
lamps flash and the horn sounds
three times.
Press and hold
7for more than
three seconds to activate the panic
alarm. The turn signal lamps flash
and the horn sounds repeatedly for
30 seconds. The alarm turns off when the ignition is turned on or
7
is pressed again. The ignition must
be off for the panic alarm to work.
Keyless Access Operation
The Keyless Access system allows
for doors and the liftgate to be
accessed without pressing the RKE
transmitter button. The RKE
transmitter must be within 1 m (3 ft)
of the liftgate or door being opened.
If the vehicle has this feature, there
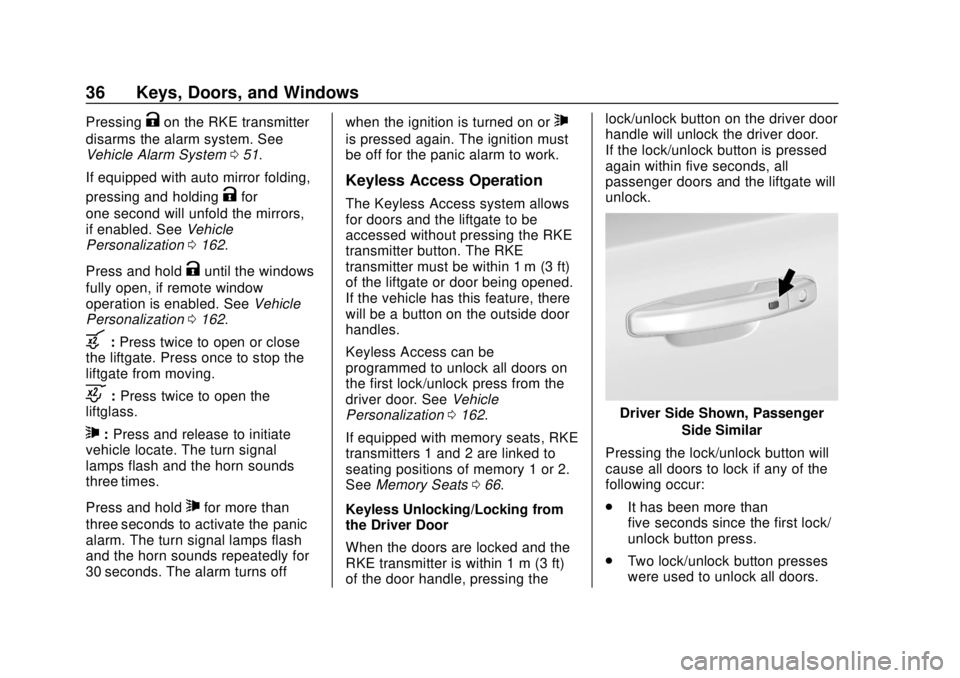
will be a button on the outside door
handles.
Keyless Access can be
programmed to unlock all doors on
the first lock/unlock press from the
driver door. See
Vehicle
Personalization 0162.
If equipped with memory seats, RKE
transmitters 1 and 2 are linked to
seating positions of memory 1 or 2.
See Memory Seats 066.
Keyless Unlocking/Locking from
the Driver Door
When the doors are locked and the
RKE transmitter is within 1 m (3 ft)
of the door handle, pressing the lock/unlock button on the driver door
handle will unlock the driver door.
If the lock/unlock button is pressed
again within five seconds, all
passenger doors and the liftgate will
unlock.
Driver Side Shown, Passenger
Side Similar
Pressing the lock/unlock button will
cause all doors to lock if any of the
following occur:
. It has been more than
five seconds since the first lock/
unlock button press.
. Two lock/unlock button presses
were used to unlock all doors.
Page 73 of 431
GMC Yukon/Yukon XL/Denali Owner Manual (GMNA-Localizing-U.S./
Canada/Mexico-11349262) - 2018 - CRC - 11/3/17
72 Seats and Restraints
{Warning
If either seatback is not locked, it
could move forward in a sudden
stop or crash. That could cause
injury to the person sitting there.
Always push and pull on the
seatbacks to be sure they are
locked.
To return the seatback to the upright
position: 1. Lift the lever fully while applying pressure to the
seatback, and the seatback will
return to the upright position.
If the lever is lifted without
applying pressure, the seat will
release to a folded position.
2. Push and pull on the seatback to make sure it is locked.
The second row seats can be folded
for additional cargo space or folded
and tumbled for easy entry and exit
to the third row seat.
Manual Fold and Tumble
Feature
{Warning
Do not leave the second row seat
in a tumbled position while the
vehicle is in motion. A tumbled
seat is not locked. It can move
when the vehicle is in motion.
People in the vehicle could be
injured in a sudden stop or crash.
Be sure to return the seat to the
passenger seating position before
driving the vehicle. Push and pull
on the seat to make sure it is
locked into place.
Caution
Folding a rear seat with the seat
belts still fastened may cause
damage to the seat or the seat
belts. Always unbuckle the seat
belts and return them to their
normal stowed position before
folding a rear seat. Folding and Tumbling the Seat
To fold and tumble the seat:
1. Make sure that there is nothing under, in front of, or on
the seat.
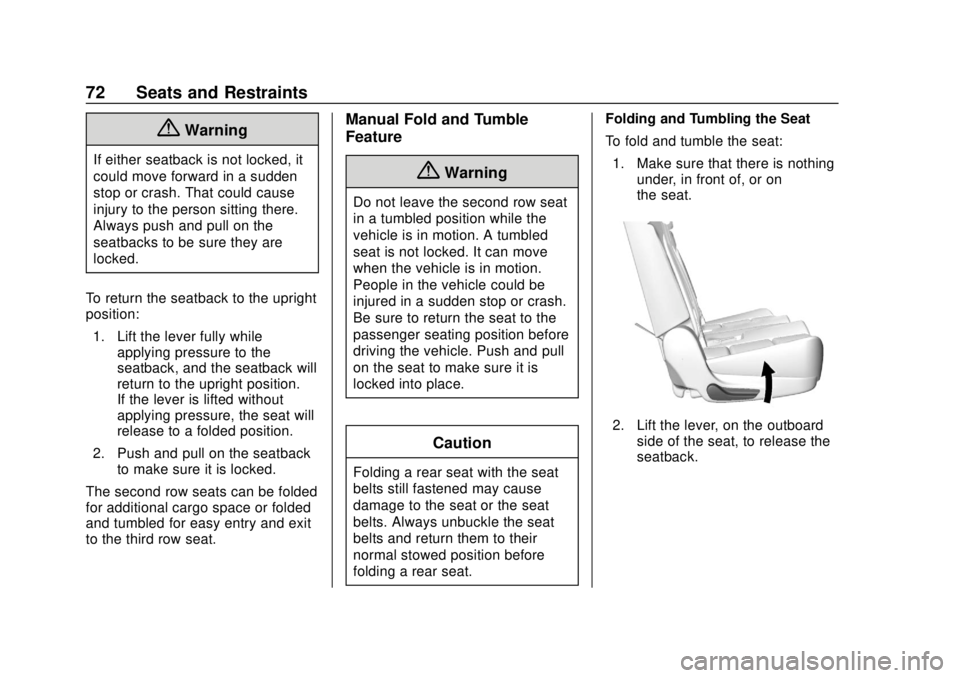
2. Lift the lever, on the outboard
side of the seat, to release the
seatback.
Page 74 of 431
GMC Yukon/Yukon XL/Denali Owner Manual (GMNA-Localizing-U.S./
Canada/Mexico-11349262) - 2018 - CRC - 11/3/17
Seats and Restraints 73
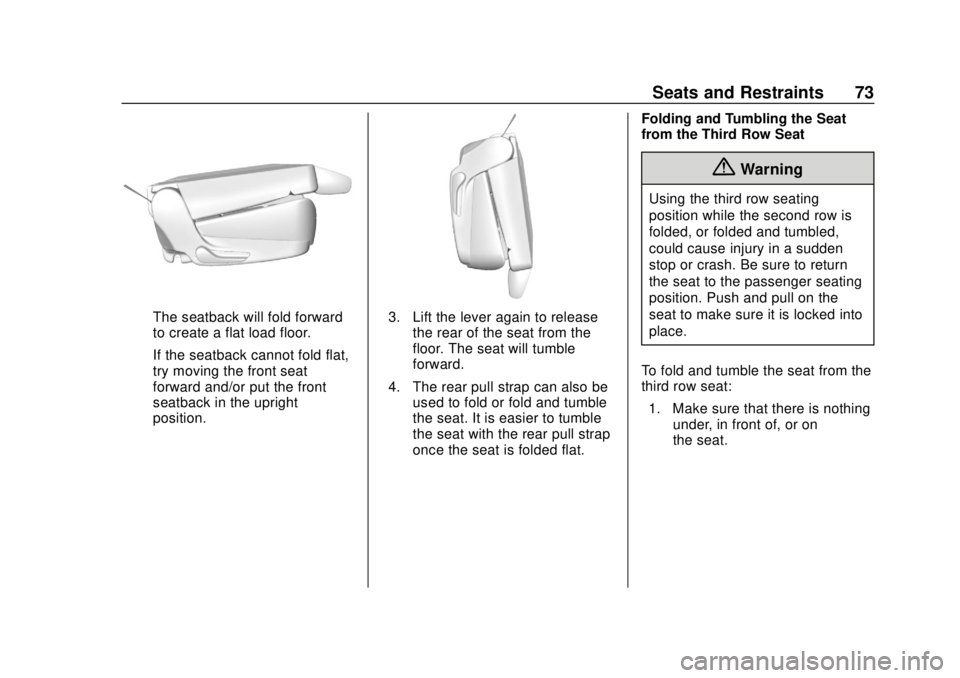
The seatback will fold forward
to create a flat load floor.
If the seatback cannot fold flat,
try moving the front seat
forward and/or put the front
seatback in the upright
position.3. Lift the lever again to releasethe rear of the seat from the
floor. The seat will tumble
forward.
4. The rear pull strap can also be used to fold or fold and tumble
the seat. It is easier to tumble
the seat with the rear pull strap
once the seat is folded flat. Folding and Tumbling the Seat
from the Third Row Seat
{Warning
Using the third row seating
position while the second row is
folded, or folded and tumbled,
could cause injury in a sudden
stop or crash. Be sure to return
the seat to the passenger seating
position. Push and pull on the
seat to make sure it is locked into
place.
To fold and tumble the seat from the
third row seat: 1. Make sure that there is nothing under, in front of, or on
the seat.
Page 75 of 431
GMC Yukon/Yukon XL/Denali Owner Manual (GMNA-Localizing-U.S./
Canada/Mexico-11349262) - 2018 - CRC - 11/3/17
74 Seats and Restraints
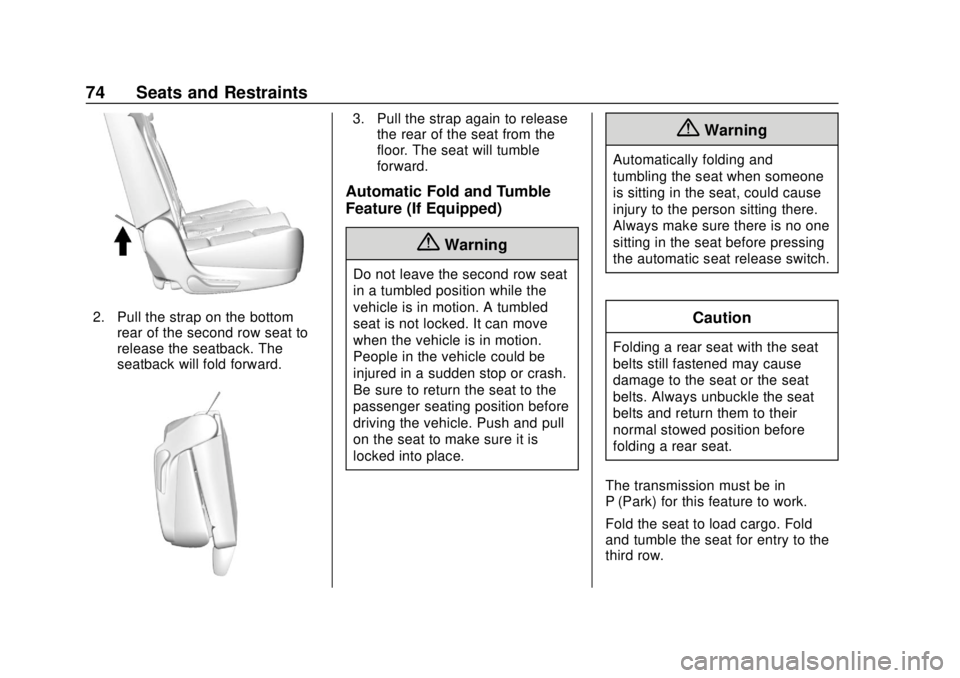
2. Pull the strap on the bottomrear of the second row seat to
release the seatback. The
seatback will fold forward.
3. Pull the strap again to releasethe rear of the seat from the
floor. The seat will tumble
forward.
Automatic Fold and Tumble
Feature (If Equipped)
{Warning
Do not leave the second row seat
in a tumbled position while the
vehicle is in motion. A tumbled
seat is not locked. It can move
when the vehicle is in motion.
People in the vehicle could be
injured in a sudden stop or crash.
Be sure to return the seat to the
passenger seating position before
driving the vehicle. Push and pull
on the seat to make sure it is
locked into place.
{Warning
Automatically folding and
tumbling the seat when someone
is sitting in the seat, could cause
injury to the person sitting there.
Always make sure there is no one
sitting in the seat before pressing
the automatic seat release switch.
Caution
Folding a rear seat with the seat
belts still fastened may cause
damage to the seat or the seat
belts. Always unbuckle the seat
belts and return them to their
normal stowed position before
folding a rear seat.
The transmission must be in
P (Park) for this feature to work.
Fold the seat to load cargo. Fold
and tumble the seat for entry to the
third row.
Page 76 of 431
GMC Yukon/Yukon XL/Denali Owner Manual (GMNA-Localizing-U.S./
Canada/Mexico-11349262) - 2018 - CRC - 11/3/17
Seats and Restraints 75
Folding and Tumbling the Seat
To fold and tumble the seat:1. Make sure that there is nothing under, in front of, or on
the seat.
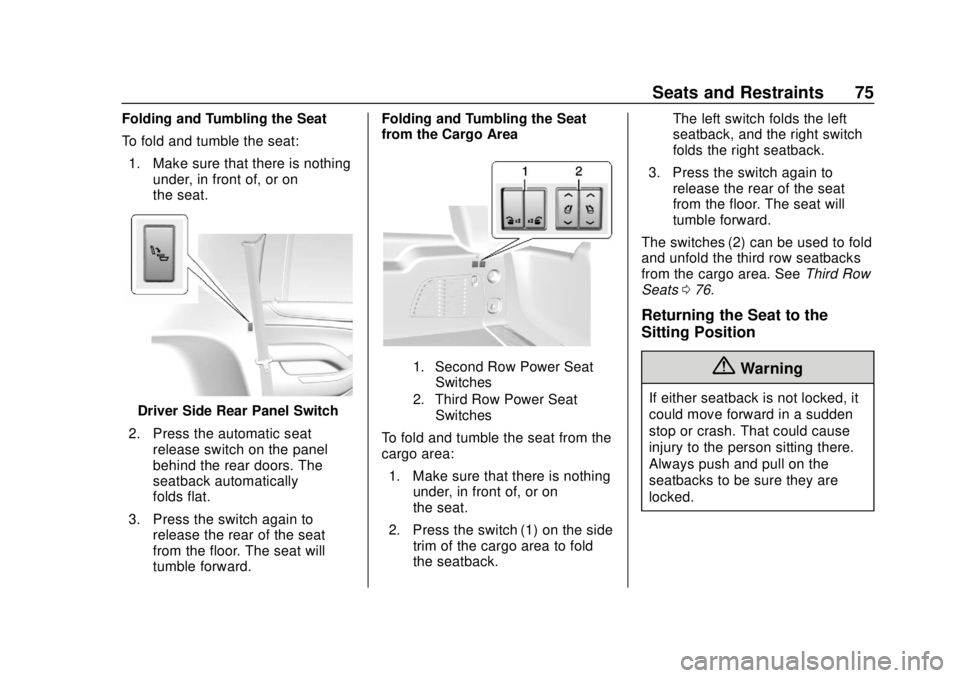
Driver Side Rear Panel Switch
2. Press the automatic seat release switch on the panel
behind the rear doors. The
seatback automatically
folds flat.
3. Press the switch again to release the rear of the seat
from the floor. The seat will
tumble forward. Folding and Tumbling the Seat
from the Cargo Area
1. Second Row Power Seat
Switches
2. Third Row Power Seat Switches
To fold and tumble the seat from the
cargo area:
1. Make sure that there is nothing under, in front of, or on
the seat.
2. Press the switch (1) on the side trim of the cargo area to fold
the seatback. The left switch folds the left
seatback, and the right switch
folds the right seatback.
3. Press the switch again to release the rear of the seat
from the floor. The seat will
tumble forward.
The switches (2) can be used to fold
and unfold the third row seatbacks
from the cargo area. See Third Row
Seats 076.
Returning the Seat to the
Sitting Position
{Warning
If either seatback is not locked, it
could move forward in a sudden
stop or crash. That could cause
injury to the person sitting there.
Always push and pull on the
seatbacks to be sure they are
locked.
Page 77 of 431
GMC Yukon/Yukon XL/Denali Owner Manual (GMNA-Localizing-U.S./
Canada/Mexico-11349262) - 2018 - CRC - 11/3/17
76 Seats and Restraints
To return the seat to the sitting
position from the tumbled position:1. Pull the seat down until both sides of the seat are latched to
the floor. Make sure the seat is
securely latched to the floor
before raising the seatback.
If both sides are not latched to
the floor, the seatback will not
raise.
2. Lift the seatback and push it rearward. Push and pull on the
seatback to make sure it is
locked.
Third Row Seats
Folding the Seatback
Caution
Folding a rear seat with the seat
belts still fastened may cause
damage to the seat or the seat
belts. Always unbuckle the seat
belts and return them to their
normal stowed position before
folding a rear seat. The transmission must be in
P (Park) for this feature to work.
The third row seatbacks can be
folded to increase cargo space.
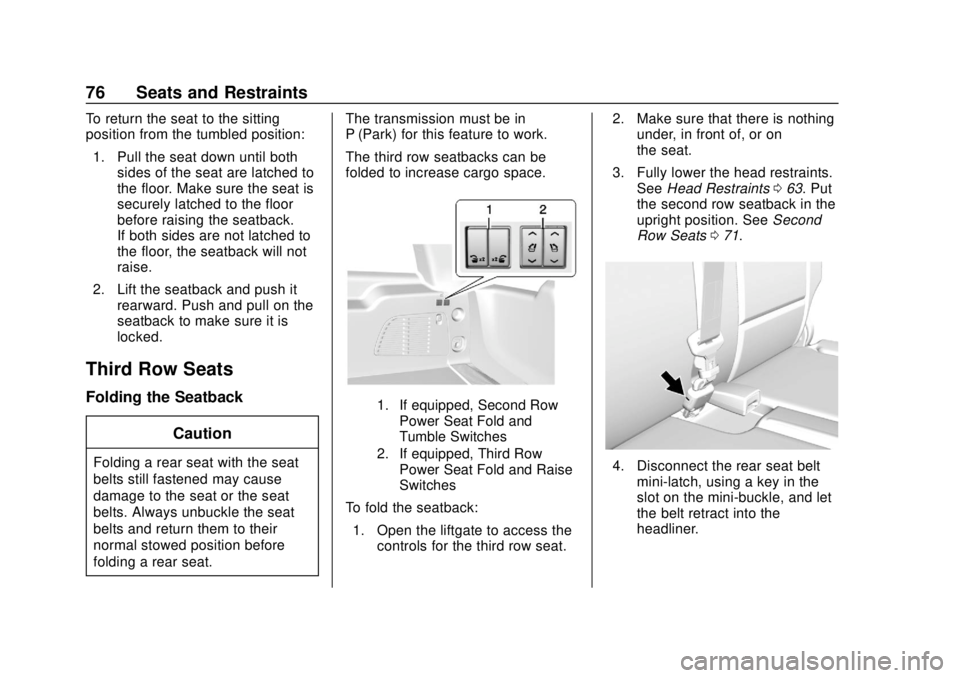
1. If equipped, Second Row
Power Seat Fold and
Tumble Switches
2. If equipped, Third Row Power Seat Fold and Raise
Switches
To fold the seatback:
1. Open the liftgate to access the controls for the third row seat. 2. Make sure that there is nothing
under, in front of, or on
the seat.
3. Fully lower the head restraints. See Head Restraints 063. Put
the second row seatback in the
upright position. See Second
Row Seats 071.
4. Disconnect the rear seat belt
mini-latch, using a key in the
slot on the mini-buckle, and let
the belt retract into the
headliner.
Page 78 of 431
GMC Yukon/Yukon XL/Denali Owner Manual (GMNA-Localizing-U.S./
Canada/Mexico-11349262) - 2018 - CRC - 11/3/17
Seats and Restraints 77
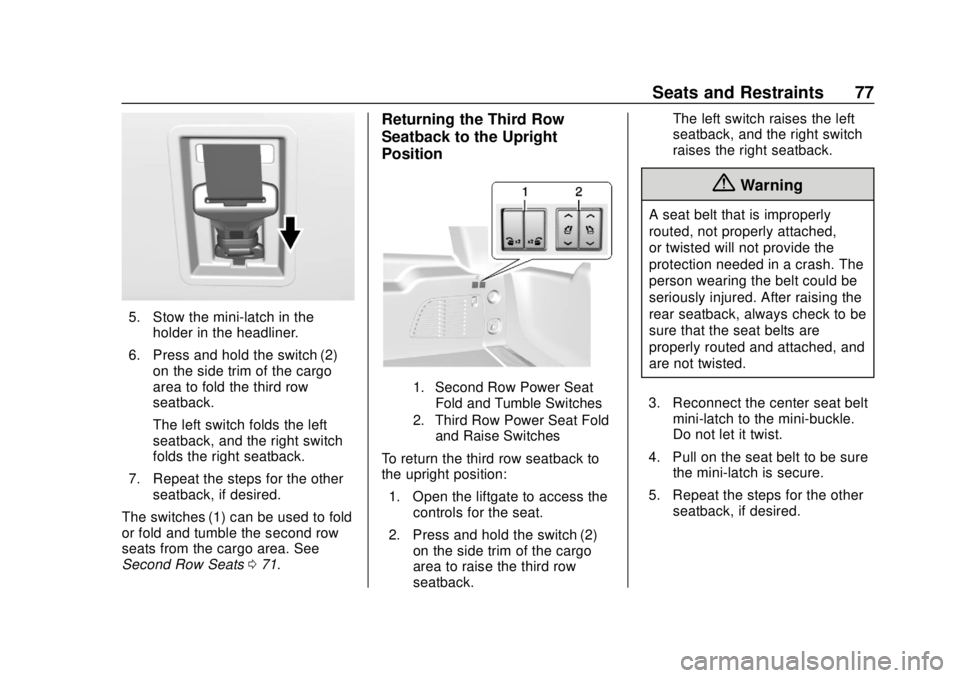
5. Stow the mini-latch in theholder in the headliner.
6. Press and hold the switch (2) on the side trim of the cargo
area to fold the third row
seatback.
The left switch folds the left
seatback, and the right switch
folds the right seatback.
7. Repeat the steps for the other seatback, if desired.
The switches (1) can be used to fold
or fold and tumble the second row
seats from the cargo area. See
Second Row Seats 071.
Returning the Third Row
Seatback to the Upright
Position
1. Second Row Power Seat
Fold and Tumble Switches
2. Third Row Power Seat Fold and Raise Switches
To return the third row seatback to
the upright position:
1. Open the liftgate to access the controls for the seat.
2. Press and hold the switch (2) on the side trim of the cargo
area to raise the third row
seatback. The left switch raises the left
seatback, and the right switch
raises the right seatback.
{Warning
A seat belt that is improperly
routed, not properly attached,
or twisted will not provide the
protection needed in a crash. The
person wearing the belt could be
seriously injured. After raising the
rear seatback, always check to be
sure that the seat belts are
properly routed and attached, and
are not twisted.
3. Reconnect the center seat belt mini-latch to the mini-buckle.
Do not let it twist.
4. Pull on the seat belt to be sure the mini-latch is secure.
5. Repeat the steps for the other seatback, if desired.
Page 113 of 431
GMC Yukon/Yukon XL/Denali Owner Manual (GMNA-Localizing-U.S./
Canada/Mexico-11349262) - 2018 - CRC - 11/3/17
112 Seats and Restraints
Caution (Continued)
Do not fold the rear seatback
when the seat is occupied. Do not
fold the empty rear seat with a
seat belt buckled. This could
damage the seat belt or the seat.
Unbuckle and return the seat belt
to its stowed position, before
folding the seat.
The vehicle is equipped with a front
center airbag in the inboard side of
the driver seat. Even with a front
center airbag, a child restraint can
be installed in any second row
seating position.
If you need to secure more than one
child restraint in the rear seat, see
Where to Put the Restraint 0105.
This system is designed to make
installation of child restraints easier.
When using lower anchors, do not
use the vehicle's seat belts. Instead
use the vehicle's anchors and child
restraint attachments to secure the restraints. Some restraints also use
another vehicle anchor to secure a
top tether.
1. Attach and tighten the lower attachments to the lower
anchors. If the child restraint
does not have lower
attachments or the desired
seating position does not have
lower anchors, secure the child
restraint with the seat belts and
top tether when recommended
by the child restraint
manufacturer. Refer to your
child restraint manufacturer
instructions and the
instructions in this manual. For
the third row outboard seating
positions, if the head restraint
interferes with the proper
installation of the child
restraint, then the head
restraint may be removed. See
“Head Restraint Removal and
Reinstallation under Lower
Anchors and Tethers for
Children (LATCH System)
0 107. 1.1. Find the lower anchors
for the desired seating
position.
1.2. Put the child restraint on the seat.
1.3. Attach and tighten the lower attachments on the
child restraint to the lower
anchors.
2. If the child restraint manufacturer recommends that
the top tether be attached,
attach and tighten the top
tether to the top tether anchor.
Refer to the child restraint
instructions and the following
steps:
2.1. Find the top tether anchor.
For the third row seat,
move the flipper panel
rearward to access the
top tether anchors.
Page 115 of 431
GMC Yukon/Yukon XL/Denali Owner Manual (GMNA-Localizing-U.S./
Canada/Mexico-11349262) - 2018 - CRC - 11/3/17
114 Seats and Restraints
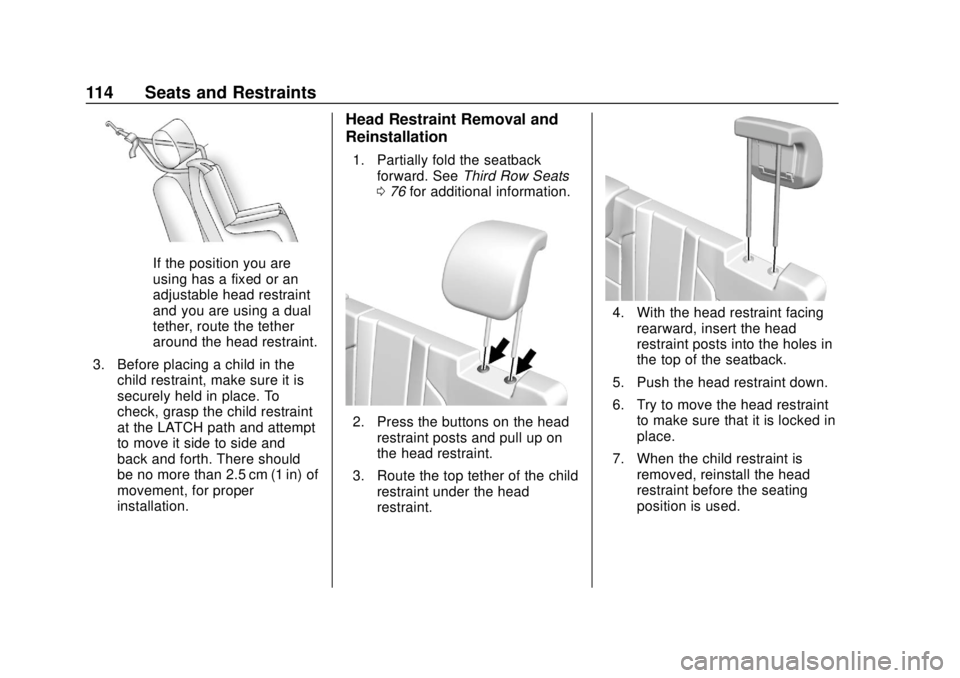
If the position you are
using has a fixed or an
adjustable head restraint
and you are using a dual
tether, route the tether
around the head restraint.
3. Before placing a child in the child restraint, make sure it is
securely held in place. To
check, grasp the child restraint
at the LATCH path and attempt
to move it side to side and
back and forth. There should
be no more than 2.5 cm (1 in) of
movement, for proper
installation.
Head Restraint Removal and
Reinstallation
1. Partially fold the seatbackforward. See Third Row Seats
0 76 for additional information.
2. Press the buttons on the head
restraint posts and pull up on
the head restraint.
3. Route the top tether of the child restraint under the head
restraint.
4. With the head restraint facingrearward, insert the head
restraint posts into the holes in
the top of the seatback.
5. Push the head restraint down.
6. Try to move the head restraint to make sure that it is locked in
place.
7. When the child restraint is removed, reinstall the head
restraint before the seating
position is used.