controls GMC YUKON 2019 User Guide
[x] Cancel search | Manufacturer: GMC, Model Year: 2019, Model line: YUKON, Model: GMC YUKON 2019Pages: 450, PDF Size: 6.5 MB
Page 59 of 450
GMC Yukon/Yukon XL/Denali Owner Manual (GMNA-Localizing-U.S./
Canada/Mexico-12460267) - 2019 - crc - 9/11/18
58 Keys, Doors, and Windows
.They are accidentally manually
folded/unfolded.
. The mirrors will not stay in the
unfolded position.
. The mirrors vibrate at normal
driving speeds.
Fold and unfold the mirrors one time
using the mirror controls to reset
them to their normal position.
A popping noise may be heard
during the resetting of the power
folding mirrors. This sound is normal
after a manual folding operation.
Auto Mirror Folding
If equipped, press and holdQon
the RKE transmitter for
approximately one second to
automatically fold the exterior
mirrors. Press and hold
Kon the
RKE transmitter for approximately
one second to unfold.
See Remote Keyless Entry (RKE)
System Operation (Keyless Access)
0 34 orRemote Keyless Entry
(RKE) System Operation (Key
Access) 041. This feature is turned on or off
through vehicle personalization. See
Vehicle Personalization
0169.
Manual Folding
Fold the mirrors inward to prevent
damage when going through an
automatic car wash. To fold, pull the
mirror toward the vehicle. Push the
mirror outward, to return to its
original position.
Heated Mirrors
K
:Press to heat the mirrors.
See “Rear Window Defogger” under
Dual Automatic Climate Control
System 0191.
Automatic Dimming
Mirror
If the vehicle has the automatic
dimming mirror, the driver outside
mirror automatically adjusts for the
glare of the headlamps from behind.
Blind Spot Mirrors
If equipped, there is a small convex
mirror built into the upper and outer
corner of the driver outside mirror.
It can show objects that may be in
the vehicle's blind zone.
Page 72 of 450
GMC Yukon/Yukon XL/Denali Owner Manual (GMNA-Localizing-U.S./
Canada/Mexico-12460267) - 2019 - crc - 9/11/18
Seats and Restraints 71
2. Start the vehicle with the initialkey or RKE transmitter. The
DIC should display the other
driver number not shown in
Step 1.
Saving Memory Positions
Read these instructions completely
before saving memory positions.
To save preferred driving positions
1 and 2: 1. Turn the ignition on or to ACC/ ACCESSORY.
A DIC welcome message may
indicate driver number 1 or 2.
2. Adjust all available memory features to the desired driving
position.
3. Press and release SET; a beep will sound.
4. Immediately press and hold the 1 or 2 memory button matching
the above DIC welcome
message until two beeps
sound. If too much time passes
between releasing SET and
pressing 1, the memory
position will not be saved and
two beeps will not sound.
Repeat Steps 3 and 4.
1 or 2 corresponds to the driver
number. See
“Identifying Driver
Number” previously in this
section.
5. Repeat Steps 1–4 for a second driver using 1 or 2.
To save the position for
Band
easy exit features, repeat Steps 1–4
using
B. This saves the position
for getting out of the vehicle.
Save preferred memory feature
positions to both 1 and 2 if you are
the only driver.
Manually Recalling Memory
Positions
Press and hold 1, 2, or
Bto recall
the previously saved memory
positions. To stop Manual Memory Recall
movement, release 1, 2, or
Bor
press any of the following controls:
. Power seat
. Memory SET
. Power mirror, with the driver or
passenger side mirror selected
. Power steering wheel,
if equipped
Auto Memory Recall
The vehicle identifies the number of
the current driver ’s RKE transmitter
(1–8).
See Remote Keyless Entry (RKE)
System Operation (Keyless Access)
0 34 orRemote Keyless Entry
(RKE) System Operation (Key
Access) 041. If the RKE transmitter
is 1 or 2, and Auto Memory Recall is
programmed on in vehicle
personalization, the positions saved
to the same memory button number
1 or 2 are automatically recalled
when the ignition is turned on,
or turned from off to ACC/
Page 73 of 450
GMC Yukon/Yukon XL/Denali Owner Manual (GMNA-Localizing-U.S./
Canada/Mexico-12460267) - 2019 - crc - 9/11/18
72 Seats and Restraints
ACCESSORY. RKE transmitters 3–8
will not provide automatic memory
recalls.
To turn Auto Memory Recall on or
off, see "Vehicle Personalization
Settings" previously in this section
andVehicle Personalization 0169.
The shift lever must be in P (Park)
to start Auto Memory Recall. Auto
Memory Recall will complete if the
vehicle is shifted out of P (Park)
prior to reaching the saved memory
position.
To stop Auto Memory Recall
movement, turn the ignition off or
press any of the following controls:
. Power seat
. Memory SET, 1, 2, or
B
.Power mirror, with the driver or
passenger side mirror selected
. Power steering wheel,
if equipped
If the saved memory seat position
does not automatically recall or
recalls to the wrong positions, the
driver ’s RKE transmitter number (1 or 2) may not match the memory
button number that positions were
saved to. Try saving the position to
the other memory button or try the
other RKE transmitter.
Easy Exit Recall
Easy Exit Recall is not linked to an
RKE transmitter. The position saved
to
Bis used for all drivers. To turn
Easy Exit Recall on or off, see
"Vehicle Personalization Settings"
previously in this section and
Vehicle Personalization 0169.
If turned on, the position saved to
Bis automatically recalled when
one of the following occurs:
. The vehicle is turned off and the
driver door is opened within a
short time.
. The vehicle is turned off with the
driver door open.
To stop Easy Exit Recall movement,
press any of the following memory
controls:
. Power seat
. Memory SET, 1, 2, or
B
.
Power mirror, with the driver or
passenger side mirror selected
. Power steering wheel,
if equipped
Obstructions
If something has blocked the driver
seat and/or power steering wheel
while recalling a memory position,
the recall may stop. Remove the
obstruction and try the recall again.
If the memory position still does not
recall, see your dealer for service.
Heated and Ventilated
Front Seats
{Warning
If temperature change or pain to
the skin cannot be felt, the seat
heater may cause burns. To
reduce the risk of burns, use care
when using the seat heater,
especially for long periods of
time. Do not place anything on
the seat that insulates against (Continued)
Page 80 of 450
GMC Yukon/Yukon XL/Denali Owner Manual (GMNA-Localizing-U.S./
Canada/Mexico-12460267) - 2019 - crc - 9/11/18
Seats and Restraints 79
The left switch folds the left
seatback, and the right switch
folds the right seatback.
3. Press the switch again to release the rear of the seat
from the floor. The seat will
tumble forward.
The switches (2) can be used to fold
and unfold the third row seatbacks
from the cargo area. See Third Row
Seats 079.
Returning the Seat to the
Sitting Position
{Warning
If either seatback is not locked, it
could move forward in a sudden
stop or crash. That could cause
injury to the person sitting there.
Always push and pull on the
seatbacks to be sure they are
locked. To return the seat to the sitting
position from the tumbled position:
1. Pull the seat down until both sides of the seat are latched to
the floor. Make sure the seat is
securely latched to the floor
before raising the seatback.
If both sides are not latched to
the floor, the seatback will not
raise.
2. Lift the seatback and push it rearward. Push and pull on the
seatback to make sure it is
locked.
Third Row Seats
Folding the Seatback
Caution
Folding a rear seat with the seat
belts still fastened may cause
damage to the seat or the seat
belts. Always unbuckle the seat
belts and return them to their
normal stowed position before
folding a rear seat. The transmission must be in
P (Park) for this feature to work.
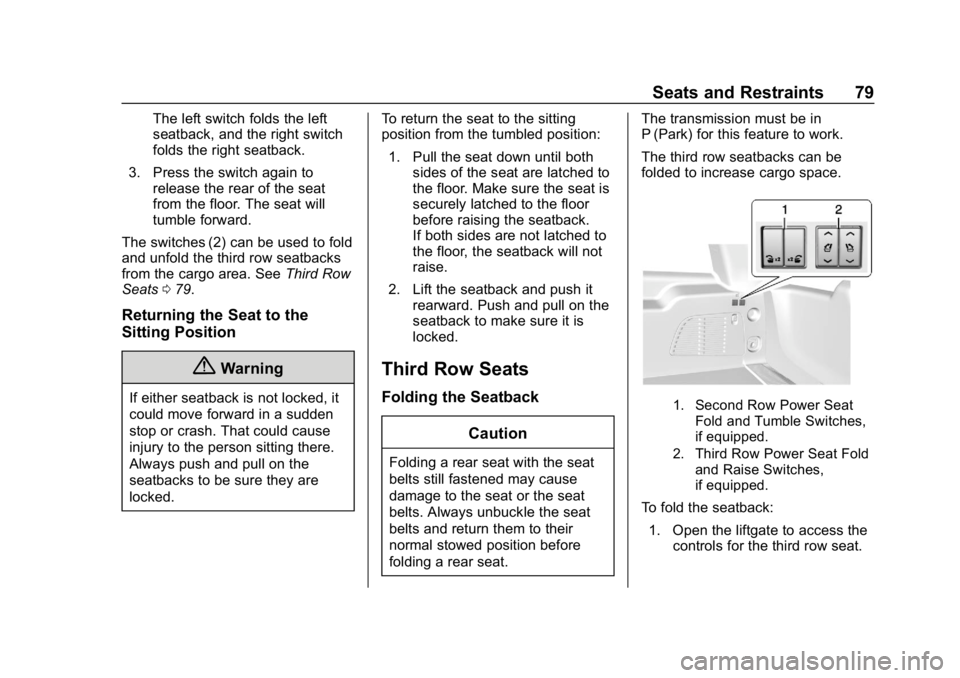
The third row seatbacks can be
folded to increase cargo space.
1. Second Row Power Seat
Fold and Tumble Switches,
if equipped.
2. Third Row Power Seat Fold and Raise Switches,
if equipped.
To fold the seatback:
1. Open the liftgate to access the controls for the third row seat.
Page 81 of 450
GMC Yukon/Yukon XL/Denali Owner Manual (GMNA-Localizing-U.S./
Canada/Mexico-12460267) - 2019 - crc - 9/11/18
80 Seats and Restraints
2. Make sure that there is nothingunder, in front of, or on
the seat.
3. Fully lower the head restraints. See Head Restraints 066. Put
the second row seatback in the
upright position. See Second
Row Seats 075.
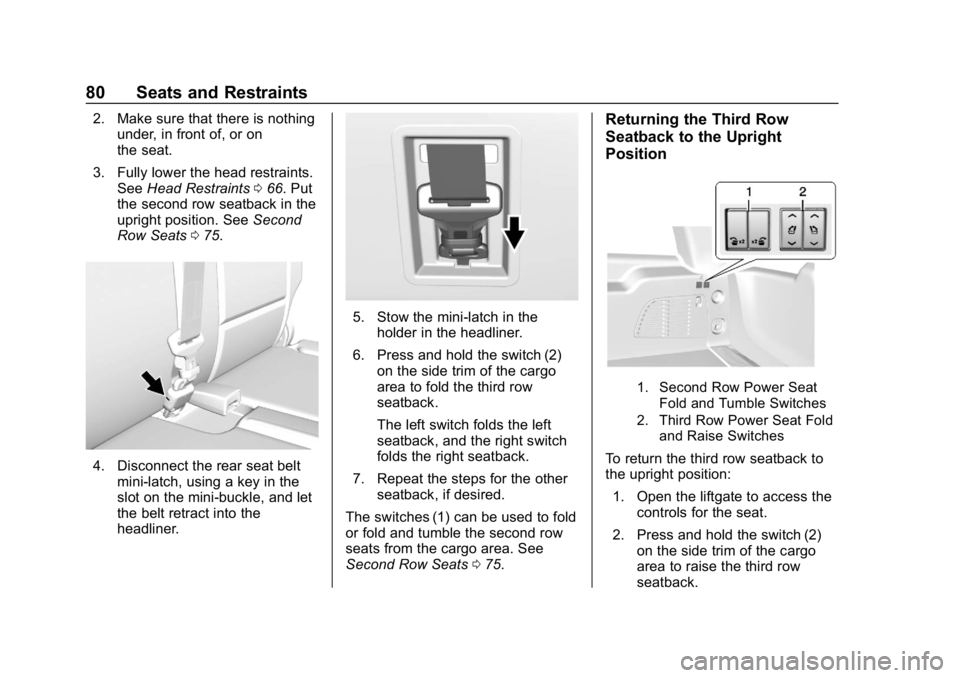
4. Disconnect the rear seat belt
mini-latch, using a key in the
slot on the mini-buckle, and let
the belt retract into the
headliner.
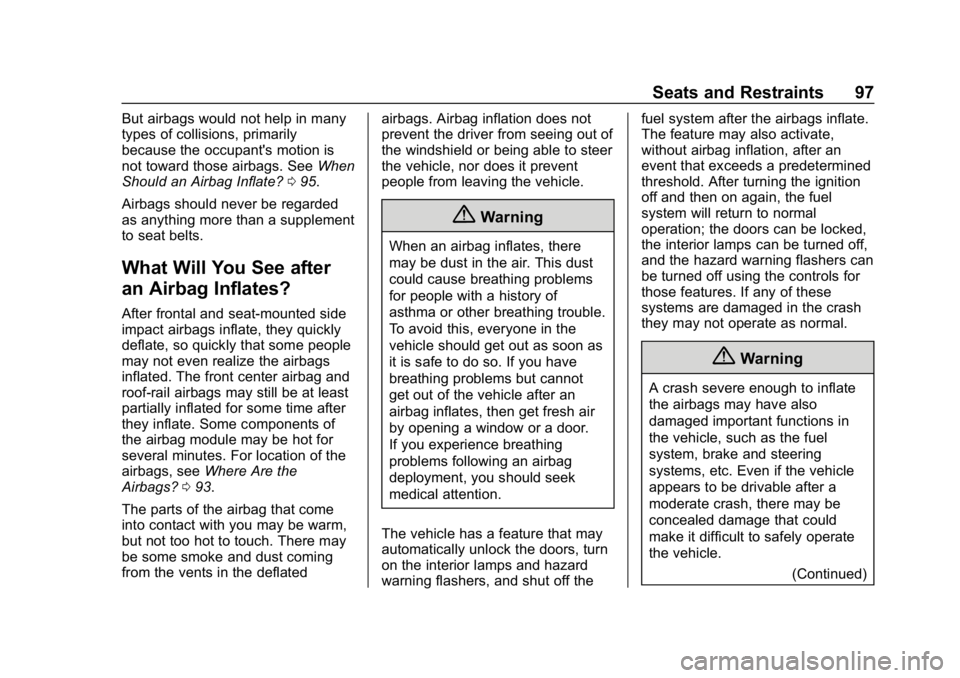
5. Stow the mini-latch in theholder in the headliner.
6. Press and hold the switch (2) on the side trim of the cargo
area to fold the third row
seatback.
The left switch folds the left
seatback, and the right switch
folds the right seatback.
7. Repeat the steps for the other seatback, if desired.
The switches (1) can be used to fold
or fold and tumble the second row
seats from the cargo area. See
Second Row Seats 075.
Returning the Third Row
Seatback to the Upright
Position
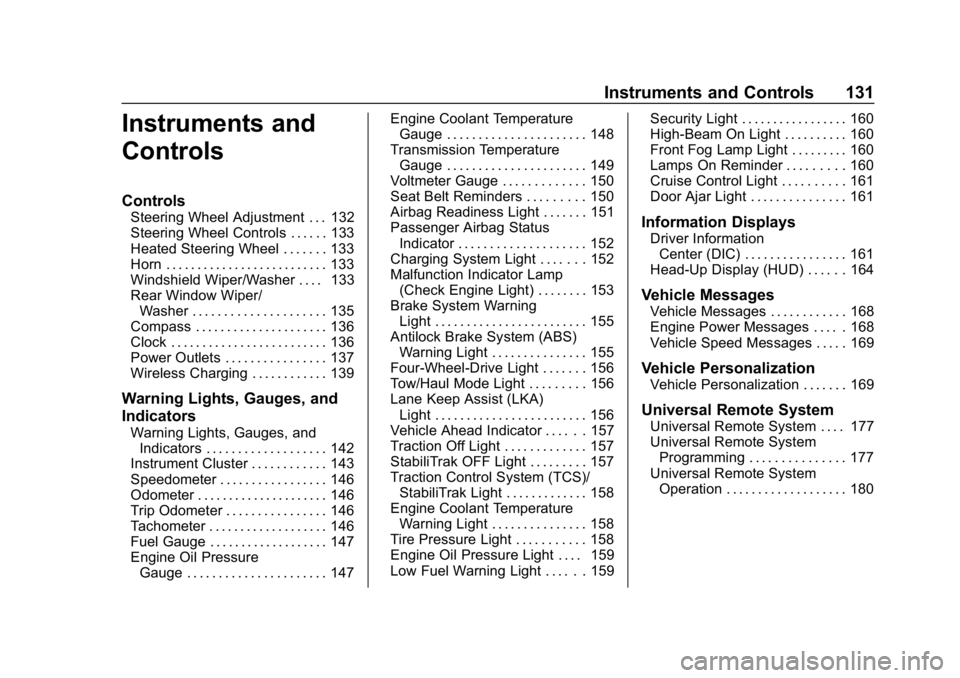
1. Second Row Power Seat
Fold and Tumble Switches
2. Third Row Power Seat Fold and Raise Switches
To return the third row seatback to
the upright position:
1. Open the liftgate to access the controls for the seat.
2. Press and hold the switch (2) on the side trim of the cargo
area to raise the third row
seatback.
Page 98 of 450
GMC Yukon/Yukon XL/Denali Owner Manual (GMNA-Localizing-U.S./
Canada/Mexico-12460267) - 2019 - crc - 9/11/18
Seats and Restraints 97
But airbags would not help in many
types of collisions, primarily
because the occupant's motion is
not toward those airbags. SeeWhen
Should an Airbag Inflate? 095.
Airbags should never be regarded
as anything more than a supplement
to seat belts.
What Will You See after
an Airbag Inflates?
After frontal and seat-mounted side
impact airbags inflate, they quickly
deflate, so quickly that some people
may not even realize the airbags
inflated. The front center airbag and
roof-rail airbags may still be at least
partially inflated for some time after
they inflate. Some components of
the airbag module may be hot for
several minutes. For location of the
airbags, see Where Are the
Airbags? 093.
The parts of the airbag that come
into contact with you may be warm,
but not too hot to touch. There may
be some smoke and dust coming
from the vents in the deflated airbags. Airbag inflation does not
prevent the driver from seeing out of
the windshield or being able to steer
the vehicle, nor does it prevent
people from leaving the vehicle.
{Warning
When an airbag inflates, there
may be dust in the air. This dust
could cause breathing problems
for people with a history of
asthma or other breathing trouble.
To avoid this, everyone in the
vehicle should get out as soon as
it is safe to do so. If you have
breathing problems but cannot
get out of the vehicle after an
airbag inflates, then get fresh air
by opening a window or a door.
If you experience breathing
problems following an airbag
deployment, you should seek
medical attention.
The vehicle has a feature that may
automatically unlock the doors, turn
on the interior lamps and hazard
warning flashers, and shut off the fuel system after the airbags inflate.
The feature may also activate,
without airbag inflation, after an
event that exceeds a predetermined
threshold. After turning the ignition
off and then on again, the fuel
system will return to normal
operation; the doors can be locked,
the interior lamps can be turned off,
and the hazard warning flashers can
be turned off using the controls for
those features. If any of these
systems are damaged in the crash
they may not operate as normal.
{Warning
A crash severe enough to inflate
the airbags may have also
damaged important functions in
the vehicle, such as the fuel
system, brake and steering
systems, etc. Even if the vehicle
appears to be drivable after a
moderate crash, there may be
concealed damage that could
make it difficult to safely operate
the vehicle.
(Continued)
Page 132 of 450
GMC Yukon/Yukon XL/Denali Owner Manual (GMNA-Localizing-U.S./
Canada/Mexico-12460267) - 2019 - crc - 9/11/18
Instruments and Controls 131
Instruments and
Controls
Controls
Steering Wheel Adjustment . . . 132
Steering Wheel Controls . . . . . . 133
Heated Steering Wheel . . . . . . . 133
Horn . . . . . . . . . . . . . . . . . . . . . . . . . . 133
Windshield Wiper/Washer . . . . 133
Rear Window Wiper/Washer . . . . . . . . . . . . . . . . . . . . . 135
Compass . . . . . . . . . . . . . . . . . . . . . 136
Clock . . . . . . . . . . . . . . . . . . . . . . . . . 136
Power Outlets . . . . . . . . . . . . . . . . 137
Wireless Charging . . . . . . . . . . . . 139
Warning Lights, Gauges, and
Indicators
Warning Lights, Gauges, and Indicators . . . . . . . . . . . . . . . . . . . 142
Instrument Cluster . . . . . . . . . . . . 143
Speedometer . . . . . . . . . . . . . . . . . 146
Odometer . . . . . . . . . . . . . . . . . . . . . 146
Trip Odometer . . . . . . . . . . . . . . . . 146
Tachometer . . . . . . . . . . . . . . . . . . . 146
Fuel Gauge . . . . . . . . . . . . . . . . . . . 147
Engine Oil Pressure
Gauge . . . . . . . . . . . . . . . . . . . . . . 147 Engine Coolant Temperature
Gauge . . . . . . . . . . . . . . . . . . . . . . 148
Transmission Temperature Gauge . . . . . . . . . . . . . . . . . . . . . . 149
Voltmeter Gauge . . . . . . . . . . . . . 150
Seat Belt Reminders . . . . . . . . . 150
Airbag Readiness Light . . . . . . . 151
Passenger Airbag Status
Indicator . . . . . . . . . . . . . . . . . . . . 152
Charging System Light . . . . . . . 152
Malfunction Indicator Lamp (Check Engine Light) . . . . . . . . 153
Brake System Warning Light . . . . . . . . . . . . . . . . . . . . . . . . 155
Antilock Brake System (ABS) Warning Light . . . . . . . . . . . . . . . 155
Four-Wheel-Drive Light . . . . . . . 156
Tow/Haul Mode Light . . . . . . . . . 156
Lane Keep Assist (LKA) Light . . . . . . . . . . . . . . . . . . . . . . . . 156
Vehicle Ahead Indicator . . . . . . 157
Traction Off Light . . . . . . . . . . . . . 157
StabiliTrak OFF Light . . . . . . . . . 157
Traction Control System (TCS)/ StabiliTrak Light . . . . . . . . . . . . . 158
Engine Coolant Temperature Warning Light . . . . . . . . . . . . . . . 158
Tire Pressure Light . . . . . . . . . . . 158
Engine Oil Pressure Light . . . . 159
Low Fuel Warning Light . . . . . . 159 Security Light . . . . . . . . . . . . . . . . . 160
High-Beam On Light . . . . . . . . . . 160
Front Fog Lamp Light . . . . . . . . . 160
Lamps On Reminder . . . . . . . . . 160
Cruise Control Light . . . . . . . . . . 161
Door Ajar Light . . . . . . . . . . . . . . . 161
Information Displays
Driver Information
Center (DIC) . . . . . . . . . . . . . . . . 161
Head-Up Display (HUD) . . . . . . 164
Vehicle Messages
Vehicle Messages . . . . . . . . . . . . 168
Engine Power Messages . . . . . 168
Vehicle Speed Messages . . . . . 169
Vehicle Personalization
Vehicle Personalization . . . . . . . 169
Universal Remote System
Universal Remote System . . . . 177
Universal Remote System Programming . . . . . . . . . . . . . . . 177
Universal Remote System Operation . . . . . . . . . . . . . . . . . . . 180
Page 133 of 450
GMC Yukon/Yukon XL/Denali Owner Manual (GMNA-Localizing-U.S./
Canada/Mexico-12460267) - 2019 - crc - 9/11/18
132 Instruments and Controls
Controls
Steering Wheel
Adjustment
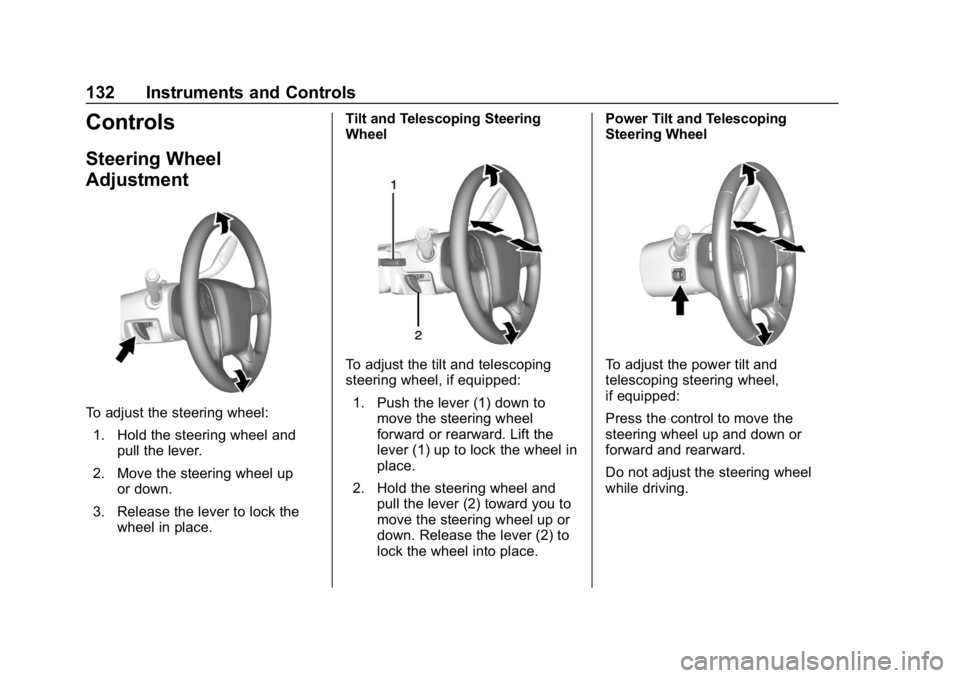
To adjust the steering wheel:1. Hold the steering wheel and pull the lever.
2. Move the steering wheel up or down.
3. Release the lever to lock the wheel in place. Tilt and Telescoping Steering
Wheel
To adjust the tilt and telescoping
steering wheel, if equipped:
1. Push the lever (1) down to move the steering wheel
forward or rearward. Lift the
lever (1) up to lock the wheel in
place.
2. Hold the steering wheel and pull the lever (2) toward you to
move the steering wheel up or
down. Release the lever (2) to
lock the wheel into place. Power Tilt and Telescoping
Steering WheelTo adjust the power tilt and
telescoping steering wheel,
if equipped:
Press the control to move the
steering wheel up and down or
forward and rearward.
Do not adjust the steering wheel
while driving.
Page 134 of 450
GMC Yukon/Yukon XL/Denali Owner Manual (GMNA-Localizing-U.S./
Canada/Mexico-12460267) - 2019 - crc - 9/11/18
Instruments and Controls 133
Steering Wheel Controls
The infotainment system can be
operated by using the steering
wheel controls. See“Steering Wheel
Controls” in the infotainment
manual.
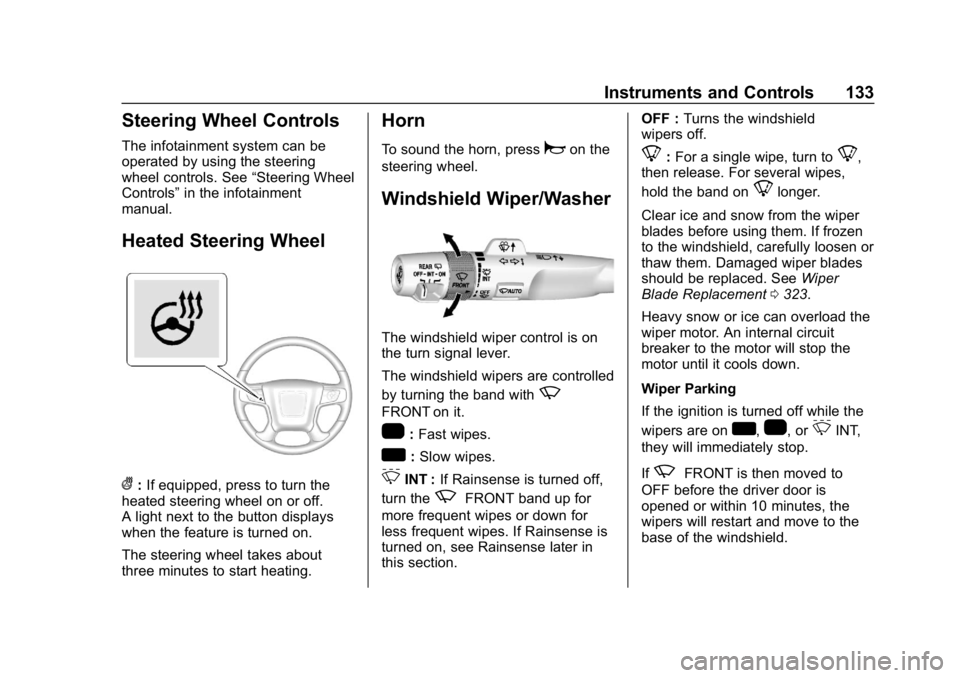
Heated Steering Wheel
(: If equipped, press to turn the
heated steering wheel on or off.
A light next to the button displays
when the feature is turned on.
The steering wheel takes about
three minutes to start heating.
Horn
To sound the horn, pressaon the
steering wheel.
Windshield Wiper/Washer
The windshield wiper control is on
the turn signal lever.
The windshield wipers are controlled
by turning the band with
z
FRONT on it.
1: Fast wipes.
w:Slow wipes.
3INT : If Rainsense is turned off,
turn the
zFRONT band up for
more frequent wipes or down for
less frequent wipes. If Rainsense is
turned on, see Rainsense later in
this section. OFF :
Turns the windshield
wipers off.
8: For a single wipe, turn to8,
then release. For several wipes,
hold the band on
8longer.
Clear ice and snow from the wiper
blades before using them. If frozen
to the windshield, carefully loosen or
thaw them. Damaged wiper blades
should be replaced. See Wiper
Blade Replacement 0323.
Heavy snow or ice can overload the
wiper motor. An internal circuit
breaker to the motor will stop the
motor until it cools down.
Wiper Parking
If the ignition is turned off while the
wipers are on
w,1, or3INT,
they will immediately stop.
If
zFRONT is then moved to
OFF before the driver door is
opened or within 10 minutes, the
wipers will restart and move to the
base of the windshield.
Page 135 of 450
GMC Yukon/Yukon XL/Denali Owner Manual (GMNA-Localizing-U.S./
Canada/Mexico-12460267) - 2019 - crc - 9/11/18
134 Instruments and Controls
If the ignition is turned off while the
wipers are performing wipes due to
windshield washing or Rainsense,
the wipers continue to run until they
reach the base of the windshield.
Rainsense
If equipped with Rainsense, a
sensor near the top center of the
windshield detects the amount of
water on the windshield and
controls the frequency of the
windshield wiper.
Keep this area of the windshield
clear of debris to allow for best
system performance.
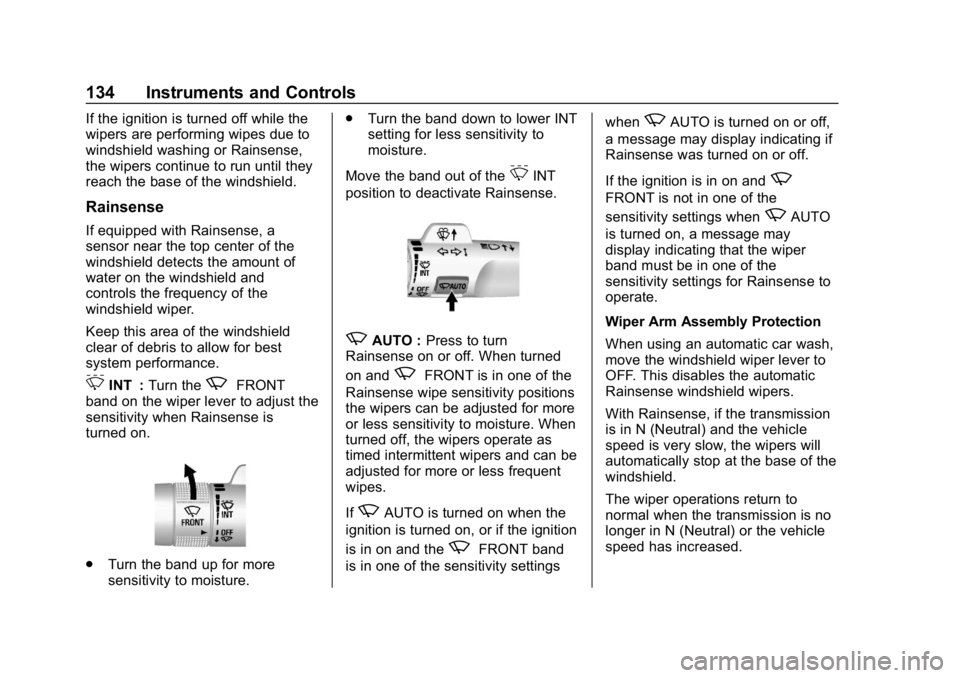
3INT :Turn thezFRONT
band on the wiper lever to adjust the
sensitivity when Rainsense is
turned on.
. Turn the band up for more
sensitivity to moisture. .
Turn the band down to lower INT
setting for less sensitivity to
moisture.
Move the band out of the
3INT
position to deactivate Rainsense.
zAUTO : Press to turn
Rainsense on or off. When turned
on and
zFRONT is in one of the
Rainsense wipe sensitivity positions
the wipers can be adjusted for more
or less sensitivity to moisture. When
turned off, the wipers operate as
timed intermittent wipers and can be
adjusted for more or less frequent
wipes.
If
zAUTO is turned on when the
ignition is turned on, or if the ignition
is in on and the
zFRONT band
is in one of the sensitivity settings when
zAUTO is turned on or off,
a message may display indicating if
Rainsense was turned on or off.
If the ignition is in on and
z
FRONT is not in one of the
sensitivity settings when
zAUTO
is turned on, a message may
display indicating that the wiper
band must be in one of the
sensitivity settings for Rainsense to
operate.
Wiper Arm Assembly Protection
When using an automatic car wash,
move the windshield wiper lever to
OFF. This disables the automatic
Rainsense windshield wipers.
With Rainsense, if the transmission
is in N (Neutral) and the vehicle
speed is very slow, the wipers will
automatically stop at the base of the
windshield.
The wiper operations return to
normal when the transmission is no
longer in N (Neutral) or the vehicle
speed has increased.