seats GMC YUKON 2020 Get To Know Guide
[x] Cancel search | Manufacturer: GMC, Model Year: 2020, Model line: YUKON, Model: GMC YUKON 2020Pages: 20, PDF Size: 3.06 MB
Page 4 of 20
4
REMOTE KEYLESS ENTRY TRANSMITTER (KEY FOB)
KEYED IGNITION SYSTEM (IF EQUIPPED)
Unlock
Press to unlock the driver’s door. Press again to unlock all doors.
Lock
Press to lock all doors.
Press and hold the Lock/Unlock buttons to automatically fold/unfold the power mirrorsF.
Note: To change the Auto Mirror Folding setting, go to Settings > Vehicle > Comfort and Convenience.
LiftglassF
Press twice to open the liftglass.
Power LiftgateF
Press twice to open or close the power liftgate.
Vehicle Locator/Panic Alarm
Press and release to locate your vehicle. The exterior lamps will flash and the horn will chirp 3 times.
Press and hold to activate the alarm. Press again to cancel the alarm.
STARTING THE VEHICLE
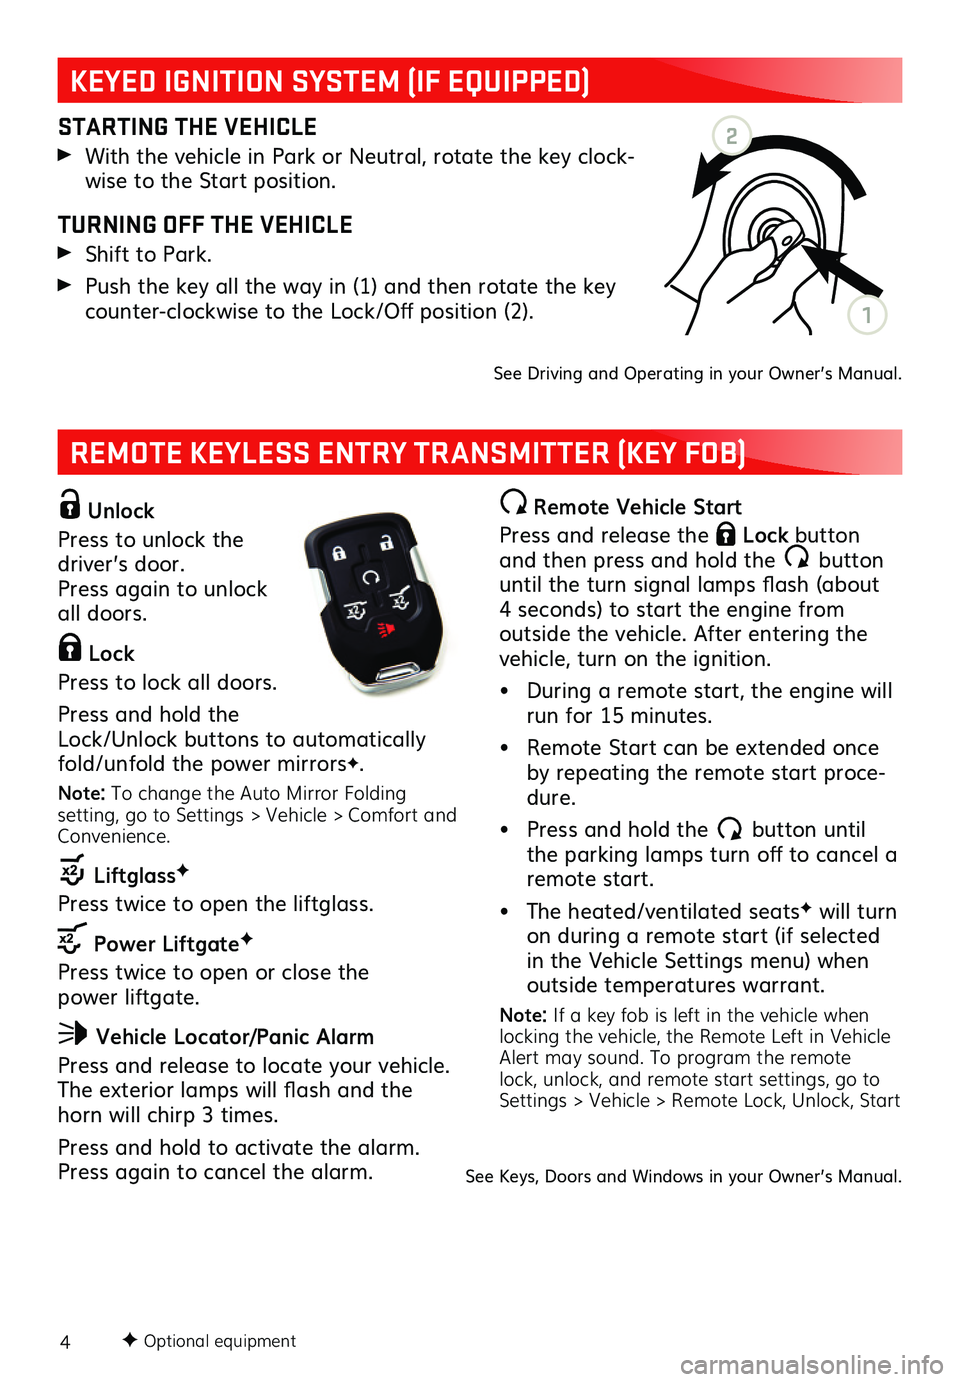
With the vehicle in Park or Neutral, rotate the key clock-wise to the Start position.
TURNING OFF THE VEHICLE
Shift to Park.
Push the key all the way in (1) and then rotate the key counter-clockwise to the Lock/Off position (2).
See Driving and Operating in your Owner’s Manual.
Remote Vehicle Start
Press and release the Lock button and then press and hold the button until the turn signal lamps flash (about 4 seconds) to start the engine from outside the vehicle. After entering the vehicle, turn on the ignition.
• During a remote start, the engine will run for 15 minutes.
• Remote Start can be extended once by repeating the remote start proce-dure.
• Press and hold the button until the parking lamps turn off to cancel a remote start.
• The heated/ventilated seatsF will turn on during a remote start (if selected in the Vehicle Settings menu) when outside temperatures warrant.
Note: If a key fob is left in the vehicle when locking the vehicle, the Remote Left in Vehicle Alert may sound. To program the remote lock, unlock, and remote start settings, go to Settings > Vehicle > Remote Lock, Unlock, Start
F Optional equipment
See Keys, Doors and Windows in your Owner’s Manual.
2
1
Page 6 of 20
6
POWER FRONT SEATS
SEAT ADJUSTMENTS
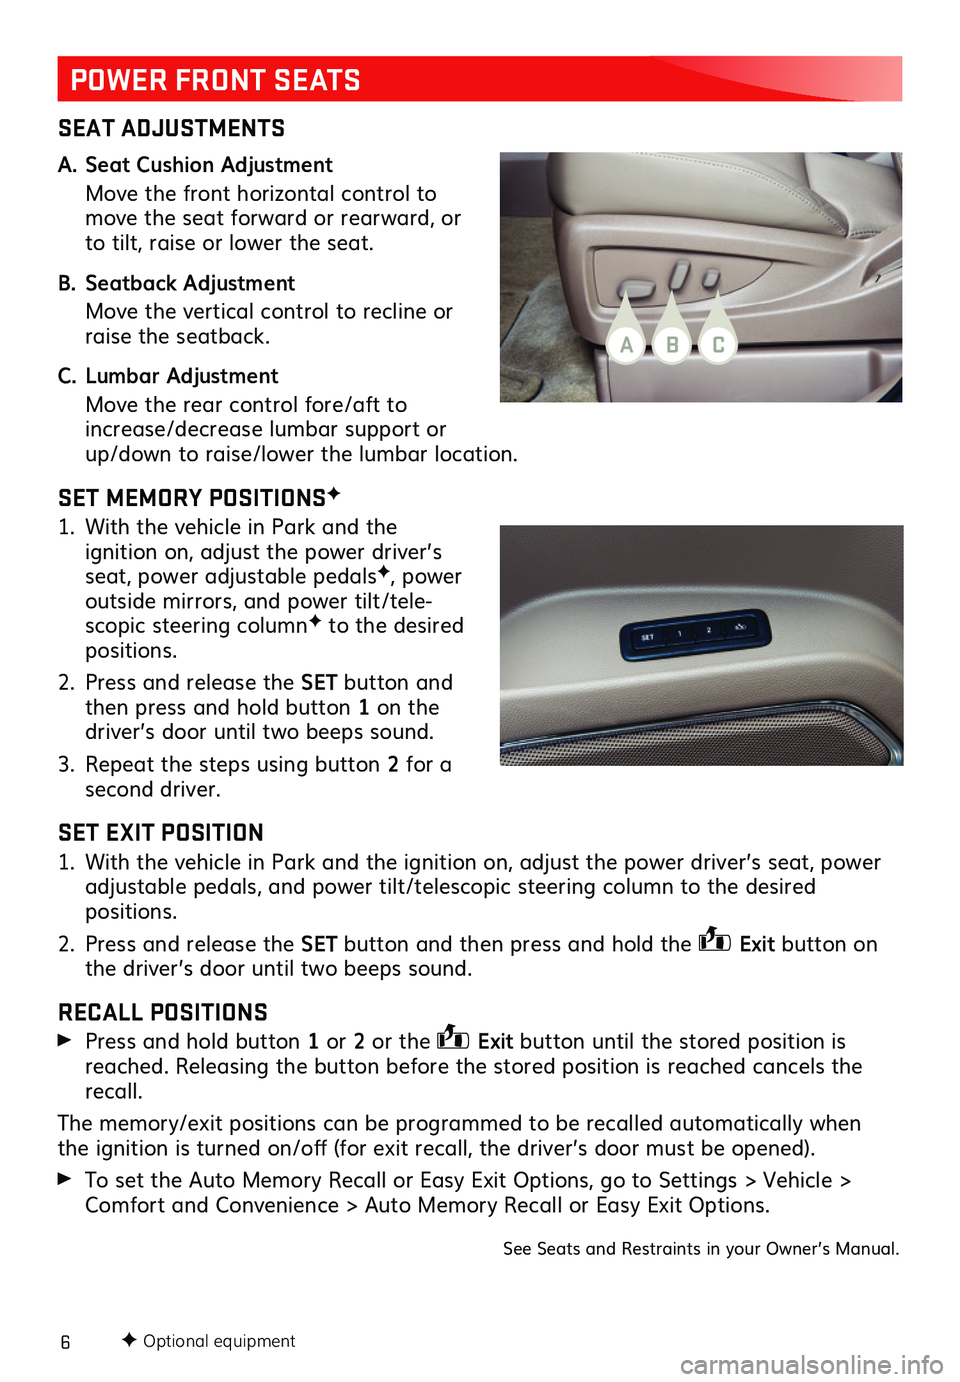
A. Seat Cushion Adjustment
Move the front horizontal control to move the seat forward or rearward, or to tilt, raise or lower the seat.
B. Seatback Adjustment
Move the vertical control to recline or raise the seatback.
C. Lumbar Adjustment
Move the rear control fore/aft to increase/decrease lumbar support or up/down to raise/lower the lumbar location.
SET MEMORY POSITIONSF
1. With the vehicle in Park and the
ignition on, adjust the power driver’s seat, power adjustable pedalsF, power outside mirrors, and power tilt/tele-scopic steering columnF to the desired positions.
2. Press and release the SET button and then press and hold button 1 on the driver’s door until two beeps sound.
3. Repeat the steps using button 2 for a second driver.
SET EXIT POSITION
1. With the vehicle in Park and the ignition on, adjust the power driver’s seat, power adjustable pedals, and power tilt/telescopic steering column to the desired positions.
2. Press and release the SET button and then press and hold the Exit button on the driver’s door until two beeps sound.
RECALL POSITIONS
Press and hold button 1 or 2 or the Exit button until the stored position is reached. Releasing the button before the stored position is reached cancels the recall.
The memory/exit positions can be programmed to be recalled automatically when the ignition is turned on/off (for exit recall, the driver’s door must be opened).
To set the Auto Memory Recall or Easy Exit Options, go to Settings > Vehicle > Comfort and Convenience > Auto Memory Recall or Easy Exit Options.
See Seats and Restraints in your Owner’s Manual.
F Optional equipment
BAC
Page 7 of 20
7
FOLDING 2ND-ROW SEATS
The 2nd-row seats fold and tumble to provide more cargo space and access to the 3rd-row seats.
1. Lower the head restraint, unbuckle the seat belt, make sure nothing is under or in front of the seat, and move the front seat forward enough to allow room for the folded seat.
2. Lift the lever on the lower outboard side of the 2nd-row seat. The seatback will fold forward.
3. Lift the lever again to tumble the seat forward.
POWER FOLDING 2ND-ROW SEATSF
1. Lower the head restraint, unbuckle the seat belt, make sure nothing is under or in front of the seat, and move the front seat forward to allow room for the folded seat.
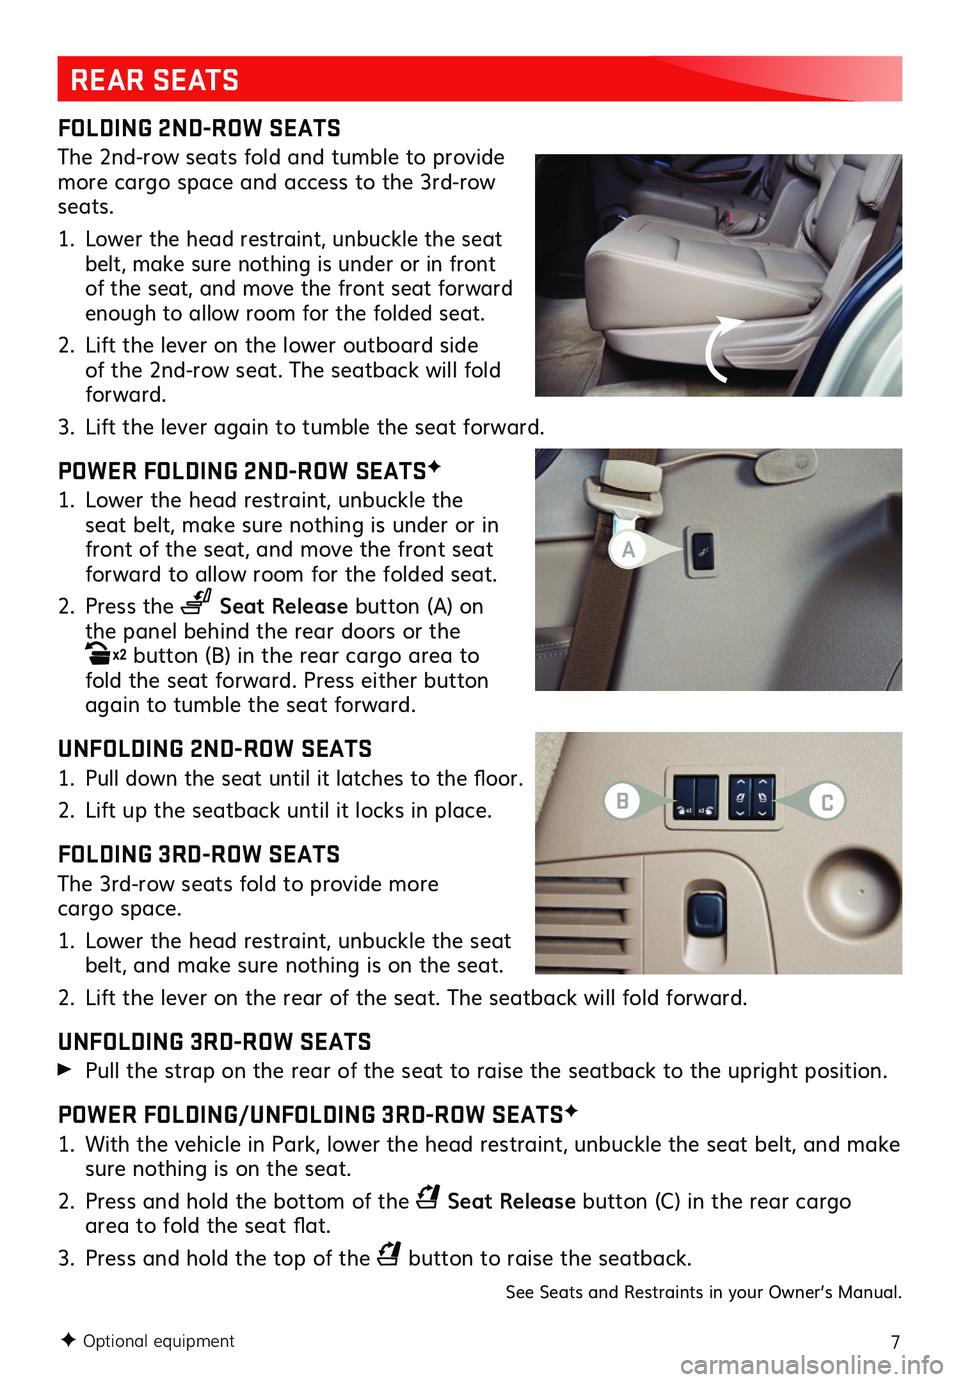
2. Press the Seat Release button (A) on the panel behind the rear doors or the x2 button (B) in the rear cargo area to fold the seat forward. Press either button again to tumble the seat forward.
UNFOLDING 2ND-ROW SEATS
1. Pull down the seat until it latches to the floor.
2. Lift up the seatback until it locks in place.
FOLDING 3RD-ROW SEATS
The 3rd-row seats fold to provide more cargo space.
1. Lower the head restraint, unbuckle the seat belt, and make sure nothing is on the seat.
2. Lift the lever on the rear of the seat. The
seatback will fold forward.
UNFOLDING 3RD-ROW SEATS
Pull the strap on the rear of the seat to raise the seatback to the upright position.
POWER FOLDING/UNFOLDING 3RD-ROW SEATSF
1. With the vehicle in Park, lower the head restraint, unbuckle the seat belt, and make sure nothing is on the seat.
2. Press and hold the bottom of the Seat Release button (C) in the rear cargo area to fold the seat flat.
3. Press and hold the top of the button to raise the seatback.
See Seats and Restraints in your Owner’s Manual.
REAR SEATS
F Optional equipment
CB
A
Page 8 of 20
8
REAR SEAT REMINDER
When the vehicle is turned off, a chime may sound and a Rear Seat Reminder
message may display on the Driver Information Center. The system does not actu-ally detect people or items in the rear seat. It works by monitoring when a rear door is opened and closed, under certain conditions. The feature is active only once each time the vehicle is turned on and off. Always check the rear seat before exiting the vehicle.
To turn the Rear Seat Reminder on or off, go to Settings > Rear Seat Reminder.
See Seats and Restraints in your Owner’s Manual.
PROGRAMMING THE LIFTGATE
HEIGHT
1. Turn the Power Liftgate knob to the 3/4 mode position.
2. Open the liftgate.
3. Adjust the liftgate manually to the desired height.
4. To save the setting, press and hold the button next to the liftgate latch for 3 seconds. The turn signals flash and a beep sounds when the setting is saved.
OPEN/CLOSE THE POWER LIFTGATE
Press the Power Liftgate button on the Remote Keyless Entry (RKE) transmitter twice.
Press the Power Liftgate knob on the overhead console.
Press the touchpad on the liftgate
handle to open the liftgate.
Press the button next to the liftgate latch to close the liftgate.
HANDS-FREE OPERATIONF
To open or close the liftgate hands-free, kick your foot straight in and out under the center of the rear bumper. Do not swing your foot side-to-side. The RKE transmitter must be within 3 feet of the liftgate.
POWER PROGRAMMABLE LIFTGATEF
See Keys, Doors and Windows in your Owner’s Manual.
F Optional equipment
HEAD-UP DISPLAYF
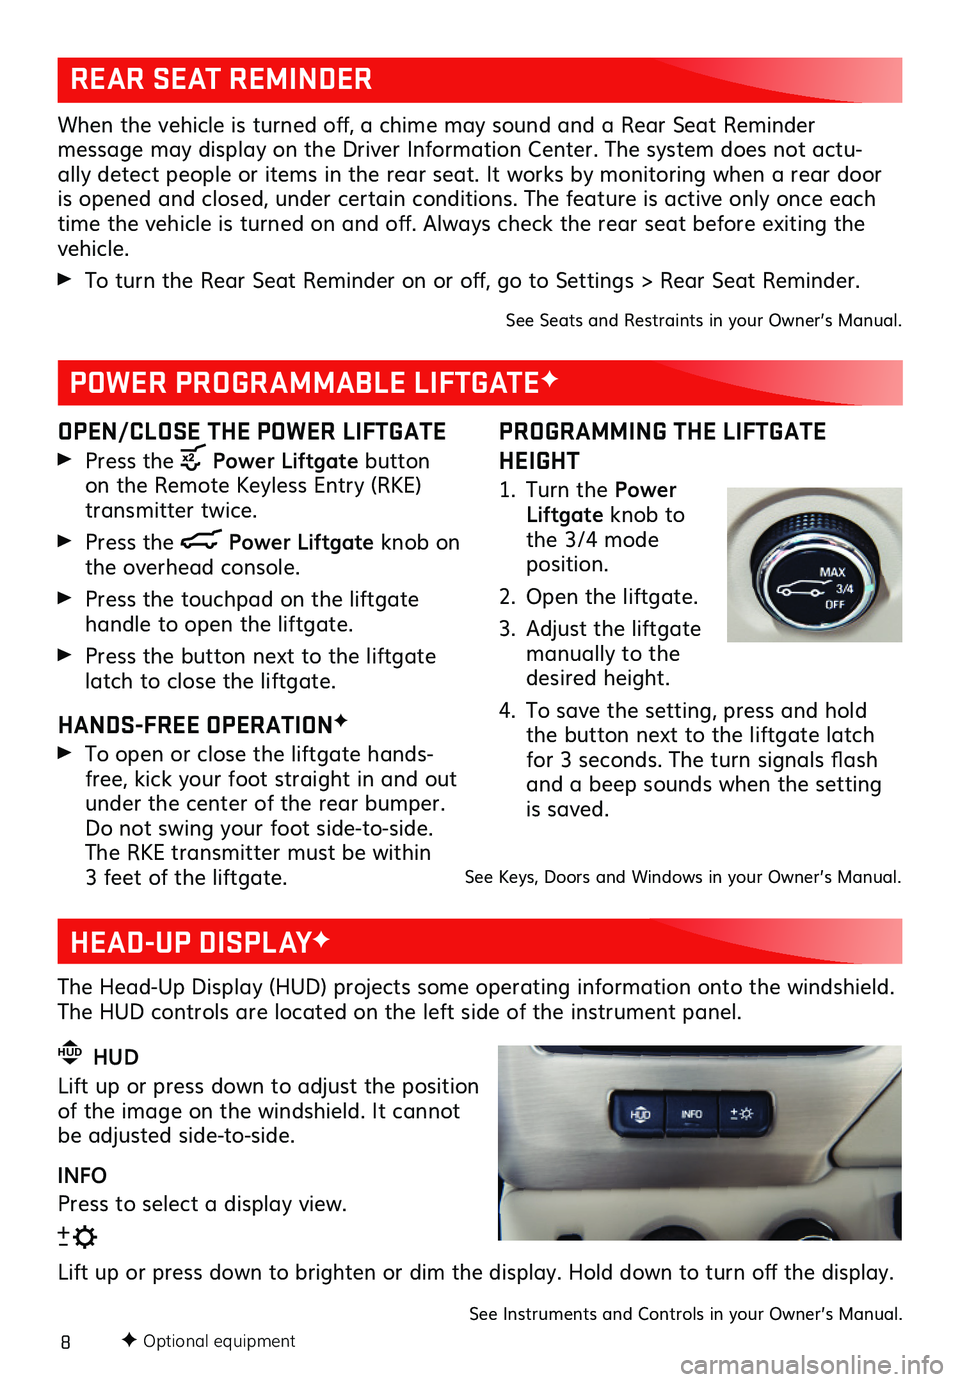
The Head-Up Display (HUD) projects some operating information onto the windshield. The HUD controls are located on the left side of the instrument panel.
HUD HUD
Lift up or press down to adjust the position of the image on the windshield. It cannot be adjusted side-to-side.
INFO
Press to select a display view.
Lift up or press down to brighten or dim the display. Hold down to turn off the display.
See Instruments and Controls in your Owner’s Manual.
Page 15 of 20
15
REAR SEAT ENTERTAINMENT SYSTEMF
The system includes a Blu-ray/DVD/CD player, two USB ports, HDMI/MHL input,
wireless digital headphones, a remote control, and two screens on XL models.
Press the release button to open the video screen. Push up the screen when not in use. The screen turns on/off automatically.
Use the remote control to select the same or a different source for each screen from the rear seats.
To access the Rear Seat Entertainment controls from the front seat, select Video on the Home page.See your Infotainment System Manual.
F Optional equipment
TEEN DRIVER
Teen Driver Mode allows multiple keys to be registered for beginning drivers. When active, the system automatically activates certain safety systems, allows setting of some features, and limits the use of others. An in-vehicle Report Card records vehicle data about driving behavior. When the vehicle is started with a registered key, a Driver Information Center message displays that Teen Driver is active.
To create a Personal Identification Number, register a key, change Teen Driver Mode settings, or access the Report Card, go to Settings > Teen Driver.
See your Infotainment System Manual.
ANDROID AUTO™
Android Auto capability is available through a compatible smartphone using the Projection icon on the Home page of the infotainment system.
1. Download the Android Auto app to your phone from the Google Play Store.
2. Connect your compatible phone by plugging the phone USB cable into a USB data port. Use your device’s factory-provided USB cable. Aftermarket cables may not work.
3. The Projection icon will change to Android Auto. Touch the Android Auto icon to have your apps displayed.
For more information, call 1-855-4-SUPPORT (1-855-478-7767) or visit my.gmc.com/learn.
See your Infotainment System Manual.