USB port GMC YUKON 2020 Infotainment System Manual
[x] Cancel search | Manufacturer: GMC, Model Year: 2020, Model line: YUKON, Model: GMC YUKON 2020Pages: 116, PDF Size: 1.32 MB
Page 5 of 116

GMC Infotainment System (U.S./Canada 2.6) (GMNA-Localizing-U.S./Canada-
13583174) - 2020 - CRC - 4/15/19
4 Introduction
.TurnOto increase or
decrease the volume.
2. MEDIA
. Press to scroll through
the USB, Bluetooth, CD
(if equipped), and AUX
Input audio sources.
3. RADIO
.Press to scroll through
the AM and FM audio
sources.
4.gord
.AM or FM: Press to
seek to the previous or
next strong station. See
AM-FM Radio 012.
. USB, CD (if equipped),
AUX, or Bluetooth
Audio: Press to seek to
the beginning of the
current or previous
track, or press to seek
to the next track.
. USB, CD (if equipped),
AUX. or Bluetooth
Audio: Press and hold
to quickly reverse through a track,
or quickly go forward
through a track.
Release to return to
playing speed. See
USB
Port 021, Auxiliary Jack
0 24, or Bluetooth Audio
0 25.
5.P(Screen)
. Press
Pto open.
There is a USB port
inside. Press
Pagain
to close. Keep the
storage area closed
when not in use. See
the owner ’s manual.
6.Y(Eject)
. Press to eject the audio
disc from the CD player.
7.{(Home Page)
. Press to go to the Home
Page. See “Home Page”
later in this section.
8.oBACK
. Press to return to the
previous display in
a menu.
9. CD Slot
.Place an audio disc
into the CD slot to
launch playback.
10. MENU
.Turn the knob to
highlight a feature.
Press to activate the
highlighted feature.
Page 7 of 116

GMC Infotainment System (U.S./Canada 2.6) (GMNA-Localizing-U.S./Canada-
13583174) - 2020 - CRC - 4/15/19
6 Introduction
3. RADIO
.Press to scroll through
the AM and FM audio
sources.
4.gord(Seek
Previous/Next)
. AM or FM: Press to
seek to the previous or
next strong station. See
AM-FM Radio 012.
. USB, CD (if equipped),
AUX, or Bluetooth
Audio: Press to seek to
the beginning of the
current or previous
track, or press to seek
forward to the next
track.
. USB, CD (if equipped),
AUX. or Bluetooth
Audio: Press and hold
to quickly reverse
through a track,
or quickly go forward
through the next track.
Release to return to playing speed. See
USB
Port 021, Auxiliary Jack
0 24, or Bluetooth Audio
0 25.5.Y(Eject)
. Press to eject the audio
disc from the CD player.
6.{(Home Page)
. Press to go to the Home
Page. See “Home Page”
later in this section.
7.oBACK
. Press to return to the
previous display in
a menu.
8. CD Slot
.Place an audio disc into
the CD slot to launch
playback.
9. MENU
.Turn the knob to
highlight a feature.
Press to activate the
highlighted feature.
Page 22 of 116
GMC Infotainment System (U.S./Canada 2.6) (GMNA-Localizing-U.S./Canada-
13583174) - 2020 - CRC - 4/15/19
Audio Players 21
The following guidelines must be
met when creating an MP3 disc,
otherwise the CD might not play:
.Sampling rate: 16 kHz,
22.05 kHz, 24 kHz, 32 kHz,
44.1 kHz, and 48 kHz.
. Bit rates supported: 8, 16, 24,
32, 40, 48, 56, 64, 80, 96, 112,
128, 144, 160, 192, 224, 256,
and 320 kbps.
. Recorded on a CD-R or CD-RW.
MP3 CD playback is unavailable
when both screens in the rear seat
area, if equipped, are in use. Turn
off one of the rear screens to allow
MP3 playback.
MP3 Music Menu
Press MENU on the center stack
while that source is active to access
the menu.
Touch any of the following options
on the MP3 Menu:
Shuffle : Touch to play the tracks
randomly. Touch again to stop
shuffle. Tone :
Touch + or –to adjust Bass,
Midrange, Treble, or Surround (if
equipped). See AM-FM Radio012.
Auto Volume (If Equipped) : This
feature adjusts the volume based on
the speed of the vehicle. See
AM-FM Radio 012.
Bose AudioPilot Noise
Compensation Technology (If
Equipped) : This feature adjusts
the volume based on the noise in
the vehicle and speed. See AM-FM
Radio 012.
MP3 Folder Information
Touch anywhere between the top
applications tray and the bottom
menu to display Browse.
Root Directory : To access, touch
anywhere between the top and
bottom menu or touch Browse. The
root directory is treated as a folder.
All files contained directly under the
root directory are accessed prior to
any root directory folders. No Folder :
When the CD only
contains compressed audio files
without any folders or playlists, all
files are under the root folder.
File System and Naming : The
song titles, artists, albums, and
genres are taken from the file's ID3
tag and are only displayed if present
in the tag. If a song title is not
present in the ID3 tag, the radio
displays the file name as the
track name.
USB Port
These vehicles are equipped with
two USB ports in the center
console. These ports are for data
and charging.
Some of these vehicles may have
USB ports in the armrest, in the
storage bin behind the radio (if
equipped) and if equipped with Rear
Seat Infotainment (RSI), there may
be USB ports for charging in the
rear media console storage area.
Page 23 of 116
GMC Infotainment System (U.S./Canada 2.6) (GMNA-Localizing-U.S./Canada-
13583174) - 2020 - CRC - 4/15/19
22 Audio Players
Playing from a USB
A USB mass storage device can be
connected to the USB port.
Audio extensions supported by the
USB may include:
.FLAC
. MP3
. AAC
. OGG
. 3GP
Gracenote
When plugging in a USB device,
Gracenote service builds voice tags
for music. Voice tags allow artists,
albums with hard to pronounce
names, and nicknames to be used
to play music through voice
recognition.
While indexing, infotainment
features are available.
My Media Library
MyMedia is only available when
more than one indexed device is
connected. It allows access to content from all indexed media
sources. MyMedia will show as an
available source in the
Source page.
USB MP3 Player and USB Devices
The USB MP3 players and USB
devices connected must comply
with the USB Mass Storage Class
specification (USB MSC).
To play a USB device:
1. Connect the USB.
2. Press MEDIA on the center stack until the connected
device is shown.
Use the following when playing an
active USB source:
r: Touch to play the current media
source.
j: Touch to pause playback of the
current media source.
g:
. Press to seek to the beginning of
the current or previous track. .
Press and hold to reverse
quickly through playback.
Release to return to playing
speed. Elapsed time displays.
d:
. Press to seek to the next track.
. Press and hold to advance
quickly through playback.
Release to return to playing
speed. Elapsed time displays.
Shuffle : Touch the shuffle icon to
play music in random order.
USB Menu
Touch the Menu icon to display the
USB menu. The following may be
available:
Shuffle : Touch to play the tracks
randomly. Touch again to stop
shuffle.
Tone : Touch + or –to adjust the
tone settings. See AM-FM Radio
0 12.
Auto Volume (If Equipped) : This
feature adjusts the volume based on
the vehicle speed. See AM-FM
Radio 012.
Page 24 of 116
GMC Infotainment System (U.S./Canada 2.6) (GMNA-Localizing-U.S./Canada-
13583174) - 2020 - CRC - 4/15/19
Audio Players 23
Bose AudioPilot Noise
Compensation Technology (If
Equipped :This feature adjusts the
volume based on the noise in the
vehicle and speed. See AM-FM
Radio 012.
USB Browse Menu
When a list of songs, albums,
artists, or other types of media
displays, the up and down arrows
and A-Z appear on the left side.
Select A-Z to view a display that will
show all letters of the alphabet and
select the letter to go to.
Touch anywhere between the top
and bottom menus or touch the
Browse option on the infotainment
display to view the Browse menu
and the following options are
displayed near the bottom of the
display:
Playlists: 1. Touch to view the playlists stored on the USB.
2. Touch a playlist to view the list of all songs in that playlist. 3. Touch a song from the list to
begin playback.
Supported Playlist extensions are
m3u, pls, and wpl.
Artists: 1. Touch to view the list of artists stored on the USB.
2. Touch an artist name to view a list of all albums by the artist.
3. To select a song, touch All Songs or touch an album and
then touch a song from the list.
Albums: 1. Touch to view the albums on the USB.
2. Touch the album to view a list of all songs on the album.
3. Touch a song from the list to begin playback.
Songs: 1. Touch to display a list of all songs on the USB.
2. To begin playback, touch a song from the list. Genres:
1. Touch to view the genres on the USB.
2. Touch a genre to view a list of artists.
3. Touch an artist to view albums by that artist.
4. Touch an album to view songs on the album.
5. Touch a song to start playback.
Podcasts, Composers, Audiobooks,
and Folder View (if equipped) are
shown when the More option is
selected from near the bottom of the
display.
Podcasts: 1. Touch to view the podcasts on the USB.
2. Touch a podcast.
3. Touch an episode to start playback.
Composers: 1. Touch to view the composers on the USB.
Page 25 of 116
GMC Infotainment System (U.S./Canada 2.6) (GMNA-Localizing-U.S./Canada-
13583174) - 2020 - CRC - 4/15/19
24 Audio Players
2. Touch a Composer to view alist of albums by that
composer.
3. Touch an album or All Songs to view a list of songs.
4. Touch a song from the list to begin playback.
Folder View: 1. Touch to view the directories on the USB.
2. Touch a folder to view a list of all files.
3. Touch a file from the list to begin playback.
Audiobooks: 1. Touch to view the audiobooks stored on the USB.
2. Touch an audiobook to get a list of chapters.
3. Touch the chapter from the list to begin playback. File System and Naming
The songs, artists, albums, and
genres are taken from the file’s
song information and are only
displayed if present. The radio
displays the file name as the track
name if the song information is not
available.
Supported Apple Devices
To view supported devices, see
my.gmc.com/learn.
Loss of Audio
If a phone currently paired over
Bluetooth is plugged in with a USB
cable, the system will automatically
mute the phone audio. Playback
can be resumed by changing the
audio source from Bluetooth to USB
cable.
Source USB from the Media icon on
the infotainment display to resume
playback.
Other phones such as Android
phones may have a similar reaction. Bluetooth Streaming Audio and
Voice Recognition
See
Bluetooth Audio 025 for
information using voice recognition
with Bluetooth streaming audio.
Make sure all devices have the
latest software downloaded.
Auxiliary Jack
This vehicle has an auxiliary input
jack. This may be located in the
center stack or center console
under the armrest. Possible auxiliary
audio sources include:
. Laptop computer
. Audio music player
This jack is not an audio output. Do
not plug headphones into the
auxiliary input jack. Set up an
auxiliary device while the vehicle is
in P (Park).
Connect a 3.5 mm (1/8 in) cable
from the auxiliary device to the
auxiliary input jack. When a device
is connected, the system can play
audio from the device over the
vehicle speakers.
Page 29 of 116
GMC Infotainment System (U.S./Canada 2.6) (GMNA-Localizing-U.S./Canada-
13583174) - 2020 - CRC - 4/15/19
28 Rear Seat Infotainment
Rear Seat
Infotainment
Rear Seat Infotainment
(RSI) System
If equipped, the system includes a
Blu-ray/DVD/CD player, two USB
ports, HDMI/MHL input, wireless
headphones, and a remote control.
The remote control is used to select
the same or a different source for
each screen from the rear seats.
Video can be viewed from the front
by touching Video on the Home
Page, if the vehicle is in P (Park).
Audio will be heard over the
speakers. If another display icon is
selected, the video on the rear
screen will continue to play but the
audio on the speakers will change
to the source selected.
To resume play of the video where it
left off, Pseudo Resume must be
on. See“Player Setup BD/DVD"
later in this section. The RSI system may not operate
properly until the temperature is
above
−20 °C (−4 °F) and below
55 °C (131 °F).
System Operation
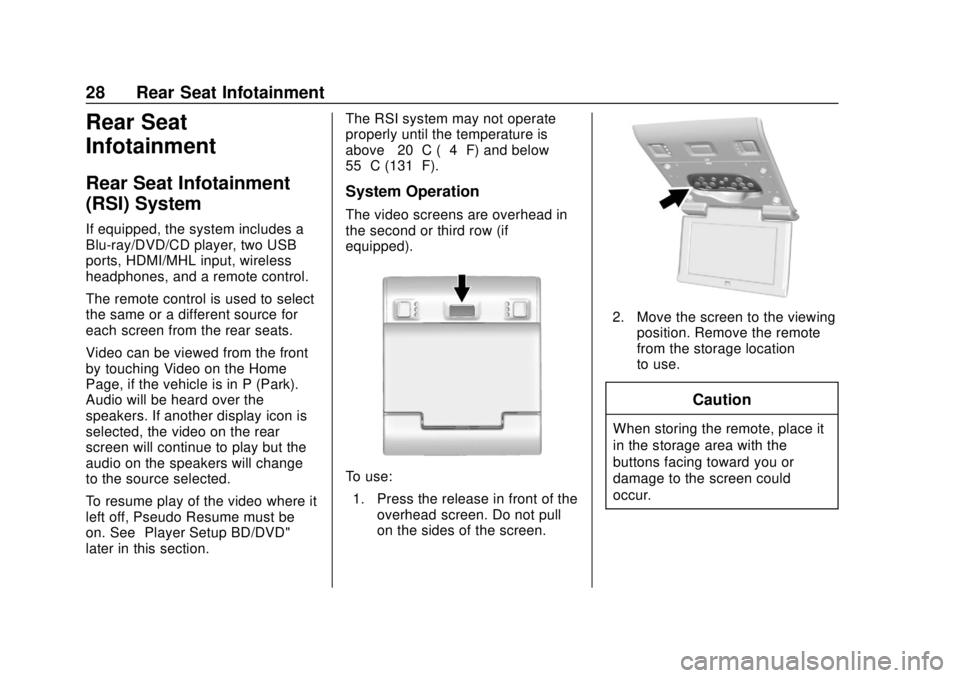
The video screens are overhead in
the second or third row (if
equipped).
To use:
1. Press the release in front of the overhead screen. Do not pull
on the sides of the screen.
2. Move the screen to the viewingposition. Remove the remote
from the storage location
to use.
Caution
When storing the remote, place it
in the storage area with the
buttons facing toward you or
damage to the screen could
occur.
Page 43 of 116
GMC Infotainment System (U.S./Canada 2.6) (GMNA-Localizing-U.S./Canada-
13583174) - 2020 - CRC - 4/15/19
42 Rear Seat Infotainment
5. From the smart device’s DLNAapplication, select Rear Seat 1
or 2 as the screen to display
the desired video, audio,
or picture files on the RSI.
Once the connection process is
done for the first time, the Wi-Fi
connection will be made whenever
the device is within Wi-Fi range or
the smart device Wi-Fi is turned on.
Select Menu from the remote control
to access the options to switch
Wi-Fi band, disconnect the smart
device from the RSI Wi-Fi, or to
remove all DLNA passwords that
have been saved.
Supported DLNA media types are:
. Video: .mp4 and .mpg
. Audio: .mp3 and .aac
. Picture: .jpeg and .jpg
Viewing the Other Display
While the left or right screen is
connected by DLNA, the other
screen can access the same source by selecting View Screen 1 or View
Screen 2 in the Wireless
Display menu.
Connecting Wireless Android
Devices
Many Android devices come with
pre-installed audio and video
players that support WiFi streaming;
consult your smart device manual
for more information. Android
devices will also support various
DLNA applications to allow the
device to connect to the RSI
wirelessly. Search the Google Play
store for DLNA applications to install
on the Android device.
Connecting Wireless Apple
Devices
Apple will support various DLNA
apps to allow the device to connect
to the RSI wirelessly. Search the
App Store for DLNA applications to
install on the Apple device.Auxiliary Inputs
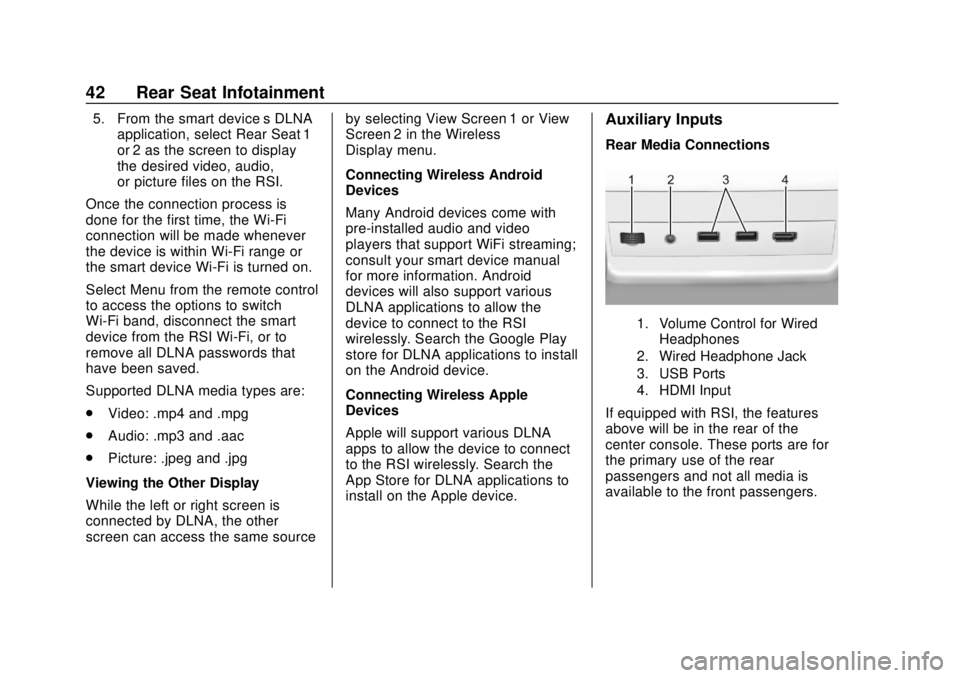
Rear Media Connections
1. Volume Control for Wired
Headphones
2. Wired Headphone Jack
3. USB Ports
4. HDMI Input
If equipped with RSI, the features
above will be in the rear of the
center console. These ports are for
the primary use of the rear
passengers and not all media is
available to the front passengers.
Page 44 of 116
GMC Infotainment System (U.S./Canada 2.6) (GMNA-Localizing-U.S./Canada-
13583174) - 2020 - CRC - 4/15/19
Rear Seat Infotainment 43
HDMI Input
An HDMI cable is required to
connect an HDMI device to the RSI
hub. The RSI HDMI input allows
connection to:
.Video games, disc players,
cameras, smartphones, tablets,
and A/V dongles that have HDMI
(version 1.4a) outputs.
. Smart devices that support
Mobile High-Definition Link
(MHL) version 2.0.
. Apple devices. A supporting
HDMI cable from Apple is
required.
For certain HDMI devices that
support USB charging, the USB
ports can be used as a power
source.
To use the HDMI input of the RSI
system: 1. Connect the auxiliary device with an HDMI cable.
2. Power on both the auxiliary device and the RSI video
screen. 3. Press MEDIA on the remote
control and use the arrows to
change the source to HDMI.
USB
There are two USB ports to provide
the RSI system audio/video from
supported devices, as well as to
provide device charging.
Audio from these ports can only be
heard and controlled by the rear
seat passengers. Video can be
heard, shown, and controlled by the
rear and front passengers.
To use the USB: 1. Insert the device into one of the two ports.
2. Select the source (USB 1 or USB 2) through the rear screen
menu using MEDIA on the
remote control.
3. Select the source via the front by touching the Video icon on
the Home Page.Audio Output
Audio from a Blu-ray/DVD/CD
player or HDMI inputs can be heard
through:
.Wireless headphones: Available
for any source depending on the
selected channel.
. Vehicle speakers: Touch the
Video icon on the Home Page.
Select any other source to stop
the speaker audio; rear audio
will continue to play.
. Vehicle wired headphone jack:
See “Wired Headphone Jack”
following.
The RSI system transmits the audio
signal to the wireless headphones if
an audio signal is available. See
“Headphones” earlier in this section.
Front seat passengers can listen to
playback from the attached rear
device through the vehicle speakers
by selecting that source from the
Video Application on the front
display Home Page.
Page 65 of 116
GMC Infotainment System (U.S./Canada 2.6) (GMNA-Localizing-U.S./Canada-
13583174) - 2020 - CRC - 4/15/19
64 Navigation
Enter the POI information into the
text file in the following format:
.Longitude coordinate, Latitude
coordinate, “Name of POI,”
“Additional information,” “Phone
number.”
Example: 7.0350000,
50.6318040, “Michaels Home,”
“123 Maple Lane,”
“02379234567.”
. The GPS coordinates must be
expressed in decimal degrees
and can be taken from a
geographical map. The
additional information and phone
number strings are optional.
. The POI name and the
additional information string may
not exceed 60 characters.
. POI information for each
destination address must be
entered in a single separate line.
Storing the POI on a USB Device
In the root directory of a USB
device, create a folder name
“myPOIs.” For example, “F:\”is the
root directory of the USB device. In the
“myPOIs” folder, store the text
file with your POIs, for example,
“F:\myPOIs\TomsPOIs.csv.”
Downloading the POI to the
Infotainment System
Connect the USB device containing
the POI information to the USB port
of the infotainment system.
A message displays prompting
whether or not to download the POI
information from the USB device. All
POIs found are saved even if they
are in multiple folders.
Subfolders can also be created to
organize the POIs into categories,
for example, “F:\myPOIs
\Restaurants\TomsPOIs.csv.”
If the message is dismissed or
ignored, no POI information is
downloaded. This prompt will not
reoccur for the current ignition cycle.
When the system is finished
downloading, a pop-up displays
asking to specify a category for the
new POIs, if desired. Importing and Overwriting
Categories
When POIs are found on a media
device, the date of the file is
examined and compared to the date
for the files already in the system.
If the file being downloaded is
newer than the one in the system,
that particular category of POIs is
overwritten. Any other POIs that had
previously been saved in other
categories are not affected.
Address Book Download
If an Address Book is found on the
connected USB device, the same
alert is used to indicate that
locations have been found and they
can be downloaded. If there is
already content in the vehicle
Address Book, the system prompts
if the stored content should be
overwritten. Touch Save to overwrite
the existing Address Book
information. Touch Cancel to abort
the import of information.