lock GMC YUKON 2020 Owner's Manual
[x] Cancel search | Manufacturer: GMC, Model Year: 2020, Model line: YUKON, Model: GMC YUKON 2020Pages: 434, PDF Size: 6.45 MB
Page 286 of 434
GMC Yukon/Yukon XL/Denali Owner Manual (GMNA-Localizing-U.S./
Canada/Mexico-13566587) - 2020 - CRC - 4/15/19
Vehicle Care 285
3. After you have partially liftedthe hood, the spring system will
automatically lift the hood and
hold it in the fully open
position.
To close the hood: 1. Before closing the hood, be sure all filler caps are on
properly, and all tools are
removed.
2. Pull the hood down until the spring system is no longer
holding up the hood.
3. Allow the hood to fall. Check to make sure the hood is latched
completely. Repeat this
process with additional force if
necessary.{Warning
Do not drive the vehicle if the
hood is not latched completely.
The hood could open fully, block
your vision, and cause a crash.
You or others could be injured.
Always close the hood completely
before driving.
The Driver Information Center (DIC)
will display a message if the hood is
not fully closed, and the vehicle is
moving. Stop and turn off the
vehicle, check the hood for
obstructions, and close the hood
again. Check to see if the message
still appears on the DIC.
Page 288 of 434

GMC Yukon/Yukon XL/Denali Owner Manual (GMNA-Localizing-U.S./
Canada/Mexico-13566587) - 2020 - CRC - 4/15/19
Vehicle Care 287
1. Positive (+) Terminal. SeeJump Starting - North America
0360.
2. Battery - North America 0305.
3. Coolant Surge Tank and Pressure Cap. See Cooling
System 0297.
4. Engine Air Cleaner/Filter 0296.
5. Automatic Transmission Dipstick. See “How to Check
Automatic Transmission Fluid”
under Automatic Transmission
Fluid (6-Speed Transmission)
0 292 or
Automatic Transmission Fluid
(10-Speed Transmission)
0 295.
6. Remote Negative (–) Location (Out of View). See Jump
Starting - North America 0360.
7. Engine Cooling Fans (Out of View). See Cooling System
0 297.
8. Engine Oil Fill Cap. See “When
to Add Engine Oil” under
Engine Oil 0289. 9. Engine Oil Dipstick. See
“Checking Engine Oil” under
Engine Oil 0289.
10. Windshield Washer Fluid Reservoir. See “Adding Washer
Fluid” under Washer Fluid
0 302.
11. Brake Fluid Reservoir. See Brake Fluid 0304.
12. Engine Compartment Fuse
Block 0315.
Page 290 of 434
GMC Yukon/Yukon XL/Denali Owner Manual (GMNA-Localizing-U.S./
Canada/Mexico-13566587) - 2020 - CRC - 4/15/19
Vehicle Care 289
1. Positive (+) Terminal. SeeJump Starting - North America
0360.
2. Battery - North America 0305.
3. Coolant Surge Tank and Pressure Cap. See Cooling
System 0297.
4. Engine Air Cleaner/Filter 0296.
5. Remote Negative (–) Location (Out of View). See Jump
Starting - North America 0360.
6. Engine Cooling Fans (Out of View). See Cooling System
0 297.
7. Engine Oil Fill Cap. See “When
to Add Engine Oil” under
Engine Oil 0289.
8. Engine Oil Dipstick. See “Checking Engine Oil” under
Engine Oil 0289.
9. Windshield Washer Fluid Reservoir. See “Adding Washer
Fluid” under Washer Fluid
0 302.
10. Brake Fluid Reservoir. See Brake Fluid 0304. 11.
Engine Compartment Fuse
Block 0315.
Engine Oil
To ensure proper engine
performance and long life, careful
attention must be paid to engine oil.
Following these simple, but
important steps will help protect
your investment:
.
Use engine oil approved to the
proper specification and of the
proper viscosity grade. See
“Selecting the Right Engine Oil”
in this section.
. Check the engine oil level
regularly and maintain the
proper oil level. See “Checking
Engine Oil” and“When to Add
Engine Oil” in this section.
. Change the engine oil at the
appropriate time. See Engine Oil
Life System 0291.
. Always dispose of engine oil
properly. See “What to Do with
Used Oil” in this section.
Checking Engine Oil
If equipped, the ENGINE OIL LOW
ADD OIL message displays when
the engine oil level may be too low.
Check the oil level before filling to
the recommended level. If the oil is
not low and this message remains
on, see your dealer.
Check the engine oil level regularly,
every 650 km (400 mi), especially
prior to a long trip. The engine oil
dipstick handle is a loop. See
Engine Compartment Overview
0286 for the location.
{Warning
The engine oil dipstick handle
may be hot; it could burn you.
Use a towel or glove to touch the
dipstick handle.
Follow these guidelines:
. To get an accurate reading, park
the vehicle on level ground.
Check the engine oil level after
the engine has been off for at
least two hours. Checking the
Page 295 of 434

GMC Yukon/Yukon XL/Denali Owner Manual (GMNA-Localizing-U.S./
Canada/Mexico-13566587) - 2020 - CRC - 4/15/19
294 Vehicle Care
1. Locate the transmissiondipstick at the rear of the
engine compartment, on the
passenger side of the vehicle.
See Engine Compartment
Overview 0286.
2. Flip the handle up, then pull out the dipstick and wipe it with a
clean rag or paper towel.
3. Install the dipstick by pushing it back in all the way; wait
three seconds, and then pull it
back out again.
4. Check both sides of the dipstick and read the lower
level. Repeat the check
procedure to verify the reading.5. If the fluid level is below theCOLD check band, add only
enough fluid as necessary to
bring the level into the COLD
band. It does not take much
fluid, generally less than 0.5 L
(1 pt). Do not overfill.
6. Perform a hot check at the first opportunity after the
transmission reaches a normal
operating temperature between
71 °C to 93 °C (160 °F to
200 °F).
7. If the fluid level is in the acceptable range, push the
dipstick back in all the way,
then flip the handle down to
lock the dipstick in place. Hot Check Procedure
Use this procedure to check the
transmission fluid level when the
transmission fluid temperature is
between 71 °C and 93 °C (160 °F
and 200 °F).
The hot check is the most accurate
method to check the fluid level. The
hot check should be performed at
the first opportunity in order to verify
the cold check. The fluid level rises
as fluid temperature increases, so it
is important to ensure the
transmission temperature is within
range.
1. Locate the transmission
dipstick at the rear of the
engine compartment, on the
passenger side of the vehicle.
See Engine Compartment
Overview 0286.
Page 296 of 434
GMC Yukon/Yukon XL/Denali Owner Manual (GMNA-Localizing-U.S./
Canada/Mexico-13566587) - 2020 - CRC - 4/15/19
Vehicle Care 295
2. Flip the handle up, then pull outthe dipstick and wipe it with a
clean rag or paper towel.
3. Install the dipstick by pushing it back in all the way; wait
three seconds, and then pull it
back out again.
4. Check both sides of the dipstick and read the lower
level. Repeat the check
procedure to verify the reading.
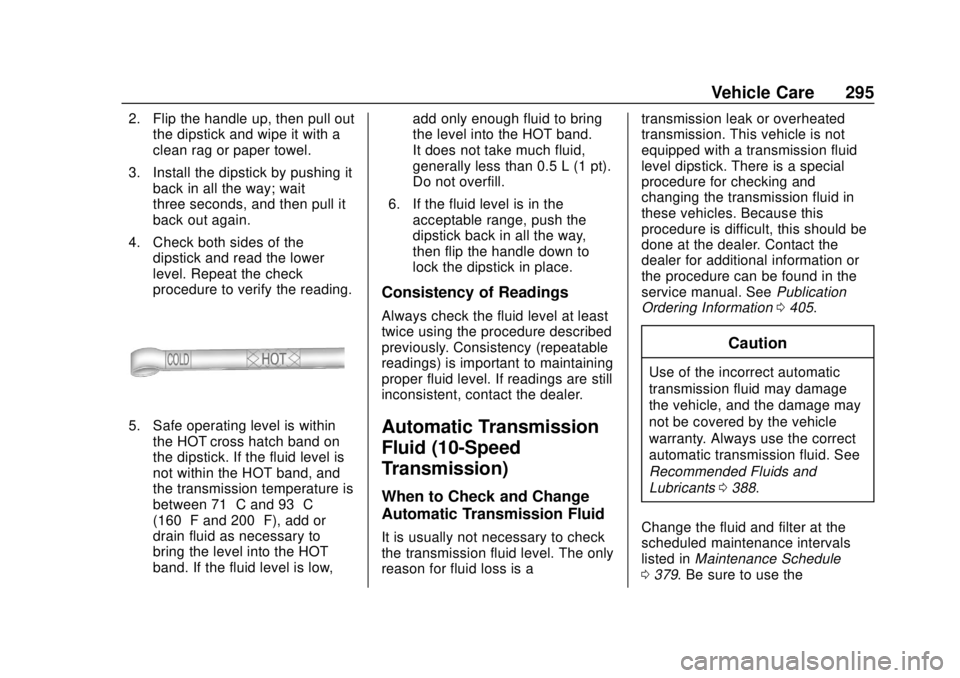
5. Safe operating level is within
the HOT cross hatch band on
the dipstick. If the fluid level is
not within the HOT band, and
the transmission temperature is
between 71 °C and 93 °C
(160 °F and 200 °F), add or
drain fluid as necessary to
bring the level into the HOT
band. If the fluid level is low, add only enough fluid to bring
the level into the HOT band.
It does not take much fluid,
generally less than 0.5 L (1 pt).
Do not overfill.
6. If the fluid level is in the acceptable range, push the
dipstick back in all the way,
then flip the handle down to
lock the dipstick in place.
Consistency of Readings
Always check the fluid level at least
twice using the procedure described
previously. Consistency (repeatable
readings) is important to maintaining
proper fluid level. If readings are still
inconsistent, contact the dealer.
Automatic Transmission
Fluid (10-Speed
Transmission)
When to Check and Change
Automatic Transmission Fluid
It is usually not necessary to check
the transmission fluid level. The only
reason for fluid loss is a transmission leak or overheated
transmission. This vehicle is not
equipped with a transmission fluid
level dipstick. There is a special
procedure for checking and
changing the transmission fluid in
these vehicles. Because this
procedure is difficult, this should be
done at the dealer. Contact the
dealer for additional information or
the procedure can be found in the
service manual. See
Publication
Ordering Information 0405.
Caution
Use of the incorrect automatic
transmission fluid may damage
the vehicle, and the damage may
not be covered by the vehicle
warranty. Always use the correct
automatic transmission fluid. See
Recommended Fluids and
Lubricants 0388.
Change the fluid and filter at the
scheduled maintenance intervals
listed in Maintenance Schedule
0 379. Be sure to use the
Page 301 of 434
GMC Yukon/Yukon XL/Denali Owner Manual (GMNA-Localizing-U.S./
Canada/Mexico-13566587) - 2020 - CRC - 4/15/19
300 Vehicle Care
Turn the pressure cap slowly
counterclockwise about one full
turn. If a hiss is heard, wait for
that to stop. A hiss means
there is still some pressure left.
2. Keep turning the pressure cap slowly, and remove it.
3. Fill the coolant surge tank with the proper mixture to the full
cold mark.
4. With the coolant surge tank pressure cap off, start the
engine and let it run until the
engine coolant temperature
gauge indicates approximately
90 °C (195 °F).
By this time, the coolant level
inside the coolant surge tank
may be lower. If the level is
lower, add more of the proper
mixture to the coolant surge
tank until the level reaches the
full cold mark.
5. Replace the pressure cap tightly. 6. Verify coolant level after the
engine is shut off and the
coolant is cold. If necessary,
repeat coolant fill procedure
Steps 1–6.
Caution
If the pressure cap is not tightly
installed, coolant loss and engine
damage may occur. Be sure the
cap is properly and tightly
secured.
Engine Overheating
Caution
Do not run the engine if there is a
leak in the engine cooling system.
This can cause a loss of all
coolant and can damage the
system and vehicle. Have any
leaks fixed right away.
The vehicle has several indicators
to warn of engine overheating. There is a coolant temperature
gauge in the vehicle's instrument
cluster. See
Engine Coolant
Temperature Gauge 0131.
In addition, there are ENGINE
OVERHEATED STOP ENGINE,
ENGINE OVERHEATED IDLE
ENGINE, and ENGINE POWER IS
REDUCED messages in the Driver
Information Center (DIC).
If the decision is made not to lift the
hood when this warning appears,
get service help right away. See
Roadside Assistance Program
0 400.
If the decision is made to lift the
hood, make sure the vehicle is
parked on a level surface.
Check to see if the engine cooling
fan(s) are running. If the engine is
overheating, the fans should be
running. If they are not, do not
continue to run the engine. Have the
vehicle serviced.
Page 309 of 434
GMC Yukon/Yukon XL/Denali Owner Manual (GMNA-Localizing-U.S./
Canada/Mexico-13566587) - 2020 - CRC - 4/15/19
308 Vehicle Care
Starter Switch Check
{Warning
When you are doing this
inspection, the vehicle could
move suddenly. If the vehicle
moves, you or others could be
injured.
1. Before starting this check, be sure there is enough room
around the vehicle.
2. Apply both the parking brake and the regular brake.
Do not use the accelerator
pedal, and be ready to turn off
the engine immediately if it
starts.
3. Try to start the engine in each gear. The vehicle should start
only in P (Park) or N (Neutral).
If the vehicle starts in any other
position, contact your dealer for
service.
Automatic Transmission
Shift Lock Control
Function Check
{Warning
When you are doing this
inspection, the vehicle could
move suddenly. If the vehicle
moves, you or others could be
injured.
1. Before starting this check, be sure there is enough room
around the vehicle. It should be
parked on a level surface.
2. Apply the parking brake. Be ready to apply the regular
brake immediately if the vehicle
begins to move.
3. With the engine off, turn the ignition on, but do not start the
engine. Without applying the
regular brake, try to move the
shift lever out of P (Park) with normal effort. If the shift lever
moves out of P (Park), contact
your dealer for service.
Ignition Transmission
Lock Check
If equipped with a Key Access
ignition, while parked and with the
parking brake set, try to turn the
ignition off in each shift lever
position.
.
The ignition should turn off only
when the shift lever is in
P (Park).
. The key should come out only
when the ignition is off.
Contact your dealer if service is
required.
Page 311 of 434
GMC Yukon/Yukon XL/Denali Owner Manual (GMNA-Localizing-U.S./
Canada/Mexico-13566587) - 2020 - CRC - 4/15/19
310 Vehicle Care
4. Remove the wiper blade.
5. Reverse Steps 1–3 for wiperblade replacement.
Rear Wiper Blade Replacement
To replace the rear wiper blade:
1. With the rear wiper in the off position, open the liftglass to
access the rear wiper arm/
blade.
The rear wiper blade will not
lock in a vertical position so
use care when pulling it away
from the vehicle.
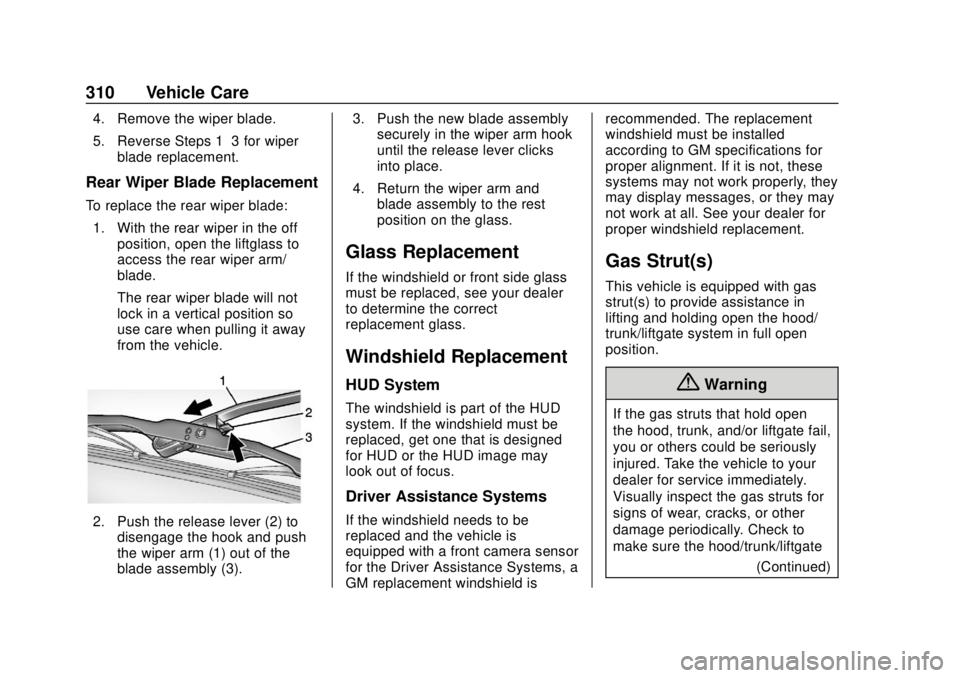
2. Push the release lever (2) todisengage the hook and push
the wiper arm (1) out of the
blade assembly (3). 3. Push the new blade assembly
securely in the wiper arm hook
until the release lever clicks
into place.
4. Return the wiper arm and blade assembly to the rest
position on the glass.
Glass Replacement
If the windshield or front side glass
must be replaced, see your dealer
to determine the correct
replacement glass.
Windshield Replacement
HUD System
The windshield is part of the HUD
system. If the windshield must be
replaced, get one that is designed
for HUD or the HUD image may
look out of focus.
Driver Assistance Systems
If the windshield needs to be
replaced and the vehicle is
equipped with a front camera sensor
for the Driver Assistance Systems, a
GM replacement windshield is recommended. The replacement
windshield must be installed
according to GM specifications for
proper alignment. If it is not, these
systems may not work properly, they
may display messages, or they may
not work at all. See your dealer for
proper windshield replacement.
Gas Strut(s)
This vehicle is equipped with gas
strut(s) to provide assistance in
lifting and holding open the hood/
trunk/liftgate system in full open
position.
{Warning
If the gas struts that hold open
the hood, trunk, and/or liftgate fail,
you or others could be seriously
injured. Take the vehicle to your
dealer for service immediately.
Visually inspect the gas struts for
signs of wear, cracks, or other
damage periodically. Check to
make sure the hood/trunk/liftgate
(Continued)
Page 314 of 434
GMC Yukon/Yukon XL/Denali Owner Manual (GMNA-Localizing-U.S./
Canada/Mexico-13566587) - 2020 - CRC - 4/15/19
Vehicle Care 313
2. Disconnect the electricalconnector from the fog lamp
bulb assembly by pressing the
connector release.
3. Turn the bulb counterclockwise to remove it from the housing.
Back-Up Lamps
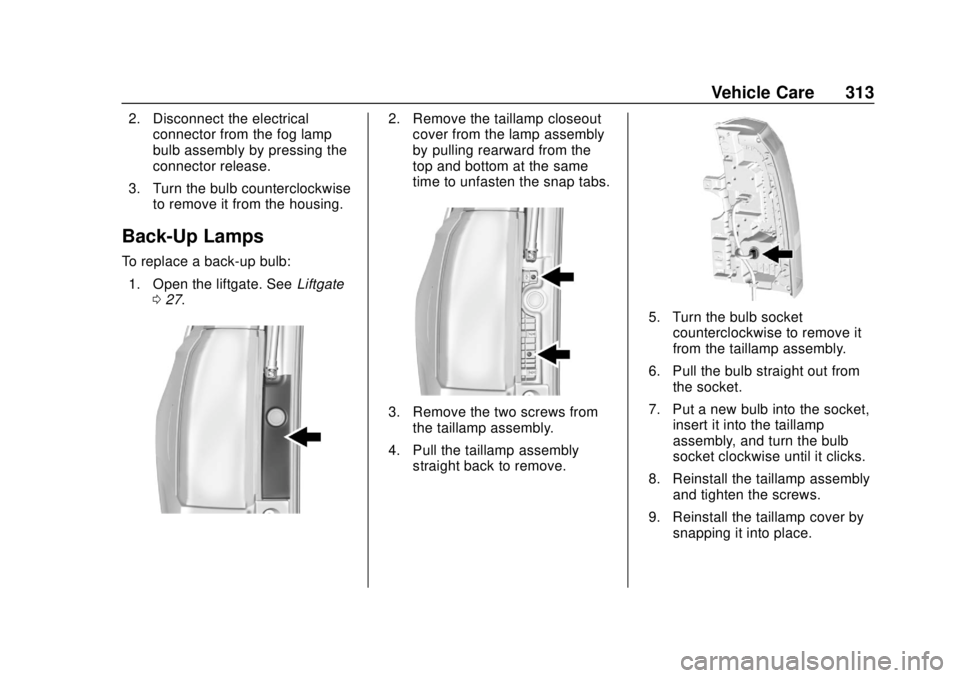
To replace a back-up bulb:
1. Open the liftgate. See Liftgate
0 27.
2. Remove the taillamp closeout
cover from the lamp assembly
by pulling rearward from the
top and bottom at the same
time to unfasten the snap tabs.
3. Remove the two screws from
the taillamp assembly.
4. Pull the taillamp assembly straight back to remove.
5. Turn the bulb socketcounterclockwise to remove it
from the taillamp assembly.
6. Pull the bulb straight out from the socket.
7. Put a new bulb into the socket, insert it into the taillamp
assembly, and turn the bulb
socket clockwise until it clicks.
8. Reinstall the taillamp assembly and tighten the screws.
9. Reinstall the taillamp cover by snapping it into place.
Page 315 of 434
GMC Yukon/Yukon XL/Denali Owner Manual (GMNA-Localizing-U.S./
Canada/Mexico-13566587) - 2020 - CRC - 4/15/19
314 Vehicle Care
License Plate Lamp
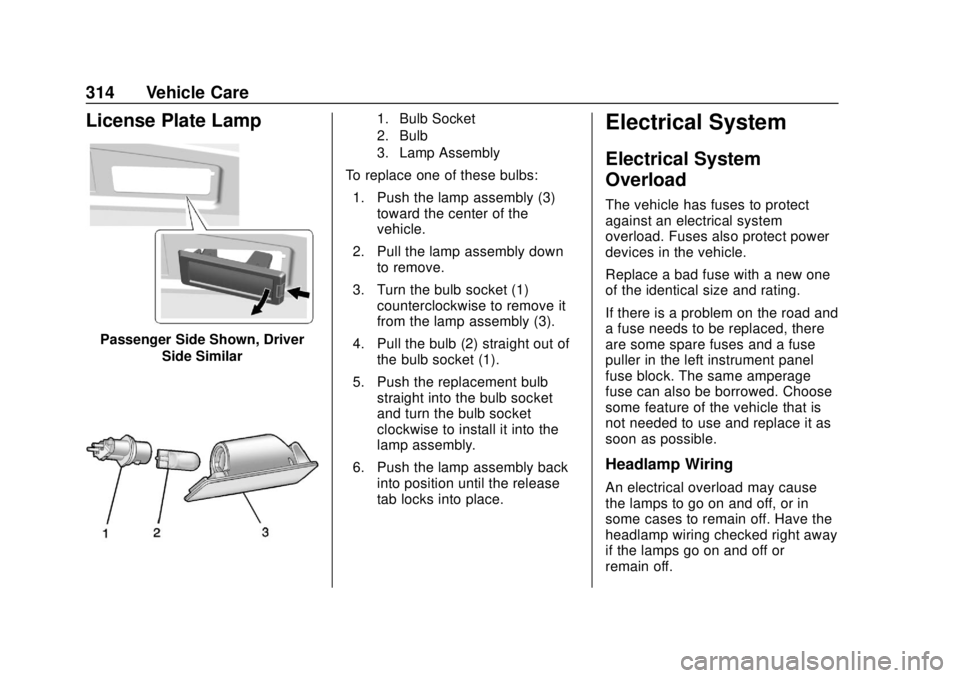
Passenger Side Shown, DriverSide Similar
1. Bulb Socket
2. Bulb
3. Lamp Assembly
To replace one of these bulbs:
1. Push the lamp assembly (3) toward the center of the
vehicle.
2. Pull the lamp assembly down to remove.
3. Turn the bulb socket (1) counterclockwise to remove it
from the lamp assembly (3).
4. Pull the bulb (2) straight out of the bulb socket (1).
5. Push the replacement bulb straight into the bulb socket
and turn the bulb socket
clockwise to install it into the
lamp assembly.
6. Push the lamp assembly back into position until the release
tab locks into place.
Electrical System
Electrical System
Overload
The vehicle has fuses to protect
against an electrical system
overload. Fuses also protect power
devices in the vehicle.
Replace a bad fuse with a new one
of the identical size and rating.
If there is a problem on the road and
a fuse needs to be replaced, there
are some spare fuses and a fuse
puller in the left instrument panel
fuse block. The same amperage
fuse can also be borrowed. Choose
some feature of the vehicle that is
not needed to use and replace it as
soon as possible.
Headlamp Wiring
An electrical overload may cause
the lamps to go on and off, or in
some cases to remain off. Have the
headlamp wiring checked right away
if the lamps go on and off or
remain off.