maint GMC YUKON 2020 Service Manual
[x] Cancel search | Manufacturer: GMC, Model Year: 2020, Model line: YUKON, Model: GMC YUKON 2020Pages: 434, PDF Size: 6.45 MB
Page 270 of 434

GMC Yukon/Yukon XL/Denali Owner Manual (GMNA-Localizing-U.S./
Canada/Mexico-13566587) - 2020 - CRC - 4/15/19
Driving and Operating 269
Vehicle Series Hitch TypeMaximum Tongue
Weight
1500 Weight Carrying 272 kg (600 lb)
1500 Weight Distributing 453 kg (1,000 lb)
The trailer tongue weight contributes
to the Gross Vehicle Weight (GVW).
GVW includes the CURB WEIGHT
of your vehicle, any passengers,
cargo, equipment and the trailer
tongue weight. Vehicle options,
passengers, cargo, and equipment
reduce the maximum allowable
tongue weight the vehicle can carry,
which also reduces the maximum
allowable trailer weight.
Trailer Load Balance
The correct trailer load balance
must be maintained to ensure trailer
stability. Incorrect load balance is a
leading cause of trailer sway.The trailer tongue weight (1) should
be 10–15% of the total loaded trailer
weight (2). Some specific trailer
types, such as boat trailers, fall
outside of this range. Always refer
to the trailer owner ’s manual for the
recommended trailer tongue weight
for each trailer. Never exceed the
maximum loads for your vehicle,
hitch and trailer. The trailer load balance percentage
is calculated as: weight (1) divided
by weight (2) times 100.
After loading the trailer, separately
weigh the trailer and then the trailer
tongue and calculate the trailer load
balance percentage to see if the
weights and distribution are
appropriate for your vehicle. If the
trailer weight is too high, it may be
possible to trasfer some of the
cargo into your vehicle. If the trailer
tongue weight is too high or too low,
it may be possible to rearrange
some of the cargo inside of the
trailer.
Do not exceed the maximum
allowable tongue weight for your
vehicle. Use the shortest hitch
extension available to position the
hitch ball closer to your vehicle. This
will help reduce the effect of the
trailer tongue weight on the trailer
hitch and the rear axle.
If a cargo carrier is used in the
trailer hitch receiver, choose a
carrier that positions the load as
close to the vehicle as possible.
Make sure the total weight,
Page 271 of 434
GMC Yukon/Yukon XL/Denali Owner Manual (GMNA-Localizing-U.S./
Canada/Mexico-13566587) - 2020 - CRC - 4/15/19
270 Driving and Operating
including the carrier, is no more than
half of the maximum allowable
tongue weight for the vehicle or
227 kg (500 lb), whichever is less.
Rear Gross Axle Weight Rating
(GAWR-RR)
The GAWR-RR is the total weight
that can be supported by the rear
axle of the vehicle. Do not exceed
the GAWR-RR for the vehicle, with
the tow vehicle and trailer fully
loaded for the trip including the
weight of the trailer tongue. If using
a weight-distributing hitch, do not
exceed the GAWR-RR before
applying the weight distribution
spring bars.
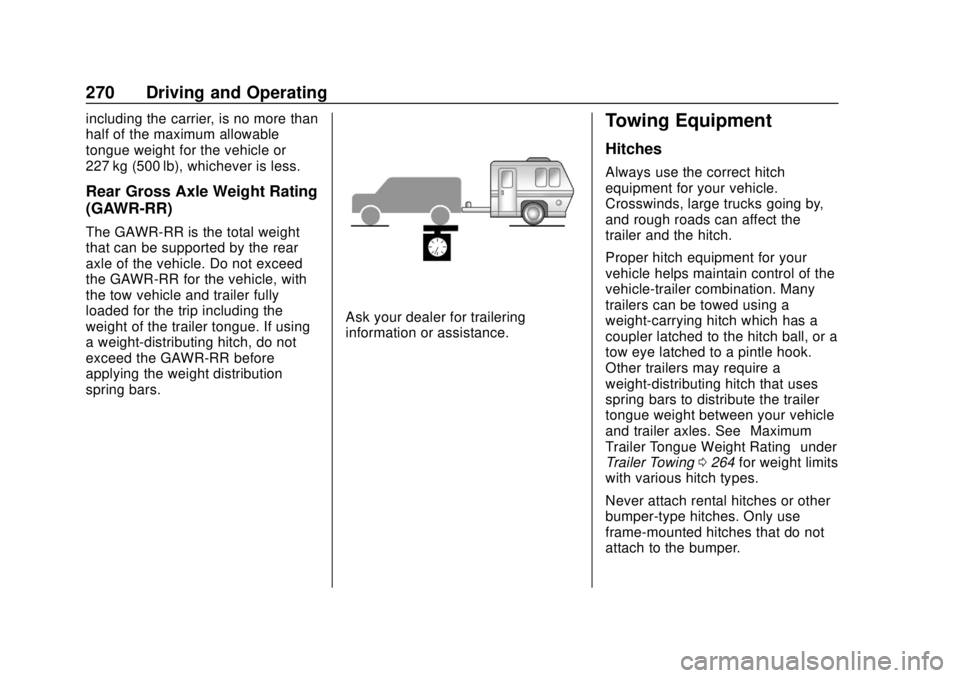
Ask your dealer for trailering
information or assistance.
Towing Equipment
Hitches
Always use the correct hitch
equipment for your vehicle.
Crosswinds, large trucks going by,
and rough roads can affect the
trailer and the hitch.
Proper hitch equipment for your
vehicle helps maintain control of the
vehicle-trailer combination. Many
trailers can be towed using a
weight-carrying hitch which has a
coupler latched to the hitch ball, or a
tow eye latched to a pintle hook.
Other trailers may require a
weight-distributing hitch that uses
spring bars to distribute the trailer
tongue weight between your vehicle
and trailer axles. See“Maximum
Trailer Tongue Weight Rating” under
Trailer Towing 0264 for weight limits
with various hitch types.
Never attach rental hitches or other
bumper-type hitches. Only use
frame-mounted hitches that do not
attach to the bumper.
Page 274 of 434
GMC Yukon/Yukon XL/Denali Owner Manual (GMNA-Localizing-U.S./
Canada/Mexico-13566587) - 2020 - CRC - 4/15/19
Driving and Operating 273
Trailer Brakes
Loaded trailers over 900 kg
(2,000 lb) must be equipped with
brake systems and with brakes for
each axle. Trailer braking equipment
conforming to Canadian Standards
Association (CSA) requirement
CAN3-D313, or its equivalent, is
recommended.
State or local regulations may
require trailers to have their own
braking system if the loaded weight
of the trailer exceeds certain
minimums that can vary from state
to state. Read and follow the
instructions for the trailer brakes so
they are installed, adjusted, and
maintained properly. Never attempt
to tap into your vehicle's hydraulic
brake system. If you do, both the
vehicle anti-lock brakes and the
trailer brakes may not function,
which could result in a crash.
Trailer Wiring Harness
The seven-pin trailer connector is
mounted in the bumper. This
connector can be plugged into aseven-pin universal heavy-duty
trailer connector available through
your dealer.
Use only a round, seven-wire
connector with flat blade terminals
meeting SAE J2863 specifications
for proper electrical connectivity.
The seven-wire harness contains
the following trailer circuits:
.
Yellow/Grey: Left Stop/Turn
Signal
. Green/Violet: Right Stop/Turn
Signal
. Grey/Brown: Taillamps
. White: Ground
. White/Green: Back-up Lamps
. Red/Green: Battery Feed
. Dark Blue: Trailer Brake
To help charge a remote
(non-vehicle) battery, press the Tow/
Haul Mode button at the end of the
shift lever. If the trailer is too light for
Tow/Haul Mode, turn on the
headlamps to help charge the
battery.
Electric Brake Control Wiring
Provisions
These wiring provisions are
included with the vehicle as part of
the trailer wiring package. These
provisions are for an electric brake
controller.
The harness should be installed by
your dealer or a qualified service
center.
Refer to the aftermarket electric
trailer brake controller owner's
manual to determine wire color
coding of the electric trailer brake
controller. The wire colors on the
brake controller may be different
from the vehicle.
Trailer Lamps
Always check all trailer lamps are
working at the beginning of each
trip, and periodically on longer trips.
Turn Signals When Towing a
Trailer
When properly connected, the trailer
turn signals should will illuminate to
indicate the vehicle is turning,
Page 281 of 434

GMC Yukon/Yukon XL/Denali Owner Manual (GMNA-Localizing-U.S./
Canada/Mexico-13566587) - 2020 - CRC - 4/15/19
280 Driving and Operating
Always know the maximum speed
rating for the trailer tires before
driving. This may be significantly
lower than the vehicle tire speed
rating. The speed rating may be on
the trailer tire sidewall. If the speed
rating is not shown, the default
trailer tire speed rating is 105 km/h
(65 mph).Conversions and
Add-Ons
Add-On Electrical
Equipment
{Warning
The Data Link Connector (DLC) is
used for vehicle service and
Emission Inspection/Maintenance
testing. SeeMalfunction Indicator
Lamp (Check Engine Light) 0136
. A device connected to the DLC
— such as an aftermarket fleet or
driver-behavior tracking device —
may interfere with vehicle
systems. This could affect vehicle
operation and cause a crash.
Such devices may also access
information stored in the vehicle’s
systems.
Caution
Some electrical equipment can
damage the vehicle or cause
components to not work and
would not be covered by the
vehicle warranty. Always check
with your dealer before adding
electrical equipment.
Add-on equipment can drain the
vehicle's 12-volt battery, even if the
vehicle is not operating.
The vehicle has an airbag system.
Before attempting to add anything
electrical to the vehicle, see
Servicing the Airbag-Equipped
Vehicle 084 and
Adding Equipment to the
Airbag-Equipped Vehicle 084.
Page 285 of 434
GMC Yukon/Yukon XL/Denali Owner Manual (GMNA-Localizing-U.S./
Canada/Mexico-13566587) - 2020 - CRC - 4/15/19
284 Vehicle Care
If equipped with remote vehicle
start, open the hood before
performing any service work to
prevent remote starting the vehicle
accidentally. SeeRemote Vehicle
Start 023.
Keep a record with all parts receipts
and list the mileage and the date of
any service work performed. See
Maintenance Records 0391.
Caution
Even small amounts of
contamination can cause damage
to vehicle systems. Do not allow
contaminants to contact the fluids,
reservoir caps, or dipsticks.
Hood
{Warning
Turn the vehicle off before
opening the hood. If the engine is
running with the hood open, you
or others could be injured.
{Warning
Components under the hood can
get hot from running the engine.
To help avoid the risk of burning
unprotected skin, never touch
these components until they have
cooled, and always use a glove or
towel to avoid direct skin contact.
Clear any snow from the hood
before opening. To open the hood:
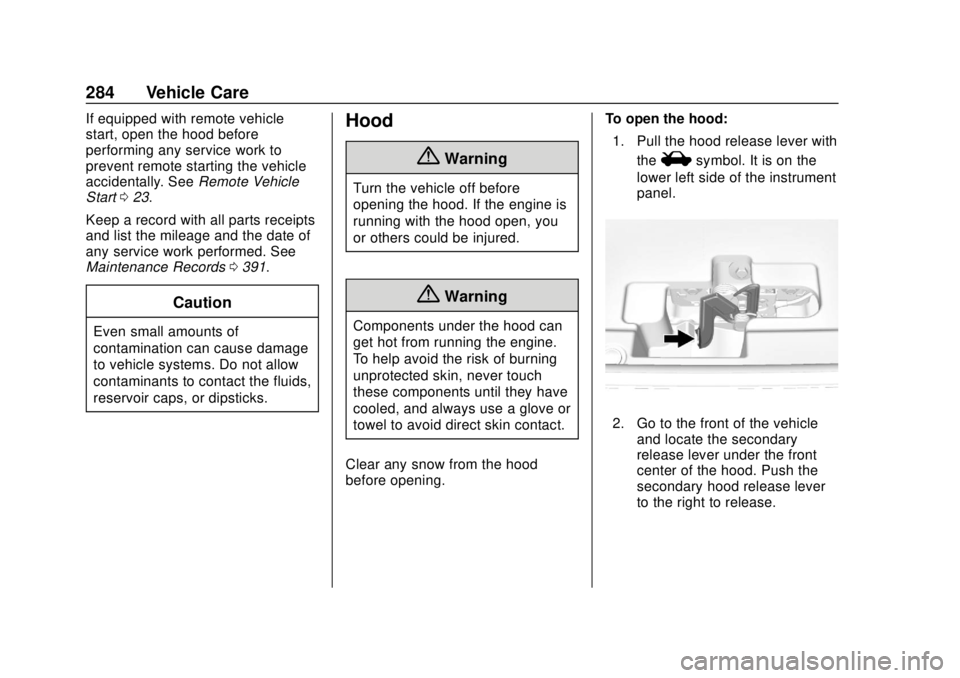
1. Pull the hood release lever with the
isymbol. It is on the
lower left side of the instrument
panel.
2. Go to the front of the vehicle and locate the secondary
release lever under the front
center of the hood. Push the
secondary hood release lever
to the right to release.
Page 290 of 434
GMC Yukon/Yukon XL/Denali Owner Manual (GMNA-Localizing-U.S./
Canada/Mexico-13566587) - 2020 - CRC - 4/15/19
Vehicle Care 289
1. Positive (+) Terminal. SeeJump Starting - North America
0360.
2. Battery - North America 0305.
3. Coolant Surge Tank and Pressure Cap. See Cooling
System 0297.
4. Engine Air Cleaner/Filter 0296.
5. Remote Negative (–) Location (Out of View). See Jump
Starting - North America 0360.
6. Engine Cooling Fans (Out of View). See Cooling System
0 297.
7. Engine Oil Fill Cap. See “When
to Add Engine Oil” under
Engine Oil 0289.
8. Engine Oil Dipstick. See “Checking Engine Oil” under
Engine Oil 0289.
9. Windshield Washer Fluid Reservoir. See “Adding Washer
Fluid” under Washer Fluid
0 302.
10. Brake Fluid Reservoir. See Brake Fluid 0304. 11.
Engine Compartment Fuse
Block 0315.
Engine Oil
To ensure proper engine
performance and long life, careful
attention must be paid to engine oil.
Following these simple, but
important steps will help protect
your investment:
.
Use engine oil approved to the
proper specification and of the
proper viscosity grade. See
“Selecting the Right Engine Oil”
in this section.
. Check the engine oil level
regularly and maintain the
proper oil level. See “Checking
Engine Oil” and“When to Add
Engine Oil” in this section.
. Change the engine oil at the
appropriate time. See Engine Oil
Life System 0291.
. Always dispose of engine oil
properly. See “What to Do with
Used Oil” in this section.
Checking Engine Oil
If equipped, the ENGINE OIL LOW
ADD OIL message displays when
the engine oil level may be too low.
Check the oil level before filling to
the recommended level. If the oil is
not low and this message remains
on, see your dealer.
Check the engine oil level regularly,
every 650 km (400 mi), especially
prior to a long trip. The engine oil
dipstick handle is a loop. See
Engine Compartment Overview
0286 for the location.
{Warning
The engine oil dipstick handle
may be hot; it could burn you.
Use a towel or glove to touch the
dipstick handle.
Follow these guidelines:
. To get an accurate reading, park
the vehicle on level ground.
Check the engine oil level after
the engine has been off for at
least two hours. Checking the
Page 294 of 434
GMC Yukon/Yukon XL/Denali Owner Manual (GMNA-Localizing-U.S./
Canada/Mexico-13566587) - 2020 - CRC - 4/15/19
Vehicle Care 293
Caution (Continued)
automatic transmission fluid. See
Recommended Fluids and
Lubricants0388.
Change the fluid and filter at the
scheduled maintenance intervals
listed in Maintenance Schedule
0 379. Be sure to use the
transmission fluid listed in
Recommended Fluids and
Lubricants 0388.
How to Check Automatic
Transmission Fluid
Caution
Too much or too little fluid can
damage the transmission. Too
much can mean that some of the
fluid could come out and fall on
hot engine parts or exhaust
system parts, starting a fire. Too
little fluid could cause the (Continued)
Caution (Continued)
transmission to overheat. Be sure
to get an accurate reading if
checking the transmission fluid.
Before checking the fluid level,
prepare the vehicle: 1. Start the engine and park the vehicle on a level surface.
Keep the engine running.
2. Apply the parking brake and place the shift lever in P (Park).
3. With your foot on the brake pedal, move the shift lever
through each gear range,
pausing for about
three seconds in each range.
Then, move the shift lever back
to P (Park).
4. Allow the engine to idle (500– 800 rpm) for at least
one minute. Slowly release the
brake pedal.
5. Keep the engine running and check the transmission fluid
temperature on the Driver Information Center (DIC). See
Driver Information Center (DIC)
0
144.
6. Using the transmission fluid temperature reading, determine
and perform the appropriate
check procedure. If the
transmission fluid temperature
reading is not within the
required temperature ranges,
allow the vehicle to cool,
or operate the vehicle until the
appropriate transmission fluid
temperature is reached.
Cold Check Procedure
Use this procedure only as a
reference to determine if the
transmission has enough fluid to be
operated safely until a hot check
procedure can be made. The hot
check procedure is the most
accurate method to check the fluid
level. Perform the hot check
procedure at the first opportunity.
Use this cold check procedure to
check fluid level when the
transmission temperature is
between 27 °C and 32 °C (80 °F and
90 °F).
Page 296 of 434
GMC Yukon/Yukon XL/Denali Owner Manual (GMNA-Localizing-U.S./
Canada/Mexico-13566587) - 2020 - CRC - 4/15/19
Vehicle Care 295
2. Flip the handle up, then pull outthe dipstick and wipe it with a
clean rag or paper towel.
3. Install the dipstick by pushing it back in all the way; wait
three seconds, and then pull it
back out again.
4. Check both sides of the dipstick and read the lower
level. Repeat the check
procedure to verify the reading.
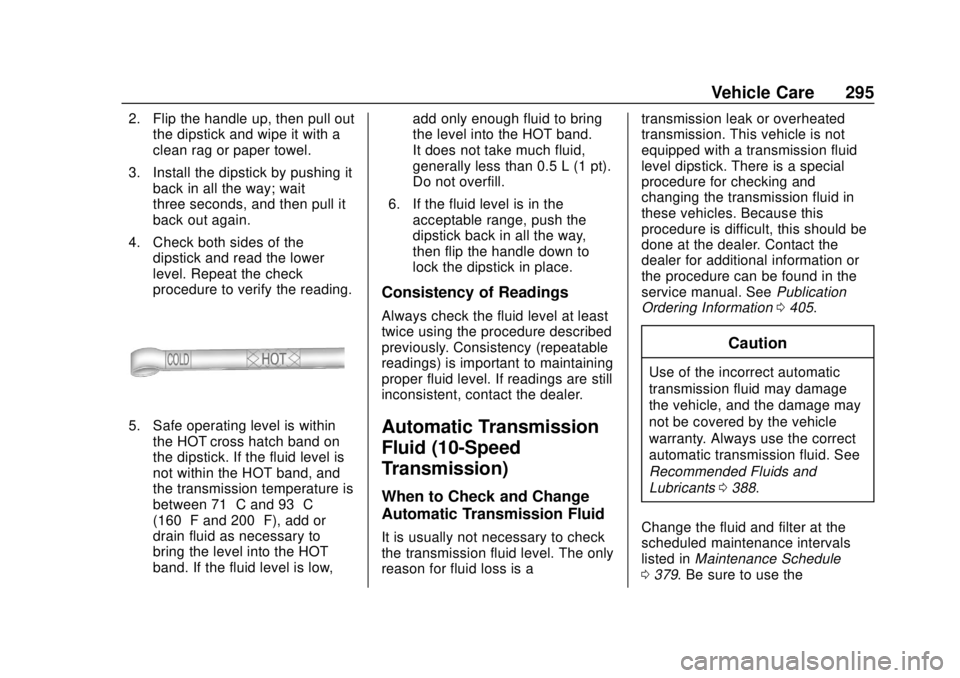
5. Safe operating level is within
the HOT cross hatch band on
the dipstick. If the fluid level is
not within the HOT band, and
the transmission temperature is
between 71 °C and 93 °C
(160 °F and 200 °F), add or
drain fluid as necessary to
bring the level into the HOT
band. If the fluid level is low, add only enough fluid to bring
the level into the HOT band.
It does not take much fluid,
generally less than 0.5 L (1 pt).
Do not overfill.
6. If the fluid level is in the acceptable range, push the
dipstick back in all the way,
then flip the handle down to
lock the dipstick in place.
Consistency of Readings
Always check the fluid level at least
twice using the procedure described
previously. Consistency (repeatable
readings) is important to maintaining
proper fluid level. If readings are still
inconsistent, contact the dealer.
Automatic Transmission
Fluid (10-Speed
Transmission)
When to Check and Change
Automatic Transmission Fluid
It is usually not necessary to check
the transmission fluid level. The only
reason for fluid loss is a transmission leak or overheated
transmission. This vehicle is not
equipped with a transmission fluid
level dipstick. There is a special
procedure for checking and
changing the transmission fluid in
these vehicles. Because this
procedure is difficult, this should be
done at the dealer. Contact the
dealer for additional information or
the procedure can be found in the
service manual. See
Publication
Ordering Information 0405.
Caution
Use of the incorrect automatic
transmission fluid may damage
the vehicle, and the damage may
not be covered by the vehicle
warranty. Always use the correct
automatic transmission fluid. See
Recommended Fluids and
Lubricants 0388.
Change the fluid and filter at the
scheduled maintenance intervals
listed in Maintenance Schedule
0 379. Be sure to use the
Page 297 of 434
GMC Yukon/Yukon XL/Denali Owner Manual (GMNA-Localizing-U.S./
Canada/Mexico-13566587) - 2020 - CRC - 4/15/19
296 Vehicle Care
transmission fluid listed in
Recommended Fluids and
Lubricants0388.
Engine Air Cleaner/Filter
See Engine Compartment Overview
0 286 for the location of the engine
air cleaner/filter.
When to Inspect the Engine Air
Cleaner/Filter
For intervals on changing and
inspecting the engine air cleaner/
filter, see Maintenance Schedule
0 379.
How to Inspect the Engine Air
Cleaner/Filter
Do not start the engine or have the
engine running with the engine air
cleaner/filter housing open. Before
removing the engine air cleaner/
filter, make sure that the engine air
cleaner/filter housing and nearby
components are free of dirt and
debris. Remove the engine air
cleaner/filter. Lightly tap and shake
the engine air cleaner/filter (away
from the vehicle), to release loose dust and dirt. Inspect the engine air
cleaner/filter for damage, and
replace if damaged. Do not clean
the engine air cleaner/filter or
components with water or
compressed air.
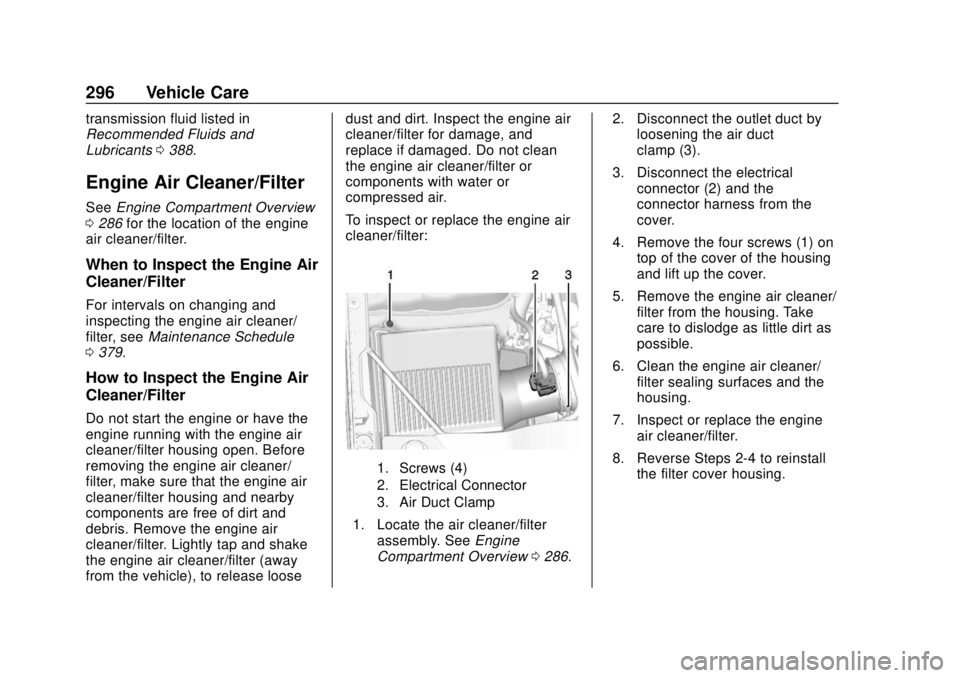
To inspect or replace the engine air
cleaner/filter:
1. Screws (4)
2. Electrical Connector
3. Air Duct Clamp
1. Locate the air cleaner/filter
assembly. See Engine
Compartment Overview 0286. 2. Disconnect the outlet duct by
loosening the air duct
clamp (3).
3. Disconnect the electrical connector (2) and the
connector harness from the
cover.
4. Remove the four screws (1) on top of the cover of the housing
and lift up the cover.
5. Remove the engine air cleaner/ filter from the housing. Take
care to dislodge as little dirt as
possible.
6. Clean the engine air cleaner/ filter sealing surfaces and the
housing.
7. Inspect or replace the engine air cleaner/filter.
8. Reverse Steps 2-4 to reinstall the filter cover housing.
Page 298 of 434
GMC Yukon/Yukon XL/Denali Owner Manual (GMNA-Localizing-U.S./
Canada/Mexico-13566587) - 2020 - CRC - 4/15/19
Vehicle Care 297
{Warning
Operating the engine with the air
cleaner/filter off can cause you or
others to be burned. Use caution
when working on the engine. Do
not start the engine or drive the
vehicle with the air cleaner/filter
off, as flames may be present if
the engine backfires.
Caution
If the air cleaner/filter is off, dirt
can easily get into the engine,
which could damage it. Always
have the air cleaner/filter in place
when driving.
Cooling System
The cooling system allows the
engine to maintain the correct
working temperature.
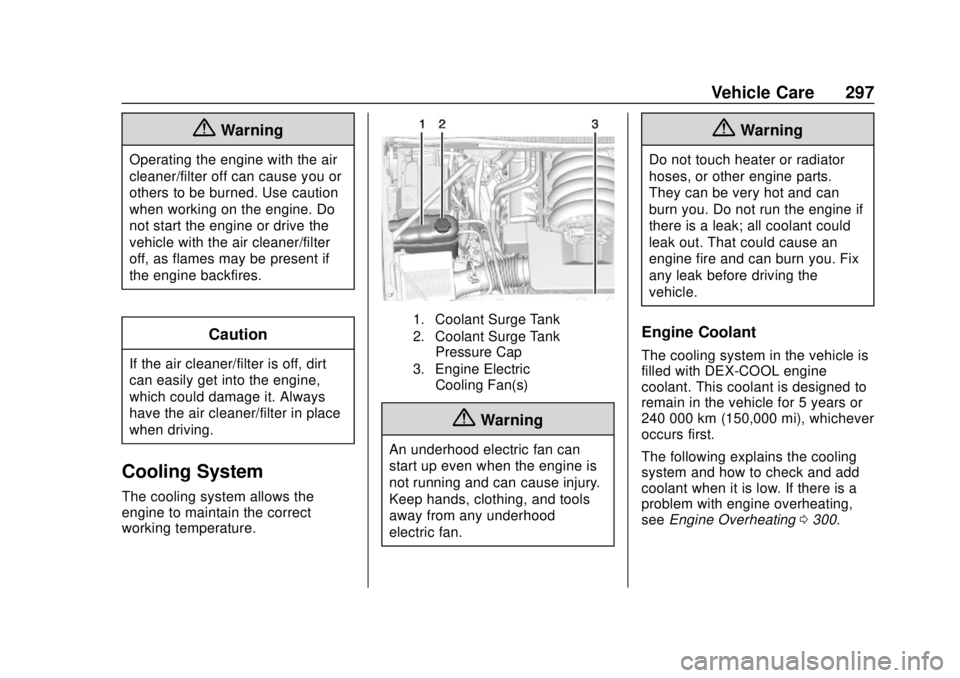
1. Coolant Surge Tank
2. Coolant Surge TankPressure Cap
3. Engine Electric Cooling Fan(s)
{Warning
An underhood electric fan can
start up even when the engine is
not running and can cause injury.
Keep hands, clothing, and tools
away from any underhood
electric fan.
{Warning
Do not touch heater or radiator
hoses, or other engine parts.
They can be very hot and can
burn you. Do not run the engine if
there is a leak; all coolant could
leak out. That could cause an
engine fire and can burn you. Fix
any leak before driving the
vehicle.
Engine Coolant
The cooling system in the vehicle is
filled with DEX-COOL engine
coolant. This coolant is designed to
remain in the vehicle for 5 years or
240 000 km (150,000 mi), whichever
occurs first.
The following explains the cooling
system and how to check and add
coolant when it is low. If there is a
problem with engine overheating,
see Engine Overheating 0300.