air filter GMC YUKON 2022 Owners Manual
[x] Cancel search | Manufacturer: GMC, Model Year: 2022, Model line: YUKON, Model: GMC YUKON 2022Pages: 422, PDF Size: 8.2 MB
Page 126 of 422

GMC Yukon/Yukon XL/Denali Owner Manual (GMNA-Localizing-U.S./
Canada/Mexico-15555988) - 2022 - CRC - 12/3/21
Instruments and Controls 125
Press the thumbwheel while this display is
active to reset the values.
Timer :To start the timer, press the
thumbwheel while this display is active. The
display will show the amount of time that
has passed since the timer was last reset. To
stop the timer, press the thumbwheel
briefly while this display is active and the
timer is running.
Press the thumbwheel while this display is
active to reset the timer.
Tire Pressure : Shows the approximate
pressures of all four tires. Tire pressure is
displayed in either kilopascal (kPa) or in
pounds per square inch (psi). If the pressure
is low, the value for that tire is shown in
amber. See Tire Pressure Monitor System
0 336 and
Tire Pressure Monitor Operation 0337.
Fuel Economy : Displays average fuel
economy, the best fuel economy over the
selected distance, and a bar graph showing
instantaneous fuel economy.
Press the thumbwheel to change the
selected distance. Press and hold the
thumbwheel while this display is active to reset the best fuel economy and average
fuel economy. This display can also be reset
by selecting Reset in the menu.
Driver Assistance :
If equipped, shows
information for Adaptive Cruise Control
(ACC), Lane Keep Assist (LKA), Forward
Collision Alert (FCA), and Follow Distance
Indicator(FDI).
Oil Life : Shows an estimate of the
remaining oil life. If REMAINING OIL LIFE
99% is displayed, that means 99% of the
current oil life remains.
When the remaining oil life is low, the
CHANGE ENGINE OIL SOON message will
appear on the display. The oil should be
changed as soon as possible. See Engine Oil
0 302. In addition to the engine oil life
system monitoring the oil life, additional
maintenance is recommended. See
Maintenance Schedule 0374.
The Oil Life display must be reset after each
oil change. It will not reset itself. Do not
reset the Oil Life display at any time other
than when the oil has just been changed.
It cannot be reset accurately until the next
oil change. To reset, see Engine Oil Life
System 0304. Brake Pad Life :
Displays an estimate of the
remaining life of the front and rear brake
pads. Messages will display based on brake
pad wear and the state of the system. Reset
the Brake Pad Life display after replacing the
brake pads. See Brake Pad Life System 0312.
Air Filter Life : Shows an estimate of the
remaining engine air filter’s life and the
state of the system. Engine Air Filter Life
95% means 95% of the current air filter life
remains. Messages will display based on the
engine air filter life and the state of the
system. When the REPLACE SOON message
displays, the engine air filter should be
replaced at the earliest convenience.
The Air Filter Life display must be reset after
the engine air filter replacement. To reset,
see Engine Air Filter Life System 0305.
Trailer Brake : On vehicles with the
Integrated Trailer Brake Control (ITBC)
system, the trailer brake display appears in
the DIC.
TRAILER GAIN shows the trailer gain setting.
This setting can be adjusted from 0.0 to 10.0
with either a trailer connected or
disconnected.
Page 179 of 422
GMC Yukon/Yukon XL/Denali Owner Manual (GMNA-Localizing-U.S./
Canada/Mexico-15555988) - 2022 - CRC - 12/3/21
178 Infotainment System
Manage Settings or Teen Driver Settings
Depending on the options of your vehicle,
the following menu items may be displayed:
Buckle to Drive :When turned ON, Buckle to
Drive prevents the driver from shifting out
of P (Park) for a period of time after the
brake pedal is pressed if driver, or on some
vehicles the detected passenger, has not
buckled their seat belt. On some vehicles,
Buckle to Drive is always ON when Teen
Driver is active and is not configurable. See
Buckle To Drive 054.
Audio Volume Limit : Allows a maximum
audio volume to be set. Turn the audio
volume limit on or off. Use the arrows to
choose the maximum allowable level for the
audio volume. On some infotainment
systems, touch Set Audio Volume Limit to
choose the maximum allowable audio
volume level.
Set Audio Volume Limit : Use the arrows to
choose the maximum allowable level for the
audio volume.
Teen Driver Speed Limiter : Limits the
maximum speed of the vehicle. When the
speed limiter is turned on and the vehicle is started with a Teen Driver key, the DIC
displays a message that the top speed is
limited.
On certain vehicles, when the Speed Limiter
is turned ON, the vehicle’s maximum
acceleration will be limited. The DIC will
display a message that the acceleration is
limited.
Teen Driver Speed Warning :
Displays a
warning in the DIC when exceeding a
selectable speed. Turn the speed warning on
or off and choose the desired speed warning
level. The speed warning does not limit the
speed of the vehicle. On some infotainment
systems, touch Set Teen Driver Speed
Warning to set the warning speed.
Set Teen Driver Speed Warning : Choose the
desired speed warning level. The speed
warning does not limit the speed of the
vehicle.
SiriusXM Explicit Content Filter (if
equipped) : Allows the SiriusXM Explicit
Content Filter to be turned ON or OFF.
When ON, the teen driver will not be able
to listen to SiriusXM stations that contain
explicit content, and the Explicit Content
Filter selection in the Audio Settings will be
unavailable for change. When Teen Driver is Active:
.The radio will mute when the driver seat
belt, and in some vehicles the front
passenger seat belt, is not buckled. The
audio from any device paired to the
vehicle will also be muted.
.An object placed on the front passenger
seat, such as a briefcase, handbag,
grocery bag, laptop, or other electronic
device, could cause the passenger sensing
system to falsely sense an unbuckled
front passenger and mute the radio.
If this happens, remove the object from
the seat. See
Passenger Sensing System
0 66.
.Some safety systems, such as Automatic
Emergency Braking, if equipped, cannot
be turned off.
.The gap setting for Adaptive Cruise
Control and the alert timing setting for
Forward Collision Alert, if equipped,
cannot be changed.
.When trying to change a safety feature
that is not configurable in Teen Driver,
the DIC displays a message indicating
that Teen Driver is active and the action
is not available.
.Super Cruise, if equipped, is not available.
Page 183 of 422
GMC Yukon/Yukon XL/Denali Owner Manual (GMNA-Localizing-U.S./
Canada/Mexico-15555988) - 2022 - CRC - 12/3/21
182 Climate Controls
Climate Controls
Climate Control Systems
Dual Automatic Climate ControlSystem . . . . . . . . . . . . . . . . . . . . . . . . . . . . . . 182
Rear Climate Control System . . . . . . . . . . 185
Air Vents
Air Vents . . . . . . . . . . . . . . . . . . . . . . . . . . . . . . 186
Maintenance
Passenger Compartment Air Filter . . . . . 187
Service . . . . . . . . . . . . . . . . . . . . . . . . . . . . . . . . 189
Climate Control Systems
Dual Automatic Climate Control System
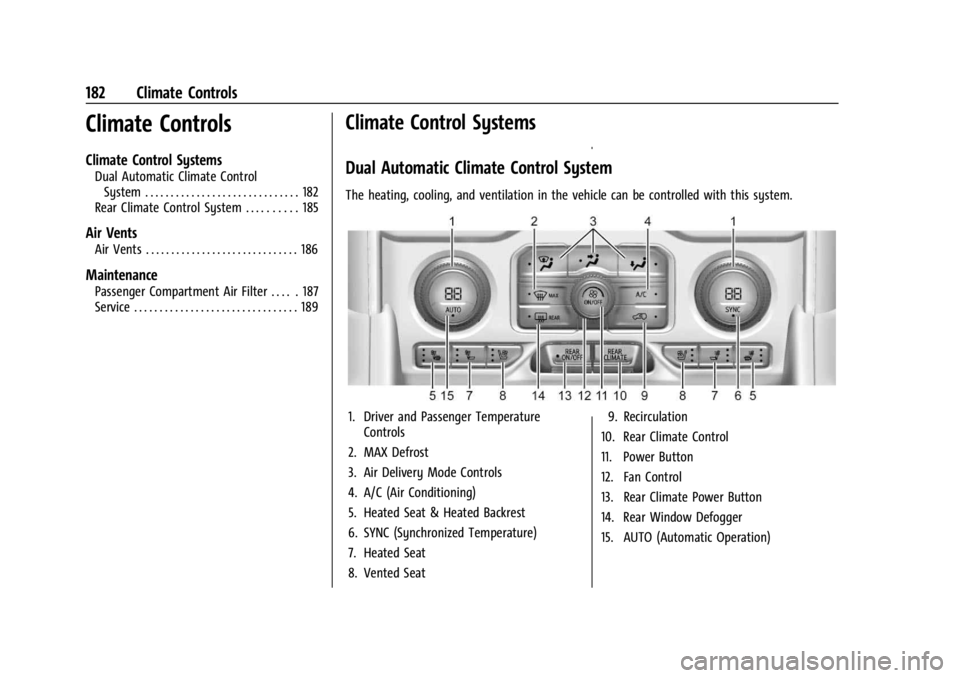
The heating, cooling, and ventilation in the vehicle can be controlled with this system.
1. Driver and Passenger Temperature Controls
2. MAX Defrost
3. Air Delivery Mode Controls
4. A/C (Air Conditioning)
5. Heated Seat & Heated Backrest
6. SYNC (Synchronized Temperature)
7. Heated Seat
8. Vented Seat 9. Recirculation
10. Rear Climate Control
11. Power Button
12. Fan Control
13. Rear Climate Power Button
14. Rear Window Defogger
15. AUTO (Automatic Operation)
Page 188 of 422
GMC Yukon/Yukon XL/Denali Owner Manual (GMNA-Localizing-U.S./
Canada/Mexico-15555988) - 2022 - CRC - 12/3/21
Climate Controls 187
Denali is shown, Yukon/Yukon XL is similar
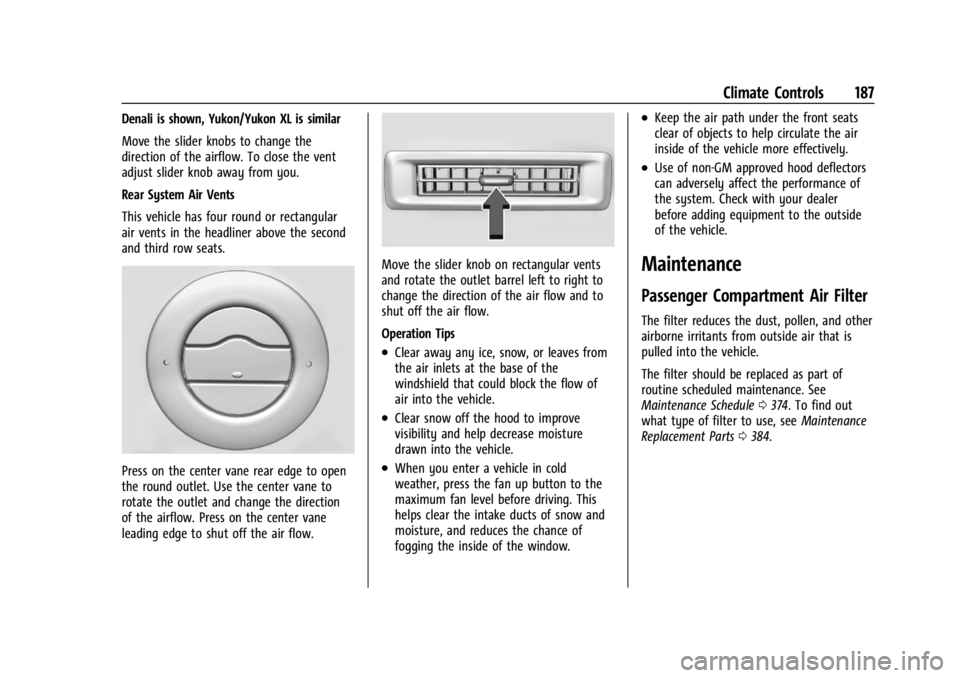
Move the slider knobs to change the
direction of the airflow. To close the vent
adjust slider knob away from you.
Rear System Air Vents
This vehicle has four round or rectangular
air vents in the headliner above the second
and third row seats.
Press on the center vane rear edge to open
the round outlet. Use the center vane to
rotate the outlet and change the direction
of the airflow. Press on the center vane
leading edge to shut off the air flow.
Move the slider knob on rectangular vents
and rotate the outlet barrel left to right to
change the direction of the air flow and to
shut off the air flow.
Operation Tips
.Clear away any ice, snow, or leaves from
the air inlets at the base of the
windshield that could block the flow of
air into the vehicle.
.Clear snow off the hood to improve
visibility and help decrease moisture
drawn into the vehicle.
.When you enter a vehicle in cold
weather, press the fan up button to the
maximum fan level before driving. This
helps clear the intake ducts of snow and
moisture, and reduces the chance of
fogging the inside of the window.
.Keep the air path under the front seats
clear of objects to help circulate the air
inside of the vehicle more effectively.
.Use of non-GM approved hood deflectors
can adversely affect the performance of
the system. Check with your dealer
before adding equipment to the outside
of the vehicle.
Maintenance
Passenger Compartment Air Filter
The filter reduces the dust, pollen, and other
airborne irritants from outside air that is
pulled into the vehicle.
The filter should be replaced as part of
routine scheduled maintenance. See
Maintenance Schedule0374. To find out
what type of filter to use, see Maintenance
Replacement Parts 0384.
Page 189 of 422
GMC Yukon/Yukon XL/Denali Owner Manual (GMNA-Localizing-U.S./
Canada/Mexico-15555988) - 2022 - CRC - 12/3/21
188 Climate Controls
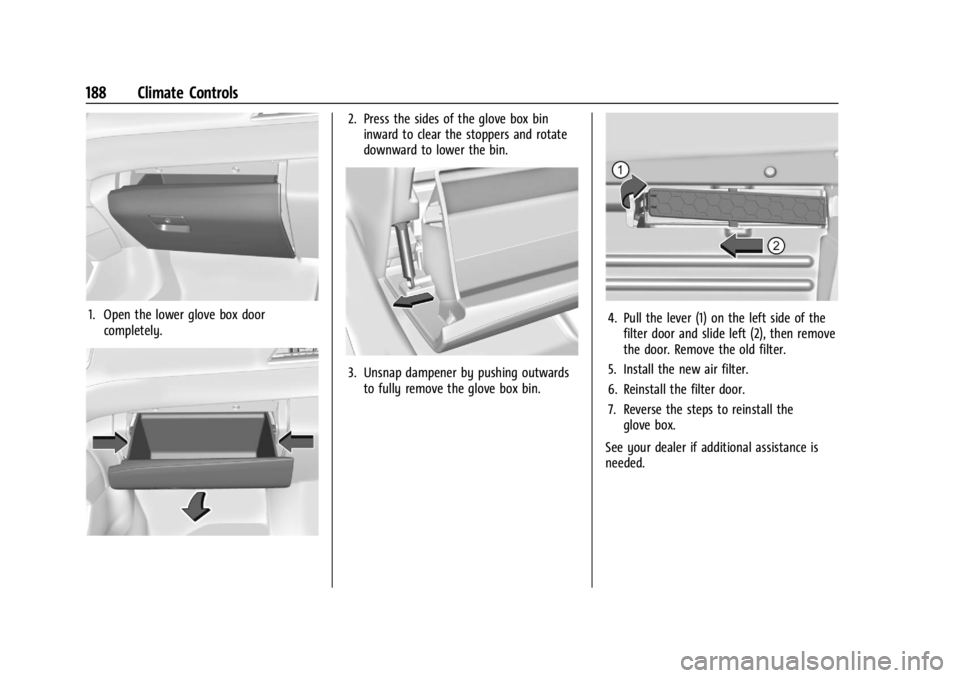
1. Open the lower glove box doorcompletely.
2. Press the sides of the glove box bininward to clear the stoppers and rotate
downward to lower the bin.
3. Unsnap dampener by pushing outwardsto fully remove the glove box bin.
4. Pull the lever (1) on the left side of thefilter door and slide left (2), then remove
the door. Remove the old filter.
5. Install the new air filter.
6. Reinstall the filter door.
7. Reverse the steps to reinstall the glove box.
See your dealer if additional assistance is
needed.
Page 296 of 422
GMC Yukon/Yukon XL/Denali Owner Manual (GMNA-Localizing-U.S./
Canada/Mexico-15555988) - 2022 - CRC - 12/3/21
Vehicle Care 295
Vehicle Care
General Information
General Information . . . . . . . . . . . . . . . . . . . 296
California Perchlorate MaterialsRequirements . . . . . . . . . . . . . . . . . . . . . . . 296
Accessories and Modifications . . . . . . . . . 296
Vehicle Checks
Doing Your Own Service Work . . . . . . . . 297
Hood . . . . . . . . . . . . . . . . . . . . . . . . . . . . . . . . . . 297
Engine Compartment Overview . . . . . . . 299
Engine Oil . . . . . . . . . . . . . . . . . . . . . . . . . . . . . 302
Engine Oil Life System . . . . . . . . . . . . . . . . 304
Automatic Transmission Fluid . . . . . . . . . 305
Engine Air Filter Life System . . . . . . . . . . 305
Engine Air Cleaner/Filter . . . . . . . . . . . . . . 305
Cooling System . . . . . . . . . . . . . . . . . . . . . . . 306
Engine Overheating . . . . . . . . . . . . . . . . . . . 309
Engine Fan . . . . . . . . . . . . . . . . . . . . . . . . . . . . . 311
Washer Fluid . . . . . . . . . . . . . . . . . . . . . . . . . . . 311
Brakes . . . . . . . . . . . . . . . . . . . . . . . . . . . . . . . . . 311
Brake Pad Life System . . . . . . . . . . . . . . . . . 312
Brake Fluid . . . . . . . . . . . . . . . . . . . . . . . . . . . . . 313
Battery - North America . . . . . . . . . . . . . . . 314
Four-Wheel Drive . . . . . . . . . . . . . . . . . . . . . . 314
Front Axle . . . . . . . . . . . . . . . . . . . . . . . . . . . . . 315
Rear Axle . . . . . . . . . . . . . . . . . . . . . . . . . . . . . . 315
Park Brake and P (Park) Mechanism Check . . . . . . . . . . . . . . . . . . . . . . . . . . . . . . . . 315 Wiper Blade Replacement . . . . . . . . . . . . . 316
Glass Replacement . . . . . . . . . . . . . . . . . . . . . 317
Windshield Replacement . . . . . . . . . . . . . . . 317
Gas Strut(s) . . . . . . . . . . . . . . . . . . . . . . . . . . . . 317
Headlamp Aiming
Front Headlamp Aiming . . . . . . . . . . . . . . . 318
Bulb Replacement
LED Lighting . . . . . . . . . . . . . . . . . . . . . . . . . . . 318
Electrical System
Electrical System Overload . . . . . . . . . . . . . 318
Fuses and Circuit Breakers . . . . . . . . . . . . . 320
Engine Compartment Fuse Block . . . . . . 320
Instrument Panel Fuse Block . . . . . . . . . . . 324
Rear Compartment Fuse Block . . . . . . . . . 326
Wheels and Tires
Tires . . . . . . . . . . . . . . . . . . . . . . . . . . . . . . . . . . . 328
All-Season Tires . . . . . . . . . . . . . . . . . . . . . . . 329
Winter Tires . . . . . . . . . . . . . . . . . . . . . . . . . . . 329
Low-Profile Tires . . . . . . . . . . . . . . . . . . . . . . . 329
All-Terrain Tires . . . . . . . . . . . . . . . . . . . . . . . 329
Tire Sidewall Labeling . . . . . . . . . . . . . . . . . 330
Tire Designations . . . . . . . . . . . . . . . . . . . . . . 331
Tire Terminology and Definitions . . . . . . 331
Tire Pressure . . . . . . . . . . . . . . . . . . . . . . . . . . 333
Tire Pressure for High-Speed
Operation . . . . . . . . . . . . . . . . . . . . . . . . . . . . 335
Tire Pressure Monitor System . . . . . . . . . 336
Tire Pressure Monitor Operation . . . . . . . 337 Tire Inspection . . . . . . . . . . . . . . . . . . . . . . . . 339
Tire Rotation . . . . . . . . . . . . . . . . . . . . . . . . . . 339
When It Is Time for New Tires . . . . . . . . 340
Buying New Tires . . . . . . . . . . . . . . . . . . . . . . 341
Different Size Tires and Wheels . . . . . . . 342
Uniform Tire Quality Grading . . . . . . . . . 343
Wheel Alignment and Tire Balance . . . . 344
Wheel Replacement . . . . . . . . . . . . . . . . . . . 344
Tire Chains . . . . . . . . . . . . . . . . . . . . . . . . . . . . 345
If a Tire Goes Flat . . . . . . . . . . . . . . . . . . . . . 345
Tire Changing . . . . . . . . . . . . . . . . . . . . . . . . . 346
Full-Size Spare Tire . . . . . . . . . . . . . . . . . . . . 356
Jump Starting
Jump Starting - North America . . . . . . . . 357
Towing the Vehicle
Towing the Vehicle . . . . . . . . . . . . . . . . . . . 360
Recreational Vehicle Towing . . . . . . . . . . . 361
Appearance Care
Exterior Care . . . . . . . . . . . . . . . . . . . . . . . . . . 364
Interior Care . . . . . . . . . . . . . . . . . . . . . . . . . . 368
Floor Mats . . . . . . . . . . . . . . . . . . . . . . . . . . . . . 371
Page 301 of 422

GMC Yukon/Yukon XL/Denali Owner Manual (GMNA-Localizing-U.S./
Canada/Mexico-15555988) - 2022 - CRC - 12/3/21
300 Vehicle Care
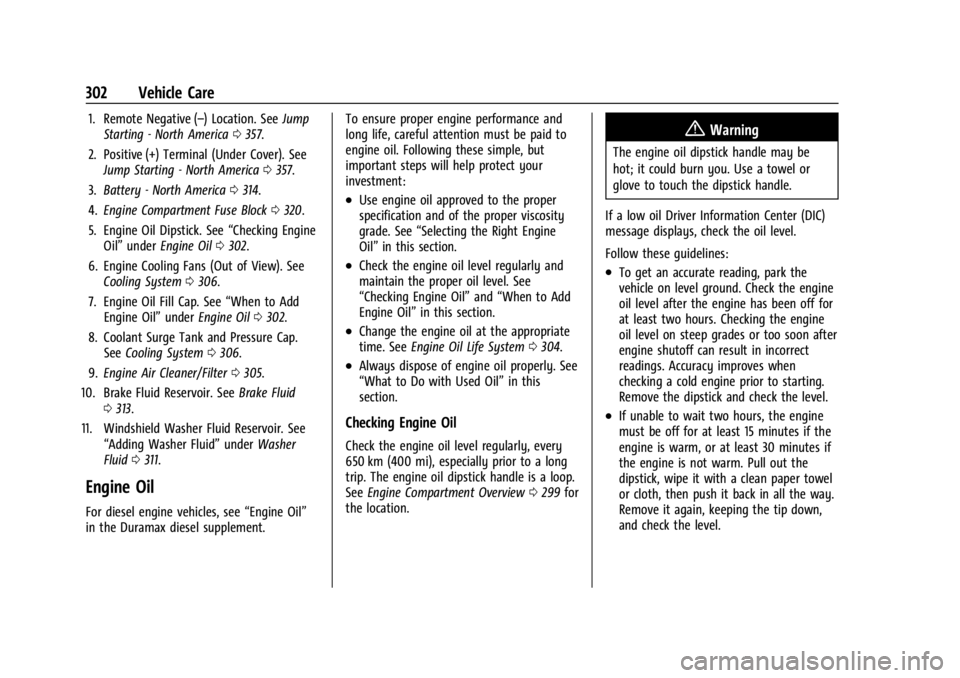
1. Remote Negative (–) Location. SeeJump
Starting - North America 0357.
2. Positive (+) Terminal (Under Cover). See Jump Starting - North America 0357.
3. Battery - North America 0314.
4. Engine Compartment Fuse Block 0320.
5. Engine Oil Dipstick. See “Checking Engine
Oil” under Engine Oil 0302.
6. Engine Cooling Fans (Out of View). See Cooling System 0306.
7. Engine Oil Fill Cap. See “When to Add
Engine Oil” underEngine Oil 0302.
8. Coolant Surge Tank and Pressure Cap. See Cooling System 0306.
9. Engine Air Cleaner/Filter 0305.
10. Brake Fluid Reservoir. See Brake Fluid
0 313.
11. Windshield Washer Fluid Reservoir. See “Adding Washer Fluid” underWasher
Fluid 0311.
Page 303 of 422
GMC Yukon/Yukon XL/Denali Owner Manual (GMNA-Localizing-U.S./
Canada/Mexico-15555988) - 2022 - CRC - 12/3/21
302 Vehicle Care
1. Remote Negative (–) Location. SeeJump
Starting - North America 0357.
2. Positive (+) Terminal (Under Cover). See Jump Starting - North America 0357.
3. Battery - North America 0314.
4. Engine Compartment Fuse Block 0320.
5. Engine Oil Dipstick. See “Checking Engine
Oil” under Engine Oil 0302.
6. Engine Cooling Fans (Out of View). See Cooling System 0306.
7. Engine Oil Fill Cap. See “When to Add
Engine Oil” underEngine Oil 0302.
8. Coolant Surge Tank and Pressure Cap. See Cooling System 0306.
9. Engine Air Cleaner/Filter 0305.
10. Brake Fluid Reservoir. See Brake Fluid
0 313.
11. Windshield Washer Fluid Reservoir. See “Adding Washer Fluid” underWasher
Fluid 0311.
Engine Oil
For diesel engine vehicles, see “Engine Oil”
in the Duramax diesel supplement. To ensure proper engine performance and
long life, careful attention must be paid to
engine oil. Following these simple, but
important steps will help protect your
investment:
.Use engine oil approved to the proper
specification and of the proper viscosity
grade. See
“Selecting the Right Engine
Oil” in this section.
.Check the engine oil level regularly and
maintain the proper oil level. See
“Checking Engine Oil” and“When to Add
Engine Oil” in this section.
.Change the engine oil at the appropriate
time. SeeEngine Oil Life System 0304.
.Always dispose of engine oil properly. See
“What to Do with Used Oil” in this
section.
Checking Engine Oil
Check the engine oil level regularly, every
650 km (400 mi), especially prior to a long
trip. The engine oil dipstick handle is a loop.
See Engine Compartment Overview 0299 for
the location.
{Warning
The engine oil dipstick handle may be
hot; it could burn you. Use a towel or
glove to touch the dipstick handle.
If a low oil Driver Information Center (DIC)
message displays, check the oil level.
Follow these guidelines:
.To get an accurate reading, park the
vehicle on level ground. Check the engine
oil level after the engine has been off for
at least two hours. Checking the engine
oil level on steep grades or too soon after
engine shutoff can result in incorrect
readings. Accuracy improves when
checking a cold engine prior to starting.
Remove the dipstick and check the level.
.If unable to wait two hours, the engine
must be off for at least 15 minutes if the
engine is warm, or at least 30 minutes if
the engine is not warm. Pull out the
dipstick, wipe it with a clean paper towel
or cloth, then push it back in all the way.
Remove it again, keeping the tip down,
and check the level.
Page 306 of 422
GMC Yukon/Yukon XL/Denali Owner Manual (GMNA-Localizing-U.S./
Canada/Mexico-15555988) - 2022 - CRC - 12/3/21
Vehicle Care 305
3. If the display changes to 100%, thesystem is reset.
If the vehicle has a CHANGE ENGINE OIL
SOON message and it comes back on when
the vehicle is started and/or the oil
life percentage is near 0%, the engine oil
life system has not been reset. Repeat the
procedure.
Automatic Transmission Fluid
How to Check Automatic Transmission
Fluid
It is not necessary to check the transmission
fluid level. A transmission fluid leak is the
only reason for fluid loss. If a leak occurs,
take the vehicle to your dealer and have it
repaired as soon as possible.
There is a special procedure for checking and
changing the transmission fluid. Because this
procedure is difficult, this should be done at
your dealer. Contact your dealer for
additional information.
Caution
Use of the incorrect automatic
transmission fluid may damage the
vehicle, and the damage may not be
(Continued)
Caution (Continued)
covered by the vehicle warranty. Always
use the correct automatic transmission
fluid. See Recommended Fluids and
Lubricants 0383.
Change the fluid and filter at the intervals
listed in Maintenance Schedule 0374, and
be sure to use the fluid listed in
Recommended Fluids and Lubricants 0383.
Engine Air Filter Life System
If equipped, this feature provides the engine
air filter’s remaining life and best timing for
a change. The timing to change an engine
air filter depends on driving and
environmental conditions.
When to Change the Engine Air Filter
When the Driver Information Center (DIC)
displays a message to replace the engine air
filter at the next oil change, follow this
timing.
When the DIC displays a message to replace
the engine air filter soon, replace the engine
air filter at the earliest convenience.
The system must be reset after the engine
air filter is changed. If the DIC displays a message to check the
engine air filter system, see your dealer.
How to Reset the Engine Air Filter Life
System
To reset:
1. Place the vehicle in P (Park).
2. Display the Air Filter Life on the DIC. See Driver Information Center (DIC) 0123.
3. Press the thumbwheel on the steering wheel to move to the Reset/Disable
display area. Select Reset then press the
thumbwheel for several seconds.
4. Press the thumbwheel to confirm the reset.
Engine Air Cleaner/Filter
The engine air cleaner/filter is on the driver
side of the engine compartment. See Engine
Compartment Overview 0299.
When to Inspect the Engine Air Cleaner/
Filter
If the vehicle is not equipped with the
engine air filter life system see Maintenance
Schedule 0374 for intervals on inspecting
and replacing the engine air cleaner filter.
Page 307 of 422
GMC Yukon/Yukon XL/Denali Owner Manual (GMNA-Localizing-U.S./
Canada/Mexico-15555988) - 2022 - CRC - 12/3/21
306 Vehicle Care
How to Inspect/Replace the Engine Air
Cleaner/Filter
Do not start the engine or have the engine
running with the engine air cleaner/filter
housing open. Before removing the engine
air cleaner/filter, make sure that the engine
air cleaner/filter housing and nearby
components are free of dirt and debris. Do
not clean the engine air cleaner/filter or
components with water or compressed air.
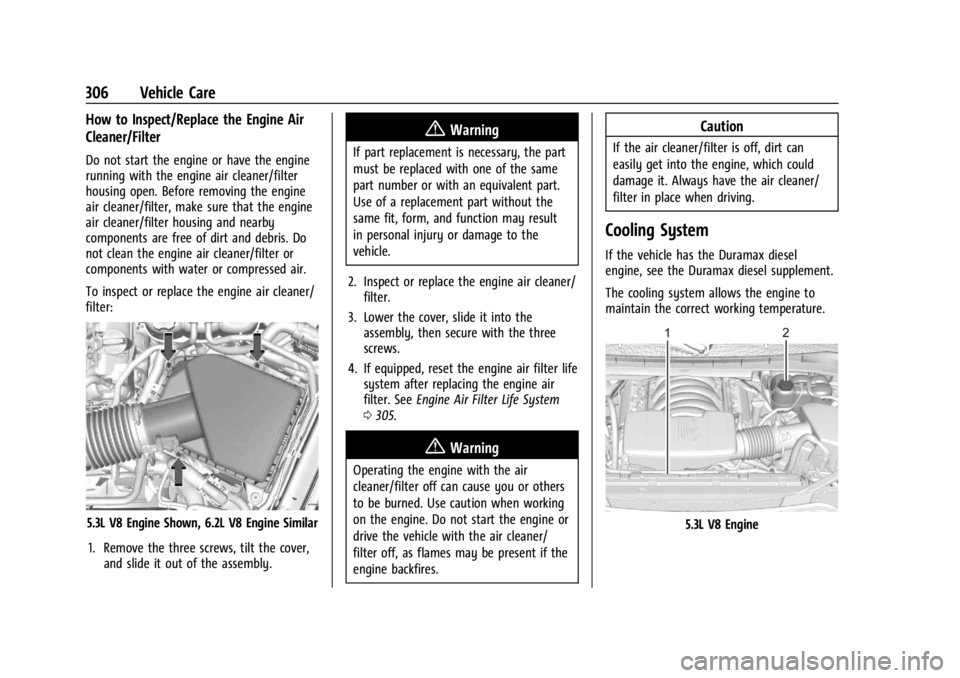
To inspect or replace the engine air cleaner/
filter:
5.3L V8 Engine Shown, 6.2L V8 Engine Similar1. Remove the three screws, tilt the cover, and slide it out of the assembly.
{Warning
If part replacement is necessary, the part
must be replaced with one of the same
part number or with an equivalent part.
Use of a replacement part without the
same fit, form, and function may result
in personal injury or damage to the
vehicle.
2. Inspect or replace the engine air cleaner/ filter.
3. Lower the cover, slide it into the assembly, then secure with the three
screws.
4. If equipped, reset the engine air filter life system after replacing the engine air
filter. See Engine Air Filter Life System
0 305.
{Warning
Operating the engine with the air
cleaner/filter off can cause you or others
to be burned. Use caution when working
on the engine. Do not start the engine or
drive the vehicle with the air cleaner/
filter off, as flames may be present if the
engine backfires.
Caution
If the air cleaner/filter is off, dirt can
easily get into the engine, which could
damage it. Always have the air cleaner/
filter in place when driving.
Cooling System
If the vehicle has the Duramax diesel
engine, see the Duramax diesel supplement.
The cooling system allows the engine to
maintain the correct working temperature.
5.3L V8 Engine