engine GMC YUKON 2023 Owners Manual
[x] Cancel search | Manufacturer: GMC, Model Year: 2023, Model line: YUKON, Model: GMC YUKON 2023Pages: 432, PDF Size: 9.3 MB
Page 333 of 432
GMC Yukon/Yukon XL/Denali Owner Manual (GMNA-Localizing-U.S./
Canada/Mexico-16417394) - 2023 - CRC - 4/26/22
332 Vehicle Care
damage. Always clear ice and heavy snow
from the windshield before using the
windshield wipers.
If the overload is caused by an electrical
problem and not snow or ice, be sure to get
it fixed.
Fuses and Circuit Breakers
The wiring circuits in the vehicle are
protected from short circuits by a
combination of fuses and circuit breakers.
This greatly reduces the chance of damage
caused by electrical problems.
{Danger
Fuses and circuit breakers are marked
with their ampere rating. Do not exceed
the specified amperage rating when
replacing fuses and circuit breakers. Use
of an oversized fuse or circuit breaker can
result in a vehicle fire. You and others
could be seriously injured or killed.
{Warning
Installation or use of fuses that do not
meet GM’s original fuse specifications is
dangerous. The fuses could fail, and result
in a fire. You or others could be injured
or killed, and the vehicle could be
damaged.
See Accessories and Modifications 0308 and
General Information 0308.
To check or replace a blown fuse, see
Electrical System Overload 0330.
Engine Compartment Fuse Block
The engine compartment fuse block is in the
engine compartment, on the driver side of
the vehicle.
Lift the cover to access the fuse block.
Caution
Spilling liquid on any electrical
component on the vehicle may damage
it. Always keep the covers on any
electrical component.
Page 335 of 432
GMC Yukon/Yukon XL/Denali Owner Manual (GMNA-Localizing-U.S./
Canada/Mexico-16417394) - 2023 - CRC - 4/26/22
334 Vehicle Care
FusesUsage
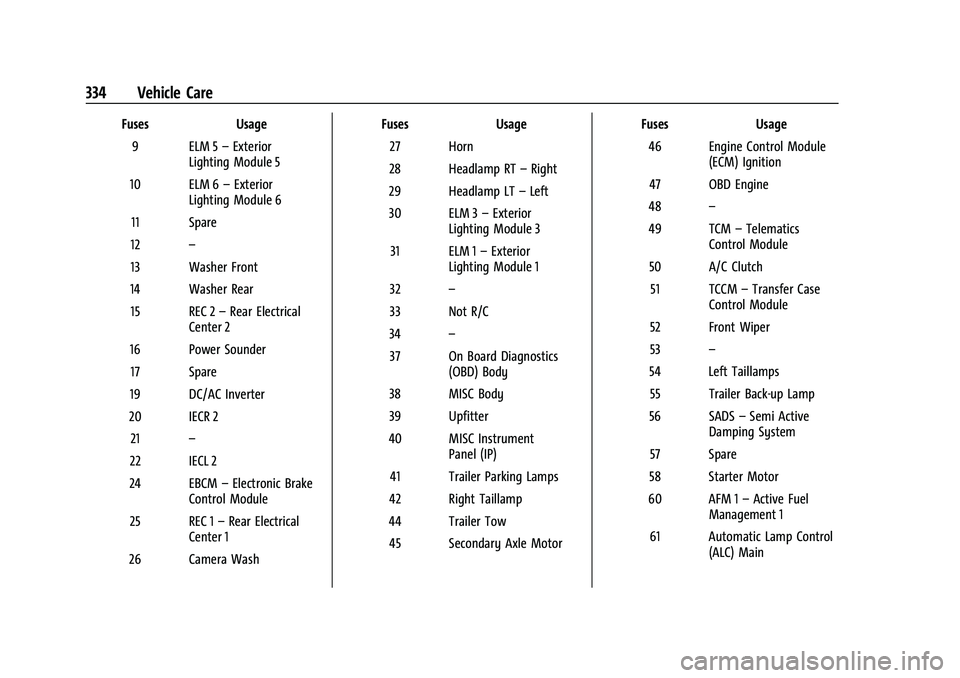
9 ELM 5 –Exterior
Lighting Module 5
10 ELM 6 –Exterior
Lighting Module 6
11 Spare
12 –
13 Washer Front
14 Washer Rear 15 REC 2 –Rear Electrical
Center 2
16 Power Sounder 17 Spare
19 DC/AC Inverter
20 IECR 2 21 –
22 IECL 2
24 EBCM –Electronic Brake
Control Module
25 REC 1 –Rear Electrical
Center 1
26 Camera Wash Fuses
Usage
27 Horn
28 Headlamp RT –Right
29 Headlamp LT –Left
30 ELM 3 –Exterior
Lighting Module 3
31 ELM 1 –Exterior
Lighting Module 1
32 –
33 Not R/C
34 –
37 On Board Diagnostics (OBD) Body
38 MISC Body
39 Upfitter
40 MISC Instrument Panel (IP)
41 Trailer Parking Lamps
42 Right Taillamp
44 Trailer Tow 45 Secondary Axle Motor Fuses
Usage
46 Engine Control Module (ECM) Ignition
47 OBD Engine
48 –
49 TCM –Telematics
Control Module
50 A/C Clutch 51 TCCM –Transfer Case
Control Module
52 Front Wiper
53 –
54 Left Taillamps 55 Trailer Back-up Lamp
56 SADS –Semi Active
Damping System
57 Spare
58 Starter Motor
60 AFM 1 –Active Fuel
Management 1
61 Automatic Lamp Control (ALC) Main
Page 336 of 432
GMC Yukon/Yukon XL/Denali Owner Manual (GMNA-Localizing-U.S./
Canada/Mexico-16417394) - 2023 - CRC - 4/26/22
Vehicle Care 335
FusesUsage
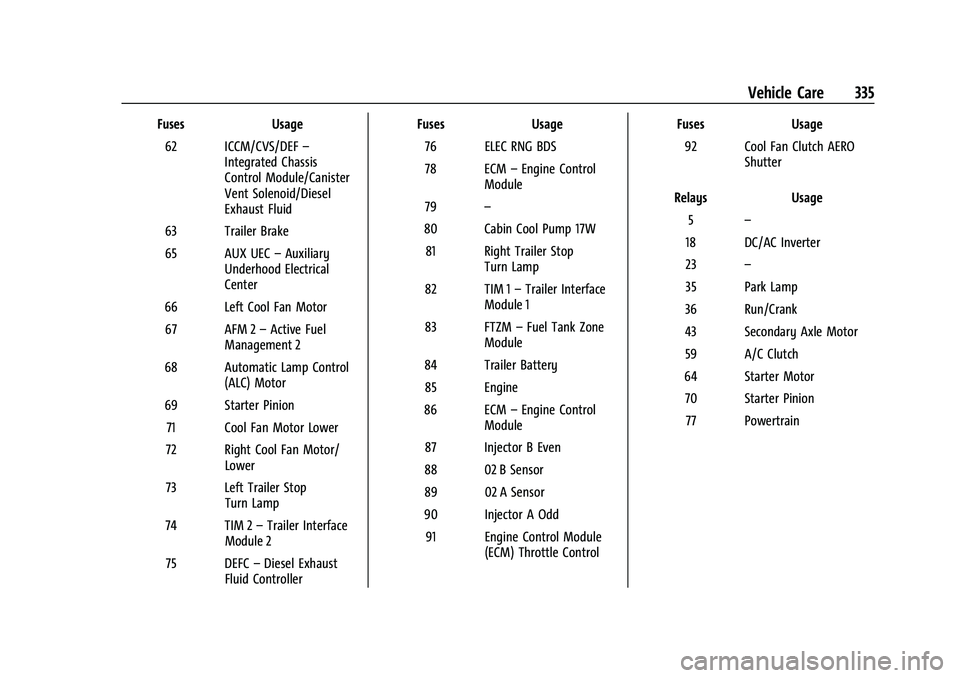
62 ICCM/CVS/DEF –
Integrated Chassis
Control Module/Canister
Vent Solenoid/Diesel
Exhaust Fluid
63 Trailer Brake
65 AUX UEC –Auxiliary
Underhood Electrical
Center
66 Left Cool Fan Motor 67 AFM 2 –Active Fuel
Management 2
68 Automatic Lamp Control (ALC) Motor
69 Starter Pinion 71 Cool Fan Motor Lower
72 Right Cool Fan Motor/ Lower
73 Left Trailer Stop Turn Lamp
74 TIM 2 –Trailer Interface
Module 2
75 DEFC –Diesel Exhaust
Fluid Controller Fuses
Usage
76 ELEC RNG BDS
78 ECM –Engine Control
Module
79 –
80 Cabin Cool Pump 17W 81 Right Trailer Stop Turn Lamp
82 TIM 1 –Trailer Interface
Module 1
83 FTZM –Fuel Tank Zone
Module
84 Trailer Battery 85 Engine
86 ECM –Engine Control
Module
87 Injector B Even
88 02 B Sensor
89 02 A Sensor
90 Injector A Odd 91 Engine Control Module (ECM) Throttle Control Fuses
Usage
92 Cool Fan Clutch AERO Shutter
Relays Usage
5 –
18 DC/AC Inverter
23 –
35 Park Lamp
36 Run/Crank
43 Secondary Axle Motor
59 A/C Clutch
64 Starter Motor 70 Starter Pinion 77 Powertrain
Page 338 of 432
GMC Yukon/Yukon XL/Denali Owner Manual (GMNA-Localizing-U.S./
Canada/Mexico-16417394) - 2023 - CRC - 4/26/22
Vehicle Care 337
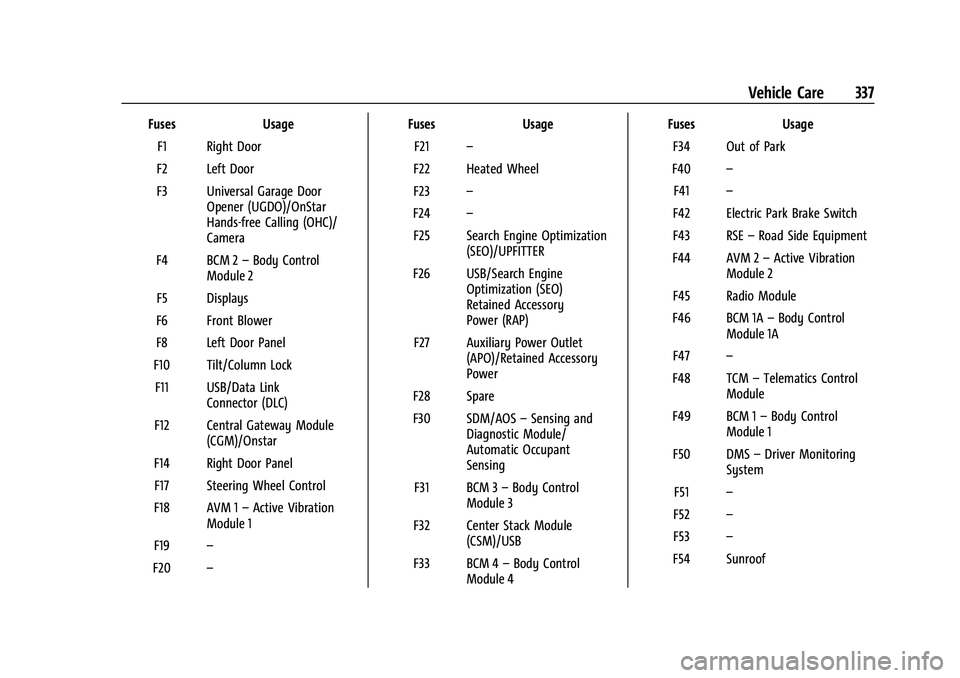
FusesUsage
F1 Right Door
F2 Left Door
F3 Universal Garage Door Opener (UGDO)/OnStar
Hands-free Calling (OHC)/
Camera
F4 BCM 2 –Body Control
Module 2
F5 Displays
F6 Front Blower
F8 Left Door Panel
F10 Tilt/Column Lock F11 USB/Data Link Connector (DLC)
F12 Central Gateway Module (CGM)/Onstar
F14 Right Door Panel F17 Steering Wheel Control
F18 AVM 1 –Active Vibration
Module 1
F19 –
F20 – Fuses
Usage
F21 –
F22 Heated Wheel
F23 –
F24 –
F25 Search Engine Optimization (SEO)/UPFITTER
F26 USB/Search Engine Optimization (SEO)
Retained Accessory
Power (RAP)
F27 Auxiliary Power Outlet (APO)/Retained Accessory
Power
F28 Spare
F30 SDM/AOS –Sensing and
Diagnostic Module/
Automatic Occupant
Sensing
F31 BCM 3 –Body Control
Module 3
F32 Center Stack Module (CSM)/USB
F33 BCM 4 –Body Control
Module 4 Fuses
Usage
F34 Out of Park
F40 –
F41 –
F42 Electric Park Brake Switch
F43 RSE –Road Side Equipment
F44 AVM 2 –Active Vibration
Module 2
F45 Radio Module
F46 BCM 1A –Body Control
Module 1A
F47 –
F48 TCM –Telematics Control
Module
F49 BCM 1 –Body Control
Module 1
F50 DMS –Driver Monitoring
System
F51 –
F52 –
F53 –
F54 Sunroof
Page 340 of 432
GMC Yukon/Yukon XL/Denali Owner Manual (GMNA-Localizing-U.S./
Canada/Mexico-16417394) - 2023 - CRC - 4/26/22
Vehicle Care 339
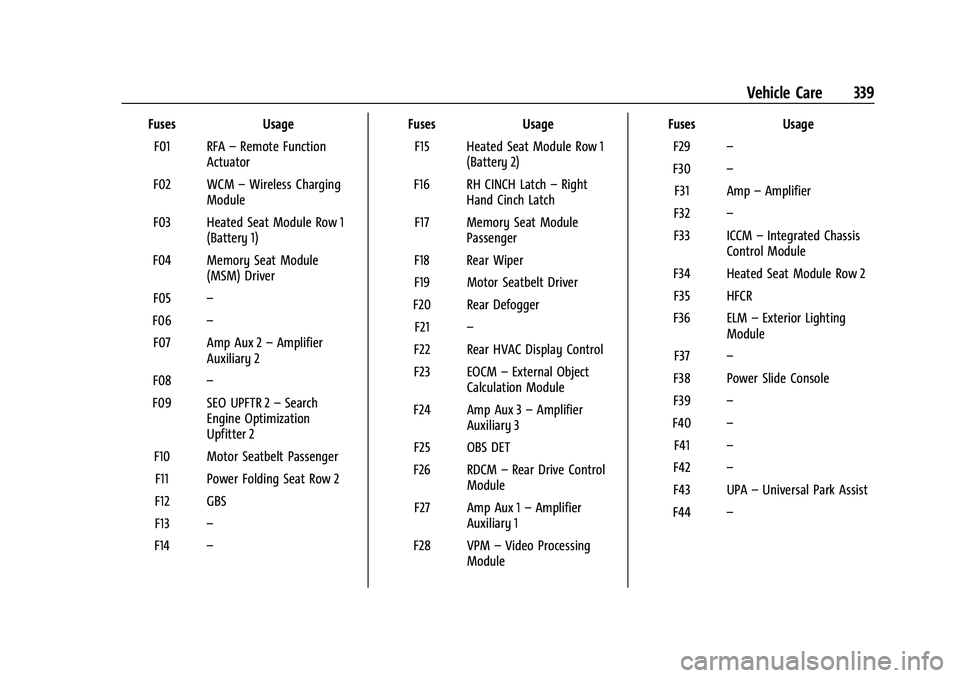
FusesUsage
F01 RFA –Remote Function
Actuator
F02 WCM –Wireless Charging
Module
F03 Heated Seat Module Row 1 (Battery 1)
F04 Memory Seat Module (MSM) Driver
F05 –
F06 –
F07 Amp Aux 2 –Amplifier
Auxiliary 2
F08 –
F09 SEO UPFTR 2 –Search
Engine Optimization
Upfitter 2
F10 Motor Seatbelt Passenger F11 Power Folding Seat Row 2
F12 GBS
F13 –
F14 – Fuses
Usage
F15 Heated Seat Module Row 1 (Battery 2)
F16 RH CINCH Latch –Right
Hand Cinch Latch
F17 Memory Seat Module Passenger
F18 Rear Wiper
F19 Motor Seatbelt Driver
F20 Rear Defogger F21 –
F22 Rear HVAC Display Control
F23 EOCM –External Object
Calculation Module
F24 Amp Aux 3 –Amplifier
Auxiliary 3
F25 OBS DET
F26 RDCM –Rear Drive Control
Module
F27 Amp Aux 1 –Amplifier
Auxiliary 1
F28 VPM –Video Processing
Module Fuses
Usage
F29 –
F30 –
F31 Amp –Amplifier
F32 –
F33 ICCM –Integrated Chassis
Control Module
F34 Heated Seat Module Row 2 F35 HFCR
F36 ELM –Exterior Lighting
Module
F37 –
F38 Power Slide Console
F39 –
F40 –
F41 –
F42 –
F43 UPA –Universal Park Assist
F44 –
Page 344 of 432

GMC Yukon/Yukon XL/Denali Owner Manual (GMNA-Localizing-U.S./
Canada/Mexico-16417394) - 2023 - CRC - 4/26/22
Vehicle Care 343
(7) Maximum Cold Inflation Load
Limit
:Maximum load that can be
carried and the maximum pressure
needed to support that load. For
information on recommended tire
pressure see Tire Pressure 0346 and
Vehicle Load Limits 0194.
(8) Temporary Use Only
:Only use a
temporary spare tire until the road tire
is repaired and replaced. This spare tire
should not be driven on over 112 km/h
(70 mph), or 88 km/h (55 mph) when
pulling a trailer, with the proper
inflation pressure. See Full-Size Spare
Tire 0370.
Tire Designations
Tire Size
The example shows a typical passenger
vehicle tire size.
Passenger (P-Metric) Tire
(1) Passenger (P-Metric) Tire:The
United States version of a metric tire
sizing system. The letter "P" as the first
character in the tire size means a
passenger vehicle tire engineered to
standards set by the U.S. Tire and Rim
Association.
(2) Tire Width
:The 3-digit number
indicates the tire section width in
millimeters from sidewall to sidewall.
(3) Aspect Ratio
:A 2-digit number that
indicates the tire height-to-width
measurements. For example, if the tire
size aspect ratio is 75, as shown in
item (3) of the illustration, it would
mean that the tire's sidewall is
75 percent as high as it is wide. (4) Construction Code
:A letter code is
used to indicate the type of ply
construction in the tire. The letter "R"
means radial ply construction; the letter
"D" means diagonal or bias ply
construction.
(5) Rim Diameter
:Diameter of the
wheel in inches.
(6) Service Description
:These
characters represent the load index and
speed rating of the tire. The load index
represents the load carrying capacity a
tire is certified to carry. The speed
rating is the maximum speed a tire is
certified to carry a load.
Tire Terminology and Definitions
Air Pressure:The amount of air inside
the tire pressing outward on each
square inch of the tire. Air pressure is
expressed in kPa (kilopascal) or psi
(pounds per square inch).
Aspect Ratio
:The relationship of a
tire's height to its width.
Page 347 of 432
GMC Yukon/Yukon XL/Denali Owner Manual (GMNA-Localizing-U.S./
Canada/Mexico-16417394) - 2023 - CRC - 4/26/22
346 Vehicle Care
Tire Pressure
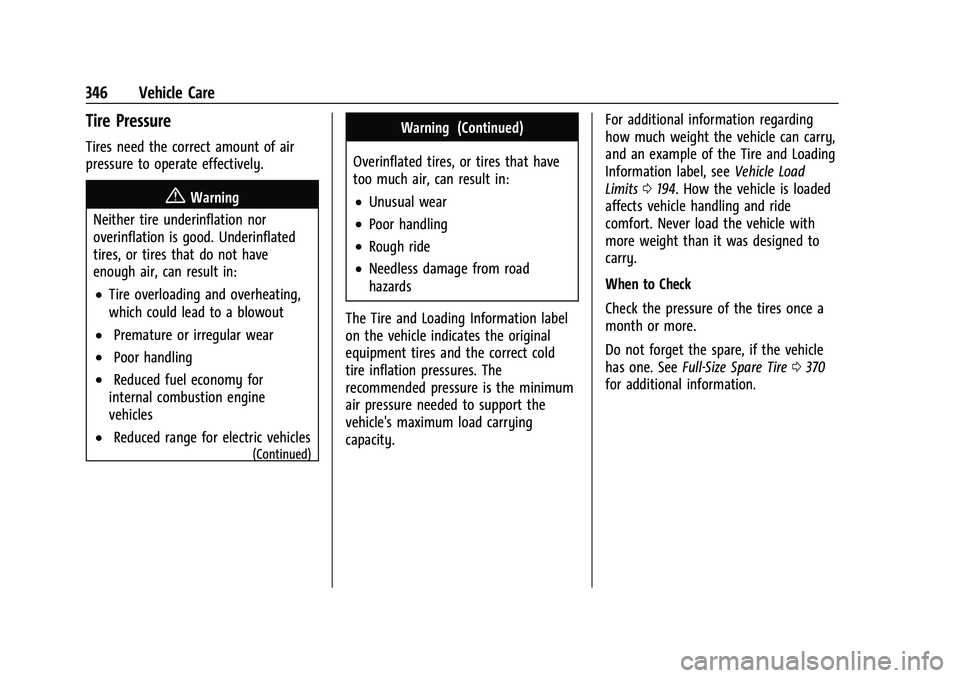
Tires need the correct amount of air
pressure to operate effectively.
{Warning
Neither tire underinflation nor
overinflation is good. Underinflated
tires, or tires that do not have
enough air, can result in:
.Tire overloading and overheating,
which could lead to a blowout
.Premature or irregular wear
.Poor handling
.Reduced fuel economy for
internal combustion engine
vehicles
.Reduced range for electric vehicles
(Continued)
Warning (Continued)
Overinflated tires, or tires that have
too much air, can result in:
.Unusual wear
.Poor handling
.Rough ride
.Needless damage from road
hazards
The Tire and Loading Information label
on the vehicle indicates the original
equipment tires and the correct cold
tire inflation pressures. The
recommended pressure is the minimum
air pressure needed to support the
vehicle's maximum load carrying
capacity. For additional information regarding
how much weight the vehicle can carry,
and an example of the Tire and Loading
Information label, see
Vehicle Load
Limits 0194. How the vehicle is loaded
affects vehicle handling and ride
comfort. Never load the vehicle with
more weight than it was designed to
carry.
When to Check
Check the pressure of the tires once a
month or more.
Do not forget the spare, if the vehicle
has one. See Full-Size Spare Tire 0370
for additional information.
Page 361 of 432
GMC Yukon/Yukon XL/Denali Owner Manual (GMNA-Localizing-U.S./
Canada/Mexico-16417394) - 2023 - CRC - 4/26/22
360 Vehicle Care
Warning (Continued)
4. Turn off the engine and do notrestart while the vehicle is raised.
5. Do not allow passengers to remain in the vehicle.
6. Place wheel blocks, if equipped, on both sides of the tire at the opposite
corner of the tire being changed.
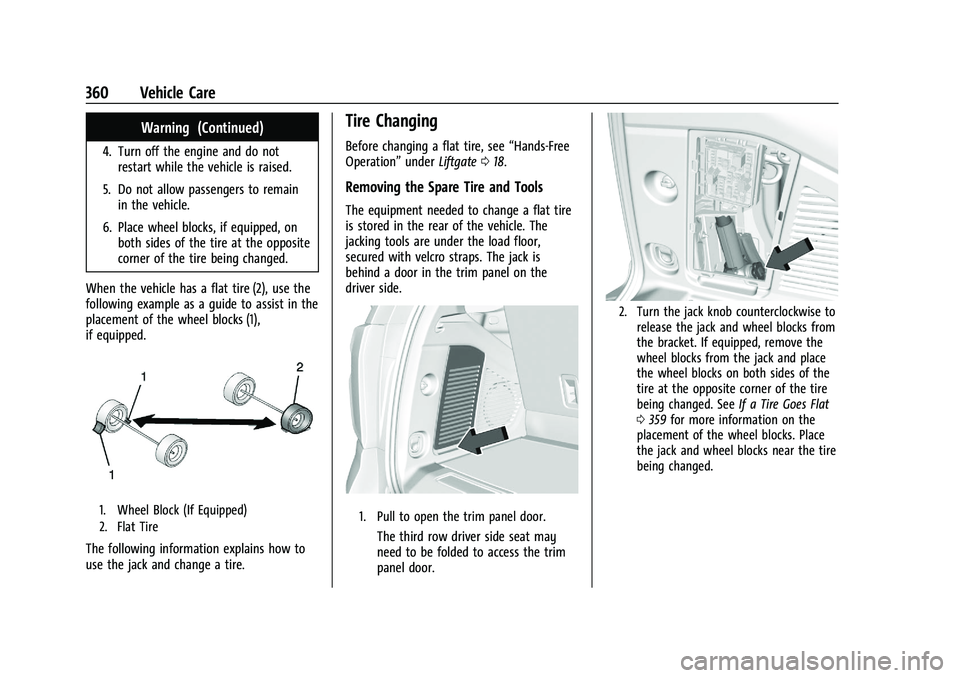
When the vehicle has a flat tire (2), use the
following example as a guide to assist in the
placement of the wheel blocks (1),
if equipped.
1. Wheel Block (If Equipped)
2. Flat Tire
The following information explains how to
use the jack and change a tire.
Tire Changing
Before changing a flat tire, see “Hands-Free
Operation” underLiftgate 018.
Removing the Spare Tire and Tools
The equipment needed to change a flat tire
is stored in the rear of the vehicle. The
jacking tools are under the load floor,
secured with velcro straps. The jack is
behind a door in the trim panel on the
driver side.
1. Pull to open the trim panel door.
The third row driver side seat may
need to be folded to access the trim
panel door.
2. Turn the jack knob counterclockwise to
release the jack and wheel blocks from
the bracket. If equipped, remove the
wheel blocks from the jack and place
the wheel blocks on both sides of the
tire at the opposite corner of the tire
being changed. See If a Tire Goes Flat
0 359 for more information on the
placement of the wheel blocks. Place
the jack and wheel blocks near the tire
being changed.
Page 373 of 432
GMC Yukon/Yukon XL/Denali Owner Manual (GMNA-Localizing-U.S./
Canada/Mexico-16417394) - 2023 - CRC - 4/26/22
372 Vehicle Care
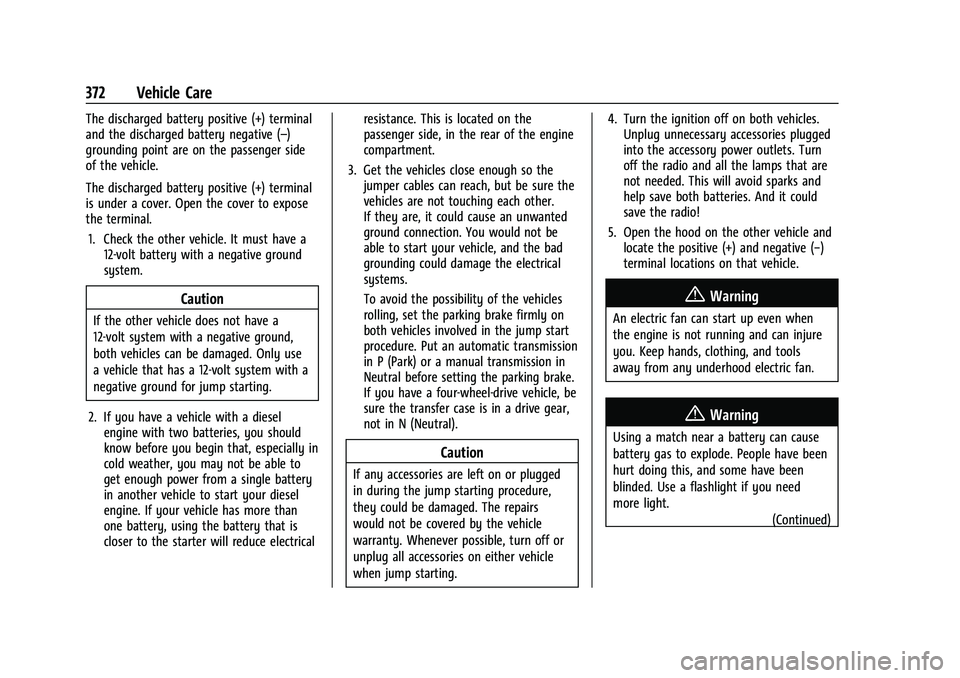
The discharged battery positive (+) terminal
and the discharged battery negative (–)
grounding point are on the passenger side
of the vehicle.
The discharged battery positive (+) terminal
is under a cover. Open the cover to expose
the terminal.1. Check the other vehicle. It must have a 12-volt battery with a negative ground
system.
Caution
If the other vehicle does not have a
12-volt system with a negative ground,
both vehicles can be damaged. Only use
a vehicle that has a 12-volt system with a
negative ground for jump starting.
2. If you have a vehicle with a diesel engine with two batteries, you should
know before you begin that, especially in
cold weather, you may not be able to
get enough power from a single battery
in another vehicle to start your diesel
engine. If your vehicle has more than
one battery, using the battery that is
closer to the starter will reduce electrical resistance. This is located on the
passenger side, in the rear of the engine
compartment.
3. Get the vehicles close enough so the jumper cables can reach, but be sure the
vehicles are not touching each other.
If they are, it could cause an unwanted
ground connection. You would not be
able to start your vehicle, and the bad
grounding could damage the electrical
systems.
To avoid the possibility of the vehicles
rolling, set the parking brake firmly on
both vehicles involved in the jump start
procedure. Put an automatic transmission
in P (Park) or a manual transmission in
Neutral before setting the parking brake.
If you have a four-wheel-drive vehicle, be
sure the transfer case is in a drive gear,
not in N (Neutral).
Caution
If any accessories are left on or plugged
in during the jump starting procedure,
they could be damaged. The repairs
would not be covered by the vehicle
warranty. Whenever possible, turn off or
unplug all accessories on either vehicle
when jump starting. 4. Turn the ignition off on both vehicles.
Unplug unnecessary accessories plugged
into the accessory power outlets. Turn
off the radio and all the lamps that are
not needed. This will avoid sparks and
help save both batteries. And it could
save the radio!
5. Open the hood on the other vehicle and locate the positive (+) and negative (−)
terminal locations on that vehicle.
{Warning
An electric fan can start up even when
the engine is not running and can injure
you. Keep hands, clothing, and tools
away from any underhood electric fan.
{Warning
Using a match near a battery can cause
battery gas to explode. People have been
hurt doing this, and some have been
blinded. Use a flashlight if you need
more light.
(Continued)
Page 374 of 432
GMC Yukon/Yukon XL/Denali Owner Manual (GMNA-Localizing-U.S./
Canada/Mexico-16417394) - 2023 - CRC - 4/26/22
Vehicle Care 373
Warning (Continued)
Battery fluid contains acid that can burn
you. Do not get it on you. If you
accidentally get it in your eyes or on
your skin, flush the place with water and
get medical help immediately.
{Warning
Fans or other moving engine parts can
injure you badly. Keep your hands away
from moving parts once the engine is
running.
6. Check that the jumper cables do not have loose or missing insulation. If they
do, you could get a shock. The vehicles
could be damaged too.
Before you connect the cables, here are
some basic things you should know.
Positive (+) will go to positive (+) or to a
remote positive (+) terminal if the
vehicle has one. Negative (−) will go to a
heavy, unpainted metal engine part or to
a remote negative (−) terminal if the
vehicle has one. Do not connect positive (+) to negative
(−) or you will get a short that would
damage the battery and maybe other
parts too. And do not connect the
negative (−) cable to the negative (−)
terminal on the dead battery because
this can cause sparks.
7. Connect one end of the red positive (+) cable to the discharged battery
positive (+) terminal.
8. Do not let the other end touch metal. Connect it to the good battery
positive (+) terminal. Use a remote
positive (+) terminal if the vehicle
has one.
9. Connect one end of the black negative (−) cable to the good battery negative
(−) terminal. Use a remote negative (−)
terminal if the vehicle has one.
Do not let the other end touch anything
until the next step.
10. Connect the other end of the negative (−) cable to the discharged battery
negative (−) grounding point.
11. Start the vehicle with the good battery and run the engine for a while. 12. Try to start the vehicle that had the
dead battery. If it will not start after a
few tries, it probably needs service.
Jumper Cable Removal
Reverse the sequence exactly when
removing the jumper cables.
After starting the disabled vehicle and
removing the jumper cables, allow it to idle
for several minutes.Towing the Vehicle
Transporting a Disabled Vehicle
Caution
Incorrectly transporting a disabled vehicle
may cause damage to the vehicle. Use
proper tire straps to secure the vehicle to
the flatbed tow truck. Do not strap or
hook to any frame, underbody,
or suspension component not specified
below. Do not move vehicles with drive
axle tires on the ground. Damage is not
covered by the vehicle warranty.