stop start GMC YUKON DENALI 2004 Owner's Guide
[x] Cancel search | Manufacturer: GMC, Model Year: 2004, Model line: YUKON DENALI, Model: GMC YUKON DENALI 2004Pages: 468, PDF Size: 3.18 MB
Page 274 of 468
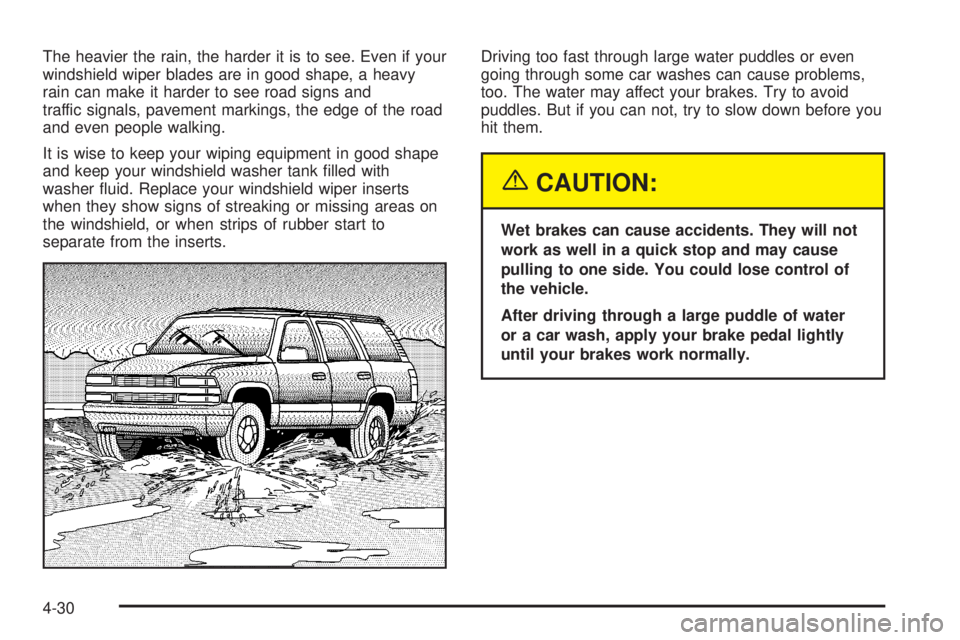
The heavier the rain, the harder it is to see. Even if your
windshield wiper blades are in good shape, a heavy
rain can make it harder to see road signs and
traffic signals, pavement markings, the edge of the road
and even people walking.
It is wise to keep your wiping equipment in good shape
and keep your windshield washer tank ®lled with
washer ¯uid. Replace your windshield wiper inserts
when they show signs of streaking or missing areas on
the windshield, or when strips of rubber start to
separate from the inserts.Driving too fast through large water puddles or even
going through some car washes can cause problems,
too. The water may affect your brakes. Try to avoid
puddles. But if you can not, try to slow down before you
hit them.
{CAUTION:
Wet brakes can cause accidents. They will not
work as well in a quick stop and may cause
pulling to one side. You could lose control of
the vehicle.
After driving through a large puddle of water
or a car wash, apply your brake pedal lightly
until your brakes work normally.
4-30
Page 278 of 468
Once you are moving on the freeway, make certain you
allow a reasonable following distance. Expect to
move slightly slower at night.
When you want to leave the freeway, move to the
proper lane well in advance. If you miss your exit, do
not, under any circumstances, stop and back up. Drive
on to the next exit.
The exit ramp can be curved, sometimes quite sharply.
The exit speed is usually posted.
Reduce your speed according to your speedometer, not
to your sense of motion. After driving for any distance
at higher speeds, you may tend to think you are
going slower than you actually are.
Before Leaving on a Long Trip
Make sure you are ready. Try to be well rested. If you
must start when you are not fresh Ð such as after
a day's work Ð do not plan to make too many miles that
®rst part of the journey. Wear comfortable clothing
and shoes you can easily drive in.
Is your vehicle ready for a long trip? If you keep it
serviced and maintained, it is ready to go. If it needs
service, have it done before starting out. Of course, you
will ®nd experienced and able service experts in GM
dealerships all across North America. They will be ready
and willing to help if you need it.Here are some things you can check before a trip:
·Windshield Washer Fluid:Is the reservoir full? Are
all windows clean inside and outside?
·Wiper Blades:Are they in good shape?
·Fuel, Engine Oil, Other Fluids:Have you checked
all levels?
·Lamps:Are they all working? Are the lenses clean?
·Tires:They are vitally important to a safe,
trouble-free trip. Is the tread good enough for
long-distance driving? Are the tires all in¯ated to the
recommended pressure?
·Weather Forecasts:What is the weather outlook
along your route? Should you delay your trip a
short time to avoid a major storm system?
·Maps:Do you have up-to-date maps?
4-34
Page 297 of 468
Tow/Haul Mode
The Tow/Haul feature assists when pulling a heavy
trailer or a large or heavy load. The purpose of
the Tow/Haul mode is to:
·Reduce the frequency and improve the predictability
of transmission shifts when pulling a heavy trailer or
a large or heavy load.
·Provide the same solid shift feel when pulling a
heavy trailer or a large or heavy load as when
the vehicle is unloaded.
·Improve control of vehicle speed while requiring
less throttle pedal activity when pulling a heavy
trailer or a large or heavy load.
Your vehicle is provided with a button at the end of the
shift lever which when pressed enables Tow/Haul.
When the button is pressed, a light on the instrument
panel will illuminate to indicate that Tow/Haul has been
selected. Tow/Haul may be turned off by pressing
the button again, at which time the indicator light on the
instrument panel will turn off. The vehicle will
automatically turn off tow/haul every time it is started.Tow/Haul is designed to be most effective when the
vehicle and trailer combined weight is at least 75 percent
of the vehicle's Gross Combination Weight Rating
(GCWR). See ªWeight of the Trailerº later in this section.
Tow/Haul is most useful under the following driving
conditions:
·When pulling a heavy trailer or a large or heavy
load through rolling terrain.
·When pulling a heavy trailer or a large or heavy
load in stop and go traffic.
·When pulling a heavy trailer or a large or heavy
load in busy parking lots where improved low
speed control of the vehicle is desired.
Operating the vehicle in Tow/Haul when lightly loaded
or with no trailer at all will not cause damage. However,
there is no bene®t to the selection of Tow/Haul when
the vehicle is unloaded. Such a selection when unloaded
may result in unpleasant engine and transmission
driving characteristics and reduced fuel economy.
Tow/Haul is recommended only when pulling a heavy
trailer or a large or heavy load.
4-53
Page 305 of 468
When You Are Ready to Leave After
Parking on a Hill
1. Apply your regular brakes and hold the pedal down
while you:
·start your engine,
·shift into a gear, and
·release the parking brake.
2. Let up on the brake pedal.
3. Drive slowly until the trailer is clear of the chocks.
4. Stop and have someone pick up and store the
chocks.
Maintenance When Trailer Towing
Your vehicle will need service more often when you're
pulling a trailer. See the Maintenance Schedule for more
on this. Things that are especially important in trailer
operation are automatic transmission ¯uid (don't over®ll),
engine oil, axle lubricant, belts, cooling system and
brake system. Each of these is covered in this manual,
and the Index will help you ®nd them quickly. If
you're trailering, it's a good idea to review these sections
before you start your trip.
Check periodically to see that all hitch nuts and bolts
are tight.
4-61
Page 309 of 468
Service............................................................5-3
Doing Your Own Service Work.........................5-3
Adding Equipment to the Outside
of Your Vehicle...........................................5-4
Fuel................................................................5-4
Gasoline Octane............................................5-4
Gasoline Speci®cations....................................5-5
California Fuel...............................................5-5
Additives.......................................................5-6
Fuels in Foreign Countries...............................5-7
Filling Your Tank............................................5-7
Filling a Portable Fuel Container.......................5-9
Checking Things Under
the Hood....................................................5-10
Hood Release..............................................5-10
Engine Compartment Overview.......................5-12
Engine Oil...................................................5-13
Engine Air Cleaner/Filter................................5-18
Automatic Transmission Fluid.........................5-20
Engine Coolant.............................................5-23
Coolant Surge Tank Pressure Cap..................5-25Engine Overheating.......................................5-25
Cooling System............................................5-28
Engine Fan Noise.........................................5-33
Power Steering Fluid.....................................5-34
Windshield Washer Fluid................................5-35
Brakes........................................................5-36
Battery........................................................5-39
Jump Starting...............................................5-40
All-Wheel Drive..............................................5-45
Rear Axle.......................................................5-46
Front Axle......................................................5-47
Bulb Replacement..........................................5-48
Halogen Bulbs..............................................5-48
Headlamps..................................................5-48
Front Turn Signal, Sidemarker and
Daytime Running Lamps.............................5-49
Center High-Mounted Stoplamp (CHMSL).........5-51
Taillamps.....................................................5-51
Replacement Bulbs.......................................5-52
Section 5 Service and Appearance Care
5-1
Page 324 of 468
Notice:Use only engine oil identi®ed as meeting
GM Standard GM6094M and showing the American
Petroleum Institute Certi®ed For Gasoline Engines
starburst symbol. Failure to use the recommended
oil can result in engine damage not covered by
your warranty.
GM Goodwrench
žoil meets all the requirements for
your vehicle.
If you are in an area of extreme cold, where the
temperature falls below-20ÉF (-29ÉC), it is
recommended that you use either an SAE 5W-30
synthetic oil or an SAE 0W-30 oil. Both will provide
easier cold starting and better protection for your engine
at extremely low temperatures.
Engine Oil Additives
Do not add anything to your oil. The recommended oils
with the starburst symbol that meet GM Standard
GM6094M are all you will need for good performance
and engine protection.
When to Change Engine Oil (GM Oil
Life System)
Your vehicle has a computer system that lets you know
when to change the engine oil and ®lter. This is
based on engine revolutions and engine temperature,
and not on mileage. Based on driving conditions,
the mileage at which an oil change will be indicated can
vary considerably. For the oil life system to work
properly, you must reset the system every time the oil is
changed.
When the system has calculated that oil life has been
diminished, it will indicate that an oil change is
necessary. A CHANGE ENGINE OIL message will
come on. Change your oil as soon as possible within
the next two times you stop for fuel. It is possible that, if
you are driving under the best conditions, the oil life
system may not indicate that an oil change is necessary
for over a year. However, your engine oil and ®lter
must be changed at least once a year and at this time
the system must be reset. Your dealer has GM-trained
service people who will perform this work using
genuine GM parts and reset the system. It is also
important to check your oil regularly and keep it at the
proper level.
If the system is ever reset accidentally, you must
change your oil at 3,000 miles (5 000 km) since your
last oil change. Remember to reset the oil life system
whenever the oil is changed.
5-16
Page 347 of 468
Brake Pedal Travel
See your dealer if the brake pedal does not return to
normal height, or if there is a rapid increase in
pedal travel. This could be a sign of brake trouble.
Brake Adjustment
Every time you make a brake stop, your disc brakes
adjust for wear.
Replacing Brake System Parts
The braking system on a vehicle is complex. Its many
parts have to be of top quality and work well together if
the vehicle is to have really good braking. Your
vehicle was designed and tested with top-quality GM
brake parts. When you replace parts of your braking
system Ð for example, when your brake linings
wear down and you need new ones put in Ð be sure
you get new approved GM replacement parts. If you do
not, your brakes may no longer work properly. For
example, if someone puts in brake linings that are wrong
for your vehicle, the balance between your front and
rear brakes can change Ð for the worse. The braking
performance you have come to expect can change
in many other ways if someone puts in the wrong
replacement brake parts.
Battery
Your new vehicle comes with a maintenance free
ACDelcožbattery. When it is time for a new battery,
get one that has the replacement number shown on the
original battery's label. We recommend an ACDelco
ž
battery. SeeEngine Compartment Overview on
page 5-12for battery location.Warning:Battery posts, terminals and related
accessories contain lead and lead compounds,
chemicals known to the State of California to cause
cancer and reproductive harm. Wash hands after
handling.
Vehicle Storage
If you are not going to drive your vehicle for 25 days
or more, remove the black, negative (-) cable from
the battery. This will help keep your battery from
running down.
{CAUTION:
Batteries have acid that can burn you and gas
that can explode. You can be badly hurt if you
are not careful. See
Jump Starting on
page 5-40
for tips on working around a battery
without getting hurt.
5-39
Page 373 of 468
TPM Sensor Identi®cation Codes
Each TPM sensor has a unique identi®cation code.
Any time you rotate your vehicle's tires or replace one
or more of the TPM sensors, the identi®cation codes will
need to be matched to the new tire/wheel position.
Each tire/wheel position is matched to a sensor,
by increasing or decreasing the tire's air pressure.
The sensors are matched to the tire/wheel positions in
the following order: left front (LF); right front (RF);
right rear (RR) and left rear (LR).
You will have one minute to match the ®rst tire/wheel
position, and ®ve minutes overall to match all four
tire/wheel positions. If it takes longer than one minute,
to match the ®rst tire and wheel, or more than ®ve
minutes to match all four tire and wheel positions the
matching process stops and you will need to start over.
The TPM sensor matching process is outlined below:
1. Set the Parking brake.
2. Turn the ignition switch to RUN with the engine off.
3. Turn the exterior lamp switch from ªOffº to ªOnº
four times within 3 seconds. A double horn chirp
will sound and the TPM low tire warning light
will begin to ¯ash. The double horn chirp and¯ashing TPM warning light indicate that the TPM
matching process has started. The TPM warning
light should continue ¯ashing throughout the
matching procedure. The SERVICE TIRE
MONITOR message will be displayed on the Driver
Information Center (DIC).
4. Start with the left (driver's side) front tire.
5. Remove the valve cap from the valve cap stem.
Activate the TPM sensor by increasing or
decreasing the tire's air pressure for 10 seconds,
then stop and listen for a single horn chirp.
The single horn chirp should sound within 15
seconds, con®rming that the sensor identi®cation
code has been matched to this tire and wheel
position. If you do not hear the con®rming single
horn chirp, you will need to start over with step
number one. To let air-pressure out of a tire you can
use the pointy end of the valve cap, a pencil-style
air pressure gage or a key.
6. Proceed to the right (passenger's side) front tire,
and repeat the procedure in step 5.
7. Proceed to the right (passenger's side) rear tire,
and repeat the procedure in step 5.
8. Proceed to the left (driver's side) rear tire, and
repeat the procedure in step 5.
5-65
Page 417 of 468
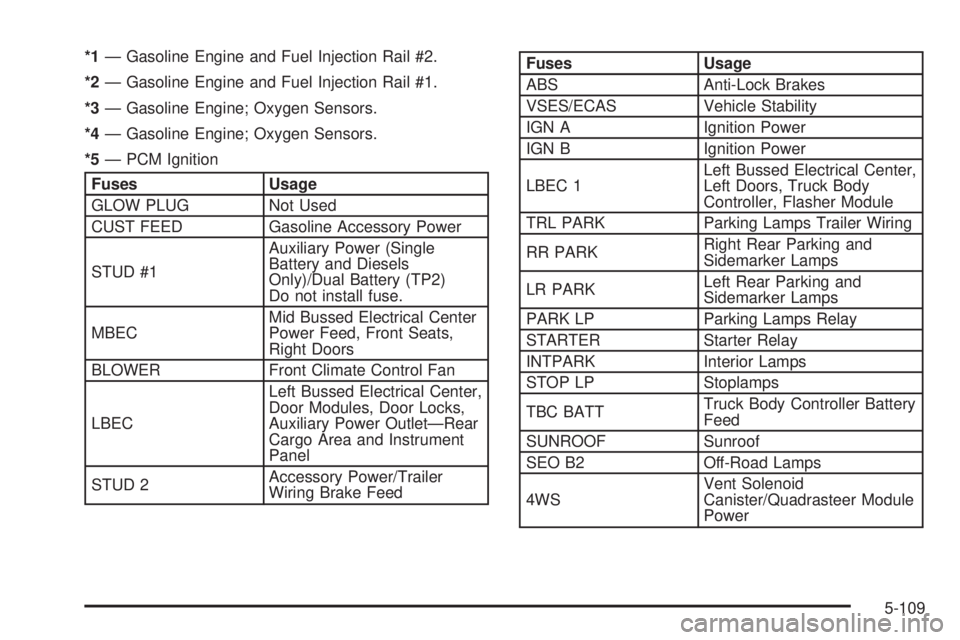
*1Ð Gasoline Engine and Fuel Injection Rail #2.
*2Ð Gasoline Engine and Fuel Injection Rail #1.
*3Ð Gasoline Engine; Oxygen Sensors.
*4Ð Gasoline Engine; Oxygen Sensors.
*5Ð PCM Ignition
Fuses Usage
GLOW PLUG Not Used
CUST FEED Gasoline Accessory Power
STUD #1Auxiliary Power (Single
Battery and Diesels
Only)/Dual Battery (TP2)
Do not install fuse.
MBECMid Bussed Electrical Center
Power Feed, Front Seats,
Right Doors
BLOWER Front Climate Control Fan
LBECLeft Bussed Electrical Center,
Door Modules, Door Locks,
Auxiliary Power OutletÐRear
Cargo Area and Instrument
Panel
STUD 2Accessory Power/Trailer
Wiring Brake Feed
Fuses Usage
ABS Anti-Lock Brakes
VSES/ECAS Vehicle Stability
IGN A Ignition Power
IGN B Ignition Power
LBEC 1Left Bussed Electrical Center,
Left Doors, Truck Body
Controller, Flasher Module
TRL PARK Parking Lamps Trailer Wiring
RR PARKRight Rear Parking and
Sidemarker Lamps
LR PARKLeft Rear Parking and
Sidemarker Lamps
PARK LP Parking Lamps Relay
STARTER Starter Relay
INTPARK Interior Lamps
STOP LP Stoplamps
TBC BATTTruck Body Controller Battery
Feed
SUNROOF Sunroof
SEO B2 Off-Road Lamps
4WSVent Solenoid
Canister/Quadrasteer Module
Power
5-109