remove seats GMC YUKON DENALI 2016 Owners Manual
[x] Cancel search | Manufacturer: GMC, Model Year: 2016, Model line: YUKON DENALI, Model: GMC YUKON DENALI 2016Pages: 396, PDF Size: 5.5 MB
Page 31 of 396
GMC Yukon Denali/Yukon XL Denali Owner Manual (GMNA-Localizing-U.S./
Canada/Mexico-9159308) - 2016 - crc - 6/2/15
30 Keys, Doors, and Windows
longer work. Each vehicle can have
up to eight transmitters matched
to it.
Programming with a Recognized
Transmitter (Keyless Access
Vehicles Only)
A new transmitter can be
programmed to the vehicle when
there is one recognized transmitter.
To program, the vehicle must be off
and all transmitters, both currently
recognized and new, must be
with you.1. Remove the key from the recognized transmitter.
2. Place the recognized transmitter(s) in the cupholder
or on the passenger seat.
3. Insert the vehicle key into the key lock cylinder on the driver
door handle. Then turn the key
counterclockwise, to the unlock
position, five times within
10 seconds.
The Driver Information Center
(DIC) displays READY FOR
REMOTE#2, 3, 4, ETC.
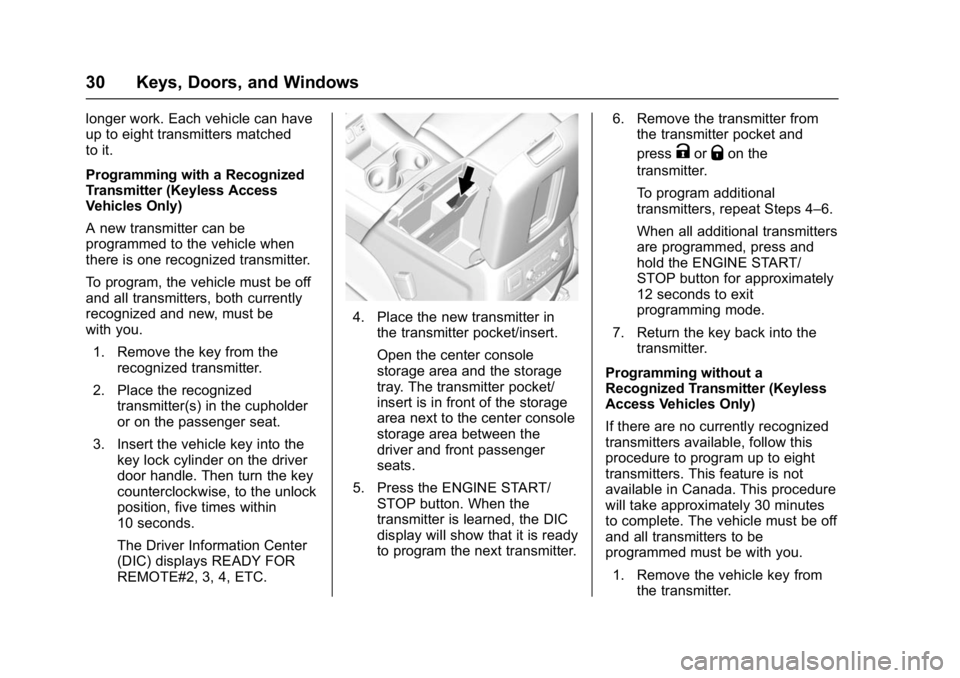
4. Place the new transmitter inthe transmitter pocket/insert.
Open the center console
storage area and the storage
tray. The transmitter pocket/
insert is in front of the storage
area next to the center console
storage area between the
driver and front passenger
seats.
5. Press the ENGINE START/ STOP button. When the
transmitter is learned, the DIC
display will show that it is ready
to program the next transmitter. 6. Remove the transmitter from
the transmitter pocket and
press
KorQon the
transmitter.
To program additional
transmitters, repeat Steps 4–6.
When all additional transmitters
are programmed, press and
hold the ENGINE START/
STOP button for approximately
12 seconds to exit
programming mode.
7. Return the key back into the transmitter.
Programming without a
Recognized Transmitter (Keyless
Access Vehicles Only)
If there are no currently recognized
transmitters available, follow this
procedure to program up to eight
transmitters. This feature is not
available in Canada. This procedure
will take approximately 30 minutes
to complete. The vehicle must be off
and all transmitters to be
programmed must be with you. 1. Remove the vehicle key from the transmitter.
Page 32 of 396
GMC Yukon Denali/Yukon XL Denali Owner Manual (GMNA-Localizing-U.S./
Canada/Mexico-9159308) - 2016 - crc - 6/2/15
Keys, Doors, and Windows 31
2. Insert the vehicle key into thekey lock cylinder on the driver
door handle; then turn the key
counterclockwise, to the unlock
position, five times within
10 seconds.
The Driver Information Center
(DIC) displays REMOTE
LEARN PENDING,
PLEASE WAIT.
3. Wait for 10 minutes until the DIC displays PRESS ENGINE
START BUTTON TO LEARN,
then press the ENGINE
START/STOP button.
The DIC display will again
show REMOTE LEARN
PENDING, PLEASE WAIT.
4. Repeat Step 3 two additional times. After the third time all
previously known transmitters
will no longer work with the
vehicle. Remaining transmitters
can be relearned during the
next steps.
The DIC display should now
show READY FOR REMOTE
# 1.
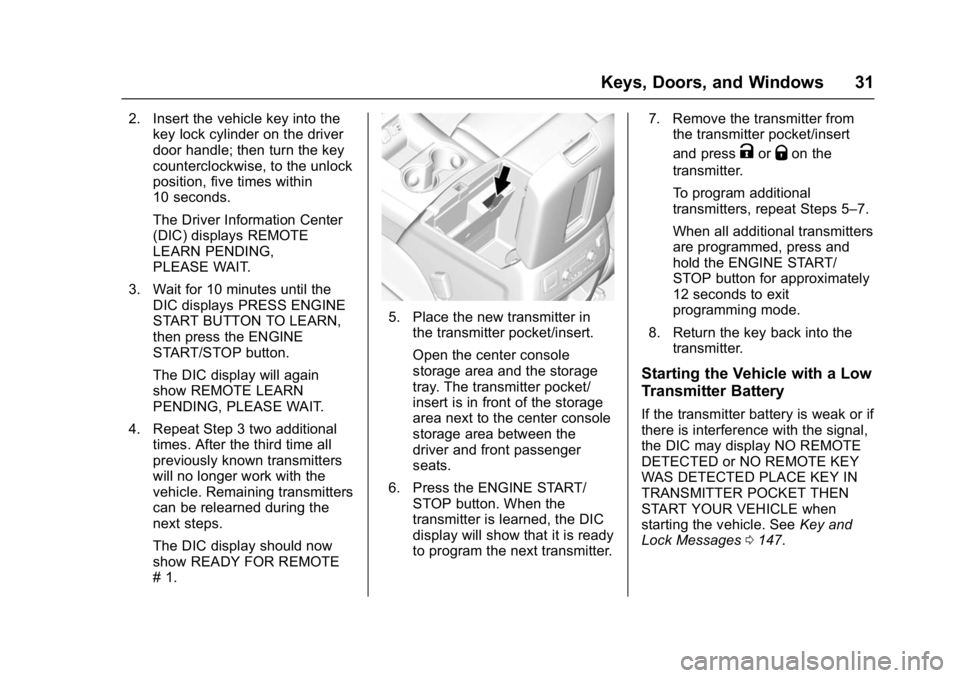
5. Place the new transmitter in
the transmitter pocket/insert.
Open the center console
storage area and the storage
tray. The transmitter pocket/
insert is in front of the storage
area next to the center console
storage area between the
driver and front passenger
seats.
6. Press the ENGINE START/ STOP button. When the
transmitter is learned, the DIC
display will show that it is ready
to program the next transmitter. 7. Remove the transmitter from
the transmitter pocket/insert
and press
KorQon the
transmitter.
To program additional
transmitters, repeat Steps 5–7.
When all additional transmitters
are programmed, press and
hold the ENGINE START/
STOP button for approximately
12 seconds to exit
programming mode.
8. Return the key back into the transmitter.
Starting the Vehicle with a Low
Transmitter Battery
If the transmitter battery is weak or if
there is interference with the signal,
the DIC may display NO REMOTE
DETECTED or NO REMOTE KEY
WAS DETECTED PLACE KEY IN
TRANSMITTER POCKET THEN
START YOUR VEHICLE when
starting the vehicle. See Key and
Lock Messages 0147.
Page 57 of 396
GMC Yukon Denali/Yukon XL Denali Owner Manual (GMNA-Localizing-U.S./
Canada/Mexico-9159308) - 2016 - crc - 6/2/15
56 Seats and Restraints
To store positions to theB(Exit)
button and easy exit features,
repeat above Steps 1–4 to store
your positions for getting out of the
vehicle.
Manually Recalling Memory
Positions
Press and hold 1, 2, or
Bto
manually recall the previously
stored memory positions. Releasing
1, 2, or
Bbefore the stored
positions are reached stops the
recall.
If something has blocked the driver
seat, power tilt and telescoping
steering column, and/or adjustable
pedals while recalling a memory
position, the recall may stop.
Remove the obstruction; then press
and hold the appropriate manual
control for the memory item that is
not recalling for two seconds. Try
recalling the memory position again
by pressing the appropriate memory
button. If the memory position is still
not recalling, see your dealer for
service. Automatically Recalling Memory
Positions (Auto Memory Recall)
If programmed on in the vehicle
personalization Menu, the Auto
(Automatic) Memory Recall feature
automatically recalls the current
driver
’s previously stored 1 or 2
position when the ignition is
changed from off to ON/RUN or
ACC/ACCESSORY.
See “Auto Memory Recall” under
"Comfort and Convenience" in
Vehicle Personalization 0155.
To stop recall movement, press one
of the memory, power mirror,
or power seat controls; press the
power tilt and telescoping steering
column control; or press the
adjustable pedal control.
If something has blocked the driver
seat, power tilt and telescoping
steering column, and/or the
adjustable pedals while recalling a
memory position, the recall may
stop. Remove the obstruction; then
press and hold the appropriate
manual control for the memory item
that is not recalling for two seconds.
Try recalling the memory position again by opening the driver door
and pressing
Kon the RKE
transmitter. If the memory position is
still not recalling, see your dealer for
service.
RKE transmitters are not labeled
with a number. If your memory seat
position is stored to 1 or 2, but this
position is not automatically
recalling, then change the stored
position or switch RKE transmitters
with the other driver.
Easy Exit Recall
If programmed on in the vehicle
personalization menu, the easy exit
feature automatically recalls the
previously stored
B(Exit) positions
for getting out of the vehicle. See
Vehicle Personalization 0155.
Easy exit recall automatically
activates when one of the following
occurs:
. The vehicle is turned off and the
driver door is opened within a
short time.
. The vehicle is turned off with the
driver door open.
Page 58 of 396
GMC Yukon Denali/Yukon XL Denali Owner Manual (GMNA-Localizing-U.S./
Canada/Mexico-9159308) - 2016 - crc - 6/2/15
Seats and Restraints 57
If something has blocked the driver
seat, power tilt and telescoping
steering column, and/or adjustable
pedals while recalling the exit
position, the recall may stop.
Remove the obstruction; then press
and hold the appropriate manual
control for the exit feature not
recalling for two seconds. Try
recalling the exit position again.
If the exit position is still not
recalling, see your dealer for
service.
Heated and Cooled Front
Seats
{Warning
If you cannot feel temperature
change or pain to the skin, the
seat heater may cause burns. To
reduce the risk of burns, people
with such a condition should use
care when using the seat heater,
especially for long periods of
time. Do not place anything on
the seat that insulates against(Continued)
Warning (Continued)
heat, such as a blanket, cushion,
cover, or similar item. This may
cause the seat heater to
overheat. An overheated seat
heater may cause a burn or may
damage the seat.
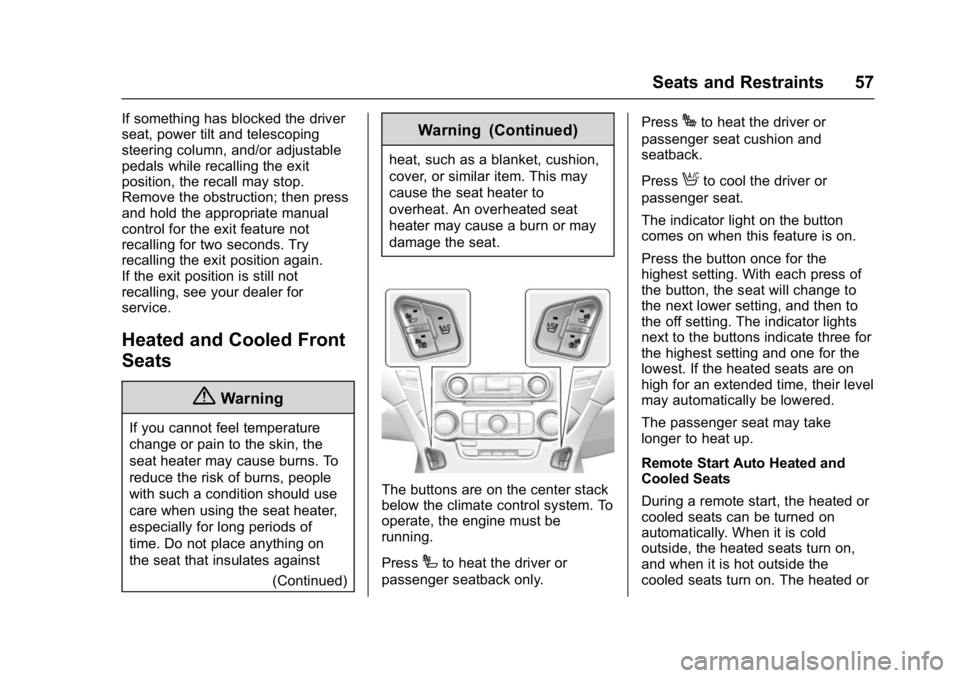
The buttons are on the center stack
below the climate control system. To
operate, the engine must be
running.
Press
Ito heat the driver or
passenger seatback only. Press
Jto heat the driver or
passenger seat cushion and
seatback.
Press
Ato cool the driver or
passenger seat.
The indicator light on the button
comes on when this feature is on.
Press the button once for the
highest setting. With each press of
the button, the seat will change to
the next lower setting, and then to
the off setting. The indicator lights
next to the buttons indicate three for
the highest setting and one for the
lowest. If the heated seats are on
high for an extended time, their level
may automatically be lowered.
The passenger seat may take
longer to heat up.
Remote Start Auto Heated and
Cooled Seats
During a remote start, the heated or
cooled seats can be turned on
automatically. When it is cold
outside, the heated seats turn on,
and when it is hot outside the
cooled seats turn on. The heated or
Page 71 of 396

GMC Yukon Denali/Yukon XL Denali Owner Manual (GMNA-Localizing-U.S./
Canada/Mexico-9159308) - 2016 - crc - 6/2/15
70 Seats and Restraints
They can help tighten the safety
belts during the early stages of a
moderate to severe frontal, near
frontal, or rear crash if the threshold
conditions for pretensioner
activation are met. Safety belt
pretensioners can also help tighten
the safety belts in a side crash or a
rollover event.
Pretensioners work only once. If the
pretensioners activate in a crash,
the pretensioners and probably
other parts of the vehicle's safety
belt system will need to be replaced.
SeeReplacing Safety Belt System
Parts after a Crash 073.
Rear Safety Belt Comfort
Guides
{Warning
A safety belt that is not properly
worn may not provide the
protection needed in a crash. The
person wearing the belt could be
seriously injured. The shoulder
belt should go over the shoulder
(Continued)
Warning (Continued)
and across the chest. These parts
of the body are best able to take
belt restraining forces.
Rear safety belt comfort guides may
provide added safety belt comfort
for older children who have
outgrown booster seats and for
some adults. When installed on a
shoulder belt, the comfort guide
positions the shoulder belt away
from the neck and head.
Second Row Outboard Seating
Positions
The vehicle has comfort guides for
the second row outboard seating
positions. The comfort guides are
stored on a clip on the interior trim
next to the outboard seatback. To install:
1. Remove the guide from its
storage clip on the interior trim
next to the outboard seatback.
Page 72 of 396
GMC Yukon Denali/Yukon XL Denali Owner Manual (GMNA-Localizing-U.S./
Canada/Mexico-9159308) - 2016 - crc - 6/2/15
Seats and Restraints 71
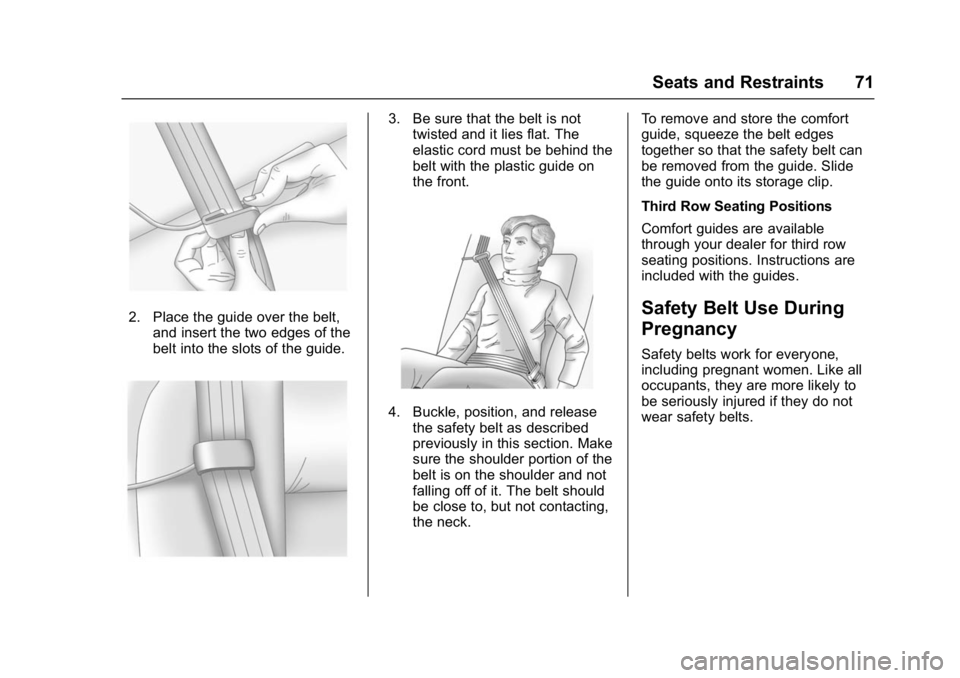
2. Place the guide over the belt,and insert the two edges of the
belt into the slots of the guide.
3. Be sure that the belt is nottwisted and it lies flat. The
elastic cord must be behind the
belt with the plastic guide on
the front.
4. Buckle, position, and release
the safety belt as described
previously in this section. Make
sure the shoulder portion of the
belt is on the shoulder and not
falling off of it. The belt should
be close to, but not contacting,
the neck. To remove and store the comfort
guide, squeeze the belt edges
together so that the safety belt can
be removed from the guide. Slide
the guide onto its storage clip.
Third Row Seating Positions
Comfort guides are available
through your dealer for third row
seating positions. Instructions are
included with the guides.
Safety Belt Use During
Pregnancy
Safety belts work for everyone,
including pregnant women. Like all
occupants, they are more likely to
be seriously injured if they do not
wear safety belts.
Page 83 of 396
GMC Yukon Denali/Yukon XL Denali Owner Manual (GMNA-Localizing-U.S./
Canada/Mexico-9159308) - 2016 - crc - 6/2/15
82 Seats and Restraints
2. Remove the child restraint fromthe vehicle.
3. Remove any additional items from the seat such as blankets,
cushions, seat covers, seat
heaters, or seat massagers.
4. Reinstall the child restraint following the directions
provided by the child restraint
manufacturer and refer to
Securing Child Restraints
(Rear Seat) 0100 orSecuring
Child Restraints (Front
Passenger Seat) 0103.
Make sure the safety belt
retractor is locked by pulling
the shoulder belt all the way
out of the retractor when
installing the child restraint,
even if the child restraint is
equipped with a safety belt
lock-off. When the retractor
lock is set, the belt can be
tightened but not pulled out of
the retractor.
5. If, after reinstalling the child restraint and restarting the
vehicle, the on indicator is still
lit, turn the vehicle off. Then slightly recline the vehicle
seatback and adjust the seat
cushion, if adjustable, to make
sure that the vehicle seatback
is not pushing the child
restraint into the seat cushion.
Also make sure the child
restraint is not trapped under
the vehicle head restraint.
If this happens, adjust the head
restraint. See
Head Restraints
0 52.
6. Restart the vehicle.
The passenger sensing system may
or may not turn off the airbag for a
child in a child restraint depending
upon the child’s size. It is better to
secure the child restraint in a
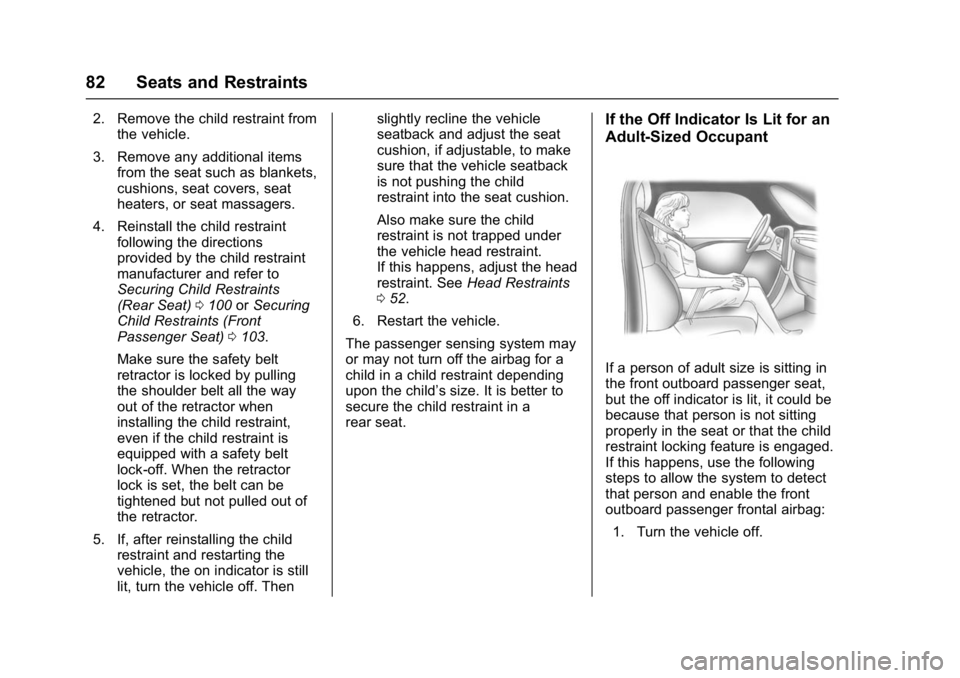
rear seat.If the Off Indicator Is Lit for an
Adult-Sized Occupant
If a person of adult size is sitting in
the front outboard passenger seat,
but the off indicator is lit, it could be
because that person is not sitting
properly in the seat or that the child
restraint locking feature is engaged.
If this happens, use the following
steps to allow the system to detect
that person and enable the front
outboard passenger frontal airbag: 1. Turn the vehicle off.
Page 84 of 396
GMC Yukon Denali/Yukon XL Denali Owner Manual (GMNA-Localizing-U.S./
Canada/Mexico-9159308) - 2016 - crc - 6/2/15
Seats and Restraints 83
2. Remove any additional materialfrom the seat, such as
blankets, cushions, seat
covers, seat heaters, or seat
massagers.
3. Place the seatback in the fully upright position.
4. Have the person sit upright in the seat, centered on the seat
cushion, with legs comfortably
extended.
5. If the shoulder portion of the belt is pulled out all the way,
the child restraint locking
feature will be engaged. This
may unintentionally cause the
passenger sensing system to
turn the airbag off for some
adult-sized occupants. If this
happens, unbuckle the belt, let
the belt go back all the way,
and then buckle the belt again
without pulling the belt out all
the way.
6. Restart the vehicle and have the person remain in this
position for two to three minutes
after the on indicator is lit.{Warning
If the front outboard passenger
airbag is turned off for an
adult-sized occupant, the airbag
will not be able to inflate and help
protect that person in a crash,
resulting in an increased risk of
serious injury or even death. An
adult-sized occupant should not
ride in the front outboard
passenger seat, if the passenger
airbag off indicator is lit.
Additional Factors Affecting
System Operation
Safety belts help keep the
passenger in position on the seat
during vehicle maneuvers and
braking, which helps the passenger
sensing system maintain the
passenger airbag status. See
“Safety Belts” and“Child Restraints”
in the Index for additional
information about the importance of
proper restraint use. A thick layer of additional material,
such as a blanket or cushion,
or aftermarket equipment such as
seat covers, seat heaters, and seat
massagers can affect how well the
passenger sensing system
operates. We recommend that you
not use seat covers or other
aftermarket equipment except when
approved by GM for your specific
vehicle. See
Adding Equipment to
the Airbag-Equipped Vehicle 084
for more information about
modifications that can affect how
the system operates.
The on indicator may be lit if an
object, such as a briefcase,
handbag, grocery bag, laptop,
or other electronic device, is put on
an unoccupied seat. If this is not
desired, remove the object from
the seat.
{Warning
Stowing of articles under the
passenger seat or between the
passenger seat cushion and
(Continued)
Page 98 of 396
GMC Yukon Denali/Yukon XL Denali Owner Manual (GMNA-Localizing-U.S./
Canada/Mexico-9159308) - 2016 - crc - 6/2/15
Seats and Restraints 97
Warning (Continued)
wrapped around a child’s neck.
If the shoulder belt is locked and
tightened around a child’s neck,
the only way to loosen the belt is
to cut it.
Buckle any unused safety belts
behind the child restraint so
children cannot reach them. Pull
the shoulder belt all the way out
of the retractor to set the lock,
and tighten the belt behind the
child restraint after the child
restraint has been installed.
Caution
Do not let the LATCH
attachments rub against the
vehicle’s safety belts. This may
damage these parts. If necessary,
move buckled safety belts to
avoid rubbing the LATCH
attachments.(Continued)
Caution (Continued)
Do not fold the empty rear seat
with a safety belt buckled. This
could damage the safety belt or
the seat. Unbuckle and return the
safety belt to its stowed position,
before folding the seat.
The vehicle is equipped with a front
center airbag in the inboard side of
the driver seat. Even with a front
center airbag, a child restraint can
be installed in any second row
seating position.
If you need to secure more than one
child restraint in the rear seat, see
Where to Put the Restraint 091.
This system is designed to make
installation of child restraints easier.
When using lower anchors, do not
use the vehicle's safety belts.
Instead use the vehicle's anchors
and child restraint attachments to
secure the restraints. Some
restraints also use another vehicle
anchor to secure a top tether. 1. Attach and tighten the lower
attachments to the lower
anchors. If the child restraint
does not have lower
attachments or the desired
seating position does not have
lower anchors, secure the child
restraint with the safety belts
and top tether when
recommended by the child
restraint manufacturer. Refer to
your child restraint
manufacturer instructions and
the instructions in this manual.
For the third row outboard
seating positions, if the head
restraint interferes with the
proper installation of the child
restraint, then the head
restraint may be removed. See
“Head Restraint Removal and
Reinstallation under Lower
Anchors and Tethers for
Children (LATCH System) 092.
1.1. Find the lower anchors for the desired seating
position.
1.2. Put the child restraint on the seat.
Page 101 of 396
GMC Yukon Denali/Yukon XL Denali Owner Manual (GMNA-Localizing-U.S./
Canada/Mexico-9159308) - 2016 - crc - 6/2/15
100 Seats and Restraints
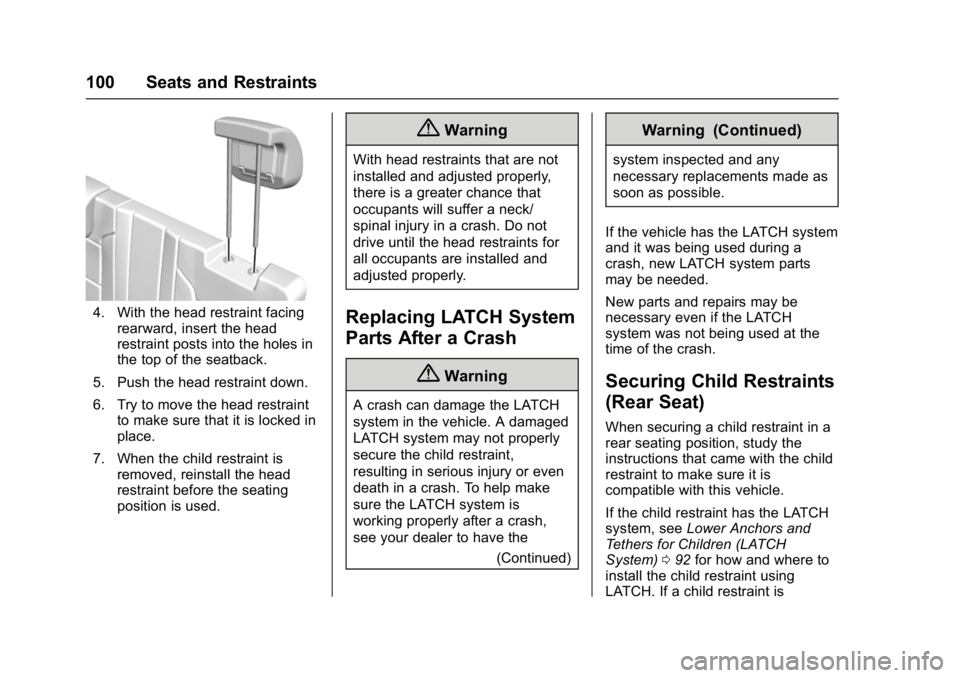
4. With the head restraint facingrearward, insert the head
restraint posts into the holes in
the top of the seatback.
5. Push the head restraint down.
6. Try to move the head restraint to make sure that it is locked in
place.
7. When the child restraint is removed, reinstall the head
restraint before the seating
position is used.
{Warning
With head restraints that are not
installed and adjusted properly,
there is a greater chance that
occupants will suffer a neck/
spinal injury in a crash. Do not
drive until the head restraints for
all occupants are installed and
adjusted properly.
Replacing LATCH System
Parts After a Crash
{Warning
A crash can damage the LATCH
system in the vehicle. A damaged
LATCH system may not properly
secure the child restraint,
resulting in serious injury or even
death in a crash. To help make
sure the LATCH system is
working properly after a crash,
see your dealer to have the
(Continued)
Warning (Continued)
system inspected and any
necessary replacements made as
soon as possible.
If the vehicle has the LATCH system
and it was being used during a
crash, new LATCH system parts
may be needed.
New parts and repairs may be
necessary even if the LATCH
system was not being used at the
time of the crash.
Securing Child Restraints
(Rear Seat)
When securing a child restraint in a
rear seating position, study the
instructions that came with the child
restraint to make sure it is
compatible with this vehicle.
If the child restraint has the LATCH
system, see Lower Anchors and
Tethers for Children (LATCH
System) 092 for how and where to
install the child restraint using
LATCH. If a child restraint is