seats GMC YUKON DENALI 2016 Owners Manual
[x] Cancel search | Manufacturer: GMC, Model Year: 2016, Model line: YUKON DENALI, Model: GMC YUKON DENALI 2016Pages: 396, PDF Size: 5.5 MB
Page 2 of 396
GMC Yukon Denali/Yukon XL Denali Owner Manual (GMNA-Localizing-U.S./
Canada/Mexico-9159308) - 2016 - crc - 6/2/15
ContentsIntroduction . . . . . . . . . . . . . . . . . . . . . . 2
In Brief . . . . . . . . . . . . . . . . . . . . . . . . . . . 5
Keys, Doors, and Windows . . . . . 25
Seats and Restraints . . . . . . . . . . . 51
Storage . . . . . . . . . . . . . . . . . . . . . . . 106
Instruments and Controls . . . . . . 110
Lighting . . . . . . . . . . . . . . . . . . . . . . . 165
Infotainment System . . . . . . . . . . 173
Climate Controls . . . . . . . . . . . . . . 174
Driving and Operating . . . . . . . . . 181
Vehicle Care . . . . . . . . . . . . . . . . . . 260
Service and Maintenance . . . . . 343
Technical Data . . . . . . . . . . . . . . . . 357
Customer Information . . . . . . . . . 360
Reporting Safety Defects . . . . . . 371
OnStar . . . . . . . . . . . . . . . . . . . . . . . . 374
Index . . . . . . . . . . . . . . . . . . . . 384
Page 6 of 396
GMC Yukon Denali/Yukon XL Denali Owner Manual (GMNA-Localizing-U.S./
Canada/Mexico-9159308) - 2016 - crc - 6/2/15
In Brief 5
In Brief
Instrument Panel
Instrument Panel . . . . . . . . . . . . . . . . 6
Initial Drive Information
Initial Drive Information . . . . . . . . . . 8
Remote Keyless Entry (RKE)System . . . . . . . . . . . . . . . . . . . . . . . . 8
Remote Vehicle Start . . . . . . . . . . . 9
Door Locks . . . . . . . . . . . . . . . . . . . . . 9
Liftgate . . . . . . . . . . . . . . . . . . . . . . . . 10
Windows . . . . . . . . . . . . . . . . . . . . . . . 10
Seat Adjustment . . . . . . . . . . . . . . . 11
Memory Features . . . . . . . . . . . . . . 11
Second Row Seats . . . . . . . . . . . . 12
Third Row Seats . . . . . . . . . . . . . . . 12
Heated and Cooled Front Seats . . . . . . . . . . . . . . . . . . . . . . . . . 12
Head Restraint Adjustment . . . . 12
Safety Belts . . . . . . . . . . . . . . . . . . . . 13
Passenger Sensing System . . . 13
Mirror Adjustment . . . . . . . . . . . . . . 13
Steering Wheel Adjustment . . . . 14
Throttle and Brake Pedal Adjustment . . . . . . . . . . . . . . . . . . . 14
Interior Lighting . . . . . . . . . . . . . . . . 15
Exterior Lighting . . . . . . . . . . . . . . . 15
Windshield Wiper/Washer . . . . . . 16
Climate Controls . . . . . . . . . . . . . . . 17 Transmission . . . . . . . . . . . . . . . . . . 17
Four-Wheel Drive . . . . . . . . . . . . . . 18
Vehicle Features
Infotainment System . . . . . . . . . . . 19
Steering Wheel Controls . . . . . . . 19
Cruise Control . . . . . . . . . . . . . . . . . 19
Driver Information
Center (DIC) . . . . . . . . . . . . . . . . . 19
Forward Collision Alert (FCA) System . . . . . . . . . . . . . . . . . . . . . . . 20
Front Automatic Braking (FAB) System . . . . . . . . . . . . . . . . . . . . . . . 20
Lane Keep Assist (LKA) . . . . . . . 20
Lane Change Alert (LCA) . . . . . . 20
Rear Vision Camera (RVC) . . . . 21
Rear Cross Traffic Alert (RCTA) System . . . . . . . . . . . . . . . . . . . . . . . 21
Parking Assist . . . . . . . . . . . . . . . . . 21
Power Outlets . . . . . . . . . . . . . . . . . 21
Universal Remote System . . . . . 22
Sunroof . . . . . . . . . . . . . . . . . . . . . . . . 22
Performance and Maintenance
Traction Control/Electronic Stability Control . . . . . . . . . . . . . . 23
Tire Pressure Monitor . . . . . . . . . . 23
Engine Oil Life System . . . . . . . . 23
Driving for Better Fuel Economy . . . . . . . . . . . . . . . . . . . . . 24 Roadside Assistance
Program . . . . . . . . . . . . . . . . . . . . . . 24
Page 8 of 396

GMC Yukon Denali/Yukon XL Denali Owner Manual (GMNA-Localizing-U.S./
Canada/Mexico-9159308) - 2016 - crc - 6/2/15
In Brief 7
1.Air Vents 0179.
2. Head-Up Display (HUD) 0140.
3.
gTraction Control/Electronic
Stability Control 0218.
jPower Assist Steps 040 (If
Equipped).
XParking Assist Button (If
Equipped). See Assistance
Systems for Parking or Backing
0 231.
ALane Departure Warning
(LDW) 0240 (If Equipped).
0Pedal Adjust Switch (If
Equipped). See Adjustable
Throttle and Brake Pedal
0 198.
4. Turn Signal Lever. See Turn
and Lane-Change Signals
0 168.
Windshield Wiper/Washer
0 112.
5. Favorite Switches (Out of View). See “Steering Wheel
Controls” in the infotainment
manual. Volume Switches (Out of View).
See
“Steering Wheel Controls”
in the infotainment manual.
6. Hazard Warning Flashers
0168.
7. Instrument Cluster 0120.
8. Shift Lever. See Automatic
Transmission 0207.
Tow/Haul Selector Button. See
Tow/Haul Mode 0212.
Range Selection Mode (If
Equipped). See Manual Mode
0 209.
9. Light Sensor. See Automatic
Headlamp System 0167.
10. Infotainment 0173.
11. Dual Automatic Climate Control
System 0174
12. Driver and Passenger Heated and Cooled Front Seat
Buttons. See Heated and
Cooled Front Seats 057.
13. Rear Climate Control Buttons. SeeRear Climate Control
System 0178.
14. Ignition Positions 0199. 15. Steering Wheel Controls. See
the infotainment manual.
16. Horn 0112.
17. Steering Wheel Adjustment
0111.
18. Hood Release. See Hood
0 263.
19. Cruise Control 0221.
Adaptive Cruise Control 0224
(If Equipped).
Forward Collision Alert (FCA)
System 0234 (If Equipped).
20. Trailer Brake Control Panel (If Equipped). See Towing
Equipment 0251.
21. Data Link Connector (DLC) (Out of View). See Malfunction
Indicator Lamp (Check Engine
Light) 0129.
22. Automatic Transfer Case Knob (If Equipped). See Four-Wheel
Drive 0213.
23. Parking Brake 0217.
24. Exterior Lamp Controls 0165.
Page 12 of 396
GMC Yukon Denali/Yukon XL Denali Owner Manual (GMNA-Localizing-U.S./
Canada/Mexico-9159308) - 2016 - crc - 6/2/15
In Brief 11
Seat Adjustment
Power Seats
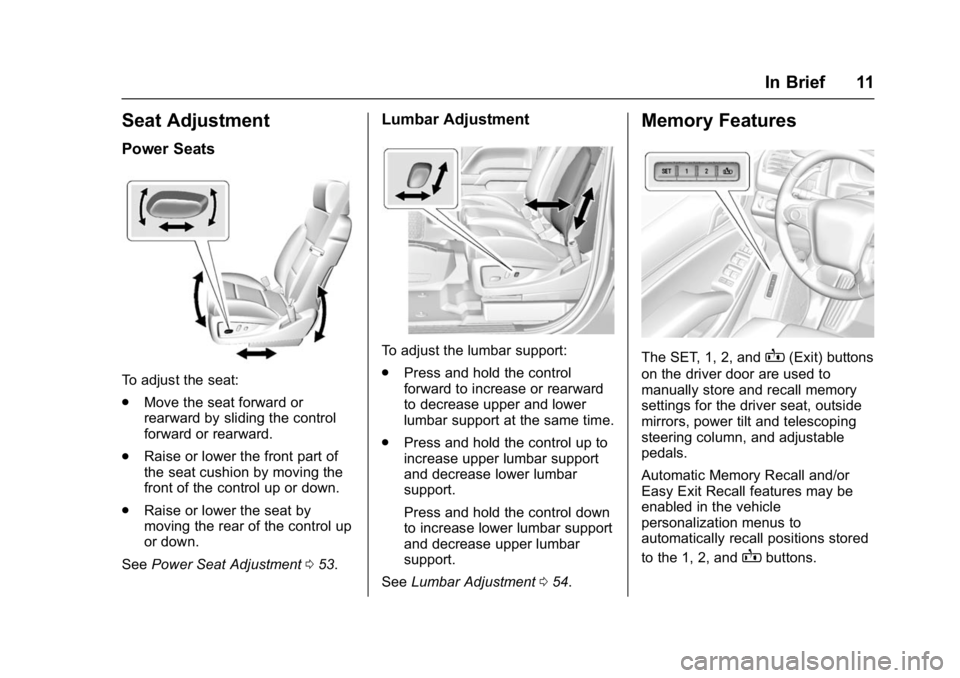
To adjust the seat:
.Move the seat forward or
rearward by sliding the control
forward or rearward.
. Raise or lower the front part of
the seat cushion by moving the
front of the control up or down.
. Raise or lower the seat by
moving the rear of the control up
or down.
See Power Seat Adjustment 053.
Lumbar Adjustment
To adjust the lumbar support:
.
Press and hold the control
forward to increase or rearward
to decrease upper and lower
lumbar support at the same time.
. Press and hold the control up to
increase upper lumbar support
and decrease lower lumbar
support.
Press and hold the control down
to increase lower lumbar support
and decrease upper lumbar
support.
See Lumbar Adjustment 054.
Memory Features
The SET, 1, 2, andB(Exit) buttons
on the driver door are used to
manually store and recall memory
settings for the driver seat, outside
mirrors, power tilt and telescoping
steering column, and adjustable
pedals.
Automatic Memory Recall and/or
Easy Exit Recall features may be
enabled in the vehicle
personalization menus to
automatically recall positions stored
to the 1, 2, and
Bbuttons.
Page 13 of 396
GMC Yukon Denali/Yukon XL Denali Owner Manual (GMNA-Localizing-U.S./
Canada/Mexico-9159308) - 2016 - crc - 6/2/15
12 In Brief
SeeMemory Seats 055 and
Vehicle Personalization 0155.
Second Row Seats
The second row seatbacks can be
folded for additional cargo space,
or the seats can be folded and
tumbled for easy entry/exit to the
third row seats. The seatbacks also
recline.
See Second Row Seats 059.
Third Row Seats
Third row seatbacks can be folded.
See Third Row Seats 063.
Heated and Cooled Front
Seats
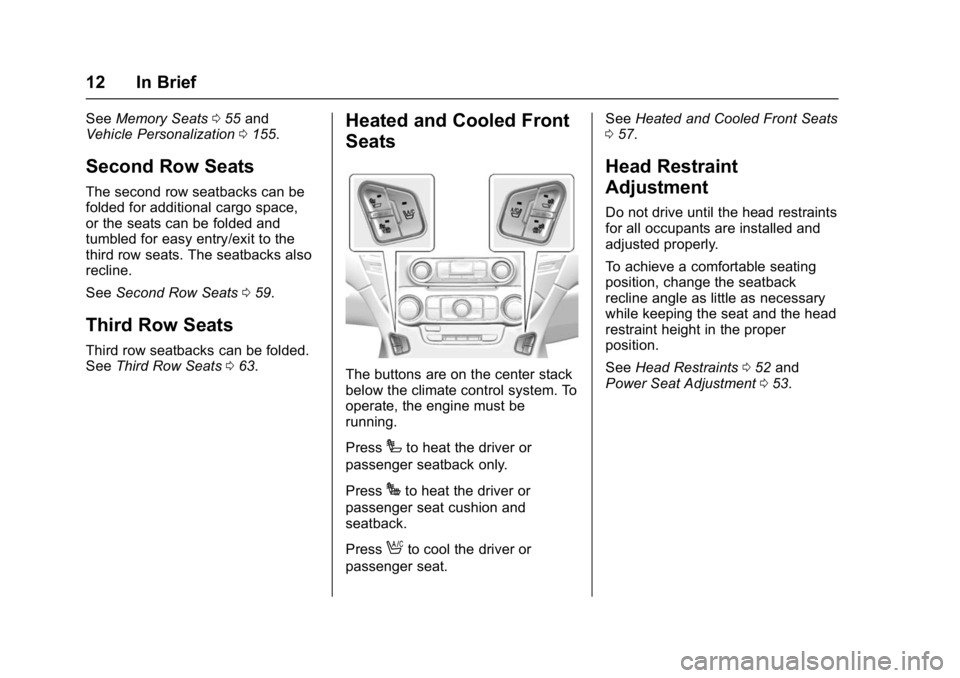
The buttons are on the center stack
below the climate control system. To
operate, the engine must be
running.
Press
Ito heat the driver or
passenger seatback only.
Press
Jto heat the driver or
passenger seat cushion and
seatback.
Press
Ato cool the driver or
passenger seat. See
Heated and Cooled Front Seats
0 57.
Head Restraint
Adjustment
Do not drive until the head restraints
for all occupants are installed and
adjusted properly.
To achieve a comfortable seating
position, change the seatback
recline angle as little as necessary
while keeping the seat and the head
restraint height in the proper
position.
See Head Restraints 052 and
Power Seat Adjustment 053.
Page 16 of 396
GMC Yukon Denali/Yukon XL Denali Owner Manual (GMNA-Localizing-U.S./
Canada/Mexico-9159308) - 2016 - crc - 6/2/15
In Brief 15
SeeAdjustable Throttle and Brake
Pedal 0198.
The vehicle may have a memory
function, which lets pedal settings
be saved and recalled. See Memory
Seats 055.
Interior Lighting
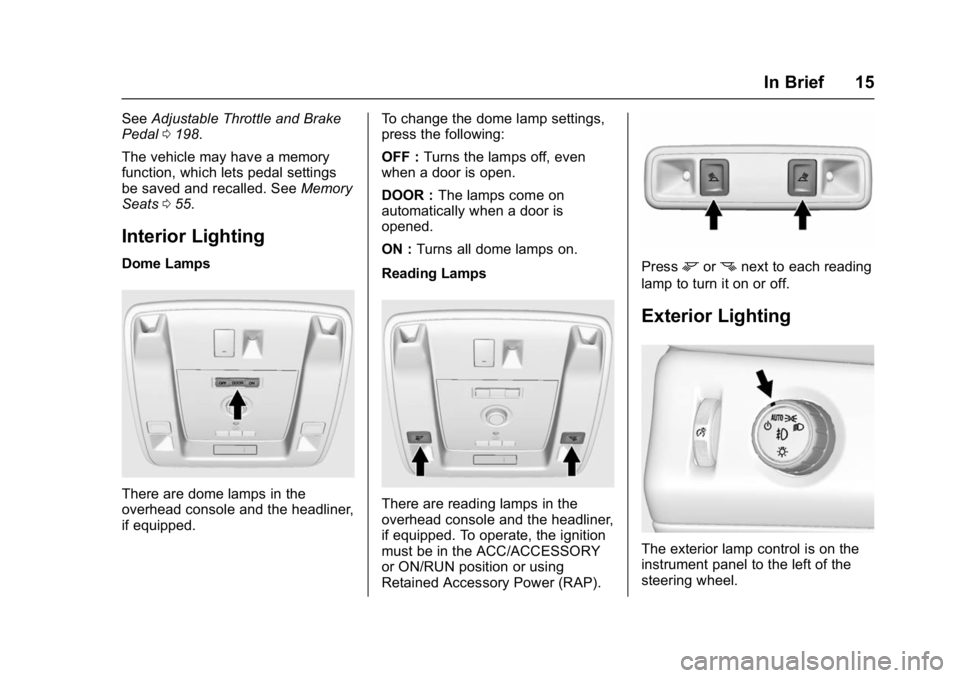
Dome Lamps
There are dome lamps in the
overhead console and the headliner,
if equipped. To change the dome lamp settings,
press the following:
OFF :
Turns the lamps off, even
when a door is open.
DOOR : The lamps come on
automatically when a door is
opened.
ON : Turns all dome lamps on.
Reading LampsThere are reading lamps in the
overhead console and the headliner,
if equipped. To operate, the ignition
must be in the ACC/ACCESSORY
or ON/RUN position or using
Retained Accessory Power (RAP).
Pressmornnext to each reading
lamp to turn it on or off.
Exterior Lighting
The exterior lamp control is on the
instrument panel to the left of the
steering wheel.
Page 22 of 396

GMC Yukon Denali/Yukon XL Denali Owner Manual (GMNA-Localizing-U.S./
Canada/Mexico-9159308) - 2016 - crc - 6/2/15
In Brief 21
Rear Vision
Camera (RVC)
If equipped, RVC displays a view of
the area behind the vehicle on the
center stack display when the
vehicle is shifted into R (Reverse) to
aid with parking and low-speed
backing maneuvers.
SeeAssistance Systems for Parking
or Backing 0231.
Rear Cross Traffic Alert
(RCTA) System
If equipped, the RCTA system uses
a triangle with an arrow displayed
on the RVC screen to warn of traffic
behind your vehicle that may cross
your vehicle's path while in
R (Reverse). In addition, beeps will
sound, or the driver seat will pulse.
See Assistance Systems for Parking
or Backing 0231.
Parking Assist
If equipped, Rear Parking Assist
(RPA) uses sensors on the rear
bumper to assist with parking and avoiding objects while in
R (Reverse). It operates at speeds
less than 8 km/h (5 mph). RPA may
display a warning triangle on the
Rear Vision Camera screen and a
graphic on the instrument cluster to
provide the object distance. In
addition, multiple beeps or seat
pulses may occur if very close to an
object.
The vehicle may also have the Front
Parking Assist system.
See
Assistance Systems for Parking
or Backing 0231.
Power Outlets
Power Outlets 12 Volt Direct
Current
Accessory power outlets can be
used to plug in electrical equipment,
such as a cell phone, MP3
player, etc.
The vehicle may have up to five
accessory power outlets:
Vehicles with a Center Console
.
One in front of the cupholders on
the center console. .
One inside the center storage
console.
. One on the rear of the center
storage console.
. One in the third row seat on the
driver side.
. One in the rear cargo area on
the passenger side.
Vehicles with Bench Seats
. One on the center stack below
the climate control system.
. One in the storage area on the
bench seat.
. One on the rear of the center
armrest storage.
. One in the third row seat area on
the driver side.
. One in the rear cargo area on
the passenger side.
Lift the cover to access and replace
when not in use.
See Power Outlets 0116.
Page 31 of 396
GMC Yukon Denali/Yukon XL Denali Owner Manual (GMNA-Localizing-U.S./
Canada/Mexico-9159308) - 2016 - crc - 6/2/15
30 Keys, Doors, and Windows
longer work. Each vehicle can have
up to eight transmitters matched
to it.
Programming with a Recognized
Transmitter (Keyless Access
Vehicles Only)
A new transmitter can be
programmed to the vehicle when
there is one recognized transmitter.
To program, the vehicle must be off
and all transmitters, both currently
recognized and new, must be
with you.1. Remove the key from the recognized transmitter.
2. Place the recognized transmitter(s) in the cupholder
or on the passenger seat.
3. Insert the vehicle key into the key lock cylinder on the driver
door handle. Then turn the key
counterclockwise, to the unlock
position, five times within
10 seconds.
The Driver Information Center
(DIC) displays READY FOR
REMOTE#2, 3, 4, ETC.
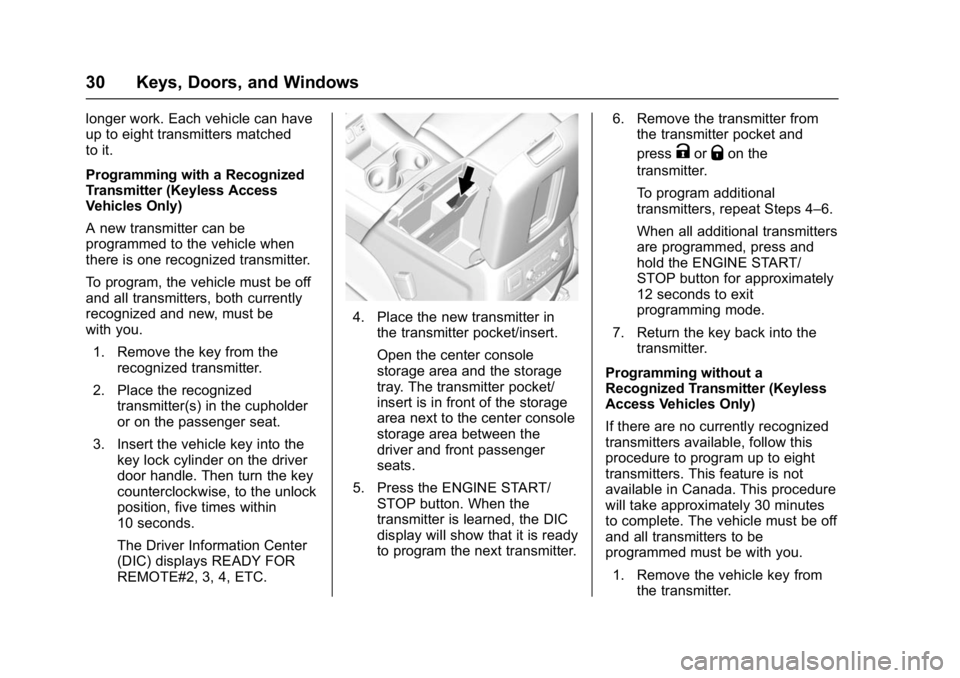
4. Place the new transmitter inthe transmitter pocket/insert.
Open the center console
storage area and the storage
tray. The transmitter pocket/
insert is in front of the storage
area next to the center console
storage area between the
driver and front passenger
seats.
5. Press the ENGINE START/ STOP button. When the
transmitter is learned, the DIC
display will show that it is ready
to program the next transmitter. 6. Remove the transmitter from
the transmitter pocket and
press
KorQon the
transmitter.
To program additional
transmitters, repeat Steps 4–6.
When all additional transmitters
are programmed, press and
hold the ENGINE START/
STOP button for approximately
12 seconds to exit
programming mode.
7. Return the key back into the transmitter.
Programming without a
Recognized Transmitter (Keyless
Access Vehicles Only)
If there are no currently recognized
transmitters available, follow this
procedure to program up to eight
transmitters. This feature is not
available in Canada. This procedure
will take approximately 30 minutes
to complete. The vehicle must be off
and all transmitters to be
programmed must be with you. 1. Remove the vehicle key from the transmitter.
Page 32 of 396
GMC Yukon Denali/Yukon XL Denali Owner Manual (GMNA-Localizing-U.S./
Canada/Mexico-9159308) - 2016 - crc - 6/2/15
Keys, Doors, and Windows 31
2. Insert the vehicle key into thekey lock cylinder on the driver
door handle; then turn the key
counterclockwise, to the unlock
position, five times within
10 seconds.
The Driver Information Center
(DIC) displays REMOTE
LEARN PENDING,
PLEASE WAIT.
3. Wait for 10 minutes until the DIC displays PRESS ENGINE
START BUTTON TO LEARN,
then press the ENGINE
START/STOP button.
The DIC display will again
show REMOTE LEARN
PENDING, PLEASE WAIT.
4. Repeat Step 3 two additional times. After the third time all
previously known transmitters
will no longer work with the
vehicle. Remaining transmitters
can be relearned during the
next steps.
The DIC display should now
show READY FOR REMOTE
# 1.
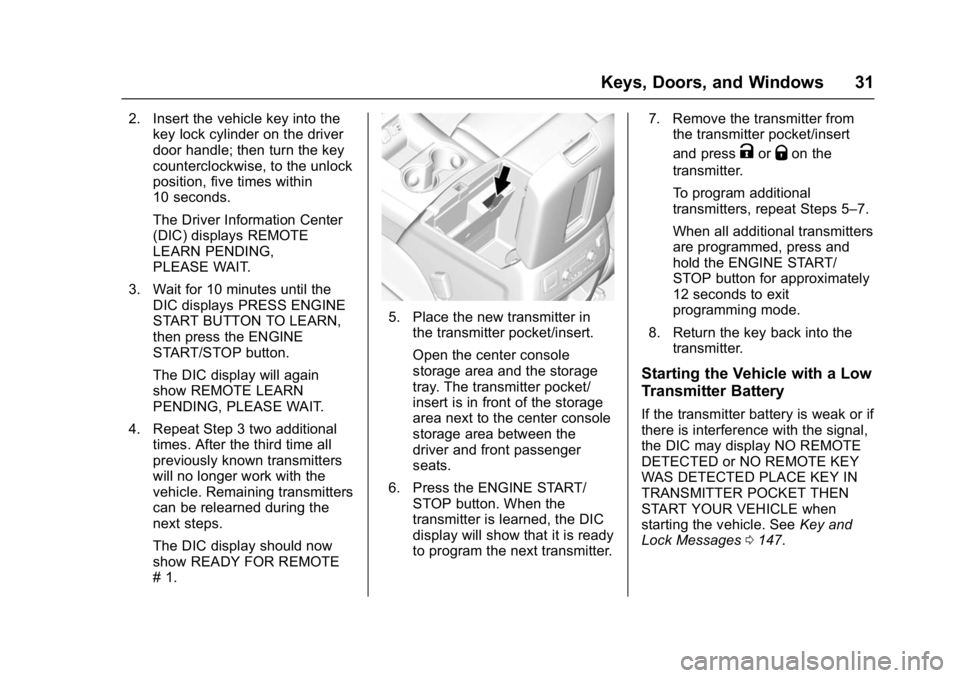
5. Place the new transmitter in
the transmitter pocket/insert.
Open the center console
storage area and the storage
tray. The transmitter pocket/
insert is in front of the storage
area next to the center console
storage area between the
driver and front passenger
seats.
6. Press the ENGINE START/ STOP button. When the
transmitter is learned, the DIC
display will show that it is ready
to program the next transmitter. 7. Remove the transmitter from
the transmitter pocket/insert
and press
KorQon the
transmitter.
To program additional
transmitters, repeat Steps 5–7.
When all additional transmitters
are programmed, press and
hold the ENGINE START/
STOP button for approximately
12 seconds to exit
programming mode.
8. Return the key back into the transmitter.
Starting the Vehicle with a Low
Transmitter Battery
If the transmitter battery is weak or if
there is interference with the signal,
the DIC may display NO REMOTE
DETECTED or NO REMOTE KEY
WAS DETECTED PLACE KEY IN
TRANSMITTER POCKET THEN
START YOUR VEHICLE when
starting the vehicle. See Key and
Lock Messages 0147.
Page 34 of 396
GMC Yukon Denali/Yukon XL Denali Owner Manual (GMNA-Localizing-U.S./
Canada/Mexico-9159308) - 2016 - crc - 6/2/15
Keys, Doors, and Windows 33
Remote Vehicle Start
If equipped with the remote start
feature, the climate control system
will come on when the vehicle is
started remotely depending on the
outside temperature.
The rear defog and heated and
cooled seats, if equipped, may also
come on. SeeHeated and Cooled
Front Seats 057 and Vehicle
Personalization 0155.
Laws in some communities may
restrict the use of remote starters.
Check local regulations for any
requirements on remote starting of
vehicles.
Do not use remote start if the
vehicle is low on fuel.
The vehicle cannot be remote
started if:
. The transmitter is in the vehicle.
. The hood is not closed.
. There is an emission control
system malfunction and the
malfunction indicator lamp is on. The engine will turn off during a
remote vehicle start if:
.
The coolant temperature gets
too high.
. The oil pressure gets low.
The RKE transmitter range may be
reduced while the vehicle is running.
Other conditions can affect the
performance of the transmitter. See
Remote Keyless Entry (RKE)
System 026 orVehicle
Personalization 0155.
Starting the Engine Using Remote
Start
1. Press and release
Q.
2. Immediately press and hold
/
until the turn signal lamps flash
or for at least four seconds.
When the vehicle starts, the
parking lamps will turn on. The
doors will be locked and the
climate control system may
come on. The engine will continue to run
for 10 minutes. Repeat
Steps 1 and 2 for a 10-minute
time extension.
Place the ignition in ON/RUN/
START to operate the vehicle.
Extending Engine Run Time
The engine run time can be
extended by 10 minutes, for a total
of 20 minutes, if during the first
10 minutes Steps 1 and 2 are
repeated while the engine is still
running. An extension can be
requested, 30 seconds after
starting.
A maximum of two remote starts,
or a single start with an extension,
is allowed between ignition cycles.
The vehicle's ignition must be
turned on and then back off to use
remote start again.
Canceling a Remote Start
To cancel a remote start, do one of
the following:
. Press and hold
/until the
parking lamps turn off.