ECU GMC YUKON XL 2005 Service Manual
[x] Cancel search | Manufacturer: GMC, Model Year: 2005, Model line: YUKON XL, Model: GMC YUKON XL 2005Pages: 468, PDF Size: 2.67 MB
Page 136 of 468

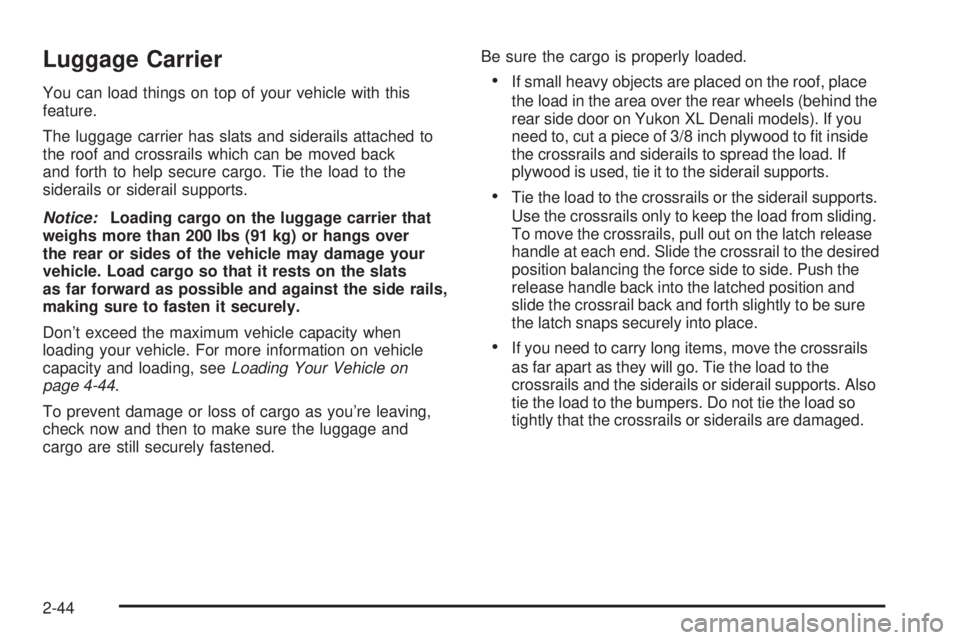
Luggage Carrier
You can load things on top of your vehicle with this
feature.
The luggage carrier has slats and siderails attached to
the roof and crossrails which can be moved back
and forth to help secure cargo. Tie the load to the
siderails or siderail supports.
Notice:Loading cargo on the luggage carrier that
weighs more than 200 lbs (91 kg) or hangs over
the rear or sides of the vehicle may damage your
vehicle. Load cargo so that it rests on the slats
as far forward as possible and against the side rails,
making sure to fasten it securely.
Don’t exceed the maximum vehicle capacity when
loading your vehicle. For more information on vehicle
capacity and loading, seeLoading Your Vehicle on
page 4-44.
To prevent damage or loss of cargo as you’re leaving,
check now and then to make sure the luggage and
cargo are still securely fastened.Be sure the cargo is properly loaded.If small heavy objects are placed on the roof, place
the load in the area over the rear wheels (behind the
rear side door on Yukon XL Denali models). If you
need to, cut a piece of 3/8 inch plywood to �t inside
the crossrails and siderails to spread the load. If
plywood is used, tie it to the siderail supports.
Tie the load to the crossrails or the siderail supports.
Use the crossrails only to keep the load from sliding.
To move the crossrails, pull out on the latch release
handle at each end. Slide the crossrail to the desired
position balancing the force side to side. Push the
release handle back into the latched position and
slide the crossrail back and forth slightly to be sure
the latch snaps securely into place.
If you need to carry long items, move the crossrails
as far apart as they will go. Tie the load to the
crossrails and the siderails or siderail supports. Also
tie the load to the bumpers. Do not tie the load so
tightly that the crossrails or siderails are damaged.
2-44
Page 137 of 468

For the purpose of wind noise reduction, locate the
front crossrail approximately 18 to 24 inches
(46 to 58 cm) rearward of the front supports.
After moving a crossrail, be sure it is securely locked
into the siderail.
Your vehicle has a Center High-Mounted Stoplamp
(CHMSL) located above the rear glass. If items
are loaded on the roof of the vehicle, care should be
taken not to block or damage the CHMSL unit.
Rear Storage Area
Your vehicle may have a storage compartment located
in the rear cargo area of the vehicle in the driver’s
side trim panel.
To open the utility compartment, press in on the release
latch and swing the compartment door open.
To open the compartment on extended models, pull the
latch to access.
Convenience Net
The convenience net (if equipped) in the rear of your
vehicle helps to keep small loads in place during sharp
turns or quick stops and starts.
The net is not designed for larger, heavier items.
To install the net, attach the hooks to the raised cargo
tie downs. Then, attach the cord loops to the button
retainers in the side trim.
You can unhook the net so that it will lie �at when
you’re not using it.
2-45
Page 138 of 468

Cargo Cover
{CAUTION:
An improperly stored cargo cover could be
thrown about the vehicle during a collision or
sudden maneuver. You or others could be
injured. If you remove the cover, always store
it in the proper storage location. When you put
it back, always be sure that it is securely
reattached.
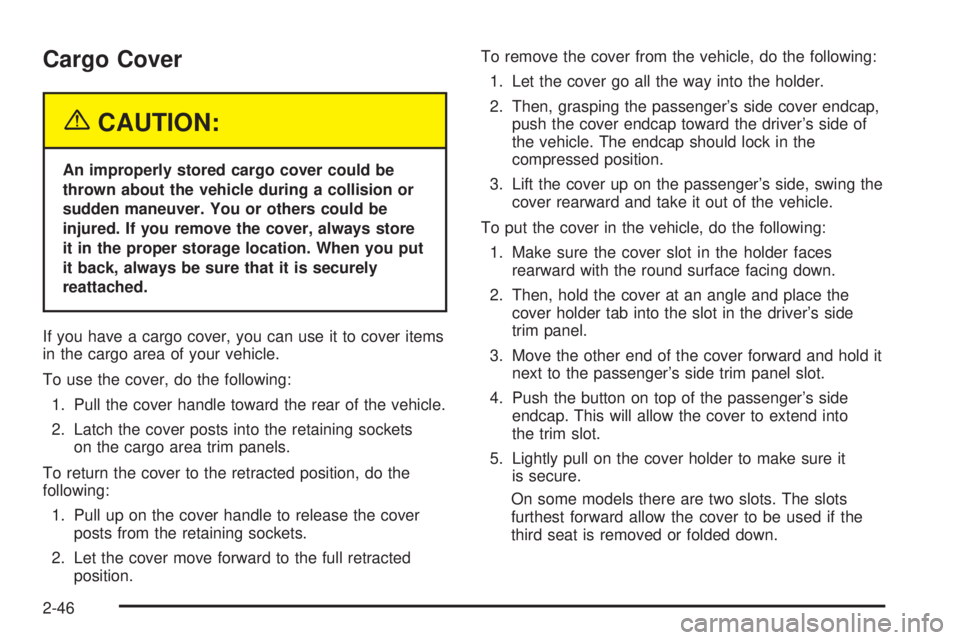
If you have a cargo cover, you can use it to cover items
in the cargo area of your vehicle.
To use the cover, do the following:
1. Pull the cover handle toward the rear of the vehicle.
2. Latch the cover posts into the retaining sockets
on the cargo area trim panels.
To return the cover to the retracted position, do the
following:
1. Pull up on the cover handle to release the cover
posts from the retaining sockets.
2. Let the cover move forward to the full retracted
position.To remove the cover from the vehicle, do the following:
1. Let the cover go all the way into the holder.
2. Then, grasping the passenger’s side cover endcap,
push the cover endcap toward the driver’s side of
the vehicle. The endcap should lock in the
compressed position.
3. Lift the cover up on the passenger’s side, swing the
cover rearward and take it out of the vehicle.
To put the cover in the vehicle, do the following:
1. Make sure the cover slot in the holder faces
rearward with the round surface facing down.
2. Then, hold the cover at an angle and place the
cover holder tab into the slot in the driver’s side
trim panel.
3. Move the other end of the cover forward and hold it
next to the passenger’s side trim panel slot.
4. Push the button on top of the passenger’s side
endcap. This will allow the cover to extend into
the trim slot.
5. Lightly pull on the cover holder to make sure it
is secure.
On some models there are two slots. The slots
furthest forward allow the cover to be used if the
third seat is removed or folded down.
2-46
Page 143 of 468

Instrument Panel Overview...............................3-4
Hazard Warning Flashers................................3-6
Other Warning Devices...................................3-6
Horn.............................................................3-6
Tilt Wheel.....................................................3-6
Turn Signal/Multifunction Lever.........................3-7
Turn and Lane-Change Signals........................3-8
Headlamp High/Low-Beam Changer..................3-8
Flash-to-Pass.................................................3-9
Windshield Wipers..........................................3-9
Windshield Washer.......................................3-10
Cruise Control..............................................3-11
Headlamps..................................................3-14
Headlamps on Reminder................................3-15
Daytime Running Lamps (DRL).......................3-15
Automatic Headlamp System..........................3-16
Puddle Lamps..............................................3-16
Fog Lamps..................................................3-17
Instrument Panel Brightness...........................3-17
Dome Lamps...............................................3-18
Entry Lighting...............................................3-18
Exit Lighting.................................................3-18
Reading Lamps............................................3-18
Battery Run-Down Protection..........................3-19
Accessory Power Outlets...............................3-19
Ashtrays and Cigarette Lighter........................3-20Climate Controls............................................3-20
Dual Automatic Climate Control System...........3-20
Outlet Adjustment.........................................3-25
Rear Climate Control System.........................3-26
Warning Lights, Gages, and Indicators............3-28
Instrument Panel Cluster................................3-29
Speedometer and Odometer...........................3-30
Tachometer.................................................3-30
Safety Belt Reminder Light.............................3-30
Airbag Readiness Light..................................3-31
Passenger Airbag Status Indicator...................3-32
Charging System Light..................................3-33
Voltmeter Gage............................................3-34
Brake System Warning Light..........................3-34
Anti-Lock Brake System Warning Light.............3-36
Traction Off Light..........................................3-36
Engine Coolant Temperature Gage..................3-37
Transmission Temperature Gage.....................3-37
Tire Pressure Light.......................................3-39
Malfunction Indicator Lamp.............................3-39
Oil Pressure Gage........................................3-42
Security Light...............................................3-43
Cruise Control Light......................................3-44
Highbeam On Light.......................................3-44
Tow/Haul Mode Light....................................3-44
Section 3 Instrument Panel
3-1
Page 162 of 468

Ashtrays and Cigarette Lighter
The front ashtray and lighter are located in the center
console near the cupholders. Press on the access door
to open it and use the ashtray and lighter.
Notice:If you put papers or other �ammable items
in the ashtray, hot cigarettes or other smoking
materials could ignite them and possibly damage
your vehicle. Never put �ammable items in the
ashtray.
To remove the ashtray, pull it from the center console.
Slide it back in and push down to be sure it is secure.
To use the cigarette lighter, push it in all the way, and let
go. When it’s ready, it will pop back out by itself.
Notice:Holding a cigarette lighter in while it is
heating will not allow the lighter to back away from
the heating element when it is hot. Damage from
overheating may occur to the lighter or heating
element, or a fuse could be blown. Do not hold a
cigarette lighter in while it is heating. Do not
use anything other than the cigarette lighter in the
heating element.
Climate Controls
Dual Automatic Climate Control
System
With this system, you can control the heating, cooling
and ventilation in your vehicle.
You can select different climate control settings for the
driver and passengers.
3-20
Page 185 of 468

A reading in the low pressure zone may be caused by a
dangerously low oil level or some other problem
causing low oil pressure. Check your oil as soon as
possible. SeeEngine Oil on page 5-14.
{CAUTION:
Do not keep driving if the oil pressure is low. If
you do, your engine can become so hot that it
catches �re. You or others could be burned.
Check your oil as soon as possible and have
your vehicle serviced.
Notice:Lack of proper engine oil maintenance may
damage the engine. The repairs would not be
covered by your warranty. Always follow the
maintenance schedule in this manual for changing
engine oil.
Security Light
This light will come on
brie�y when you turn the
key toward START.
The light will stay on until
the engine starts.
If the light �ashes, the Passlock
®system has entered a
tamper mode. If the vehicle fails to start, seePasslock®
on page 2-19.
If the light comes on continuously while driving and
stays on, there may be a problem with the Passlock
®
system. Your vehicle will not be protected by Passlock®,
and you should see your dealer.
Also, seeContent Theft-Deterrent on page 2-17for
additional information regarding the security light.
3-43
Page 218 of 468

XM™ Radio Messages (cont’d)
Radio Display
MessageCondition Action Required
No Info Song/Program Title not
availableNo song title information is available at this time on this
channel. The system is working properly.
No Info Category Name not
availableNo category information is available at this time on this
channel. The system is working properly.
No Info No Text/Informational
message availableNo text or informational messages are available at this
time on this channel. The system is working properly.
Not Found No channel available for
the chosen categoryThere are no channels available for the selected category.
The system is working properly.
XM Locked Theft lock active The XM™ receiver in the vehicle may have previously
been in another vehicle. For security purposes, XM™
receivers cannot be swapped between vehicles. If this
message is received after having your vehicle serviced,
check with your GM dealer.
Radio ID Radio ID label
(channel 0)If tuned to channel 0, this message will alternate with the
XM™ Radio eight digit radio ID label. This label is needed
to activate the service.
Unknown Radio ID not known
(should only be if
hardware failure)If this message is received when tuned to channel 0, there
may be a receiver fault. Consult with your GM dealer.
Chk XMRcvr Hardware failure If this message does not clear within a short period of time,
the receiver may have a fault. Consult with your GM dealer.
3-76
Page 233 of 468

Battery Replacement
To change the batteries, do the following:
1. Remove the battery compartment door located on
the bottom of the remote control.
2. Replace the two AA batteries in the compartment.
Make sure that they are installed correctly, using
the diagram on the inside of the battery
compartment.
3. Close the battery door securely.
If the remote control is to be stored for a long period of
time, remove the batteries and keep them in a cool,
dry place.Problem Recommended Action
No power. The ignition might not be
in on or accessory. The
parental control button
might have been turned
on. The power indicator
light will �ash.
Disc will not play. The system might be off.
The parental control
button might have been
turned on. The power
indicator light will �ash.
The system might be in
auxiliary mode. The disc
is upside down or is not
compatible.
The picture does not �ll
the screen. There are
black borders on the
top and bottom or on
both sides or it looks
stretched out.Check the display
mode settings in the
display menu.
The disc was ejected, but
it was pulled back into the
DVD player.The disc is being stored in
the DVD player. Press the
eject button again to eject
the disc.
3-91
Page 261 of 468

Off-road driving involves some new skills. And that is why
it is very important that you read this guide. You will �nd
many driving tips and suggestions. These will help make
your off-road driving safer and more enjoyable.
Before You Go Off-Roading
There are some things to do before you go out. For
example, be sure to have all necessary maintenance
and service work done. Check to make sure all
underbody shields (if so equipped) are properly
attached. Is there enough fuel? Is the spare tire fully
in�ated? Are the �uid levels up where they should be?
What are the local laws that apply to off-roading
where you will be driving? If you do not know, you
should check with law enforcement people in the area.
Will you be on someone’s private land? If so, be
sure to get the necessary permission.
Loading Your Vehicle for Off-Road
Driving
There are some important things to remember about
how to load your vehicle.
The heaviest things should be on the load �oor and
forward of your rear axle. Put heavier items as far
forward as you can.
Be sure the load is secured properly, so driving on
the off-road terrain does not toss things around.
{CAUTION:
Cargo on the load �oor piled higher than
the seatbacks can be thrown forward
during a sudden stop. You or your
passengers could be injured. Keep cargo
below the top of the seatbacks.
Unsecured cargo on the load �oor can be
tossed about when driving over rough
terrain. You or your passengers can be
struck by �ying objects. Secure the cargo
properly.
Heavy loads on the roof raise the vehicle’s
center of gravity, making it more likely to
roll over. You can be seriously or fatally
injured if the vehicle rolls over. Put heavy
loads inside the cargo area, not on the
roof. Keep cargo in the cargo area as far
forward and low as possible.
You will �nd other important information in this manual.
SeeLoading Your Vehicle on page 4-44andTires
on page 5-56.
4-17
Page 282 of 468

Winter Driving
Here are some tips for winter driving:
Have your vehicle in good shape for winter.
You may want to put winter emergency supplies in
your vehicle.
Also seeTires on page 5-56.Include an ice scraper, a small brush or broom, a
supply of windshield washer �uid, a rag, some winter
outer clothing, a small shovel, a �ashlight, a red
cloth, and a couple of re�ective warning triangles. And,
if you will be driving under severe conditions, include
a small bag of sand, a piece of old carpet, or a couple of
burlap bags to help provide traction. Be sure you
properly secure these items in your vehicle.
Driving on Snow or Ice
Most of the time, those places where your tires meet
the road probably have good traction.
However, if there is snow or ice between your tires and
the road, you can have a very slippery situation. You
will have a lot less traction, or grip, and will need to be
very careful.
4-38