buttons GMC YUKON XL 2013 Owners Manual
[x] Cancel search | Manufacturer: GMC, Model Year: 2013, Model line: YUKON XL, Model: GMC YUKON XL 2013Pages: 510, PDF Size: 7.71 MB
Page 9 of 510
Black plate (3,1)GMC Yukon/Yukon XL Owner Manual - 2013 - CRC 2nd edition - 8/15/12
In Brief 1-3
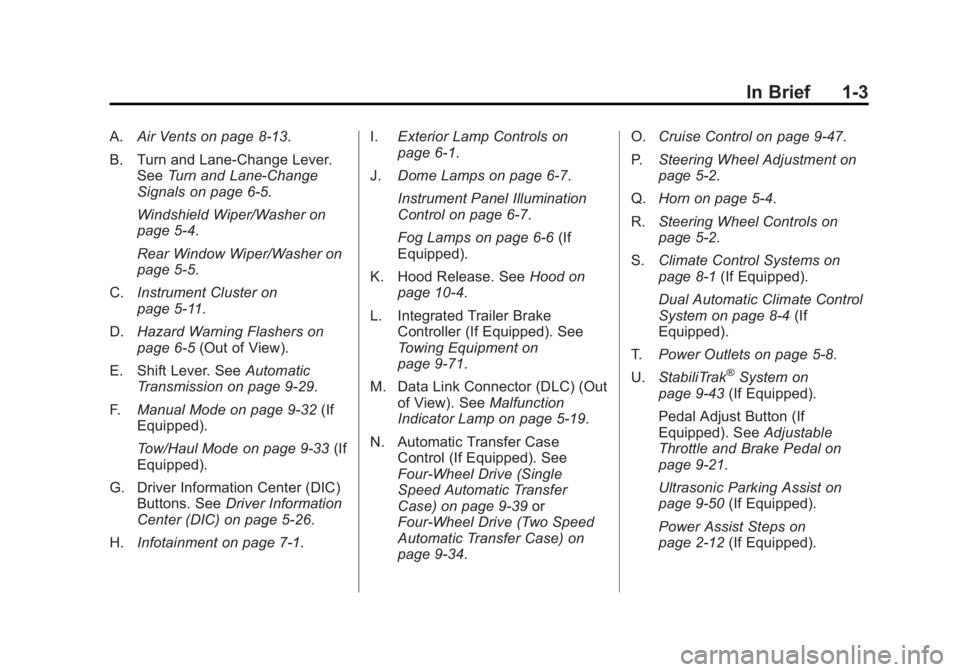
A.Air Vents on page 8‑13.
B. Turn and Lane‐Change Lever. See Turn and Lane-Change
Signals on page 6‑5.
Windshield Wiper/Washer on
page 5‑4.
Rear Window Wiper/Washer on
page 5‑5.
C. Instrument Cluster on
page 5‑11.
D. Hazard Warning Flashers on
page 6‑5 (Out of View).
E. Shift Lever. See Automatic
Transmission on page 9‑29.
F. Manual Mode on page 9‑32 (If
Equipped).
Tow/Haul Mode on page 9‑33 (If
Equipped).
G. Driver Information Center (DIC) Buttons. See Driver Information
Center (DIC) on page 5‑26.
H. Infotainment on page 7‑1. I.
Exterior Lamp Controls on
page 6‑1.
J. Dome Lamps on page 6‑7.
Instrument Panel Illumination
Control on page 6‑7.
Fog Lamps on page 6‑6 (If
Equipped).
K. Hood Release. See Hood on
page 10‑4.
L. Integrated Trailer Brake Controller (If Equipped). See
Towing Equipment on
page 9‑71.
M. Data Link Connector (DLC) (Out of View). See Malfunction
Indicator Lamp on page 5‑19.
N. Automatic Transfer Case Control (If Equipped). See
Four-Wheel Drive (Single
Speed Automatic Transfer
Case) on page 9‑39 or
Four-Wheel Drive (Two Speed
Automatic Transfer Case) on
page 9‑34. O.
Cruise Control on page 9‑47.
P. Steering Wheel Adjustment on
page 5‑2.
Q. Horn on page 5‑4.
R. Steering Wheel Controls on
page 5‑2.
S. Climate Control Systems on
page 8‑1 (If Equipped).
Dual Automatic Climate Control
System on page 8‑4 (If
Equipped).
T. Power Outlets on page 5‑8.
U. StabiliTrak
®System on
page 9‑43 (If Equipped).
Pedal Adjust Button (If
Equipped). See Adjustable
Throttle and Brake Pedal on
page 9‑21.
Ultrasonic Parking Assist on
page 9‑50 (If Equipped).
Power Assist Steps on
page 2‑12 (If Equipped).
Page 10 of 510
Black plate (4,1)GMC Yukon/Yukon XL Owner Manual - 2013 - CRC 2nd edition - 8/15/12
1-4 In Brief
Initial Drive
Information
This section provides a brief
overview about some of the
important features that may or may
not be on your specific vehicle.
For more detailed information, refer
to each of the features which can be
found later in this owner manual.
Remote Keyless Entry
(RKE) System
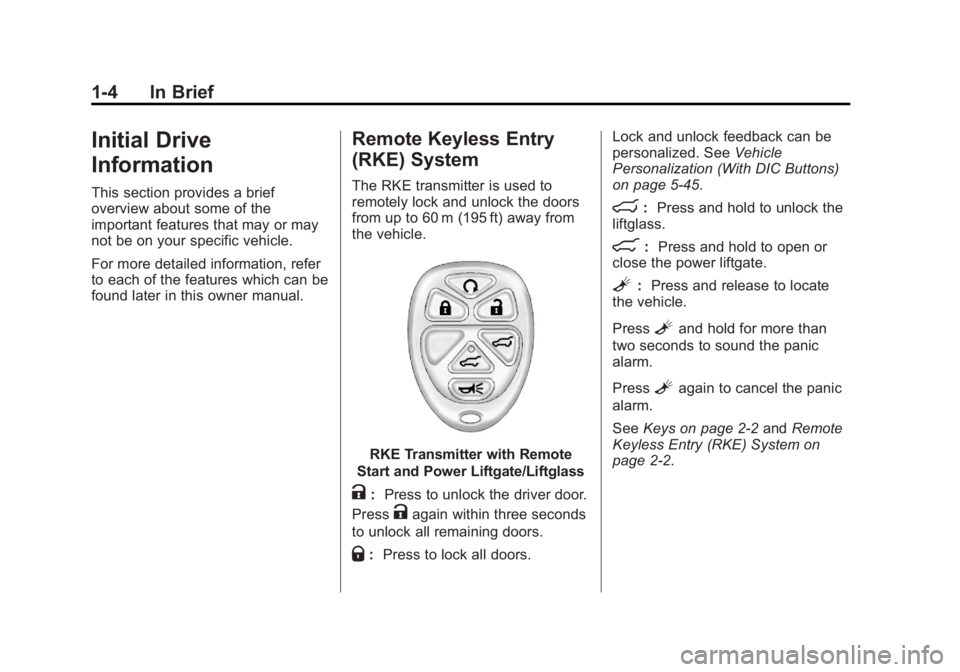
The RKE transmitter is used to
remotely lock and unlock the doors
from up to 60 m (195 ft) away from
the vehicle.
RKE Transmitter with Remote
Start and Power Liftgate/Liftglass
K: Press to unlock the driver door.
Press
Kagain within three seconds
to unlock all remaining doors.
Q: Press to lock all doors. Lock and unlock feedback can be
personalized. See
Vehicle
Personalization (With DIC Buttons)
on page 5‑45.
m: Press and hold to unlock the
liftglass.
8: Press and hold to open or
close the power liftgate.
L: Press and release to locate
the vehicle.
Press
Land hold for more than
two seconds to sound the panic
alarm.
Press
Lagain to cancel the panic
alarm.
See Keys on page 2‑2 andRemote
Keyless Entry (RKE) System on
page 2‑2.
Page 15 of 510
Black plate (9,1)GMC Yukon/Yukon XL Owner Manual - 2013 - CRC 2nd edition - 8/15/12
In Brief 1-9
2. Move the seatback to thedesired position, and then
release the lever to lock the
seatback in place.
3. Push and pull on the seatback to make sure it is locked.
To return the seatback to the upright
position:
1. Lift the lever fully without applying pressure to the
seatback, and the seatback will
return to the upright position.
2. Push and pull on the seatback to make sure it is locked.
See Reclining Seatbacks on
page 3‑5. Power Reclining Seatbacks
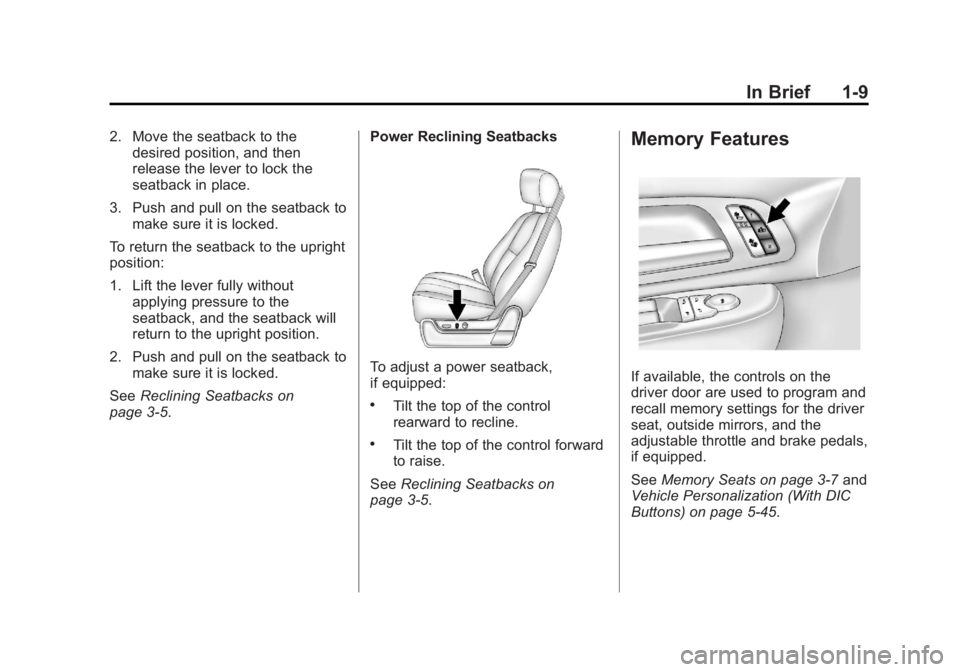
To adjust a power seatback,
if equipped:
.Tilt the top of the control
rearward to recline.
.Tilt the top of the control forward
to raise.
See Reclining Seatbacks on
page 3‑5.
Memory Features
If available, the controls on the
driver door are used to program and
recall memory settings for the driver
seat, outside mirrors, and the
adjustable throttle and brake pedals,
if equipped.
See Memory Seats on page 3‑7 and
Vehicle Personalization (With DIC
Buttons) on page 5‑45.
Page 16 of 510
Black plate (10,1)GMC Yukon/Yukon XL Owner Manual - 2013 - CRC 2nd edition - 8/15/12
1-10 In Brief
Second Row Seats
On vehicles with a 60/40 split-bench
or buckets seats, the seatbacks can
be folded for additional cargo space,
or the seats can be folded and
tumbled for easy entry/exit to the
third row seats, if equipped. On
vehicles with bucket seats, the
seatbacks also recline.
SeeSecond Row Seats on
page 3‑11.
Third Row Seats
On vehicles with third row seats, the
seatbacks can be folded, and the
entire seat can be tumbled or
removed from the vehicle.
For detailed instructions, see Third
Row Seats on page 3‑15.
Heated and Ventilated
Seats
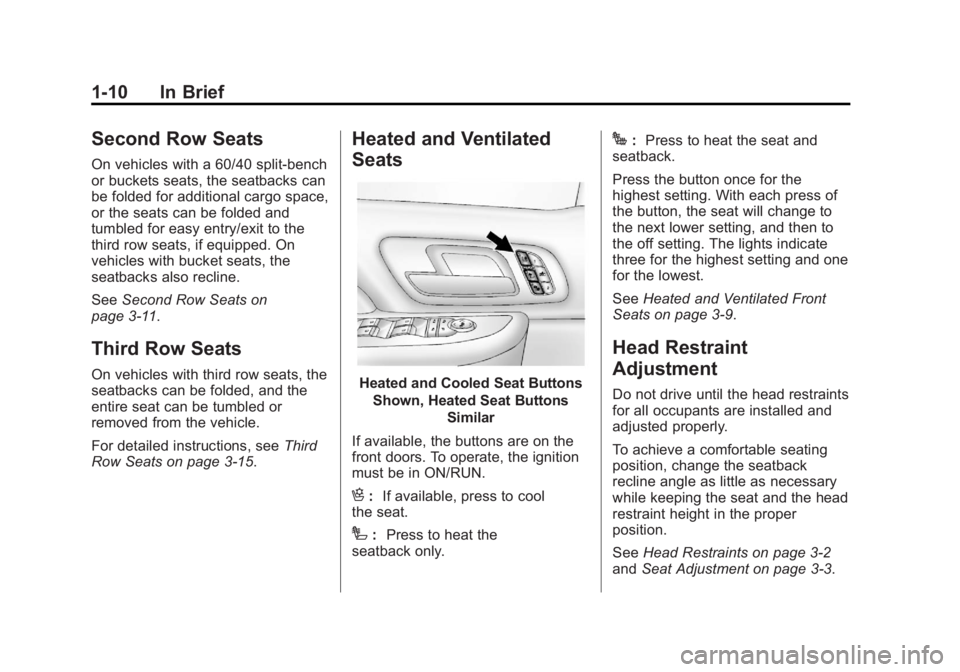
Heated and Cooled Seat Buttons
Shown, Heated Seat Buttons Similar
If available, the buttons are on the
front doors. To operate, the ignition
must be in ON/RUN.
H: If available, press to cool
the seat.
I: Press to heat the
seatback only.
J: Press to heat the seat and
seatback.
Press the button once for the
highest setting. With each press of
the button, the seat will change to
the next lower setting, and then to
the off setting. The lights indicate
three for the highest setting and one
for the lowest.
See Heated and Ventilated Front
Seats on page 3‑9.
Head Restraint
Adjustment
Do not drive until the head restraints
for all occupants are installed and
adjusted properly.
To achieve a comfortable seating
position, change the seatback
recline angle as little as necessary
while keeping the seat and the head
restraint height in the proper
position.
See Head Restraints on page 3‑2
and Seat Adjustment on page 3‑3.
Page 19 of 510
Black plate (13,1)GMC Yukon/Yukon XL Owner Manual - 2013 - CRC 2nd edition - 8/15/12
In Brief 1-13
3. Adjust the outside mirror so thatthe side of the vehicle and the
area behind are seen.
See Power Mirrors on page 2‑17.
Keep the selector switch in the
center position when not adjusting
either outside mirror.
To manual fold the mirrors:
Fold the mirrors inward to prevent
damage when going through an
automatic car wash. To fold, pull the
mirror toward the vehicle. Push the
mirror outward, to return to its
original position.
Heated Mirrors
Press
1to heat the mirrors.
See “Rear Window Defogger” under
Dual Automatic Climate Control
System on page 8‑4 orClimate
Control Systems on page 8‑1.
Park Tilt Mirrors
If the vehicle has the memory
package, the exterior mirrors tilt to a
preselected position when the vehicle is in R (Reverse). This
feature lets the driver view the curb
when parallel parking. The mirrors
return to the original position when
the vehicle is shifted out of
R (Reverse), or the ignition is turned
off or to OFF/LOCK.
This feature can be programed
through the Driver Information
Center (DIC). See
Vehicle
Personalization (With DIC Buttons)
on page 5‑45.
Trailer-Tow Mirrors
For vehicle with towing mirrors, they
can be extended for a clearer view
of the objects behind the vehicle.
Manually pull out the mirror head to
extend it for better visibility when
towing a trailer. See Trailer-Tow
Mirrors on page 2‑16.
Interior Mirror
Adjustment
Hold the rearview mirror in the
center and move it to view the area
behind the vehicle. Manual Rearview Mirror
For vehicles with a manual rearview
mirror, push the tab forward for
daytime use and pull it for nighttime
use to avoid glare from the
headlamps from behind. See
Manual Rearview Mirror on
page 2‑19.
Automatic Dimming Rearview
Mirror
For vehicles with an automatic
dimming rearview mirror. The mirror
will automatically reduce the glare
from the headlamps from behind.
The dimming feature comes on and
the indicator light illuminates each
time the ignition is turned to start.
See
Automatic Dimming Rearview
Mirror on page 2‑20.
Page 24 of 510
Black plate (18,1)GMC Yukon/Yukon XL Owner Manual - 2013 - CRC 2nd edition - 8/15/12
1-18 In Brief
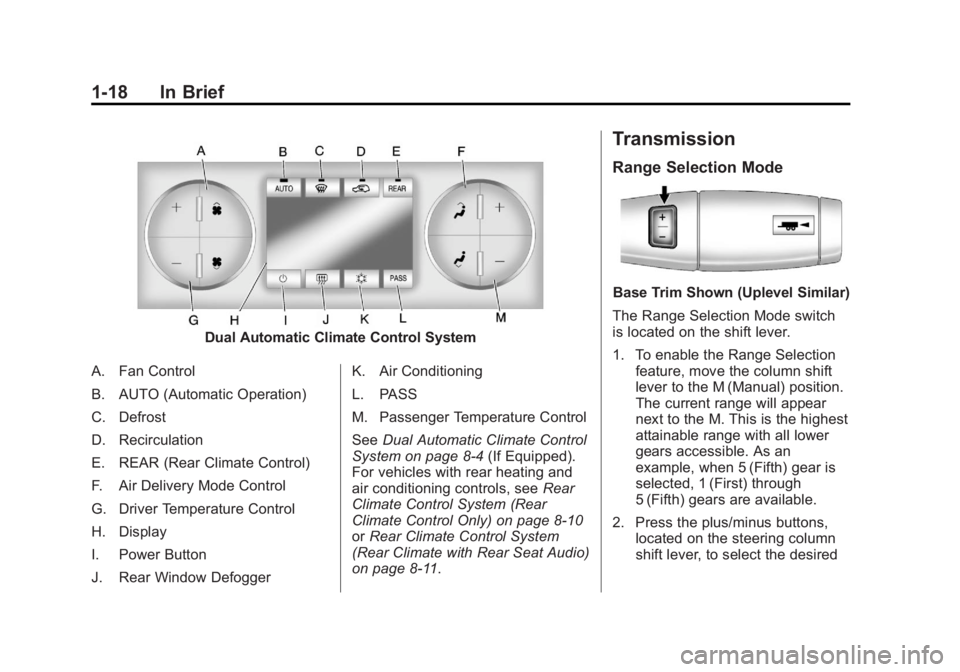
Dual Automatic Climate Control System
A. Fan Control
B. AUTO (Automatic Operation)
C. Defrost
D. Recirculation
E. REAR (Rear Climate Control)
F. Air Delivery Mode Control
G. Driver Temperature Control
H. Display
I. Power Button
J. Rear Window Defogger K. Air Conditioning
L. PASS
M. Passenger Temperature Control
See
Dual Automatic Climate Control
System on page 8‑4 (If Equipped).
For vehicles with rear heating and
air conditioning controls, see Rear
Climate Control System (Rear
Climate Control Only) on page 8‑10
or Rear Climate Control System
(Rear Climate with Rear Seat Audio)
on page 8‑11.
Transmission
Range Selection Mode
Base Trim Shown (Uplevel Similar)
The Range Selection Mode switch
is located on the shift lever.
1. To enable the Range Selection feature, move the column shift
lever to the M (Manual) position.
The current range will appear
next to the M. This is the highest
attainable range with all lower
gears accessible. As an
example, when 5 (Fifth) gear is
selected, 1 (First) through
5 (Fifth) gears are available.
2. Press the plus/minus buttons, located on the steering column
shift lever, to select the desired
Page 31 of 510
Black plate (25,1)GMC Yukon/Yukon XL Owner Manual - 2013 - CRC 2nd edition - 8/15/12
In Brief 1-25
Universal Remote System
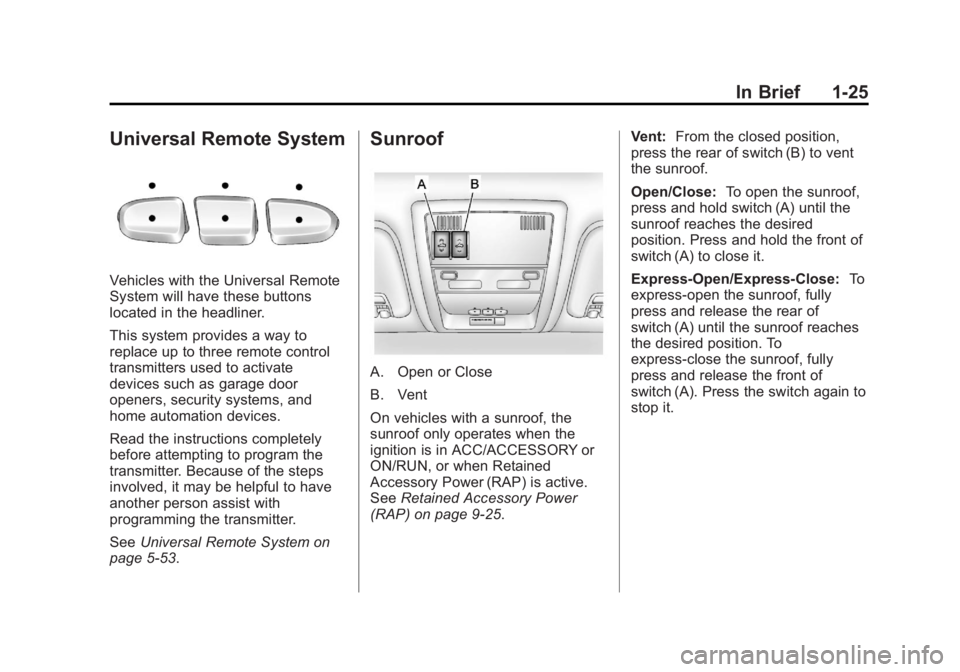
Vehicles with the Universal Remote
System will have these buttons
located in the headliner.
This system provides a way to
replace up to three remote control
transmitters used to activate
devices such as garage door
openers, security systems, and
home automation devices.
Read the instructions completely
before attempting to program the
transmitter. Because of the steps
involved, it may be helpful to have
another person assist with
programming the transmitter.
SeeUniversal Remote System on
page 5‑53.
Sunroof
A. Open or Close
B. Vent
On vehicles with a sunroof, the
sunroof only operates when the
ignition is in ACC/ACCESSORY or
ON/RUN, or when Retained
Accessory Power (RAP) is active.
See Retained Accessory Power
(RAP) on page 9‑25. Vent:
From the closed position,
press the rear of switch (B) to vent
the sunroof.
Open/Close: To open the sunroof,
press and hold switch (A) until the
sunroof reaches the desired
position. Press and hold the front of
switch (A) to close it.
Express-Open/Express-Close: To
express-open the sunroof, fully
press and release the rear of
switch (A) until the sunroof reaches
the desired position. To
express-close the sunroof, fully
press and release the front of
switch (A). Press the switch again to
stop it.
Page 33 of 510
Black plate (27,1)GMC Yukon/Yukon XL Owner Manual - 2013 - CRC 2nd edition - 8/15/12
In Brief 1-27
The low tire pressure warning light
may come on in cool weather when
the vehicle is first started, and then
turn off as the vehicle is driven. This
may be an early indicator that the
tire pressures are getting low and
the tires need to be inflated to the
proper pressure.
The TPMS does not replace normal
monthly tire maintenance. Maintain
the correct tire pressures.
SeeTire Pressure Monitor System
on page 10‑51.
Engine Oil Life System
The engine oil life system calculates
engine oil life based on vehicle use
and, on most vehicles, displays a
DIC message when it is necessary
to change the engine oil and filter.
The oil life system should be reset
to 100% only following an oil
change. Resetting the Oil Life System
To reset the Engine Oil Life System
on most vehicles:
1. Display OIL LIFE REMAINING
on the DIC. If the vehicle does
not have DIC buttons, the
vehicle must be in P (Park) to
access this display.
2. Press and hold the SET/RESET button on the DIC, or the trip
odometer reset stem if the
vehicle does not have DIC
buttons, for more than
five seconds. The oil life will
change to 100%.
On all vehicles, the Engine Oil Life
System can be reset as follows:
1. Turn the ignition to ON/RUN with the engine off.
2. Fully press the accelerator pedal slowly three times within
five seconds.
3. Display OIL LIFE REMAINING on the DIC. If the display shows
100%, the system is reset. See
Engine Oil Life System on
page 10‑9.
Fuel E85 (85% Ethanol)
Vehicles that have a yellow fuel cap
can use either unleaded gasoline or
ethanol fuel containing up to 85%
ethanol (E85). See Fuel E85 (85%
Ethanol) on page 9‑59. For all other
vehicles, use only the unleaded
gasoline described under
Recommended Fuel on page 9‑58.
Driving for Better Fuel
Economy
Driving habits can affect fuel
mileage. Here are some driving tips
to get the best fuel economy
possible.
.Avoid fast starts and accelerate
smoothly.
.Brake gradually and avoid
abrupt stops.
.Avoid idling the engine for long
periods of time.
Page 37 of 510
Black plate (3,1)GMC Yukon/Yukon XL Owner Manual - 2013 - CRC 2nd edition - 8/15/12
Keys, Doors, and Windows 2-3
.If the transmitter is still not
working correctly, see your
dealer or a qualified technician
for service.
Remote Keyless Entry
(RKE) System Operation
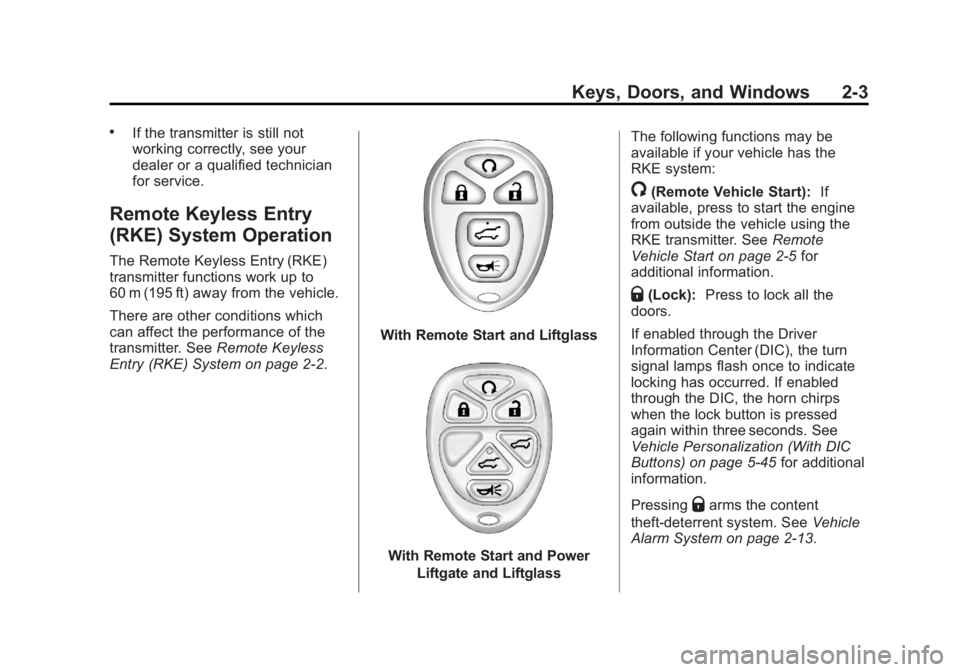
The Remote Keyless Entry (RKE)
transmitter functions work up to
60 m (195 ft) away from the vehicle.
There are other conditions which
can affect the performance of the
transmitter. SeeRemote Keyless
Entry (RKE) System on page 2‑2.
With Remote Start and Liftglass
With Remote Start and Power
Liftgate and Liftglass The following functions may be
available if your vehicle has the
RKE system:
/(Remote Vehicle Start):
If
available, press to start the engine
from outside the vehicle using the
RKE transmitter. See Remote
Vehicle Start on page 2‑5 for
additional information.
Q(Lock): Press to lock all the
doors.
If enabled through the Driver
Information Center (DIC), the turn
signal lamps flash once to indicate
locking has occurred. If enabled
through the DIC, the horn chirps
when the lock button is pressed
again within three seconds. See
Vehicle Personalization (With DIC
Buttons) on page 5‑45 for additional
information.
Pressing
Qarms the content
theft-deterrent system. See Vehicle
Alarm System on page 2‑13.
Page 38 of 510
Black plate (4,1)GMC Yukon/Yukon XL Owner Manual - 2013 - CRC 2nd edition - 8/15/12
2-4 Keys, Doors, and Windows
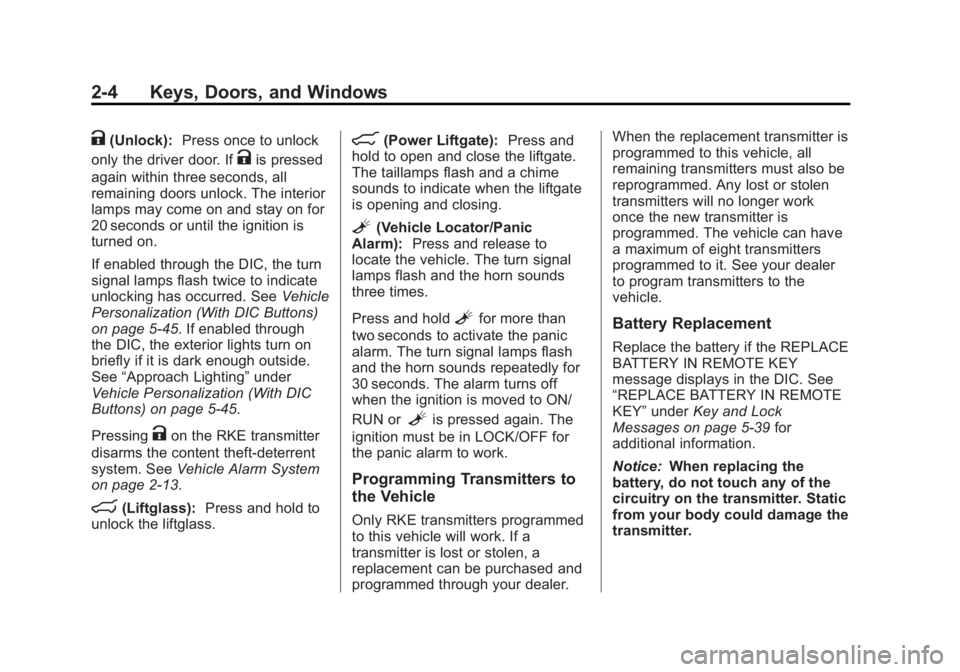
K(Unlock):Press once to unlock
only the driver door. If
Kis pressed
again within three seconds, all
remaining doors unlock. The interior
lamps may come on and stay on for
20 seconds or until the ignition is
turned on.
If enabled through the DIC, the turn
signal lamps flash twice to indicate
unlocking has occurred. See Vehicle
Personalization (With DIC Buttons)
on page 5‑45. If enabled through
the DIC, the exterior lights turn on
briefly if it is dark enough outside.
See “Approach Lighting” under
Vehicle Personalization (With DIC
Buttons) on page 5‑45.
Pressing
Kon the RKE transmitter
disarms the content theft-deterrent
system. See Vehicle Alarm System
on page 2‑13.
m(Liftglass): Press and hold to
unlock the liftglass.
8(Power Liftgate): Press and
hold to open and close the liftgate.
The taillamps flash and a chime
sounds to indicate when the liftgate
is opening and closing.
L(Vehicle Locator/Panic
Alarm): Press and release to
locate the vehicle. The turn signal
lamps flash and the horn sounds
three times.
Press and hold
Lfor more than
two seconds to activate the panic
alarm. The turn signal lamps flash
and the horn sounds repeatedly for
30 seconds. The alarm turns off
when the ignition is moved to ON/
RUN or
Lis pressed again. The
ignition must be in LOCK/OFF for
the panic alarm to work.
Programming Transmitters to
the Vehicle
Only RKE transmitters programmed
to this vehicle will work. If a
transmitter is lost or stolen, a
replacement can be purchased and
programmed through your dealer. When the replacement transmitter is
programmed to this vehicle, all
remaining transmitters must also be
reprogrammed. Any lost or stolen
transmitters will no longer work
once the new transmitter is
programmed. The vehicle can have
a maximum of eight transmitters
programmed to it. See your dealer
to program transmitters to the
vehicle.
Battery Replacement
Replace the battery if the REPLACE
BATTERY IN REMOTE KEY
message displays in the DIC. See
“REPLACE BATTERY IN REMOTE
KEY”
under Key and Lock
Messages on page 5‑39 for
additional information.
Notice: When replacing the
battery, do not touch any of the
circuitry on the transmitter. Static
from your body could damage the
transmitter.