clock GMC YUKON XL 2013 User Guide
[x] Cancel search | Manufacturer: GMC, Model Year: 2013, Model line: YUKON XL, Model: GMC YUKON XL 2013Pages: 510, PDF Size: 7.71 MB
Page 203 of 510
Black plate (9,1)GMC Yukon/Yukon XL Owner Manual - 2013 - CRC 2nd edition - 8/15/12
Infotainment System 7-9
.Surround (Centerpoint®)—
Select this setting to enable
Bose Centerpoint. Centerpoint
signal processing produces a
surround sound listening
experience from a CD or XM
stereo digital audio source.
Centerpoint delivers five
independent audio channels
from conventional two channel
stereo recordings. (Not available
for AM or FM.)
Adjusting the Speakers
(Balance/Fade)
BAL/FADE (Balance/Fade): To
adjust the balance or fade:
1. Press the
fknob until the
speaker control tabs display.
2. Highlight the desired speaker control tab by doing one of the
following:
.Pressing thefknob.
.Press the softkey under the
desired tab. 3. Adjust the setting by doing one
of the following:
.Turn thefknob clockwise
or counterclockwise.
.Press the¨SEEK, or©
SEEK button.
.Press the\FWD, ors
REV button.
To quickly adjust all speaker and
tone controls to the middle position,
press the
fknob for more than
two seconds.
If the Rear Seat Audio (RSA) is
turned on, the radio disables FADE
and mutes the rear speakers.
Radio Messages
Calibration Error: The audio
system has been calibrated for the
vehicle from the factory.
If Calibration Error displays, it
means that the radio has not been
configured properly for the vehicle
and it must be returned to your
dealer for service.
Locked or Loc: One of these
messages will display when the
TheftLock
®system has locked up
the radio. Take the vehicle to your
dealer for service.
If any error occurs repeatedly or if
an error cannot be corrected,
contact your dealer.
Page 222 of 510
Black plate (28,1)GMC Yukon/Yukon XL Owner Manual - 2013 - CRC 2nd edition - 8/15/12
7-28 Infotainment System
Loading a disc into the system,
depending on media type and
format, ranges from 5 to 20 seconds
for a CD, and up to 30 seconds for
a DVD.
Ejecting a Disc
ZDVD (Eject):Press and
release to eject the disc currently
playing in the top slot. A beep
sounds and Ejecting Disc displays.
If loading and reading of a disc
cannot be completed, due to
unknown format, etc., and the disc
fails to eject, press and hold for
more than five seconds to force the
disc to eject.
Playing a DVD
DVD/CD AUX (Auxiliary): Press to
cycle through DVD, CD, or Auxiliary
when listening to the radio. The
DVD/CD text tab and a message
showing the track or chapter
number will display when a disc is in
either slot. Press the DVD/CD AUX
button again and the system
automatically searches for an auxiliary input device; see
Auxiliary
Devices on page 7‑31 for more
information. If a portable audio
player is not connected, “No Aux
Input Device” displays. If a disc is in
both the DVD slot and the CD slot,
the DVD/CD AUX button cycles
between the two sources and does
not indicate “No Aux Input Device.”
If a front auxiliary device is
connected, the DVD/CD AUX button
cycles through all available options,
such as: DVD slot, CD slot, front
auxiliary, and rear auxiliary (if
available). See “Using the Auxiliary
Input Jack” inAuxiliary Devices on
page 7‑31 or“Audio/Video (A/V)
Jacks” underRear Seat
Entertainment (RSE) System on
page 7‑36 for more information.
If a disc is inserted into the top DVD
slot, the rear seat operator can turn
on the video screen and use the
remote control to navigate the CD
(tracks only) through the remote
control.
O(Power): Press to turn the radio
on or off. Turn clockwise or
counterclockwise to increase or
decrease the volume. Press and
hold for more than two seconds to
turn off the entire radio and Rear
Seat Entertainment (RSE) system
and to start the Parental Control
feature. Parental Control prevents
the rear seat occupant from
operating the Rear Seat Audio
(RSA) system or remote control.
A lock symbol displays next to the
clock display. The Parental Control
feature remains on until the knob is
pressed and held for more than
two seconds again, or until the
driver turns the ignition off and exits
the vehicle.
f(Tune): Turn to select tracks on
a CD or DVD.
©SEEK: Press to return to the start
of the current track or chapter.
Press again to go to the previous
track or chapter. This button might
Page 226 of 510
Black plate (32,1)GMC Yukon/Yukon XL Owner Manual - 2013 - CRC 2nd edition - 8/15/12
7-32 Infotainment System
For optimal sound quality, increase
the portable audio device's volume
to the loudest level.
It is always best to power the
portable audio device through its
own battery while playing.
O(Power/Volume):Turn clockwise
or counterclockwise to increase or
decrease the volume of the portable
player. Additional volume
adjustments might have to be made
from the portable device if the
volume is not loud or soft enough.
BAND: Press to listen to the radio
when a portable audio device is
playing. The portable audio device
continues playing.
CD/AUX (CD/Auxiliary): Press to
play a CD when a portable audio
device is playing. Press again and
the system begins playing audio
from the connected portable audio
player. If a portable audio player is
not connected, “No Input Device
Found” displays. DVD/CD AUX (CD/Auxiliary):
Press to cycle through DVD, CD,
or Auxiliary when listening to the
radio. The DVD/CD text tab and a
message showing track or chapter
number displays when a disc is in
either slot. Press again and the
system automatically searches for
an auxiliary input device, such as a
portable audio player. If a portable
audio player is not connected,
“No
Aux Input Device” displays. If a disc
is in both the DVD slot and the CD
slot the DVD/CD AUX button cycles
between the two sources and not
indicate “No Aux Input Device”. If a
front auxiliary device is connected,
the DVD/CD AUX button cycles
through all available options, such
as: DVD slot, CD slot, Front
Auxiliary, and Rear Auxiliary (if
available). See “Using the Auxiliary
Input Jack(s)” in this section,
or “Audio/Video (A/V) Jacks” under,
Rear Seat Entertainment (RSE)
System on page 7‑36 for more
information.
Using the USB Port
Radios with a USB port can control
a USB storage device or an iPod
using the radio buttons and knobs.
USB Support
The USB connector is located on
the instrument panel or in the center
console, and uses the USB 2.0
standard.
USB Supported Devices
.USB Flash Drives
.Portable USB Hard Drives
.Fifth generation or later iPod
.iPod nanos
.iPod touch
.iPod classic
Not all iPods and USB Drives are
compatible with the USB port.
Make sure the iPod has the latest
firmware from Apple
®for proper
operation. iPod firmware can be
Page 252 of 510
Black plate (2,1)GMC Yukon/Yukon XL Owner Manual - 2013 - CRC 2nd edition - 8/15/12
8-2 Climate Controls
Temperature Control:Move the
thumbwheels up or down to
increase or decrease the
temperature on the driver side or
the passenger side of the vehicle for
the dual zone system.
9(Fan Control): Turn the left
knob clockwise or counterclockwise
to increase or decrease the fan
speed. Turn the knob all the way
counterclockwise to turn the front
system off.
Air Delivery Mode Control: Turn
clockwise or counterclockwise to
change the airflow direction inside
the vehicle. By positioning the knob
between two modes, a combination
of those modes is selected.
Select from the following modes:
H(Vent): Air is directed to the
instrument panel outlets.
)(Bi-Level): Air is divided
between the instrument panel and
floor outlets. Some air is directed
towards the windshield and side window outlets. Cooler air is
directed to the upper outlets and
warmer air to the floor outlets.
6(Floor):
Air is directed to the
floor outlets, with some of the air
directed to the windshield, side
window, and second row floor
outlets. In this mode, the system
automatically selects outside air.
Recirculation cannot be selected
when in Floor Mode.
-(Defog): The defog mode is
used to clear the windows of fog or
moisture. Air is directed to the
windshield, floor outlets, and side
window vents. In this mode, the
system turns off recirculation and
runs the air conditioning compressor
unless the outside temperature is
close to freezing. The recirculation
mode cannot be selected while in
the defog mode.
0(Defrost): The defrost mode is
used to remove fog or frost from the
windshield more quickly. Air is
directed to the windshield and side
window vents, with some directed to the floor vents. In this mode, the
system automatically forces outside
air into the vehicle. The recirculation
mode cannot be selected while in
the defrost mode. The air
conditioning compressor runs
automatically in this setting, unless
the outside temperature is close to
freezing.
Do not drive the vehicle until all the
windows are clear.
#(Air Conditioning):
Press this
button to turn the air conditioning
system on or off. An indicator light
comes on to show that the air
conditioning is on. The air
conditioning can be selected in any
mode as long as the fan switch
is on.
On hot days, open the windows to
let hot inside air escape; then close
them. This helps to reduce the time
it takes for the vehicle to cool down.
It also helps the system to operate
more efficiently.
Page 260 of 510
Black plate (10,1)GMC Yukon/Yukon XL Owner Manual - 2013 - CRC 2nd edition - 8/15/12
8-10 Climate Controls
Rear Climate Control System (Rear Climate
Control Only)
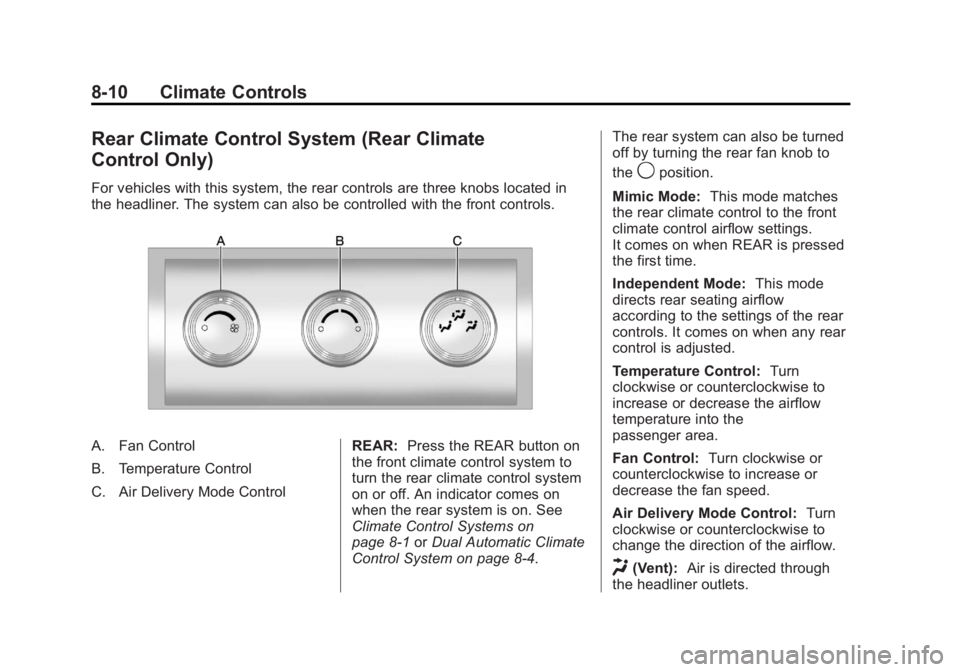
For vehicles with this system, the rear controls are three knobs located in
the headliner. The system can also be controlled with the front controls.
A. Fan Control
B. Temperature Control
C. Air Delivery Mode ControlREAR:
Press the REAR button on
the front climate control system to
turn the rear climate control system
on or off. An indicator comes on
when the rear system is on. See
Climate Control Systems on
page 8‑1 orDual Automatic Climate
Control System on page 8‑4. The rear system can also be turned
off by turning the rear fan knob to
the
9position.
Mimic Mode: This mode matches
the rear climate control to the front
climate control airflow settings.
It comes on when REAR is pressed
the first time.
Independent Mode: This mode
directs rear seating airflow
according to the settings of the rear
controls. It comes on when any rear
control is adjusted.
Temperature Control: Turn
clockwise or counterclockwise to
increase or decrease the airflow
temperature into the
passenger area.
Fan Control: Turn clockwise or
counterclockwise to increase or
decrease the fan speed.
Air Delivery Mode Control: Turn
clockwise or counterclockwise to
change the direction of the airflow.
H(Vent): Air is directed through
the headliner outlets.
Page 302 of 510
Black plate (38,1)GMC Yukon/Yukon XL Owner Manual - 2013 - CRC 2nd edition - 8/15/12
9-38 Driving and Operating
If the knob is turned to the
Four-Wheel Drive High, AUTO,
or Two-Wheel Drive High switch
position when the vehicle is in gear
and/or moving more than 5 km/h
(3 mph), the Four-Wheel Drive High,
AUTO, or Two-Wheel Drive High
indicator light will flash for
30 seconds but will not complete the
shift. With the vehicle moving less
than 5 km/h (3 mph) and the
transmission is in N (Neutral),
attempt the shift again.
Shifting into N (Neutral)
To shift the transfer case to
N (Neutral) do the following:
1. Make sure the vehicle is parkedso that it will not roll.
2. Set the parking brake and apply the regular brake pedal. See
Parking Brake on page 9‑42 for
more information.
3. Start the vehicle or turn the ignition to ON/RUN.
4. Put the transmission in N (Neutral). 5. Shift the transfer case to
Two-Wheel Drive High.
6. Turn the transfer case dial clockwise to N (Neutral) until it
stops and hold it there until the
N (Neutral) light starts blinking.
This will take at least
10 seconds. Then slowly release
the dial to the Four-Wheel Drive
Low position. The N (Neutral)
light will come on when the
transfer case shift to N (Neutral)
is complete.
7. If the engine is running, verify that the transfer case is in
N (Neutral) by shifting the
transmission to R (Reverse) for
one second, then shift the
transmission to D (Drive) for
one second.
8. Turn the ignition to ACC/ ACCESSORY, which will turn the
engine off.
9. Place the transmission shift lever in P (Park). 10. Release the parking brake prior
to moving the vehicle.
11. Turn the ignition to LOCK/OFF.
Shifting Out of N (Neutral)
To shift out of N (Neutral) do the
following:
1. Set the parking brake and apply the regular brake pedal.
2. Turn the ignition to ON/RUN with the engine off, and shift the
transmission to N (Neutral).
3. Turn the transfer case dial to the desired transfer case shift
position (Two-Wheel Drive High,
Four-Wheel Drive High,
or AUTO).
After the transfer case has
shifted out of N (Neutral), the
N (Neutral) light will go out.
4. Release the parking brake prior to moving the vehicle.
Notice: Shifting the transmission
into gear before the requested
mode indicator light has stopped
flashing could damage the
Page 325 of 510
Black plate (61,1)GMC Yukon/Yukon XL Owner Manual - 2013 - CRC 2nd edition - 8/15/12
Driving and Operating 9-61
WARNING (Continued)
.Fuel can spray out if the fuel
cap is opened too quickly.
This spray can happen if the
tank is nearly full, and is
more likely in hot weather.
Open the fuel cap slowly and
wait for any hiss noise to stop
then unscrew the cap all
the way
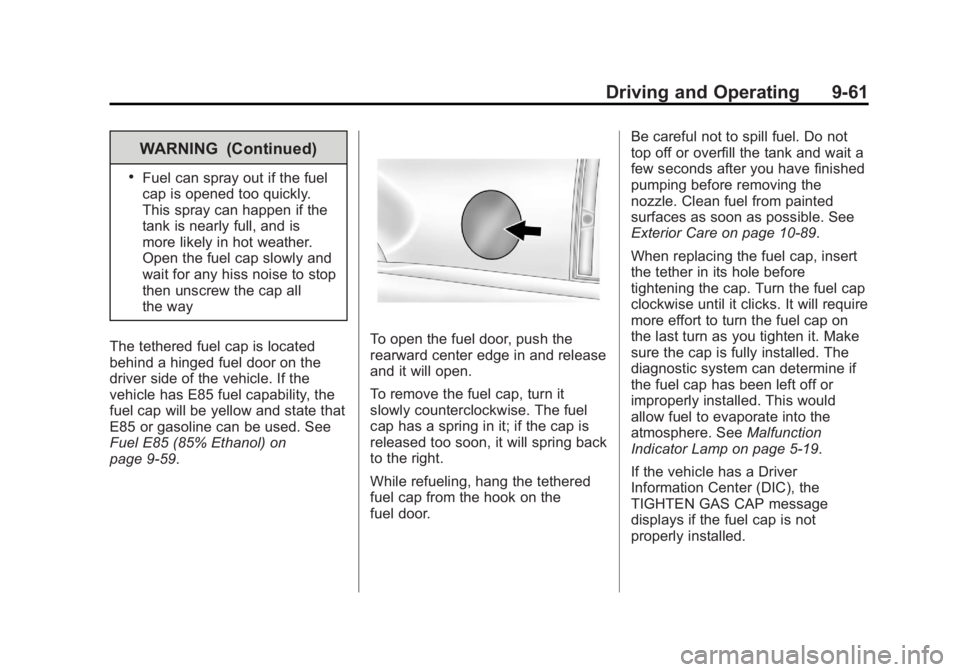
The tethered fuel cap is located
behind a hinged fuel door on the
driver side of the vehicle. If the
vehicle has E85 fuel capability, the
fuel cap will be yellow and state that
E85 or gasoline can be used. See
Fuel E85 (85% Ethanol) on
page 9‑59.
To open the fuel door, push the
rearward center edge in and release
and it will open.
To remove the fuel cap, turn it
slowly counterclockwise. The fuel
cap has a spring in it; if the cap is
released too soon, it will spring back
to the right.
While refueling, hang the tethered
fuel cap from the hook on the
fuel door. Be careful not to spill fuel. Do not
top off or overfill the tank and wait a
few seconds after you have finished
pumping before removing the
nozzle. Clean fuel from painted
surfaces as soon as possible. See
Exterior Care on page 10‑89.
When replacing the fuel cap, insert
the tether in its hole before
tightening the cap. Turn the fuel cap
clockwise until it clicks. It will require
more effort to turn the fuel cap on
the last turn as you tighten it. Make
sure the cap is fully installed. The
diagnostic system can determine if
the fuel cap has been left off or
improperly installed. This would
allow fuel to evaporate into the
atmosphere. See
Malfunction
Indicator Lamp on page 5‑19.
If the vehicle has a Driver
Information Center (DIC), the
TIGHTEN GAS CAP message
displays if the fuel cap is not
properly installed.
Page 365 of 510
Black plate (17,1)GMC Yukon/Yukon XL Owner Manual - 2013 - CRC 2nd edition - 8/15/12
Vehicle Care 10-17
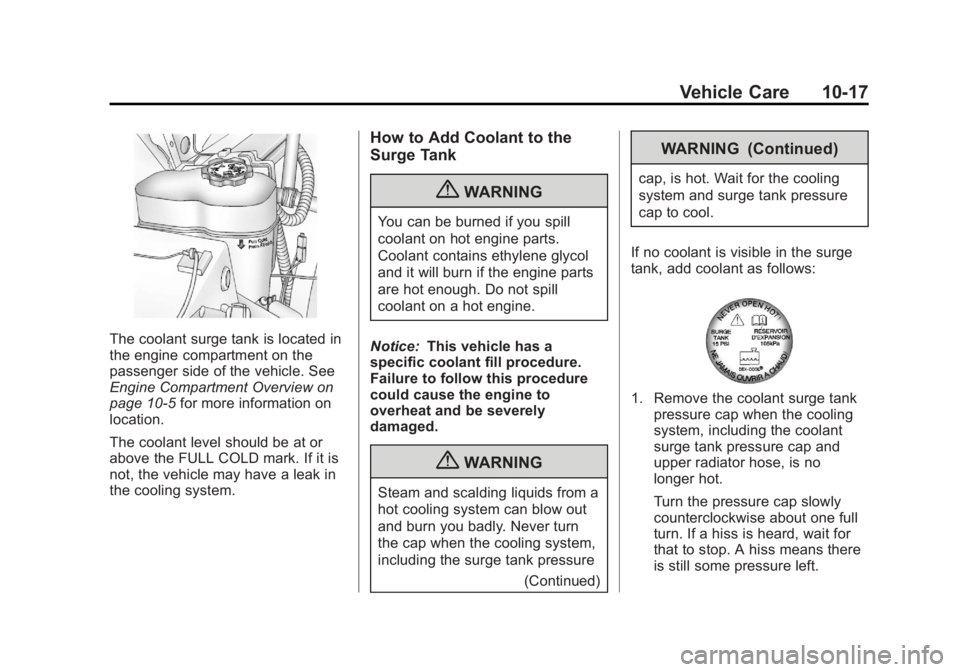
The coolant surge tank is located in
the engine compartment on the
passenger side of the vehicle. See
Engine Compartment Overview on
page 10‑5for more information on
location.
The coolant level should be at or
above the FULL COLD mark. If it is
not, the vehicle may have a leak in
the cooling system.
How to Add Coolant to the
Surge Tank
{WARNING
You can be burned if you spill
coolant on hot engine parts.
Coolant contains ethylene glycol
and it will burn if the engine parts
are hot enough. Do not spill
coolant on a hot engine.
Notice: This vehicle has a
specific coolant fill procedure.
Failure to follow this procedure
could cause the engine to
overheat and be severely
damaged.
{WARNING
Steam and scalding liquids from a
hot cooling system can blow out
and burn you badly. Never turn
the cap when the cooling system,
including the surge tank pressure
(Continued)
WARNING (Continued)
cap, is hot. Wait for the cooling
system and surge tank pressure
cap to cool.
If no coolant is visible in the surge
tank, add coolant as follows:
1. Remove the coolant surge tank pressure cap when the cooling
system, including the coolant
surge tank pressure cap and
upper radiator hose, is no
longer hot.
Turn the pressure cap slowly
counterclockwise about one full
turn. If a hiss is heard, wait for
that to stop. A hiss means there
is still some pressure left.
Page 380 of 510
Black plate (32,1)GMC Yukon/Yukon XL Owner Manual - 2013 - CRC 2nd edition - 8/15/12
10-32 Vehicle Care
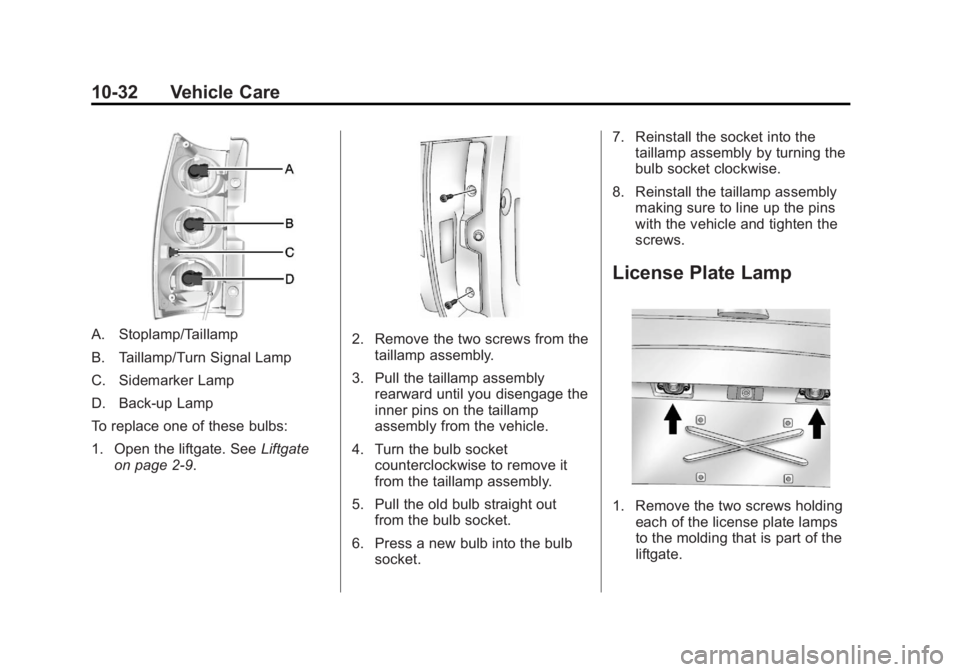
A. Stoplamp/Taillamp
B. Taillamp/Turn Signal Lamp
C. Sidemarker Lamp
D. Back-up Lamp
To replace one of these bulbs:
1. Open the liftgate. SeeLiftgate
on page 2‑9.2. Remove the two screws from the taillamp assembly.
3. Pull the taillamp assembly rearward until you disengage the
inner pins on the taillamp
assembly from the vehicle.
4. Turn the bulb socket counterclockwise to remove it
from the taillamp assembly.
5. Pull the old bulb straight out from the bulb socket.
6. Press a new bulb into the bulb socket. 7. Reinstall the socket into the
taillamp assembly by turning the
bulb socket clockwise.
8. Reinstall the taillamp assembly making sure to line up the pins
with the vehicle and tighten the
screws.
License Plate Lamp
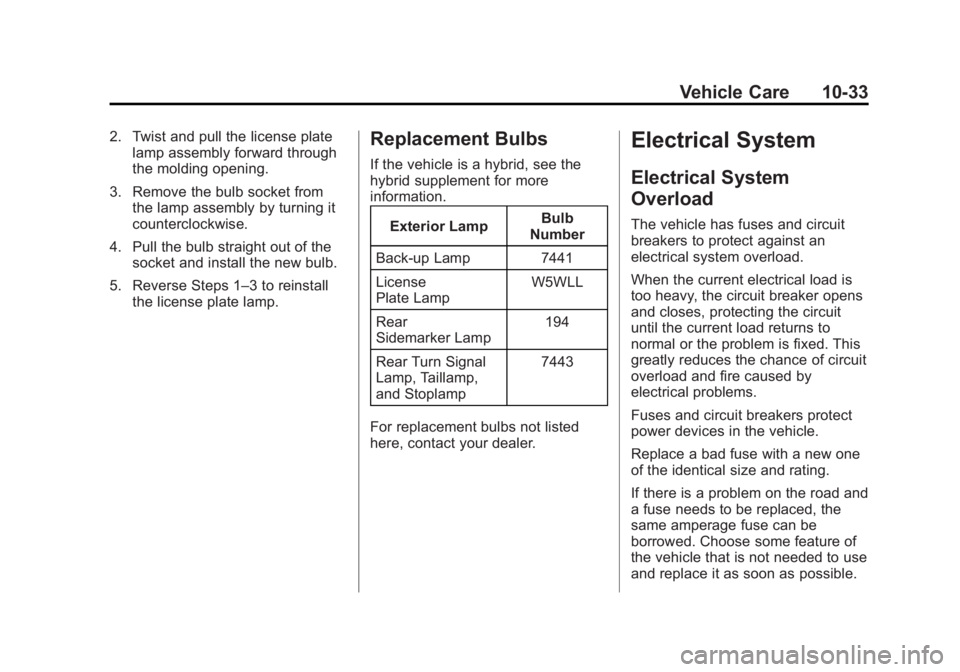
1. Remove the two screws holdingeach of the license plate lamps
to the molding that is part of the
liftgate.
Page 381 of 510
Black plate (33,1)GMC Yukon/Yukon XL Owner Manual - 2013 - CRC 2nd edition - 8/15/12
Vehicle Care 10-33
2. Twist and pull the license platelamp assembly forward through
the molding opening.
3. Remove the bulb socket from the lamp assembly by turning it
counterclockwise.
4. Pull the bulb straight out of the socket and install the new bulb.
5. Reverse Steps 1–3 to reinstall the license plate lamp.Replacement Bulbs
If the vehicle is a hybrid, see the
hybrid supplement for more
information.
Exterior Lamp Bulb
Number
Back-up Lamp 7441
License
Plate Lamp W5WLL
Rear
Sidemarker Lamp 194
Rear Turn Signal
Lamp, Taillamp,
and Stoplamp 7443
For replacement bulbs not listed
here, contact your dealer.
Electrical System
Electrical System
Overload
The vehicle has fuses and circuit
breakers to protect against an
electrical system overload.
When the current electrical load is
too heavy, the circuit breaker opens
and closes, protecting the circuit
until the current load returns to
normal or the problem is fixed. This
greatly reduces the chance of circuit
overload and fire caused by
electrical problems.
Fuses and circuit breakers protect
power devices in the vehicle.
Replace a bad fuse with a new one
of the identical size and rating.
If there is a problem on the road and
a fuse needs to be replaced, the
same amperage fuse can be
borrowed. Choose some feature of
the vehicle that is not needed to use
and replace it as soon as possible.