radio controls GMC YUKON XL 2013 User Guide
[x] Cancel search | Manufacturer: GMC, Model Year: 2013, Model line: YUKON XL, Model: GMC YUKON XL 2013Pages: 510, PDF Size: 7.71 MB
Page 179 of 510
Black plate (53,1)GMC Yukon/Yukon XL Owner Manual - 2013 - CRC 2nd edition - 8/15/12
Instruments and Controls 5-53
Universal Remote
System
SeeRadio Frequency Statement on
page 13‑21 for information
regarding Part 15 of the Federal
Communications Commission (FCC)
rules and Industry Canada
Standards RSS-GEN/210/220/310.
Universal Remote System
Programming
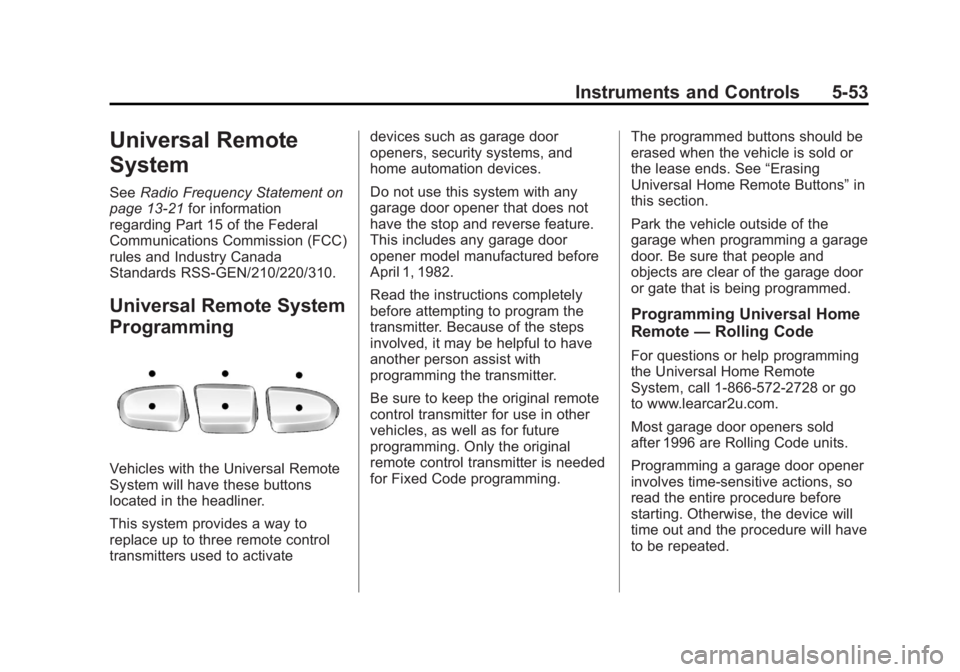
Vehicles with the Universal Remote
System will have these buttons
located in the headliner.
This system provides a way to
replace up to three remote control
transmitters used to activate devices such as garage door
openers, security systems, and
home automation devices.
Do not use this system with any
garage door opener that does not
have the stop and reverse feature.
This includes any garage door
opener model manufactured before
April 1, 1982.
Read the instructions completely
before attempting to program the
transmitter. Because of the steps
involved, it may be helpful to have
another person assist with
programming the transmitter.
Be sure to keep the original remote
control transmitter for use in other
vehicles, as well as for future
programming. Only the original
remote control transmitter is needed
for Fixed Code programming.
The programmed buttons should be
erased when the vehicle is sold or
the lease ends. See
“Erasing
Universal Home Remote Buttons” in
this section.
Park the vehicle outside of the
garage when programming a garage
door. Be sure that people and
objects are clear of the garage door
or gate that is being programmed.
Programming Universal Home
Remote —Rolling Code
For questions or help programming
the Universal Home Remote
System, call 1-866-572-2728 or go
to www.learcar2u.com.
Most garage door openers sold
after 1996 are Rolling Code units.
Programming a garage door opener
involves time-sensitive actions, so
read the entire procedure before
starting. Otherwise, the device will
time out and the procedure will have
to be repeated.
Page 195 of 510
Black plate (1,1)GMC Yukon/Yukon XL Owner Manual - 2013 - CRC 2nd edition - 8/15/12
Infotainment System 7-1
Infotainment
System
Introduction
Infotainment . . . . . . . . . . . . . . . . . . . 7-1
Theft-Deterrent Feature . . . . . . . 7-2
Overview (Radio withCD (MP3)) . . . . . . . . . . . . . . . . . . . 7-3
Overview (Radio with CD, USB, and DVD (MP3)) . . . . . . . . . . . . . 7-5
Operation . . . . . . . . . . . . . . . . . . . . . 7-6
Radio
AM-FM Radio . . . . . . . . . . . . . . . . 7-10
Satellite Radio . . . . . . . . . . . . . . . 7-11
Radio Reception . . . . . . . . . . . . . 7-14
Rear Side Window Antenna . . . . . . . . . . . . . . . . . . . . 7-15
Satellite Radio Antenna . . . . . . 7-16
Audio Players
CD Player . . . . . . . . . . . . . . . . . . . 7-16
CD/DVD Player . . . . . . . . . . . . . . 7-21
Auxiliary Devices . . . . . . . . . . . . 7-31
Rear Seat Infotainment
Rear Seat Entertainment (RSE) System . . . . . . . . . . . . . . 7-36
Rear Seat Audio (RSA) System . . . . . . . . . . . . . . . . . . . . . 7-46
Phone
Bluetooth . . . . . . . . . . . . . . . . . . . . 7-48
Trademarks and License
Agreements
Trademarks and LicenseAgreements . . . . . . . . . . . . . . . . 7-55
Introduction
Infotainment
Read the following pages to
become familiar with the audio
system's features.
{WARNING
Taking your eyes off the road for
extended periods could cause a
crash resulting in injury or death
to you or others. Do not give
extended attention to infotainment
tasks while driving.
This system provides access to
many audio and non audio listings.
To minimize taking your eyes off the
road while driving, do the following
while the vehicle is parked:
.Become familiar with the
operation and controls of the
audio system.
Page 202 of 510
Black plate (8,1)GMC Yukon/Yukon XL Owner Manual - 2013 - CRC 2nd edition - 8/15/12
7-8 Infotainment System
For additional information on
AudioPilot, please visit
www.bose.com/audiopilot.
Setting the Tone (Bass/
Midrange/Treble)
BASS/MID/TREB (Bass, Midrange,
or Treble):To adjust the bass,
midrange, or treble:
1. Press the
fknob until the tone
control tabs display.
2. Highlight the desired tone control tab by doing one of the
following:
.Pressing thefknob.
.Press the softkey under the
desired tab.
3. Adjust the setting by doing one of the following:
.Turn thefknob clockwise
or counterclockwise.
.Press the¨SEEK, or©
SEEK button.
.Press the\FWD, ors
REV button.
If a station's frequency is weak or if
there is static, decrease the treble.
To quickly adjust bass, midrange,
or treble to the middle position,
press the softkey positioned under
the BASS, MID, or TREB tab for
more than two seconds. A beep
sounds and the level adjusts to the
middle position.
To quickly adjust all tone and
speaker controls to the middle
position, press the
fknob for more
than two seconds until a beep
sounds.
EQ (Equalization): Press this
button to choose bass and treble
equalization settings designed for
different types of music. Selecting
MANUAL or changing bass or
treble, returns the EQ to the manual
bass and treble settings.
Unique EQ settings can be saved
for each source. If the radio has a Bose audio
system, the EQ settings are either
MANUAL or TALK.
Digital Signal Processing (DSP):
Press the EQ button to change the
DSP settings (only available on
Bose systems with the LTZ option
package). DSP settings provide a
choice of different listening
experiences.
The following DSP settings are
available:
.Normal
—Select this setting to
adjust the audio for normal
mode. This provides the best
sound quality for all seating
positions.
.Driver —Select this setting to
adjust the audio for the driver to
receive the best possible sound
quality.
.Rear —Select this setting to
adjust the audio for the rear seat
passengers to receive the best
possible sound quality.
Page 203 of 510
Black plate (9,1)GMC Yukon/Yukon XL Owner Manual - 2013 - CRC 2nd edition - 8/15/12
Infotainment System 7-9
.Surround (Centerpoint®)—
Select this setting to enable
Bose Centerpoint. Centerpoint
signal processing produces a
surround sound listening
experience from a CD or XM
stereo digital audio source.
Centerpoint delivers five
independent audio channels
from conventional two channel
stereo recordings. (Not available
for AM or FM.)
Adjusting the Speakers
(Balance/Fade)
BAL/FADE (Balance/Fade): To
adjust the balance or fade:
1. Press the
fknob until the
speaker control tabs display.
2. Highlight the desired speaker control tab by doing one of the
following:
.Pressing thefknob.
.Press the softkey under the
desired tab. 3. Adjust the setting by doing one
of the following:
.Turn thefknob clockwise
or counterclockwise.
.Press the¨SEEK, or©
SEEK button.
.Press the\FWD, ors
REV button.
To quickly adjust all speaker and
tone controls to the middle position,
press the
fknob for more than
two seconds.
If the Rear Seat Audio (RSA) is
turned on, the radio disables FADE
and mutes the rear speakers.
Radio Messages
Calibration Error: The audio
system has been calibrated for the
vehicle from the factory.
If Calibration Error displays, it
means that the radio has not been
configured properly for the vehicle
and it must be returned to your
dealer for service.
Locked or Loc: One of these
messages will display when the
TheftLock
®system has locked up
the radio. Take the vehicle to your
dealer for service.
If any error occurs repeatedly or if
an error cannot be corrected,
contact your dealer.
Page 204 of 510
Black plate (10,1)GMC Yukon/Yukon XL Owner Manual - 2013 - CRC 2nd edition - 8/15/12
7-10 Infotainment System
Radio
AM-FM Radio
Radio Data System (RDS)
For radios with the Radio Data
System (RDS) feature, it only works
with FM stations that broadcast
RDS information. This system relies
upon receiving specific information
from these stations and only works
when the information is available.
While the radio is tuned to an
FM-RDS station, the station name
or call letters displays. In rare
cases, a radio station could
broadcast incorrect information that
causes the radio features to work
improperly. If this happens, contact
the radio station.
4(Information) (RDS Features):
For vehicles with RDS features,
press
4to display additional text
information related to the current
FM-RDS station. If information is
available, the song title information
displays on the top line of the display and artist information
displays on the bottom line. When
information is not available,
“NO
INFO” displays.
Finding a Station
BAND: Press to switch between
AM, FM, or XM™, if equipped.
f(Tune): Turn to manually select
radio stations.
©SEEK: Press to seek the
previous radio station. Press and
hold for a few seconds until a beep
sounds to scan for radio stations in
descending order, press the
©
SEEK button again to stop scanning
radio stations. The radio only seeks
and scans stations with a strong
signal that are in the selected band.
¨SEEK: Press to seek the next
radio station. Press and hold for a
few seconds until a beep sounds to
scan for radio stations in ascending
order, press the
¨SEEK button
again to stop scanning radio stations. The radio only seeks and
scans stations with a strong signal
that are in the selected band.
sREV:
Press to manually tune to
a radio station in descending order.
\FWD: Press to manually tune to
a radio station in ascending order.
FAV (Favorites): Press to select
different favorite pages for stored
radio stations.
Storing Radio Stations
Drivers are encouraged to store
radio station while the vehicle is
parked, see Defensive Driving on
page 9‑3. Tune to stored radio
stations using the presets, favorites
button, and steering wheel controls,
if the vehicle has this feature.
Up to 36 stations can be
programmed as favorites using the
sixbutton. Press the FAV button to
go through up to six pages of
favorites, each having six favorite
stations available per page. Each
Page 206 of 510
Black plate (12,1)GMC Yukon/Yukon XL Owner Manual - 2013 - CRC 2nd edition - 8/15/12
7-12 Infotainment System
sREV:Press to go to the
previous SiriusXM category.
\FWD: Press to go to the next
SiriusXM category.
FAV (Favorites): Press to select
different favorites pages for stored
radio stations.
CAT (Category): The CAT button is
used to find SiriusXM channels
when the radio is in the XM mode.
Finding a Category (CAT)
Station
To find XM channels in a category:
1. Press the CAT button to display the category tabs. Continue
pressing the CAT button until the
desired category name displays.
.Radios with CD and DVD
can also navigate the
category list by pressing the
\FWD or thesREV
buttons. 2. Press either of the two softkeys
below the desired category tab
to immediately tune to the first
SiriusXM station in that category.
To go to the previous or next
SiriusXM station in the selected
category, do one of the
following:
.Turn thefknob.
.Press the softkey below the
right or left arrows in the
category tab.
.Press©SEEK or¨SEEK.
3. To exit the category search mode, press the FAV button or
BAND button to display the
favorites again.
Adding and Removing Categories
Categories cannot be added or
removed while the vehicle is moving
faster than 8 km/h (5 mph).
To add or remove a category:
1. Press the MENU button. 2. Press the softkey located below
the XM CAT tab.
3. Turn the
fknob to display the
category to add or remove.
4. Press the softkey located under the Add or Remove tab.
To restore all removed
categories, press the softkey
under the Restore All tab.
5. Repeat the steps to remove more categories.
Storing SiriusXM Channels
Drivers are encouraged to store
SiriusXM channels while the vehicle
is parked; see Defensive Driving on
page 9‑3. Tune to stored radio
stations using the presets, favorites
button, and steering wheel controls,
if the vehicle has this feature.
Up to 36 stations can be
programmed as favorites using the
six softkeys below the radio station
frequency tabs and by using the
FAV button. Press the FAV button to
go through up to six pages of
Page 224 of 510
Black plate (30,1)GMC Yukon/Yukon XL Owner Manual - 2013 - CRC 2nd edition - 8/15/12
7-30 Infotainment System
The rear seat passenger can
navigate the DVD-V and DVD-A
menus and controls through the
remote control. See“Remote
Control” underRear Seat
Entertainment (RSE) System on
page 7‑36 for more information. The
video screen automatically turns on
when the DVD-V is inserted into the
DVD slot, and does not
automatically power on when the
DVD-A is inserted into the DVD slot.
It must be manually turned on by
the rear seat occupant through the
remote control power button.
Using Softkeys to Play a DVD-A
(Audio)
Once a DVD-A is inserted, the radio
display menu shows several tab
options for playback. Press the
softkey located under any tab option
during DVD-A playback.
r/j(Play/Pause): Press either
the play or pause icon displayed on
the radio, to toggle between pausing
or restarting playback of a DVD.
If the forward arrow is showing on the display, the system is in pause
mode. If the pause tab is showing
on the display, the system is in
playback mode.
qGroupr:
Press to cycle
through musical groupings on the
DVD-A disc.
Nav (Navigate): Press to display
directional arrows for navigating
through the menus.
e(Audio Stream): Press to cycle
through audio stream formats
located on the DVD-A disc. The
video screen shows the audio
stream changing.
The rear seat passenger can
navigate the DVD-V and DVD-A
menus and controls through the
remote control. See “Remote
Control” underRear Seat
Entertainment (RSE) System on
page 7‑36 for more information. The
video screen automatically turns on
when the DVD-V is inserted into the
DVD slot, and does not
automatically power on when the
DVD-A is inserted into the DVD slot. It must be manually turned on by
the rear seat occupant through the
remote control power button.
Stopping and Resuming
Playback
To stop playing a DVD without
turning off the system, press the
c
button on the remote control,
or press the softkey located under
the
cor ther/jtabs displayed
on the radio. If the radio is sourced
to something other than DVD-V,
press the DVD/CD AUX button to
make DVD-V the active source.
To resume DVD playback, press the
r/jbutton on the remote control,
or press the softkey located under
the
r/jtab on the radio. The DVD
should resume play from where it
last stopped if the disc has not been
ejected and the stop button has not
been pressed twice on the remote
control. If the disc has been ejected
or the stop button has been pressed
Page 240 of 510
Black plate (46,1)GMC Yukon/Yukon XL Owner Manual - 2013 - CRC 2nd edition - 8/15/12
7-46 Infotainment System
Cleaning the Video Screen
When cleaning the video screen,
use only a clean cloth dampened
with clean water. Use care when
directly touching or cleaning the
screen, as damage could result.
Rear Seat Audio (RSA)
System
Vehicles with this feature allow the
rear seat passengers to listen to
and control any of the music
sources: radio, CDs, DVDs, or other
auxiliary sources. However, the rear
seat passengers can only control
the music sources the front seat
passengers are not listening to
(except on some radios where dual
control is allowed). For example,
rear seat passengers can control
and listen to a CD through the
headphones, while the driver listens
to the radio through the front
speakers. The rear seat passengers
have control of the volume for each
set of headphones.The radio functionality is controlled
by both the RSA and the front radio.
Only one band can be tuned to at
one time. Changing the band on the
RSA or the front radio will change
the band on the other system,
if they are both sourced to the radio.
The RSA functions operate even
when the main radio is off. The front
audio system will display the
headphone icon when the RSA is
on, and will disappear from the
display when it is off.
Audio can be heard through wired
headphones (not included) plugged
into the jacks on the RSA. If the
vehicle has this feature, audio can
also be heard on Channel 2 of the
wireless headphones.
The audio system mutes the rear
speakers when the RSA audio is
active through the headphones.P(Power):
Press thePbutton to
turn the RSA on or off.
Volume: To increase or decrease
headphone volume, turn the knobs
located next to the SRCE or PROG
buttons. The left knob controls the
left headphones and the right knob
controls the right headphones.
SRCE (Source): Press this button
to switch between the radio (AM/
FM), XM™ (if equipped), CD, and if
the vehicle has these features,
DVD, front auxiliary, and rear
auxiliary.