spare wheel GMC YUKON XL 2014 User Guide
[x] Cancel search | Manufacturer: GMC, Model Year: 2014, Model line: YUKON XL, Model: GMC YUKON XL 2014Pages: 490, PDF Size: 7.49 MB
Page 402 of 490
Black plate (64,1)GMC Yukon/Yukon XL Owner Manual (GMNA-Localizing-U.S./Canada-
6081505) - 2014 - crc - 4/23/13
10-64 Vehicle Care
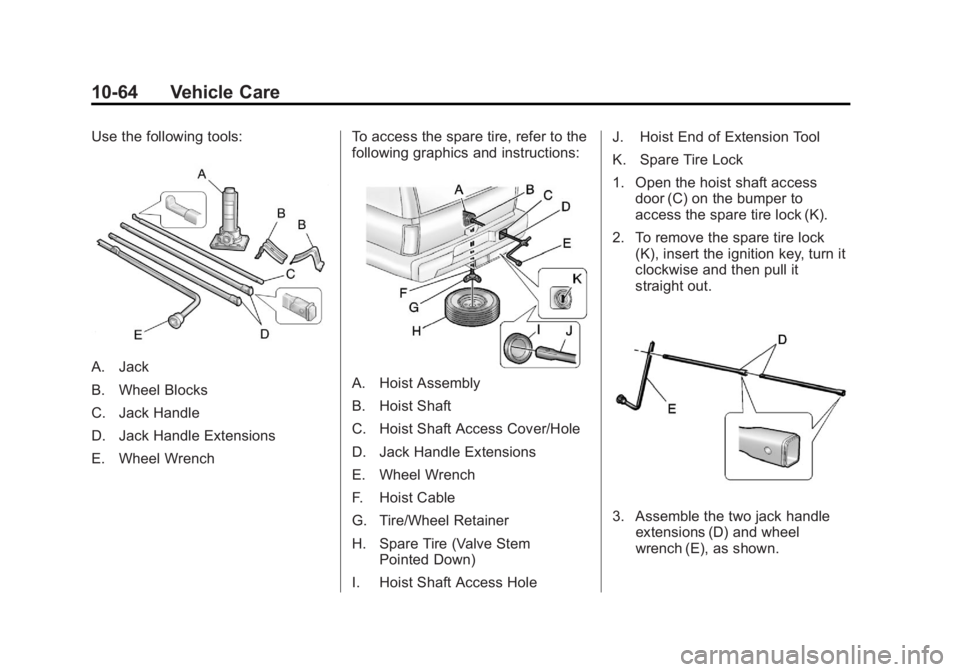
Use the following tools:
A. Jack
B. Wheel Blocks
C. Jack Handle
D. Jack Handle Extensions
E. Wheel WrenchTo access the spare tire, refer to the
following graphics and instructions:A. Hoist Assembly
B. Hoist Shaft
C. Hoist Shaft Access Cover/Hole
D. Jack Handle Extensions
E. Wheel Wrench
F. Hoist Cable
G. Tire/Wheel Retainer
H. Spare Tire (Valve Stem
Pointed Down)
I. Hoist Shaft Access Hole J. Hoist End of Extension Tool
K. Spare Tire Lock
1. Open the hoist shaft access
door (C) on the bumper to
access the spare tire lock (K).
2. To remove the spare tire lock (K), insert the ignition key, turn it
clockwise and then pull it
straight out.
3. Assemble the two jack handleextensions (D) and wheel
wrench (E), as shown.
Page 403 of 490
Black plate (65,1)GMC Yukon/Yukon XL Owner Manual (GMNA-Localizing-U.S./Canada-
6081505) - 2014 - crc - 4/23/13
Vehicle Care 10-65
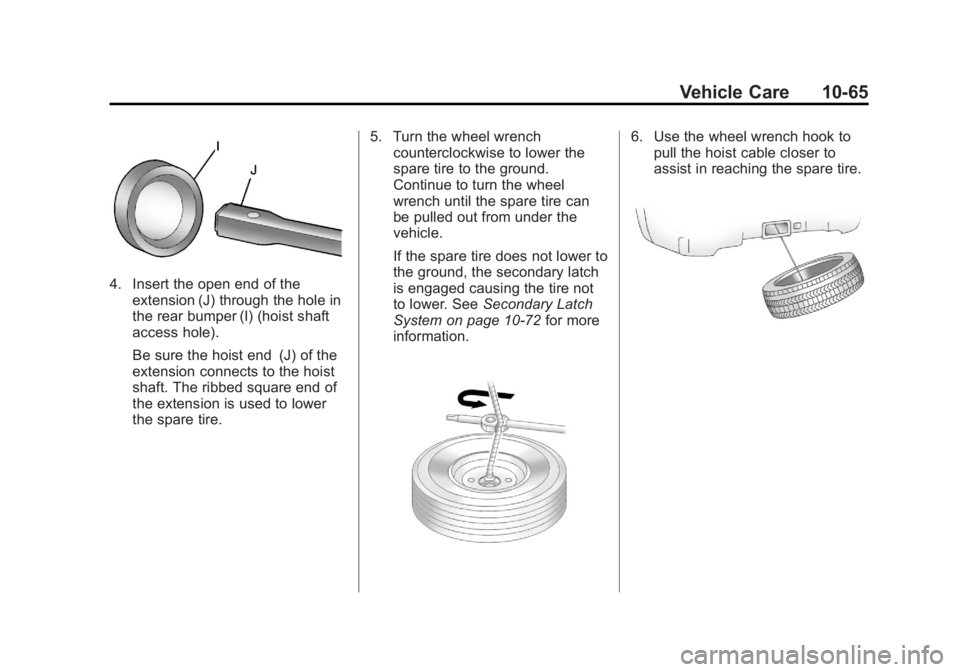
4. Insert the open end of theextension (J) through the hole in
the rear bumper (I) (hoist shaft
access hole).
Be sure the hoist end (J) of the
extension connects to the hoist
shaft. The ribbed square end of
the extension is used to lower
the spare tire. 5. Turn the wheel wrench
counterclockwise to lower the
spare tire to the ground.
Continue to turn the wheel
wrench until the spare tire can
be pulled out from under the
vehicle.
If the spare tire does not lower to
the ground, the secondary latch
is engaged causing the tire not
to lower. See Secondary Latch
System on page 10-72 for more
information.
6. Use the wheel wrench hook to pull the hoist cable closer to
assist in reaching the spare tire.
Page 404 of 490
Black plate (66,1)GMC Yukon/Yukon XL Owner Manual (GMNA-Localizing-U.S./Canada-
6081505) - 2014 - crc - 4/23/13
10-66 Vehicle Care
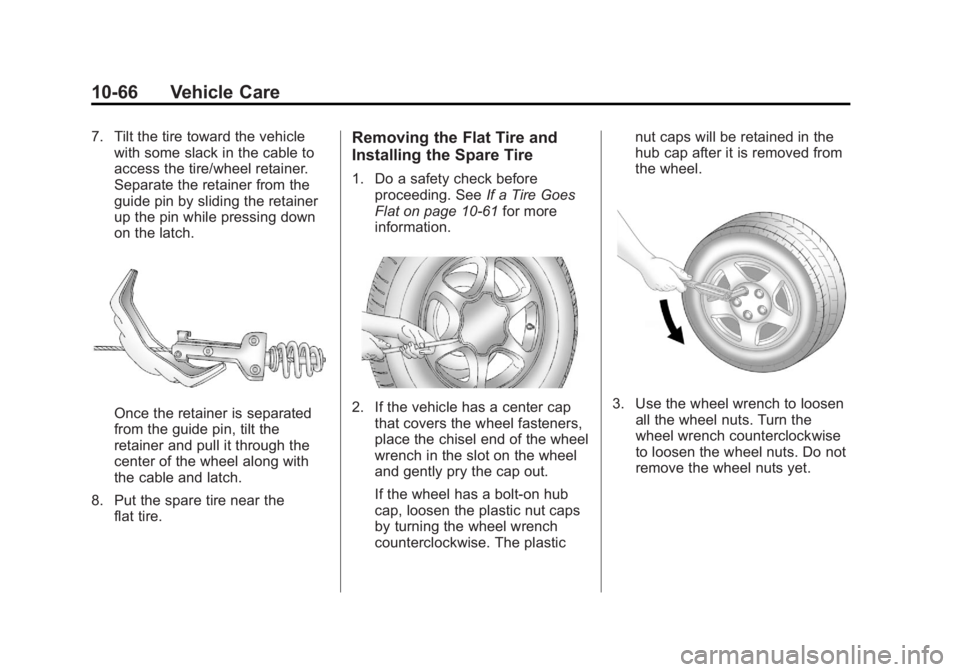
7. Tilt the tire toward the vehiclewith some slack in the cable to
access the tire/wheel retainer.
Separate the retainer from the
guide pin by sliding the retainer
up the pin while pressing down
on the latch.
Once the retainer is separated
from the guide pin, tilt the
retainer and pull it through the
center of the wheel along with
the cable and latch.
8. Put the spare tire near the flat tire.
Removing the Flat Tire and
Installing the Spare Tire
1. Do a safety check beforeproceeding. See If a Tire Goes
Flat on page 10-61 for more
information.
2. If the vehicle has a center cap that covers the wheel fasteners,
place the chisel end of the wheel
wrench in the slot on the wheel
and gently pry the cap out.
If the wheel has a bolt-on hub
cap, loosen the plastic nut caps
by turning the wheel wrench
counterclockwise. The plastic nut caps will be retained in the
hub cap after it is removed from
the wheel.3. Use the wheel wrench to loosen
all the wheel nuts. Turn the
wheel wrench counterclockwise
to loosen the wheel nuts. Do not
remove the wheel nuts yet.
Page 405 of 490
Black plate (67,1)GMC Yukon/Yukon XL Owner Manual (GMNA-Localizing-U.S./Canada-
6081505) - 2014 - crc - 4/23/13
Vehicle Care 10-67
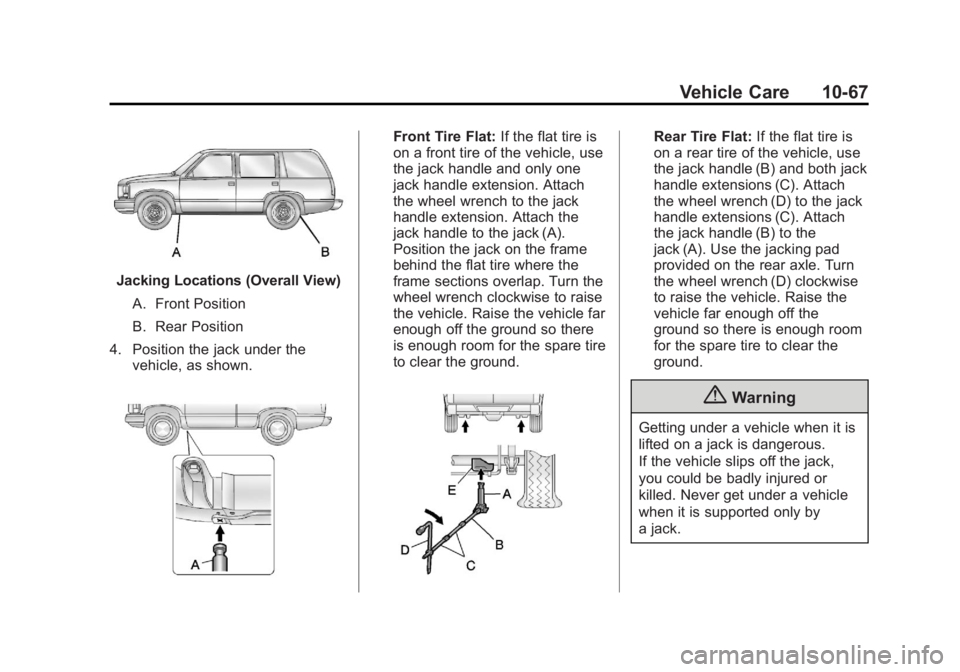
Jacking Locations (Overall View)A. Front Position
B. Rear Position
4. Position the jack under the vehicle, as shown.
Front Tire Flat: If the flat tire is
on a front tire of the vehicle, use
the jack handle and only one
jack handle extension. Attach
the wheel wrench to the jack
handle extension. Attach the
jack handle to the jack (A).
Position the jack on the frame
behind the flat tire where the
frame sections overlap. Turn the
wheel wrench clockwise to raise
the vehicle. Raise the vehicle far
enough off the ground so there
is enough room for the spare tire
to clear the ground.Rear Tire Flat: If the flat tire is
on a rear tire of the vehicle, use
the jack handle (B) and both jack
handle extensions (C). Attach
the wheel wrench (D) to the jack
handle extensions (C). Attach
the jack handle (B) to the
jack (A). Use the jacking pad
provided on the rear axle. Turn
the wheel wrench (D) clockwise
to raise the vehicle. Raise the
vehicle far enough off the
ground so there is enough room
for the spare tire to clear the
ground.
{Warning
Getting under a vehicle when it is
lifted on a jack is dangerous.
If the vehicle slips off the jack,
you could be badly injured or
killed. Never get under a vehicle
when it is supported only by
a jack.
Page 406 of 490
Black plate (68,1)GMC Yukon/Yukon XL Owner Manual (GMNA-Localizing-U.S./Canada-
6081505) - 2014 - crc - 4/23/13
10-68 Vehicle Care
{Warning
Raising the vehicle with the jack
improperly positioned can
damage the vehicle and even
make the vehicle fall. To help
avoid personal injury and vehicle
damage, be sure to fit the jack lift
head into the proper location
before raising the vehicle.
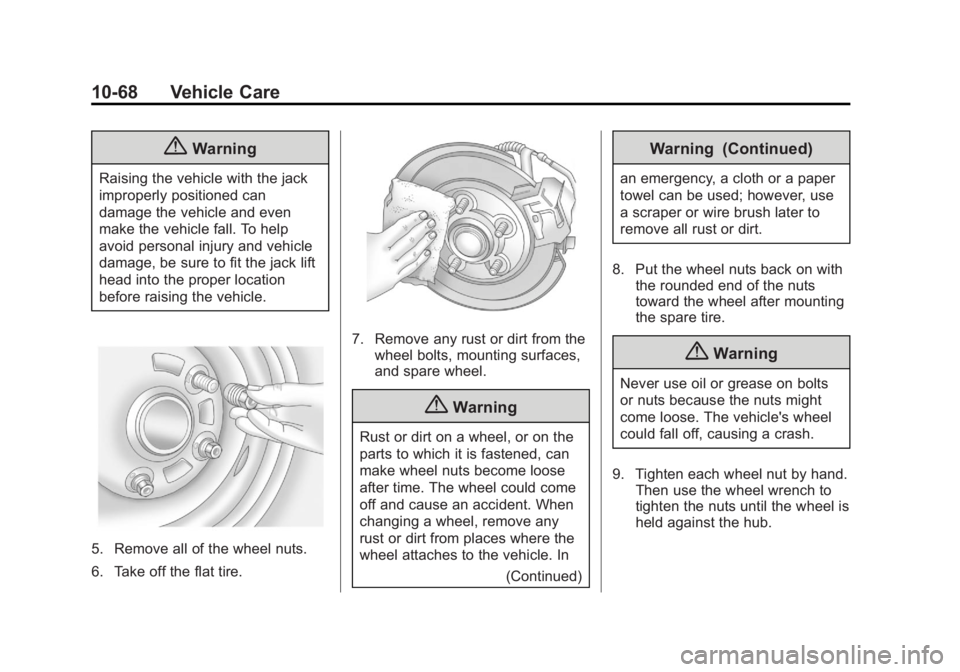
5. Remove all of the wheel nuts.
6. Take off the flat tire.
7. Remove any rust or dirt from thewheel bolts, mounting surfaces,
and spare wheel.
{Warning
Rust or dirt on a wheel, or on the
parts to which it is fastened, can
make wheel nuts become loose
after time. The wheel could come
off and cause an accident. When
changing a wheel, remove any
rust or dirt from places where the
wheel attaches to the vehicle. In
(Continued)
Warning (Continued)
an emergency, a cloth or a paper
towel can be used; however, use
a scraper or wire brush later to
remove all rust or dirt.
8. Put the wheel nuts back on with the rounded end of the nuts
toward the wheel after mounting
the spare tire.
{Warning
Never use oil or grease on bolts
or nuts because the nuts might
come loose. The vehicle's wheel
could fall off, causing a crash.
9. Tighten each wheel nut by hand. Then use the wheel wrench to
tighten the nuts until the wheel is
held against the hub.
Page 408 of 490
Black plate (70,1)GMC Yukon/Yukon XL Owner Manual (GMNA-Localizing-U.S./Canada-
6081505) - 2014 - crc - 4/23/13
10-70 Vehicle Care
Storing a Flat or Spare Tire
and Tools
{Warning
Storing a jack, a tire, or other
equipment in the passenger
compartment of the vehicle could
cause injury. In a sudden stop or
collision, loose equipment could
strike someone. Store all these in
the proper place.
Notice: Storing an aluminum
wheel with a flat tire under your
vehicle for an extended period of
time or with the valve stem
pointing up can damage the
wheel. Always stow the wheel
with the valve stem pointing
down and have the wheel/tire
repaired as soon as possible. Store the tire under the rear of the
vehicle in the spare tire carrier.
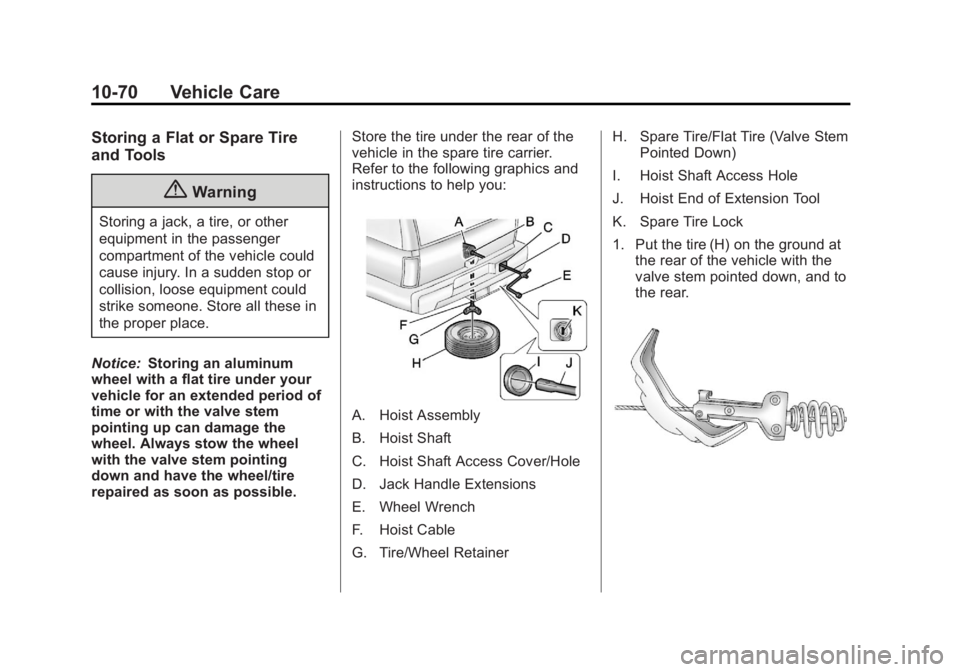
Refer to the following graphics and
instructions to help you:
A. Hoist Assembly
B. Hoist Shaft
C. Hoist Shaft Access Cover/Hole
D. Jack Handle Extensions
E. Wheel Wrench
F. Hoist Cable
G. Tire/Wheel RetainerH. Spare Tire/Flat Tire (Valve Stem
Pointed Down)
I. Hoist Shaft Access Hole
J. Hoist End of Extension Tool
K. Spare Tire Lock
1. Put the tire (H) on the ground at the rear of the vehicle with the
valve stem pointed down, and to
the rear.
Page 409 of 490
Black plate (71,1)GMC Yukon/Yukon XL Owner Manual (GMNA-Localizing-U.S./Canada-
6081505) - 2014 - crc - 4/23/13
Vehicle Care 10-71
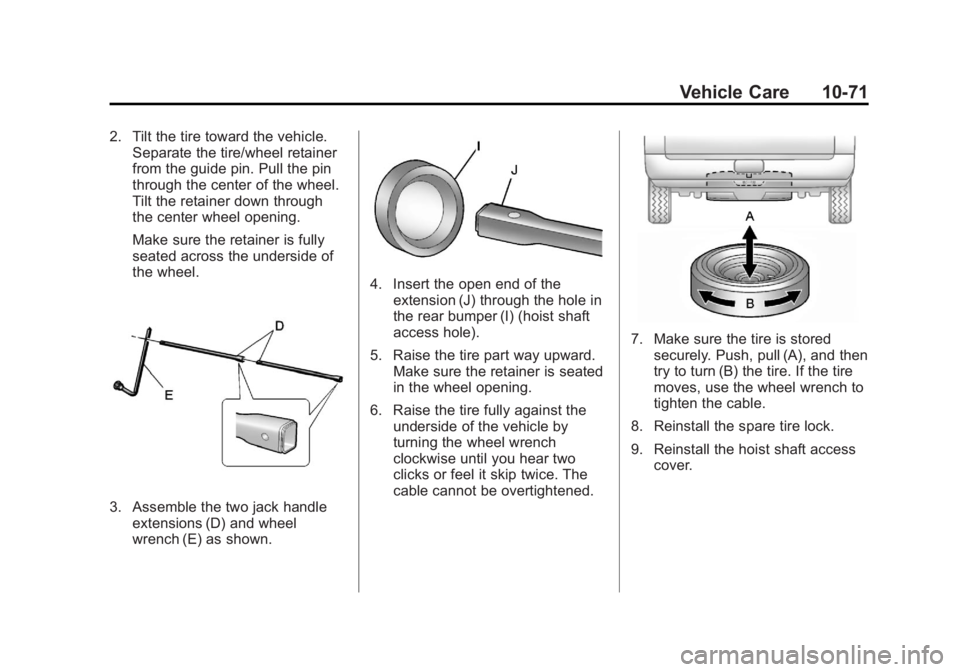
2. Tilt the tire toward the vehicle.Separate the tire/wheel retainer
from the guide pin. Pull the pin
through the center of the wheel.
Tilt the retainer down through
the center wheel opening.
Make sure the retainer is fully
seated across the underside of
the wheel.
3. Assemble the two jack handle
extensions (D) and wheel
wrench (E) as shown.
4. Insert the open end of theextension (J) through the hole in
the rear bumper (I) (hoist shaft
access hole).
5. Raise the tire part way upward. Make sure the retainer is seated
in the wheel opening.
6. Raise the tire fully against the underside of the vehicle by
turning the wheel wrench
clockwise until you hear two
clicks or feel it skip twice. The
cable cannot be overtightened.
7. Make sure the tire is storedsecurely. Push, pull (A), and then
try to turn (B) the tire. If the tire
moves, use the wheel wrench to
tighten the cable.
8. Reinstall the spare tire lock.
9. Reinstall the hoist shaft access cover.
Page 410 of 490
Black plate (72,1)GMC Yukon/Yukon XL Owner Manual (GMNA-Localizing-U.S./Canada-
6081505) - 2014 - crc - 4/23/13
10-72 Vehicle Care
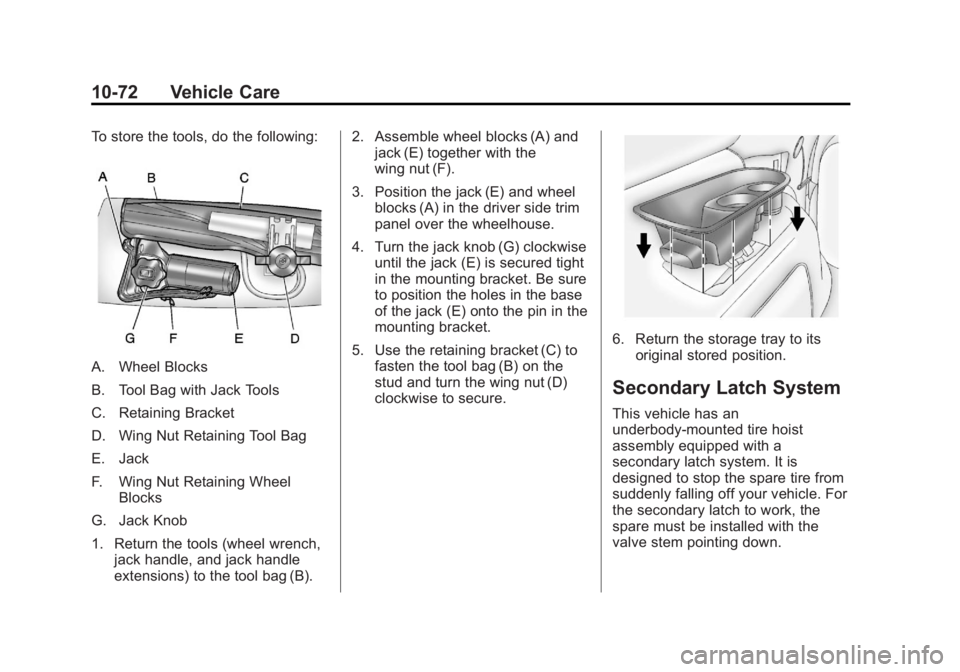
To store the tools, do the following:
A. Wheel Blocks
B. Tool Bag with Jack Tools
C. Retaining Bracket
D. Wing Nut Retaining Tool Bag
E. Jack
F. Wing Nut Retaining WheelBlocks
G. Jack Knob
1. Return the tools (wheel wrench, jack handle, and jack handle
extensions) to the tool bag (B). 2. Assemble wheel blocks (A) and
jack (E) together with the
wing nut (F).
3. Position the jack (E) and wheel blocks (A) in the driver side trim
panel over the wheelhouse.
4. Turn the jack knob (G) clockwise until the jack (E) is secured tight
in the mounting bracket. Be sure
to position the holes in the base
of the jack (E) onto the pin in the
mounting bracket.
5. Use the retaining bracket (C) to fasten the tool bag (B) on the
stud and turn the wing nut (D)
clockwise to secure.
6. Return the storage tray to itsoriginal stored position.
Secondary Latch System
This vehicle has an
underbody-mounted tire hoist
assembly equipped with a
secondary latch system. It is
designed to stop the spare tire from
suddenly falling off your vehicle. For
the secondary latch to work, the
spare must be installed with the
valve stem pointing down.
Page 411 of 490
Black plate (73,1)GMC Yukon/Yukon XL Owner Manual (GMNA-Localizing-U.S./Canada-
6081505) - 2014 - crc - 4/23/13
Vehicle Care 10-73
See“Storing a Flat or Spare Tire
and Tools” underTire Changing on
page 10-63.
{Warning
Before beginning this procedure
read all the instructions. Failure to
read and follow the instructions
could damage the hoist assembly
and you and others could get
hurt. Read and follow the
instructions listed next. To release the spare tire from the
secondary latch:
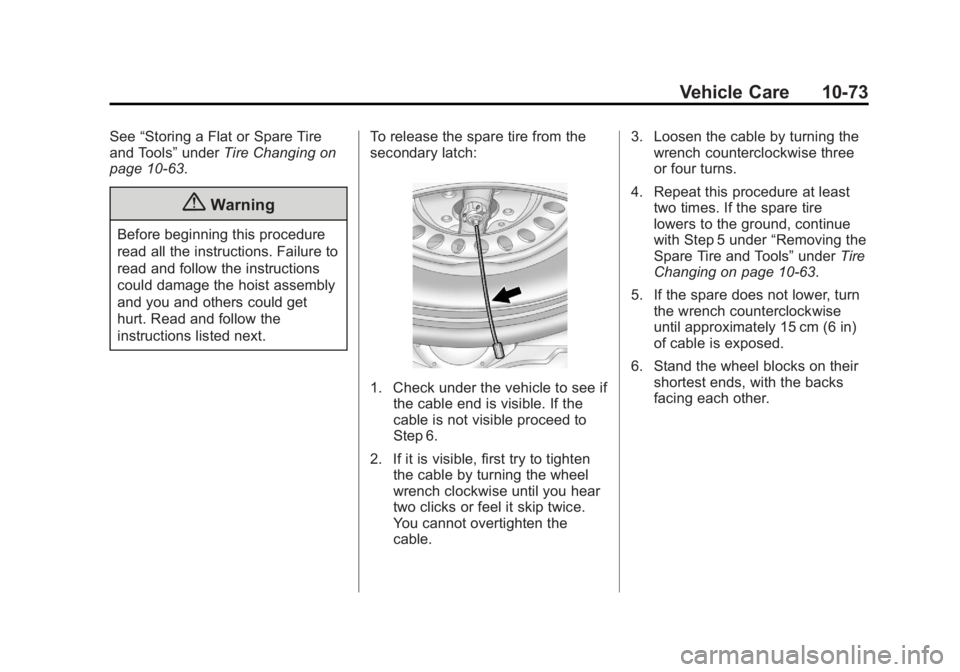
1. Check under the vehicle to see if
the cable end is visible. If the
cable is not visible proceed to
Step 6.
2. If it is visible, first try to tighten the cable by turning the wheel
wrench clockwise until you hear
two clicks or feel it skip twice.
You cannot overtighten the
cable. 3. Loosen the cable by turning the
wrench counterclockwise three
or four turns.
4. Repeat this procedure at least two times. If the spare tire
lowers to the ground, continue
with Step 5 under “Removing the
Spare Tire and Tools” underTire
Changing on page 10-63.
5. If the spare does not lower, turn the wrench counterclockwise
until approximately 15 cm (6 in)
of cable is exposed.
6. Stand the wheel blocks on their shortest ends, with the backs
facing each other.
Page 412 of 490
Black plate (74,1)GMC Yukon/Yukon XL Owner Manual (GMNA-Localizing-U.S./Canada-
6081505) - 2014 - crc - 4/23/13
10-74 Vehicle Care
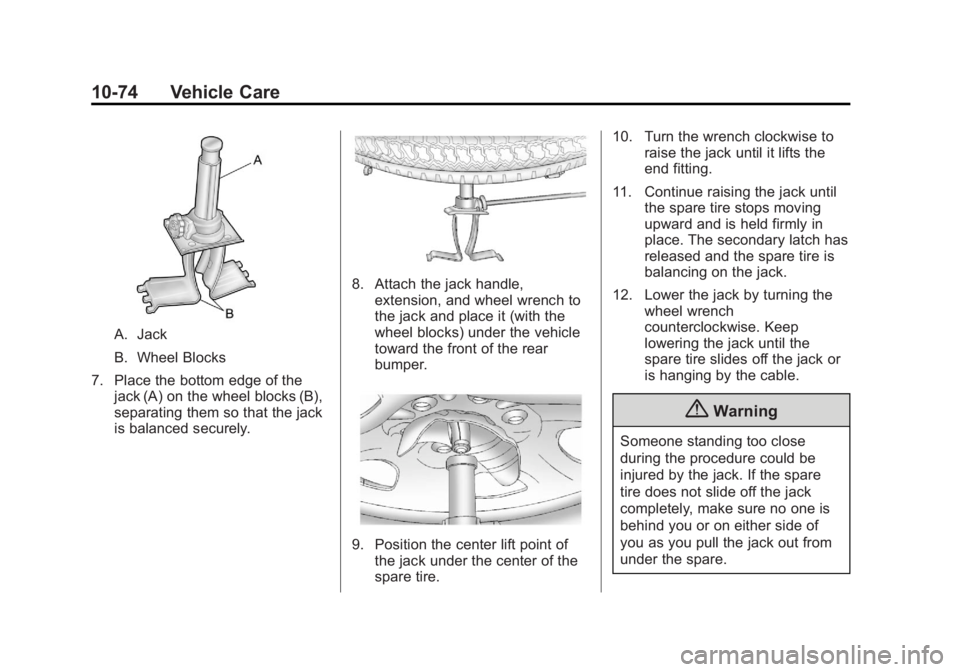
A. Jack
B. Wheel Blocks
7. Place the bottom edge of the jack (A) on the wheel blocks (B),
separating them so that the jack
is balanced securely.
8. Attach the jack handle,extension, and wheel wrench to
the jack and place it (with the
wheel blocks) under the vehicle
toward the front of the rear
bumper.
9. Position the center lift point ofthe jack under the center of the
spare tire. 10. Turn the wrench clockwise to
raise the jack until it lifts the
end fitting.
11. Continue raising the jack until the spare tire stops moving
upward and is held firmly in
place. The secondary latch has
released and the spare tire is
balancing on the jack.
12. Lower the jack by turning the wheel wrench
counterclockwise. Keep
lowering the jack until the
spare tire slides off the jack or
is hanging by the cable.
{Warning
Someone standing too close
during the procedure could be
injured by the jack. If the spare
tire does not slide off the jack
completely, make sure no one is
behind you or on either side of
you as you pull the jack out from
under the spare.