key battery GMC YUKON XL 2017 Owners Manual
[x] Cancel search | Manufacturer: GMC, Model Year: 2017, Model line: YUKON XL, Model: GMC YUKON XL 2017Pages: 427, PDF Size: 7.04 MB
Page 33 of 427

GMC Yukon/Yukon XL/Denali Owner Manual (GMNA-Localizing-U.S./
Canada/Mexico-9955936) - 2017 - crc - 7/5/16
32 Keys, Doors, and Windows
If the vehicle has the Keyless
Access system, the transmitter has
a button on the side of the
transmitter used to remove the key.
Do not pull the key out without
pressing the button.
See your dealer if a replacement
key or additional key is needed.
If it becomes difficult to turn a key,
inspect the key blade for debris.
Periodically clean with a brush
or pick.
With an active OnStar subscription,
an OnStar Advisor may remotely
unlock the vehicle. SeeOnStar
Overview 0405.
Remote Keyless Entry
(RKE) System
See Radio Frequency
Statement 0401.
If there is a decrease in the Remote
Keyless Entry (RKE) operating
range:
. Check the distance. The
transmitter may be too far from
the vehicle.
. Check the location. Other
vehicles or objects may be
blocking the signal.
. Check the transmitter's battery.
See “Battery Replacement” later
in this section.
. If the transmitter is still not
working correctly, see your
dealer or a qualified technician
for service.
Remote Keyless Entry
(RKE) System Operation
(Key Access)
The RKE transmitter functions may
work up to 60 m (197 ft) away from
the vehicle.
Other conditions can affect the
performance of the transmitter. See
Remote Keyless Entry (RKE)
System 032.
With Remote Start (without
Remote Start Similar)
/:If equipped, press and releaseQ, then immediately press and
hold
/until the turn signal lamps
Page 35 of 427

GMC Yukon/Yukon XL/Denali Owner Manual (GMNA-Localizing-U.S./
Canada/Mexico-9955936) - 2017 - crc - 7/5/16
34 Keys, Doors, and Windows
Battery Replacement
Replace the battery in the
transmitter soon if the REPLACE
BATTERY IN REMOTE KEY
message displays in the DIC.
Caution
When replacing the battery, do
not touch any of the circuitry on
the transmitter. Static from your
body could damage the
transmitter.
To replace the battery:
1. Separate and remove the back cover of the transmitter with a
flat, thin object, such as a coin.
2. Press and slide the battery
down toward the pocket of the
transmitter in the direction of
the key ring. Do not use a
metal object
3. Remove the battery.
4. Insert the new battery, positive side facing up. Replace with a
CR2032 or equivalent battery.
5. Push together the transmitter back cover top side first, and
then the bottom toward the
key ring.
Remote Keyless Entry
(RKE) System Operation
(Keyless Access)
The Keyless Access system allows
for vehicle entry when the
transmitter is within 1 m (3 ft). See
“Keyless Access Operation” later in
this section.
The RKE transmitter functions may
work up to 60 m (197 ft) away from
the vehicle.
Other conditions can affect the
performance of the transmitter. See
Remote Keyless Entry (RKE)
System 032.
Page 38 of 427

GMC Yukon/Yukon XL/Denali Owner Manual (GMNA-Localizing-U.S./
Canada/Mexico-9955936) - 2017 - crc - 7/5/16
Keys, Doors, and Windows 37
Passive Locking
If equipped with Keyless Access,
this feature will lock the vehicle
several seconds after all doors are
closed, if the vehicle is off and at
least one RKE transmitter has been
removed from the interior, or none
remain in the interior.
If other electronic devices interfere
with the RKE transmitter signal, the
vehicle may not detect the RKE
transmitter inside the vehicle.
If passive locking is enabled, the
doors may lock with the RKE
transmitter inside the vehicle. Do
not leave the RKE transmitter in an
unattended vehicle.
To customize the doors to
automatically lock when exiting the
vehicle, see“Remote Lock, Unlock,
Start” under Vehicle
Personalization 0170.
Temporary Disable of Passive
Locking
Temporarily disable passive locking
by pressing and holding
Kon the
interior door switch with a door open
for at least four seconds, or until three chimes are heard. Passive
locking will then remain disabled
until
Qon the interior door is
pressed, or until the vehicle is
turned on.
Keyless Liftgate Opening
Press the touch pad on the
underside of the liftgate handle to
open the liftgate when all doors are
unlocked, or when the transmitter is
within 1 m (3 ft).
Keyless Liftglass Opening
Press the exterior liftglass button to
open the liftglass when all doors are
unlocked, or when the transmitter is
within 1 m (3 ft).
See Liftgate 044.
Keyed Access
To access a vehicle with a dead
transmitter battery, see Door
Locks 041.
Programming Transmitters to
the Vehicle
Only RKE transmitters programmed
to the vehicle will work. If a
transmitter is lost or stolen, a replacement can be purchased and
programmed through your dealer.
The vehicle can be reprogrammed
so that lost or stolen transmitters no
longer work. Each vehicle can have
up to eight transmitters matched
to it.
Programming with Two
Recognized Transmitters (Keyless
Access Vehicles Only)
A new transmitter can be
programmed to the vehicle when
there are two recognized
transmitters.
To program, the vehicle must be off
and all transmitters, both currently
recognized and new, must be
with you.
1. Remove the key from the recognized transmitter.
2. Place the two recognized transmitters in the cupholder or
on the passenger seat.
3. Insert the vehicle key into the key lock cylinder on the driver
door handle. Then turn the key
Page 40 of 427

GMC Yukon/Yukon XL/Denali Owner Manual (GMNA-Localizing-U.S./
Canada/Mexico-9955936) - 2017 - crc - 7/5/16
Keys, Doors, and Windows 39
vehicle. Remaining transmitters
can be relearned during the
next steps.
The DIC display should now
show READY FOR REMOTE
# 1.
5. Place the new transmitter inthe transmitter pocket/insert.
Open the center console
storage area and the storage
tray. The transmitter pocket/
insert is in front of the storage
area next to the center console
storage area between the
driver and front passenger
seats. 6. Press ENGINE START/STOP.
When the transmitter is
learned, the DIC display will
show that it is ready to program
the next transmitter.
7. Remove the transmitter from the transmitter pocket/insert
and press
KorQon the
transmitter.
To program additional
transmitters, repeat Steps 5–7.
When all additional transmitters
are programmed, press and
hold ENGINE START/STOP for
approximately 12 seconds to
exit programming mode.
8. Return the key back into the transmitter.
Starting the Vehicle with a Low
Transmitter Battery
If the transmitter battery is weak or if
there is interference with the signal,
the DIC may display NO REMOTE
DETECTED or NO REMOTE KEY
WAS DETECTED PLACE KEY IN
TRANSMITTER POCKET THEN START YOUR VEHICLE when
starting the vehicle. See
Key and
Lock Messages 0162.
To start the vehicle: 1. Open the center console storage area and the
storage tray.
2. Place the transmitter in the
transmitter pocket/insert.
3. With the vehicle in P (Park) or N (Neutral) press the brake
pedal and ENGINE
START/STOP.
Replace the transmitter battery
as soon as possible.
Page 41 of 427

GMC Yukon/Yukon XL/Denali Owner Manual (GMNA-Localizing-U.S./
Canada/Mexico-9955936) - 2017 - crc - 7/5/16
40 Keys, Doors, and Windows
Battery Replacement
Replace the battery in the
transmitter soon if the REPLACE
BATTERY IN REMOTE KEY
message displays in the DIC.
Caution
When replacing the battery, do
not touch any of the circuitry on
the transmitter. Static from your
body could damage the
transmitter.
To replace the battery:
1. With the key removed, insert a flat, thin object in the center of
the transmitter to separate and
remove the back cover.
2. Lift the battery with a flat
object.
3. Remove the battery.
4. Insert the new battery, positive side toward the back cover.
Replace with a CR2032 or
equivalent battery.
5. Push together the transmitter.
Remote Vehicle Start
The climate control system will
come on when the vehicle is started
remotely depending on the outside
temperature.
The rear defog and heated and
ventilated seats, if equipped, may
also come on. See Heated and
Ventilated Front Seats 068 and
Vehicle Personalization 0170.
Laws in some communities may
restrict the use of remote starters.
Check local regulations for any
requirements on remote starting of
vehicles.
Do not use remote start if the
vehicle is low on fuel.
The vehicle cannot be remote
started if:
. The key is in the ignition (Key
Access) or the transmitter is in
the vehicle (Keyless Access).
. The hood is not closed.
. There is an emission control
system malfunction and the
malfunction indicator lamp is on.
Page 46 of 427

GMC Yukon/Yukon XL/Denali Owner Manual (GMNA-Localizing-U.S./
Canada/Mexico-9955936) - 2017 - crc - 7/5/16
Keys, Doors, and Windows 45
Manual Liftgate
To open the liftgate, pressKon the
power door lock switch or press
K
on the RKE transmitter twice to
unlock all doors. Press the touch
pad (1) on the underside of the
liftgate handle and lift up.
Press the button (2) above the
license plate to open the liftglass,
or press
ctwice quickly on the
RKE transmitter. Do not leave the
liftglass open when raising the
liftgate. There will be a delay in the release
of the liftglass if there is an attempt
to open it while the rear wiper is in
motion.
Use the pull cup to lower and close
the liftgate. Do not press the touch
pad while closing the liftgate. This
will cause the liftgate to be
unlatched.
If equipped with Keyless Access,
the RKE transmitter must be within
1 m (3 ft) of the liftgate to
automatically unlock it. See
Remote
Keyless Entry (RKE) System
Operation (Keyless Access) 034 or
Remote Keyless Entry (RKE)
System Operation (Key
Access) 032.
The liftgate has an electric latch.
If the battery is disconnected or has
low voltage, the liftgate will not
open. The liftgate will resume
operation when the battery is
reconnected and charged.
Power Liftgate Operation
{Warning
You or others could be injured if
caught in the path of the power
liftgate. Make sure there is no one
in the way of the liftgate as it is
opening and closing.
Caution
Driving with an open and
unsecured liftgate may result in
damage to the power liftgate
components.
Page 52 of 427

GMC Yukon/Yukon XL/Denali Owner Manual (GMNA-Localizing-U.S./
Canada/Mexico-9955936) - 2017 - crc - 7/5/16
Keys, Doors, and Windows 51
.Always unlock a door with the
RKE transmitter, or use the
Keyless Access system.
Unlocking the driver door with
the key will not disarm the
system or turn off the alarm.
How to Detect a Tamper
Condition
IfKis pressed on the RKE
transmitter and the horn chirps three
times, an alarm occurred previously
while the alarm system was armed.
If the alarm has been activated, a
message will appear on the DIC.
See Security Messages 0166.
Power Sounder, Inclination
Sensor, and Intrusion Sensor
In addition to the standard
theft-deterrent system features, this
system may also have a power
sounder, inclination sensor, and
intrusion sensor.
The power sounder provides an
audible alarm which is distinct from
the vehicle’ s horn. It has its own power source, and can sound an
alarm if the vehicle’s battery is
compromised.
The inclination sensor can set off
the alarm if it senses movement of
the vehicle, such as a change in
vehicle orientation.
The intrusion sensor monitors the
vehicle interior, and can activate the
alarm if it senses unauthorized entry
into the vehicle’s interior. Do not
allow passengers or pets to remain
in the vehicle when the intrusion
sensor is activated.
Before arming the theft-deterrent
system and activating the intrusion
sensor:
.
Make sure all doors and
windows are completely closed.
. Secure any loose items such as
a sunshades.
. Make sure there are no
obstructions blocking the
sensors in the front overhead
console.
. Close DVD screens before
leaving the vehicle.
Intrusion and Inclination
Sensors Disable Switch
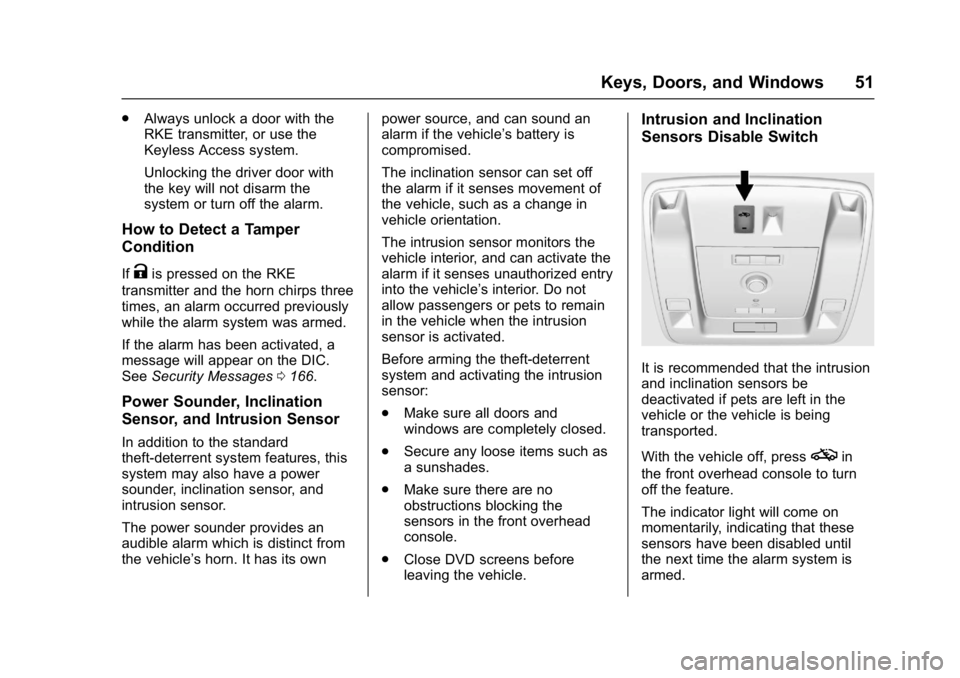
It is recommended that the intrusion
and inclination sensors be
deactivated if pets are left in the
vehicle or the vehicle is being
transported.
With the vehicle off, press
oin
the front overhead console to turn
off the feature.
The indicator light will come on
momentarily, indicating that these
sensors have been disabled until
the next time the alarm system is
armed.
Page 60 of 427

GMC Yukon/Yukon XL/Denali Owner Manual (GMNA-Localizing-U.S./
Canada/Mexico-9955936) - 2017 - crc - 7/5/16
Keys, Doors, and Windows 59
Express Window Obstacle
Detection
The express-up feature will reverse
window movement if it comes in
contact with an object. Extreme cold
or ice could cause the window to
auto-reverse. The window will
operate as normal after the object or
condition is removed.
Obstacle Detection Override
{Warning
If obstacle detection override is
activated, the window will not
reverse automatically. You or
others could be injured and the
window could be damaged.
Before you use obstacle detection
override, make sure that all
people and obstructions are clear
of the window path.
The window can be closed by
holding the window switch in the up
position if conditions prevent it from
express closing.
Programming the Power
Windows
Programming may be necessary if
the vehicle's battery has been
disconnected or discharged. If the
window is unable to express-up,
program the window: 1. Close all doors.
2. Place the ignition in ACC/ ACCESSORY or ON/RUN.
3. Partially open the window to be programmed, then close it and
continue to pull the switch
briefly after the window has
fully closed.
4. Press the power window switch until the window is fully open
and briefly hold.
Sun Visors
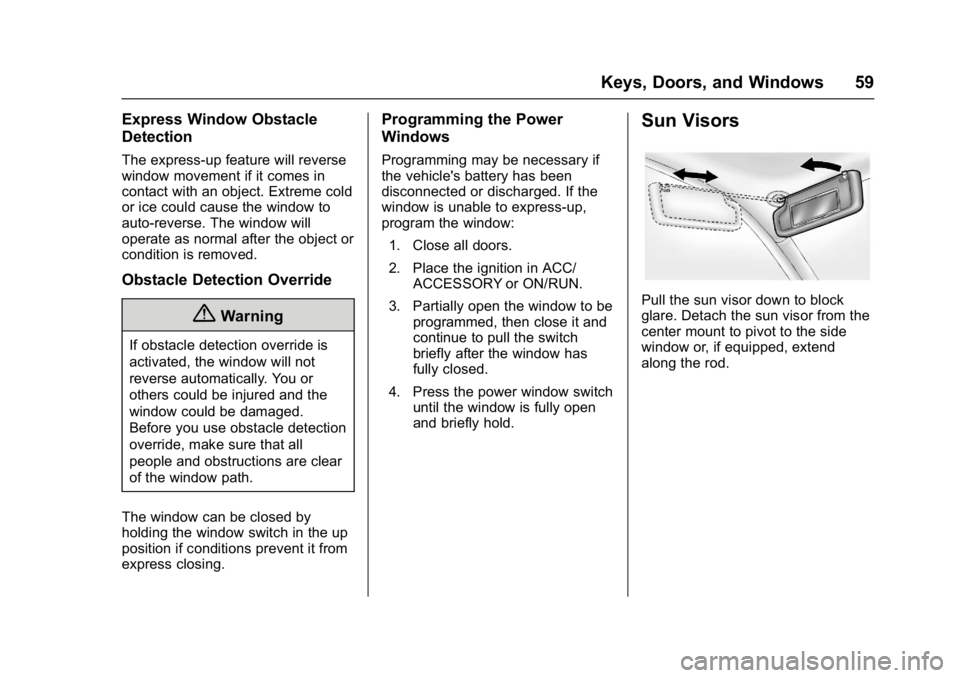
Pull the sun visor down to block
glare. Detach the sun visor from the
center mount to pivot to the side
window or, if equipped, extend
along the rod.
Page 125 of 427

GMC Yukon/Yukon XL/Denali Owner Manual (GMNA-Localizing-U.S./
Canada/Mexico-9955936) - 2017 - crc - 7/13/16
124 Instruments and Controls
Instruments and
Controls
Controls
Steering Wheel Adjustment . . . 125
Steering Wheel Controls . . . . . . 125
Heated Steering Wheel . . . . . . . 125
Horn . . . . . . . . . . . . . . . . . . . . . . . . . . 126
Windshield Wiper/Washer . . . . 126
Rear Window Wiper/Washer . . . . . . . . . . . . . . . . . . . . . 128
Compass . . . . . . . . . . . . . . . . . . . . . 128
Clock . . . . . . . . . . . . . . . . . . . . . . . . . 129
Power Outlets . . . . . . . . . . . . . . . . 130
Wireless Charging . . . . . . . . . . . . 132
Warning Lights, Gauges, and
Indicators
Warning Lights, Gauges, and Indicators . . . . . . . . . . . . . . . . . . . 133
Instrument Cluster . . . . . . . . . . . . 134
Speedometer . . . . . . . . . . . . . . . . . 137
Odometer . . . . . . . . . . . . . . . . . . . . . 137
Trip Odometer . . . . . . . . . . . . . . . . 137
Tachometer . . . . . . . . . . . . . . . . . . . 137
Fuel Gauge . . . . . . . . . . . . . . . . . . . 137
Engine Oil Pressure
Gauge . . . . . . . . . . . . . . . . . . . . . . 138 Engine Coolant Temperature
Gauge . . . . . . . . . . . . . . . . . . . . . . 139
Transmission Temperature Gauge . . . . . . . . . . . . . . . . . . . . . . 140
Voltmeter Gauge . . . . . . . . . . . . . 140
Safety Belt Reminders . . . . . . . . 141
Airbag Readiness Light . . . . . . . 142
Passenger Airbag Status
Indicator . . . . . . . . . . . . . . . . . . . . 142
Charging System Light . . . . . . . 143
Malfunction Indicator Lamp (Check Engine Light) . . . . . . . . 144
Brake System Warning Light . . . . . . . . . . . . . . . . . . . . . . . . 145
Antilock Brake System (ABS) Warning Light . . . . . . . . . . . . . . . 146
Four-Wheel-Drive Light . . . . . . . 146
Tow/Haul Mode Light . . . . . . . . . 147
Lane Keep Assist (LKA) Light . . . . . . . . . . . . . . . . . . . . . . . . 147
Vehicle Ahead Indicator . . . . . . 147
Traction Off Light . . . . . . . . . . . . . 147
StabiliTrak
®OFF Light . . . . . . . . 148
Traction Control System (TCS)/ StabiliTrak
®Light . . . . . . . . . . . 148
Engine Coolant Temperature Warning Light . . . . . . . . . . . . . . . 148
Tire Pressure Light . . . . . . . . . . . 149
Engine Oil Pressure Light . . . . 149
Low Fuel Warning Light . . . . . . 150
Security Light . . . . . . . . . . . . . . . . . 150 High-Beam On Light . . . . . . . . . . 150
Front Fog Lamp Light . . . . . . . . . 151
Lamps On Reminder . . . . . . . . . 151
Cruise Control Light . . . . . . . . . . 151
Door Ajar Light . . . . . . . . . . . . . . . 151
Information Displays
Driver Information
Center (DIC) . . . . . . . . . . . . . . . . 152
Head-Up Display (HUD) . . . . . . 155
Vehicle Messages
Vehicle Messages . . . . . . . . . . . . 158
Battery Voltage and Charging Messages . . . . . . . . . . . . . . . . . . . 158
Brake System Messages . . . . . 159
Compass Messages . . . . . . . . . . 159
Cruise Control Messages . . . . . 159
Door Ajar Messages . . . . . . . . . . 160
Engine Cooling System Messages . . . . . . . . . . . . . . . . . . . 161
Engine Oil Messages . . . . . . . . . 161
Engine Power Messages . . . . . 162
Fuel System Messages . . . . . . . 162
Key and Lock Messages . . . . . 162
Lamp Messages . . . . . . . . . . . . . . 163
Object Detection System Messages . . . . . . . . . . . . . . . . . . . 163
Ride Control System
Messages . . . . . . . . . . . . . . . . . . . 165
Airbag System Messages . . . . 166
Page 131 of 427

GMC Yukon/Yukon XL/Denali Owner Manual (GMNA-Localizing-U.S./
Canada/Mexico-9955936) - 2017 - crc - 7/13/16
130 Instruments and Controls
To set the clock display:1. Touch SETTINGS on the Home Page, then touch Time
and Date.
2. Touch Clock Display, then touch Off or On to turn the
clock display off or on.
3. Touch
Sto go back to the
previous menu.
Power Outlets
Power Outlets 12-Volt Direct
Current
Accessory power outlets can be
used to plug in electrical equipment,
such as a cell phone, MP3
player, etc.
The vehicle may have up to five
accessory power outlets:
Vehicles with a Center Console
. One in front of the cupholders on
the center console.
. One inside the center storage
console.
. One on the rear of the center
storage console. .
One in the third row seat on the
driver side.
. One in the rear cargo area on
the passenger side.
Vehicles with Bench Seats
. One on the center stack below
the climate control system.
. One in the storage area on the
bench seat.
. One on the rear of the center
armrest storage.
. One in the third row seat area on
the driver side.
. One in the rear cargo area on
the passenger side.
Lift the cover to access and replace
when not in use.
The accessory power outlets are
powered as follows:
. The power outlet near the
cupholders for vehicles with a
center console or on the center
stack for vehicles with bench
seats, can be configured to
operate using Retained
Accessory Power (RAP) or battery power modes. If these
power outlets are used while in
the battery power mode, this
could cause interference
between the Remote Keyless
Entry (RKE) transmitter and the
vehicle, and the vehicle may not
start. See
Ignition Positions
(Keyless Access) 0219 or
Ignition Positions (Key
Access) 0217.
. The power outlets in the third
row seat area or in the rear
cargo area are powered at all
times. The power outlets inside
the storage area, on the rear of
the console, or on the bench
seat are only powered when the
ignition is in ON/RUN or ACC/
ACCESSORY, or when RAP is
active.
{Warning
Power is always supplied to the
outlet, if configured accordingly.
Do not leave electrical equipment
plugged in when the vehicle is not
(Continued)