air condition GMC YUKON XL 2023 User Guide
[x] Cancel search | Manufacturer: GMC, Model Year: 2023, Model line: YUKON XL, Model: GMC YUKON XL 2023Pages: 432, PDF Size: 9.3 MB
Page 122 of 432

GMC Yukon/Yukon XL/Denali Owner Manual (GMNA-Localizing-U.S./
Canada/Mexico-16417394) - 2023 - CRC - 4/26/22
Instruments and Controls 121
the light will come on every time the
vehicle is started. SeeTire Pressure Monitor
Operation 0349.
Engine Oil Pressure Light
Caution
Driving the vehicle with low engine oil
pressure can damage the engine and the
repairs would not be covered by the
vehicle warranty.
If the engine oil pressure light comes on
while driving:
1. Stop in a safe location and turn off the engine.
2. Check the oil level. See Engine Oil
0 314.
3. Add oil if the oil level is below the normal operating range.
4. Restart the vehicle. If the engine oil pressure light stays on for more
than 10 seconds, turn the vehicle
back off. Do not restart the vehicle.
See your dealer for service.This light should come on briefly when the
engine starts. When the engine is off and
the vehicle is on, the light should remain
illuminated. If it does not come on under
either condition, contact your dealer.
If the light comes on and stays on when the
engine is running, it may not have adequate
oil pressure. The oil level may be low or
there may be some other oil system
problem. Turn the engine off when it is safe
to do so and contact your dealer.
Low Fuel Warning Light
A Low Fuel Warning Light near the fuel
gauge comes on briefly when the ignition is
turned on as a check to show it is working. For vehicles with a reconfigurable cluster,
this light is in the display area and may not
come on when the ignition is turned on.
It also comes on when the fuel gauge
indicator nears empty. The light turns off
when fuel is added. If it does not, have the
vehicle serviced.
Security Light
The security light should come on briefly as
the engine is started. If it does not come on,
have the vehicle serviced by your dealer.
If the system is working normally, the
indicator light turns off.
If the light stays on and the engine does
not start, there could be a problem with the
theft-deterrent system. See
Immobilizer
Operation 026.
Page 130 of 432

GMC Yukon/Yukon XL/Denali Owner Manual (GMNA-Localizing-U.S./
Canada/Mexico-16417394) - 2023 - CRC - 4/26/22
Instruments and Controls 129
Audio overlays display when the audio app
is selected on the instrument cluster. All
HUD views may briefly display audio
information when the driver uses the
steering wheel controls to adjust the audio
settings appearing in the instrument cluster.
Incoming phone calls appearing in the
instrument cluster, may also display in any
HUD view.
Care of the HUD
Clean the inside of the windshield to remove
any dirt or film that could reduce the
sharpness or clarity of the HUD image.
Clean the HUD lens with a soft cloth
sprayed with glass cleaner. Wipe the lens
gently, then dry it.
HUD Troubleshooting
Check that:
.Nothing is covering the HUD lens.
.The HUD brightness setting is not too
dim or too bright.
.The HUD is adjusted to the proper height.
.Polarized sunglasses are not worn.
.The windshield and HUD lens are clean.
If the HUD image is not correct, contact
your dealer. The windshield is part of the HUD system.
See
Windshield Replacement 0329.
Vehicle Messages
Messages displayed on the DIC indicate the
status of the vehicle or some action that
may be needed to correct a condition.
Multiple messages may appear one after
another.
The messages that do not require
immediate action can be acknowledged and
cleared by pressing
V. The messages that
require immediate action cannot be cleared
until that action is performed.
All messages should be taken seriously;
clearing the message does not correct the
problem.
If a SERVICE message appears, see your
dealer.
Follow the instructions given in the
messages. The system displays messages
regarding the following topics:
.Service Messages
.Fluid Levels
.Vehicle Security
.Brakes
.Steering
.Ride Control Systems
.Driver Assistance Systems
.Cruise Control
.Lighting and Bulb Replacement
.Wiper/Washer Systems
.Doors and Windows
.Seat Belts
.Airbag Systems
.Engine and Transmission
.Tire Pressure
.Battery
.Four Corner Air Suspension System
Engine Power Messages
REDUCED ACCELERATION DRIVE
WITH CARE
This message displays when the vehicle's
propulsion power is reduced. A reduction in
propulsion power can affect the vehicle's
ability to accelerate. If this message is on,
but there is no observed reduction in
performance, proceed to your destination.
Under certain conditions the performance
may be reduced the next time the vehicle is
driven. The vehicle may be driven while this
message is on, but maximum acceleration
and speed may be reduced. Anytime this
Page 135 of 432

GMC Yukon/Yukon XL/Denali Owner Manual (GMNA-Localizing-U.S./
Canada/Mexico-16417394) - 2023 - CRC - 4/26/22
134 Lighting
The system turns the high-beam headlamps
on when it is dark enough and there is no
other traffic present.
This light displays on the instrument cluster
when the IntelliBeam system is enabled.
Turning On and Enabling IntelliBeam
To enable the IntelliBeam system, activate
the high/low-beam changer two times
within two seconds while the exterior lamp
control is in AUTO or
2.
Driving with IntelliBeam
The system only activates the high beams
when driving over 40 km/h (25 mph).
The blue high-beam on light appears on the
instrument cluster when the high beams
are on.
There is a sensor near the top center of the
windshield that automatically controls the
system. Keep this area of the windshield
clear of debris to allow for best system
performance. The high-beam headlamps remain on, under
the automatic control, until one of the
following situations occurs:
.The system detects an approaching
vehicle's headlamps.
.The system detects a preceding vehicle's
taillamps.
.The outside light is bright enough that
high-beam headlamps are not required.
.The vehicle speed drops below 20 km/h
(12 mph).
The IntelliBeam system can be disabled by
the High/Low-Beam Changer or the
Flash-to-Pass feature. If this happens, the
High/Low-Beam Changer must be activated
two times within two seconds to reactivate
the IntelliBeam system. The instrument
cluster light will come on to indicate the
IntelliBeam is reactivated. See Headlamp
High/Low-Beam Changer 0135 and
Flash-to-Pass 0135.
The high beams may not turn off
automatically if the system cannot detect
another vehicle's lamps because of any of
the following:
.The other vehicle's lamps are missing,
damaged, obstructed from view,
or otherwise undetected.
.The other vehicle's lamps are covered
with dirt, snow, and/or road spray.
.The other vehicle's lamps cannot be
detected due to dense exhaust, smoke,
fog, snow, road spray, mist, or other
airborne obstructions.
.The vehicle windshield is dirty, cracked,
or obstructed by something that blocks
the view of the light sensor.
.The vehicle is loaded such that the front
end points upward, causing the light
sensor to aim high and not detect
headlamps and taillamps.
.The vehicle is being driven on winding or
hilly roads.
The automatic high-beam headlamps may
need to be disabled if any of the above
conditions exist.
Exterior Lamps Off Reminder
A reminder chime sounds when the
headlamps or parking lamps are manually
turned on, the vehicle is turned off, and a
door is open. To disable the chime, turn the
lamps off.
Page 157 of 432

GMC Yukon/Yukon XL/Denali Owner Manual (GMNA-Localizing-U.S./
Canada/Mexico-16417394) - 2023 - CRC - 4/26/22
156 Infotainment System
Rear Media Settings
From the Rear Media page, touch Settings to
access the settings menu.
The menu may contain the following:
Remember Screen Power Status
Select to have rear screens automatically
power on when the vehicle is started.
Rear Screen Voice-Over
Select to have Video Voice Over for the
individual rear screens.
Allowed Applications
Select to choose which applications are
visible.
Account
Select to show the vehicle data plan.
Reset Rear Media
Select to reset the applications.
Rear Media Terms of Use
Select to view the terms of use.
Privacy Statement
Select to view the Privacy statement.RSI Troubleshooting
No power :
The ignition might not be on or
in accessory mode.
There is no sound from the headphones
with the indicator light on : Make sure the
headphones have sufficient charge. Plug the
headphones to a USB-C port to charge.
Check to see if headphones are paired to the
screens. Make sure that you are listening in
to the correct screen by pressing the
channel select button.
If the steps above do not work, then unpair
the headphones from the RSI screens, turn
the headphones off, turn them back on and
attempt to pair them. See pairing
procedures for the Bluetooth headphone
previously in this section.
Video Distortion
Video distortion can occur when operating
cellular phones, scanners, CB radios, Global
Positioning Systems (GPS), two-way radios,
mobile faxes, or walkie talkies.
It might be necessary to turn off the video
player when operating one of these devices
in or near the vehicle.
Navigation
Using the Navigation System
The Navigation software is provided by
Google Maps. The information provided in
this section is a general overview and is
subject to change. For the latest functional
information, see g.co/mapsincar.
Accept the Terms and Conditions to use.
Internet Connectivity
Google Maps relies on a subscription data
plan for full functionality, including
availability of offline maps. With an
applicable connected services plan, Google
Maps can be used offline when driving
through connectivity dead zones by
auto-downloading offline maps prior to
going offline.
Profiles
Sign in to a Google Account for personalized
service. Information available in the Google
Account will be shown.
To log into a profile, see Accounts under
Settings 0167.
Page 160 of 432

GMC Yukon/Yukon XL/Denali Owner Manual (GMNA-Localizing-U.S./
Canada/Mexico-16417394) - 2023 - CRC - 4/26/22
Infotainment System 159
At times, other interference such as the
satellite condition, road configuration,
condition of the vehicle, and/or other
circumstances can affect the navigation
system's ability to determine the accurate
position of the vehicle.
This system might not be available or
interference can occur if any of the
following are true:
.Signals are obstructed by tall buildings,
trees, large trucks, or a tunnel.
.Satellites are being repaired or improved.
For more information if the GPS is not
functioning properly, see Problems with
Route Guidance 0159.
Vehicle Positioning
At times, the position of the vehicle on the
map could be inaccurate due to one or more
of the following reasons:
.The road system has changed.
.The vehicle is driving on slippery road
surfaces such as sand, gravel, or snow.
.The vehicle is traveling on winding roads
or long, straight roads.
.The vehicle is approaching a tall building
or a large vehicle.
.The surface streets run parallel to a
freeway.
.The vehicle has been transferred by a
vehicle carrier or a ferry.
.The current position calibration is set
incorrectly.
.The vehicle is traveling at high speed.
.The vehicle changes directions more than
once, or the vehicle is turning on a turn
table in a parking lot.
.The vehicle is entering and/or exiting a
parking lot, garage, or a lot with a roof.
.The GPS signal is not received.
.A roof carrier is installed on the vehicle.
.Tire chains are installed on the vehicle.
.The tires are replaced or worn.
.The tire pressure for the tires is incorrect.
.This is the first navigation use after the
map data is updated.
.The 12-volt battery has been disconnected
for several days.
.The vehicle is driving in heavy traffic
where driving is at low speeds, and the
vehicle is stopped and started repeatedly.
Problems with Route Guidance
Inappropriate route guidance can occur
under one or more of the following
conditions:
.The turn was not made on the road
indicated.
.Route guidance might not be available
when using automatic rerouting for the
next right or left turn.
.The route might not be changed when
using automatic rerouting.
.There is no route guidance when turning
at an intersection.
.Automatic rerouting might display a route
returning to the set waypoint if heading
for a destination without passing through
a set waypoint.
.The route prohibits the entry of a vehicle
due to a regulation by time or season or
any other regulation which may be given.
.Some routes might not be searched.
.The route to the destination might not be
shown if there are new roads, if roads
have recently changed, or if certain roads
are not listed in Maps.
Page 162 of 432

GMC Yukon/Yukon XL/Denali Owner Manual (GMNA-Localizing-U.S./
Canada/Mexico-16417394) - 2023 - CRC - 4/26/22
Infotainment System 161
“Play
Page 167 of 432

GMC Yukon/Yukon XL/Denali Owner Manual (GMNA-Localizing-U.S./
Canada/Mexico-16417394) - 2023 - CRC - 4/26/22
166 Infotainment System
Ending a Call
.Presscon the steering wheel controls.
.Touch#on the infotainment display,
next to a call, to end only that call.
Dual Tone Multi-Frequency (DTMF) Tones
The in-vehicle Bluetooth system can send
numbers during a call. This is used when
calling a menu-driven phone system. Use the
Keypad to enter the number.
Apple CarPlay and Android Auto
If equipped, Android Auto and/or Apple
CarPlay capability may be available through
a compatible smartphone. If available, the
Android Auto and Apple CarPlay icons will
change from gray to color on the Home
Page of the infotainment display.
To use Android Auto and/or Apple CarPlay:
For Wired Phone Projection
1. Download the Android Auto app to your smartphone from Google Play for phones
running Android 9 and below. There is
no app required for Apple CarPlay or
newer versions of Android. 2. Connect your Android phone or Apple
iPhone by using the factory-provided
phone USB cable and plugging into a
USB data port. For best performance, it is
highly recommended to use the device’s
factory-provided USB cable, which should
be replaced after significant wear to
maintain connection quality. Aftermarket
or third-party cables may not work.
3. When the phone is first connected to activate Apple CarPlay or Android Auto,
accept the terms and conditions on both
the infotainment system and the phone.
4. Follow the instructions on the phone.
The Android Auto and Apple CarPlay icons
on the Home Page will illuminate depending
on the smartphone. Android Auto and/or
Apple CarPlay may automatically launch the
next time the USB is connected. If not,
touch the Android Auto or Apple CarPlay
icon on the Home Page to launch.
Press
{on the center stack to return to the
Home Page.
For Wireless Phone Projection
Verify your phone is wireless compatible by
visiting the Android Auto or Apple CarPlay
support page. 1. Download the Android Auto app to your
smartphone from Google Play for phones
running Android 9 and below. There is
no app required for Apple CarPlay or
newer versions of Android.
2. For first time connection, there are two ways to set up wireless projection:
.Connect your Android phone or Apple
iPhone by using the factory-provided
phone USB cable and plugging into a
USB data port. For best performance,
it is highly recommended to use the
device’s factory-provided USB cable,
which should be replaced after
significant wear to maintain
connection quality. Aftermarket or
third-party cables may not work.
.Connecting the phone over Bluetooth.
See Bluetooth (Pairing and Using a
Phone) 0162 or
Bluetooth (Overview) 0161.
3. Make sure Wi-Fi and Bluetooth is turned on the phone for wireless projection
to work.
4. When the phone is first connected to activate Apple CarPlay or Android Auto,
agree to the terms and conditions on
both the infotainment system and the
phone.
Page 176 of 432

GMC Yukon/Yukon XL/Denali Owner Manual (GMNA-Localizing-U.S./
Canada/Mexico-16417394) - 2023 - CRC - 4/26/22
Climate Controls 175
Climate Controls
Climate Control Systems
Dual Automatic Climate ControlSystem . . . . . . . . . . . . . . . . . . . . . . . . . . . . . . . 175
Rear Climate Control System . . . . . . . . . . 178
Air Vents
Air Vents . . . . . . . . . . . . . . . . . . . . . . . . . . . . . . 179
Maintenance
Passenger Compartment Air Filter . . . . . 180
Service . . . . . . . . . . . . . . . . . . . . . . . . . . . . . . . . . 182
Climate Control Systems
Dual Automatic Climate Control System
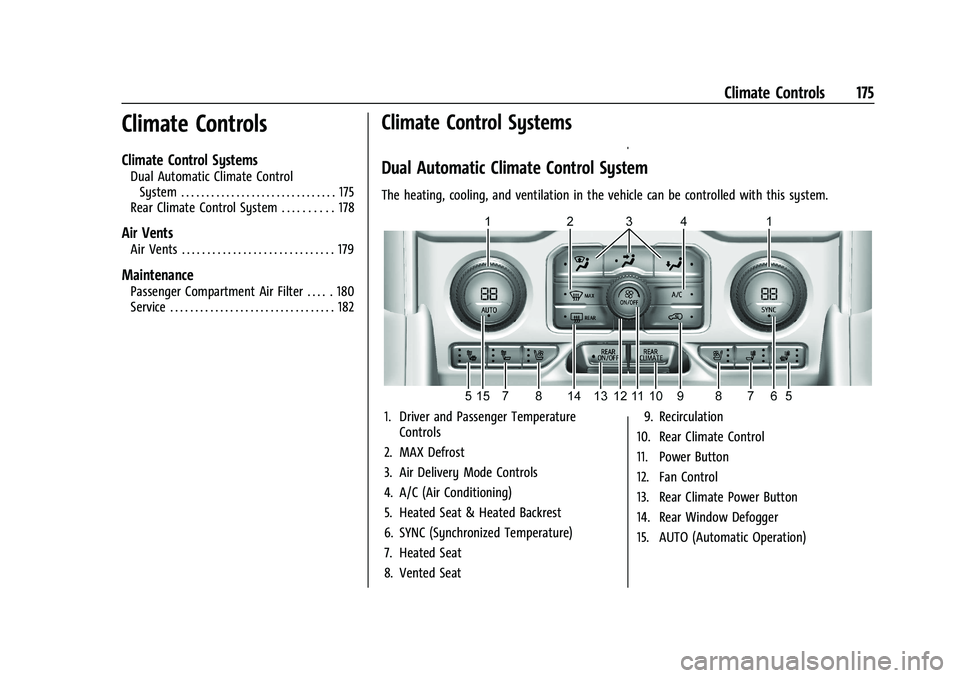
The heating, cooling, and ventilation in the vehicle can be controlled with this system.
1. Driver and Passenger Temperature Controls
2. MAX Defrost
3. Air Delivery Mode Controls
4. A/C (Air Conditioning)
5. Heated Seat & Heated Backrest
6. SYNC (Synchronized Temperature)
7. Heated Seat
8. Vented Seat 9. Recirculation
10. Rear Climate Control
11. Power Button
12. Fan Control
13. Rear Climate Power Button
14. Rear Window Defogger
15. AUTO (Automatic Operation)
Page 177 of 432

GMC Yukon/Yukon XL/Denali Owner Manual (GMNA-Localizing-U.S./
Canada/Mexico-16417394) - 2023 - CRC - 4/26/22
176 Climate Controls
Front Climate Control Display
Uplevel Shown
1. Driver and Passenger Temperature Settings
2. Fan Control
3. Driver and Passenger Temperature Controls
4. Recirculation
5. A/C (Air Conditioning)
6. Sync (Synchronized Temperature)
7. Auto (Automatic Operation)
8. Air Delivery Mode Controls
9. On/Off (Power)
10. Front Climate Selection The fan, air delivery mode, air conditioning,
driver and passenger temperatures, and Sync
settings can be controlled by touching
CLIMATE on the infotainment Home Page.
A selection can then be made on the front
climate control page displayed. See the
infotainment manual.
Climate Control Status Display
On some models, the climate control status
display appears briefly when the center
stack climate controls are adjusted.
Automatic Operation
The system automatically controls the fan
speed, air delivery, air conditioning, and
recirculation in order to heat or cool the
vehicle to the desired temperature.
When AUTO is pressed, all four functions
operate automatically. Each function can
also be manually set and the selected
setting is displayed. Functions not manually
set will continue to be automatically
controlled, even if the AUTO indicator is
not lit.
For automatic operation:
1. Press AUTO.
2. Set the temperature. Allow the system time to stabilize. Adjust the temperature
as needed for best comfort.
To improve fuel efficiency and to cool the
vehicle faster, recirculation may be
automatically selected in warm weather.
The recirculation light will not come on
when automatically controlled. See
@
under “Manual Operation” for more details.
During hands free calling the blower level
may automatically reduce. The blower level
can be manually adjusted if desired.
Page 178 of 432

GMC Yukon/Yukon XL/Denali Owner Manual (GMNA-Localizing-U.S./
Canada/Mexico-16417394) - 2023 - CRC - 4/26/22
Climate Controls 177
Manual Operation
Fan Control :Turn clockwise or
counterclockwise to increase or decrease the
fan speed. Press the knob to turn the fan
off. When off is selected, a small amount of
air may still come out of the outlets
depending on vehicle speed. If any buttons
are pressed or knobs are turned, the climate
control system will turn on and operate at
the current setting.
Press AUTO to return to automatic
operation.
Driver and Passenger Temperature Control :
The temperature can be adjusted separately
for the driver and passenger.
Turn the knob clockwise or counterclockwise
to increase or decrease the driver or
passenger temperature setting. The driver
side or passenger side temperature display
shows the temperature setting increasing or
decreasing.
SYNC : Press to link the passenger and rear
temperature setting to the driver setting.
The SYNC indicator light will turn on. When
the passenger setting is adjusted, the SYNC
indicator light will turn off. Air Delivery Mode Control :
Press
z,Y,
or
[to change the direction of the
airflow. Any combination of the three
controls can be selected. An indicator light
comes on in the selected mode button.
Changing the mode cancels the automatic
operation and the system goes into manual
mode. Press AUTO to return to automatic
operation.
To change the current mode, select one or
more of the following:
z: Air is directed to the windshield,
outboard a/c outlets, and side window
outlets.
Y: Air is directed to the a/c outlets.
[:Air is directed to the floor outlets,
with some air directed to the windshield,
outboard a/c outlets, and side window
outlets.
0MAX : Air is directed to the windshield
and the fan runs at a higher speed if not
already above a medium fan speed. This
mode overrides the previous mode selected
and clears fog or frost from the windshield
more quickly. When the control is pressed
again, the system returns to the previous
mode setting and fan speed. For best results, clear all snow and ice from
the windshield before defrosting.
@:
Press to turn on recirculation. An
indicator light comes on. Air is recirculated
to quickly cool the inside of the vehicle.
It can also be used to help reduce outside
air and odors that enter the vehicle.
Avoid using recirculation for long periods of
time in cold or damp conditions. Using
recirculation in cold or damp conditions can
result in window fogging.
A/C : Press to turn the air conditioning on
or off. An indicator light comes on to show
that the air conditioning is enabled. If the
fan is turned off, the air conditioner will not
run. The A/C light will stay on even if the
outside temperatures are below freezing.
Rear Window Defogger
1REAR : If equipped, press to turn the
rear window defogger on or off. An indicator
light on the button comes on to show that
the rear window defogger is on.
The rear window defogger only works when
the engine is running. The defogger turns
off if the vehicle is turned off or to
accessory mode.