four wheel drive GMC YUKON XL DENALI 2004 Owners Manual
[x] Cancel search | Manufacturer: GMC, Model Year: 2004, Model line: YUKON XL DENALI, Model: GMC YUKON XL DENALI 2004Pages: 468, PDF Size: 3.18 MB
Page 119 of 468
Tow/Haul Mode
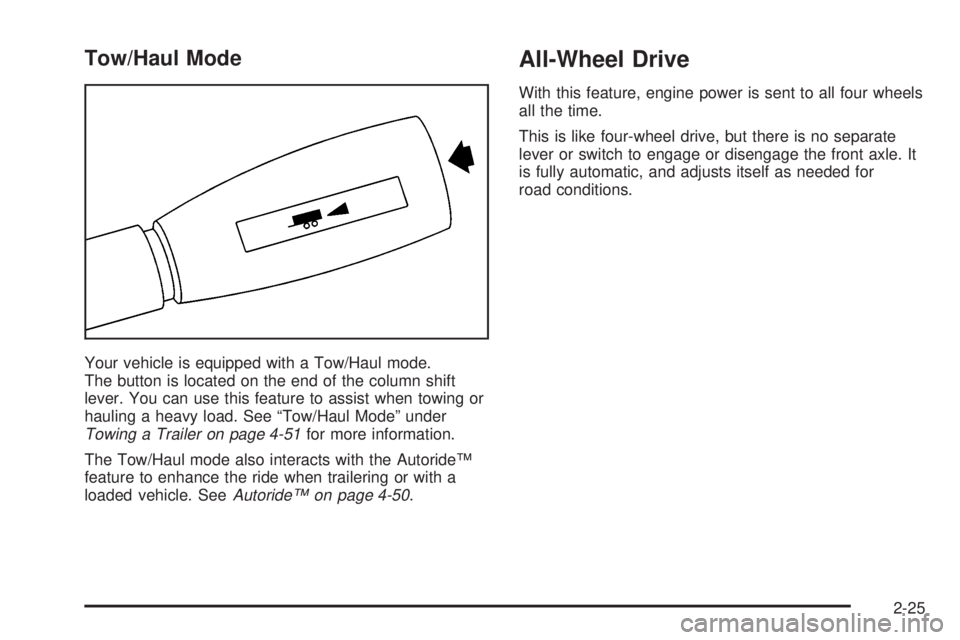
Your vehicle is equipped with a Tow/Haul mode.
The button is located on the end of the column shift
lever. You can use this feature to assist when towing or
hauling a heavy load. See ªTow/Haul Modeº under
Towing a Trailer on page 4-51for more information.
The Tow/Haul mode also interacts with the AutorideŸ
feature to enhance the ride when trailering or with a
loaded vehicle. See
AutorideŸ on page 4-50.
All-Wheel Drive
With this feature, engine power is sent to all four wheels
all the time.
This is like four-wheel drive, but there is no separate
lever or switch to engage or disengage the front axle. It
is fully automatic, and adjusts itself as needed for
road conditions.
2-25
Page 190 of 468
Driver Information Center (DIC)
The DIC display is located on the instrument panel
cluster above the steering wheel. The DIC can display
information such as the trip odometer, fuel economy and
personalization features. Vehicles without the DIC
buttons will not have all the features as the regular DIC.
See
Speedometer and Odometer on page 3-32for
information on features for vehicles without a full DIC.
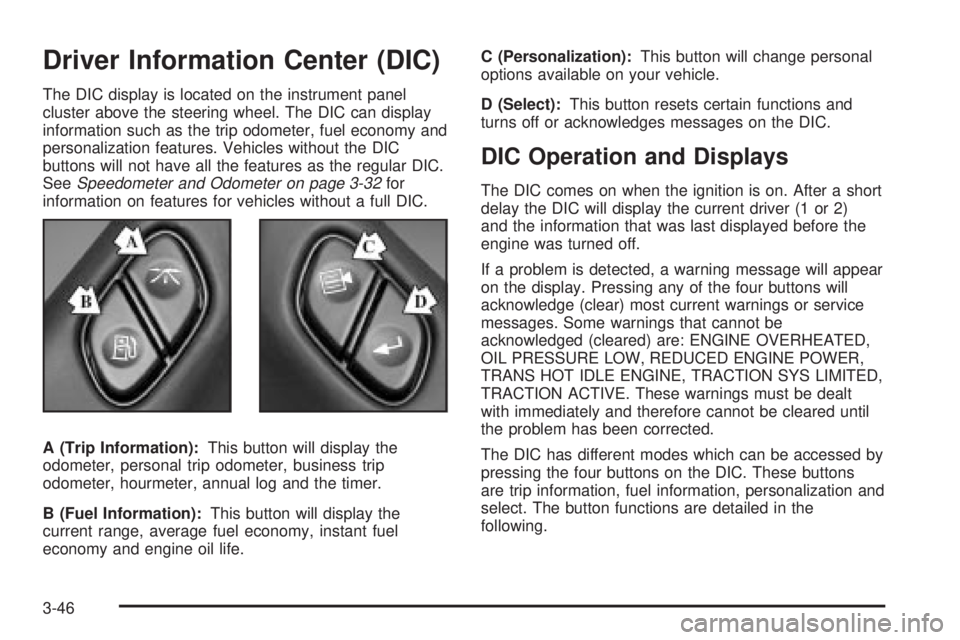
A (Trip Information):This button will display the
odometer, personal trip odometer, business trip
odometer, hourmeter, annual log and the timer.
B (Fuel Information):This button will display the
current range, average fuel economy, instant fuel
economy and engine oil life.C (Personalization):This button will change personal
options available on your vehicle.
D (Select):This button resets certain functions and
turns off or acknowledges messages on the DIC.
DIC Operation and Displays
The DIC comes on when the ignition is on. After a short
delay the DIC will display the current driver (1 or 2)
and the information that was last displayed before the
engine was turned off.
If a problem is detected, a warning message will appear
on the display. Pressing any of the four buttons will
acknowledge (clear) most current warnings or service
messages. Some warnings that cannot be
acknowledged (cleared) are: ENGINE OVERHEATED,
OIL PRESSURE LOW, REDUCED ENGINE POWER,
TRANS HOT IDLE ENGINE, TRACTION SYS LIMITED,
TRACTION ACTIVE. These warnings must be dealt
with immediately and therefore cannot be cleared until
the problem has been corrected.
The DIC has different modes which can be accessed by
pressing the four buttons on the DIC. These buttons
are trip information, fuel information, personalization and
select. The button functions are detailed in the
following.
3-46
Page 205 of 468
SERVICE AIR BAG
If there is a problem with the air bag system, this
message will be displayed on the DIC. Have a quali®ed
technician inspect the system for problems. Pressing
the select button will acknowledge this message
and clear it from the DIC display.
SERVICE BRAKE SYSTEM
If a problem occurs with the brake system, this message
will appear on the DIC. If this message appears, stop
as soon as possible and turn off the vehicle. Restart the
vehicle and check for the message on the DIC display.
If the message is still displayed, or appears again when
you begin driving, the brake system needs service.
SERVICE 4WD
If a problem occurs with the all-wheel drive system, this
message will appear on the DIC. If this message
appears, stop as soon as possible and turn off the
vehicle. Restart the vehicle and check for the message
on the DIC display. If the message is still displayed,
or appears again when you begin driving, the four wheel
drive system needs service.
SERVICE RIDE CONTROL
If a problem occurs with the suspension system, this
message will appear on the DIC. If this message
appears, stop and turn off the vehicle. Restart the
vehicle and check for the message on the DIC display.
If the message is still displayed, or appears again
when you begin driving, the suspension system needs
service.
SERVICE TIRE MONITOR
If your vehicle is equipped with the tire pressure monitor
system, this message will be displayed if any of the
tire monitor sensors have malfunctioned, or if all the tire
monitor sensors have not been programmed
successfully. Press the select button, or the reset stem,
to clear it from the display. The message will appear
at each ignition cycle until the system is serviced.
STABILITY SYS ACTIVE
You may see the STABILITY SYS ACTIVE message on
the DIC. It means that an advanced computer-controlled
system has come on to help your vehicle continue to
go in the direction in which you're steering.
Stabilitrak
žactivates when the computer senses that
your vehicle is just starting to spin, as it might if you hit
a patch of ice or other slippery spot on the road.
When the system activates, you may hear a noise or
feel a vibration in the brake pedal. This is normal.
3-61
Page 206 of 468
When the STABILITY SYS ACTIVE message is on, you
should continue to steer in the direction you want to
go. The system is designed to help you in bad weather
or other difficult driving situations by making the most
of whatever road conditions will permit.
SERVICE STABILITY
If you ever see the SERVICE STABILITY message, it
means there may be a problem with your
Stabilitrak
žsystem. If you see this message try to reset
the system (stop; turn off the engine; then start the
engine again). If the SERVICE STABILITY message still
comes on, it means there is a problem. You should
see your dealer for service. The vehicle is safe to drive,
however, you do not have the bene®t of Stabilitrak
ž,
so reduce your speed and drive accordingly.
STABILITY SYS DISABLED
The STABILITY SYS DISABLED message will turn on
when you press the Stabilitrakžbutton, or when the
stability control has been automatically disabled. To limit
wheel spin and realize the full bene®ts of the stability
enhancement system, you should normally leave
Stabilitrak
žon. However, you should turn Stabilitrakžoff
if your vehicle gets stuck in sand, mud, ice or snow
and you want to ªrockº your vehicle to attempt to free it,
or if you are driving in extreme off-road conditions
and require more wheel spin. See
If You Are Stuck: In
Sand, Mud, Ice or Snow on page 4-41. To turn theStabilitrak
žsystem back on press the Stabilitrakžbutton
again. There are four conditions that can cause this
message to appear. One condition is overheating, which
could occur if Stabilitrak
žactivates continuously for
an extended period of time. The message will also be
displayed if the brake system warning light is on.
See
Brake System Warning Light on page 3-36. The
message could be displayed if the stability system takes
longer than usual to complete its diagnostic checks
due to driving conditions. Also, if an engine or vehicle
related problem has been detected, and the vehicle
needs service, the message will appear.
The message will turn off as soon as the conditions that
caused the message to be displayed are no longer
present.
TIGHTEN FUEL CAP
If the vehicle's fuel cap is not tightened properly this
message may appear along with the check engine light
on the instrument panel. See
Malfunction Indicator
Lamp on page 3-40. Reinstall the fuel cap fully. SeeFilling Your Tank on page 5-7. The diagnostic system
can determine if the fuel cap has been left off, or
improperly installed. A loose or missing fuel cap will
allow fuel to evaporate into the atmosphere. A few
driving trips with the cap properly installed should turn
this light and message off.
3-62
Page 288 of 468
Towing
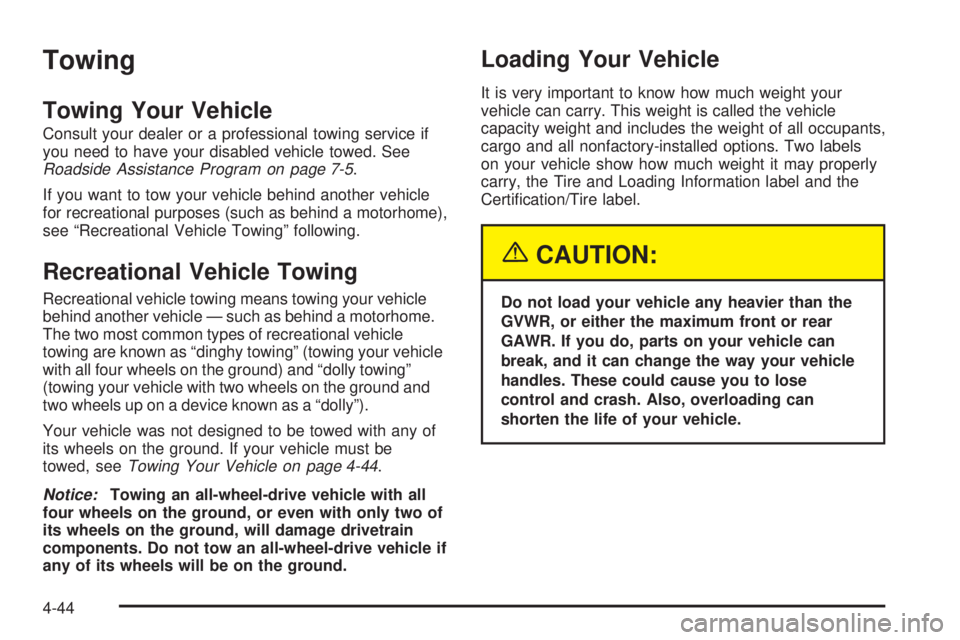
Towing Your Vehicle
Consult your dealer or a professional towing service if
you need to have your disabled vehicle towed. See
Roadside Assistance Program on page 7-5.
If you want to tow your vehicle behind another vehicle
for recreational purposes (such as behind a motorhome),
see ªRecreational Vehicle Towingº following.
Recreational Vehicle Towing
Recreational vehicle towing means towing your vehicle
behind another vehicle Ð such as behind a motorhome.
The two most common types of recreational vehicle
towing are known as ªdinghy towingº (towing your vehicle
with all four wheels on the ground) and ªdolly towingº
(towing your vehicle with two wheels on the ground and
two wheels up on a device known as a ªdollyº).
Your vehicle was not designed to be towed with any of
its wheels on the ground. If your vehicle must be
towed, see
Towing Your Vehicle on page 4-44.
Notice:Towing an all-wheel-drive vehicle with all
four wheels on the ground, or even with only two of
its wheels on the ground, will damage drivetrain
components. Do not tow an all-wheel-drive vehicle if
any of its wheels will be on the ground.
Loading Your Vehicle
It is very important to know how much weight your
vehicle can carry. This weight is called the vehicle
capacity weight and includes the weight of all occupants,
cargo and all nonfactory-installed options. Two labels
on your vehicle show how much weight it may properly
carry, the Tire and Loading Information label and the
Certi®cation/Tire label.
{CAUTION:
Do not load your vehicle any heavier than the
GVWR, or either the maximum front or rear
GAWR. If you do, parts on your vehicle can
break, and it can change the way your vehicle
handles. These could cause you to lose
control and crash. Also, overloading can
shorten the life of your vehicle.
4-44
Page 346 of 468
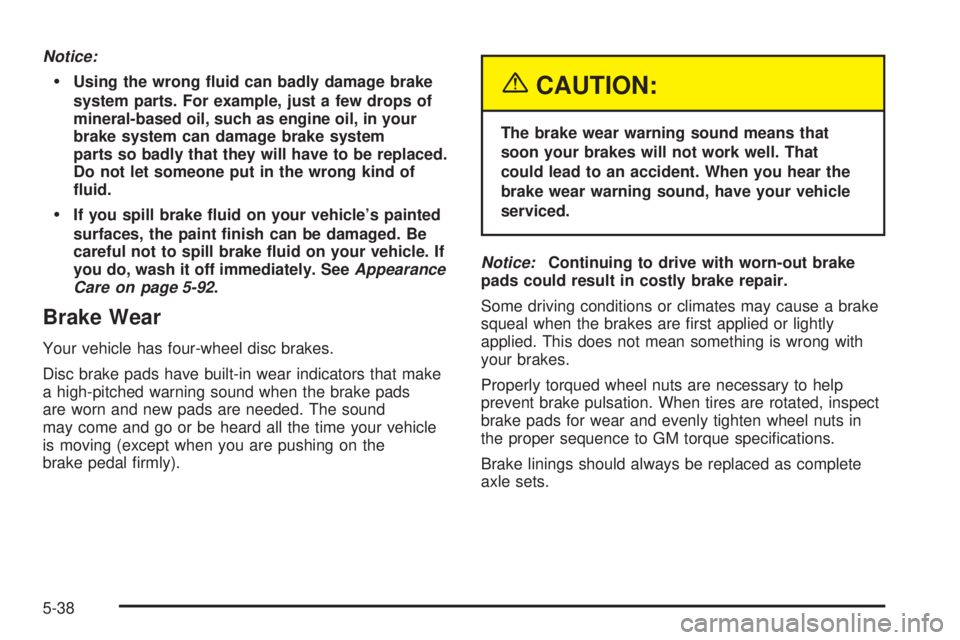
Notice:
·Using the wrong ¯uid can badly damage brake
system parts. For example, just a few drops of
mineral-based oil, such as engine oil, in your
brake system can damage brake system
parts so badly that they will have to be replaced.
Do not let someone put in the wrong kind of
¯uid.
·If you spill brake ¯uid on your vehicle's painted
surfaces, the paint ®nish can be damaged. Be
careful not to spill brake ¯uid on your vehicle. If
you do, wash it off immediately. See
Appearance
Care on page 5-92.
Brake Wear
Your vehicle has four-wheel disc brakes.
Disc brake pads have built-in wear indicators that make
a high-pitched warning sound when the brake pads
are worn and new pads are needed. The sound
may come and go or be heard all the time your vehicle
is moving (except when you are pushing on the
brake pedal ®rmly).
{CAUTION:
The brake wear warning sound means that
soon your brakes will not work well. That
could lead to an accident. When you hear the
brake wear warning sound, have your vehicle
serviced.
Notice:Continuing to drive with worn-out brake
pads could result in costly brake repair.
Some driving conditions or climates may cause a brake
squeal when the brakes are ®rst applied or lightly
applied. This does not mean something is wrong with
your brakes.
Properly torqued wheel nuts are necessary to help
prevent brake pulsation. When tires are rotated, inspect
brake pads for wear and evenly tighten wheel nuts in
the proper sequence to GM torque speci®cations.
Brake linings should always be replaced as complete
axle sets.
5-38
Page 373 of 468
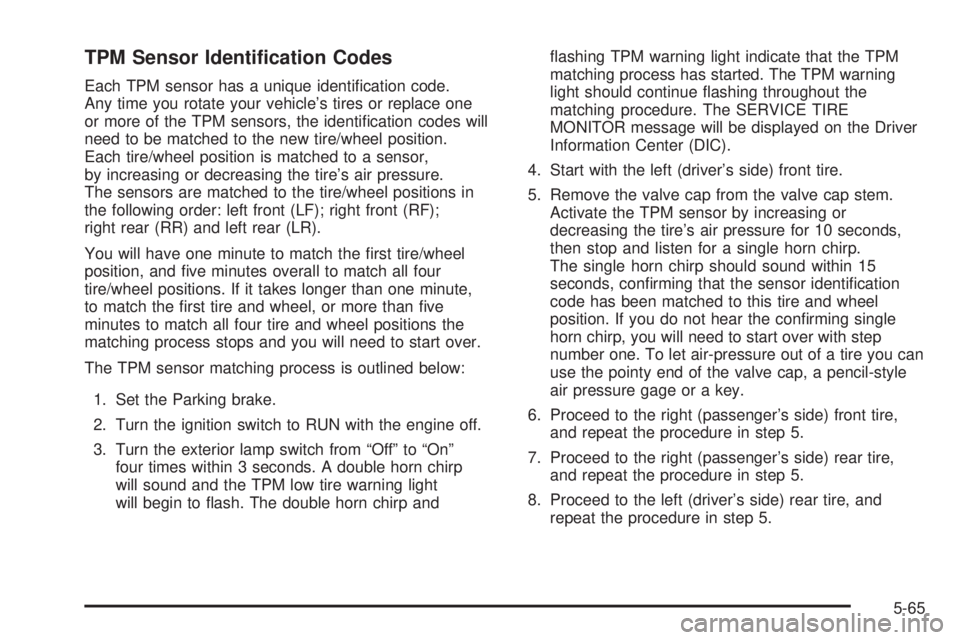
TPM Sensor Identi®cation Codes
Each TPM sensor has a unique identi®cation code.
Any time you rotate your vehicle's tires or replace one
or more of the TPM sensors, the identi®cation codes will
need to be matched to the new tire/wheel position.
Each tire/wheel position is matched to a sensor,
by increasing or decreasing the tire's air pressure.
The sensors are matched to the tire/wheel positions in
the following order: left front (LF); right front (RF);
right rear (RR) and left rear (LR).
You will have one minute to match the ®rst tire/wheel
position, and ®ve minutes overall to match all four
tire/wheel positions. If it takes longer than one minute,
to match the ®rst tire and wheel, or more than ®ve
minutes to match all four tire and wheel positions the
matching process stops and you will need to start over.
The TPM sensor matching process is outlined below:
1. Set the Parking brake.
2. Turn the ignition switch to RUN with the engine off.
3. Turn the exterior lamp switch from ªOffº to ªOnº
four times within 3 seconds. A double horn chirp
will sound and the TPM low tire warning light
will begin to ¯ash. The double horn chirp and¯ashing TPM warning light indicate that the TPM
matching process has started. The TPM warning
light should continue ¯ashing throughout the
matching procedure. The SERVICE TIRE
MONITOR message will be displayed on the Driver
Information Center (DIC).
4. Start with the left (driver's side) front tire.
5. Remove the valve cap from the valve cap stem.
Activate the TPM sensor by increasing or
decreasing the tire's air pressure for 10 seconds,
then stop and listen for a single horn chirp.
The single horn chirp should sound within 15
seconds, con®rming that the sensor identi®cation
code has been matched to this tire and wheel
position. If you do not hear the con®rming single
horn chirp, you will need to start over with step
number one. To let air-pressure out of a tire you can
use the pointy end of the valve cap, a pencil-style
air pressure gage or a key.
6. Proceed to the right (passenger's side) front tire,
and repeat the procedure in step 5.
7. Proceed to the right (passenger's side) rear tire,
and repeat the procedure in step 5.
8. Proceed to the left (driver's side) rear tire, and
repeat the procedure in step 5.
5-65
Page 413 of 468
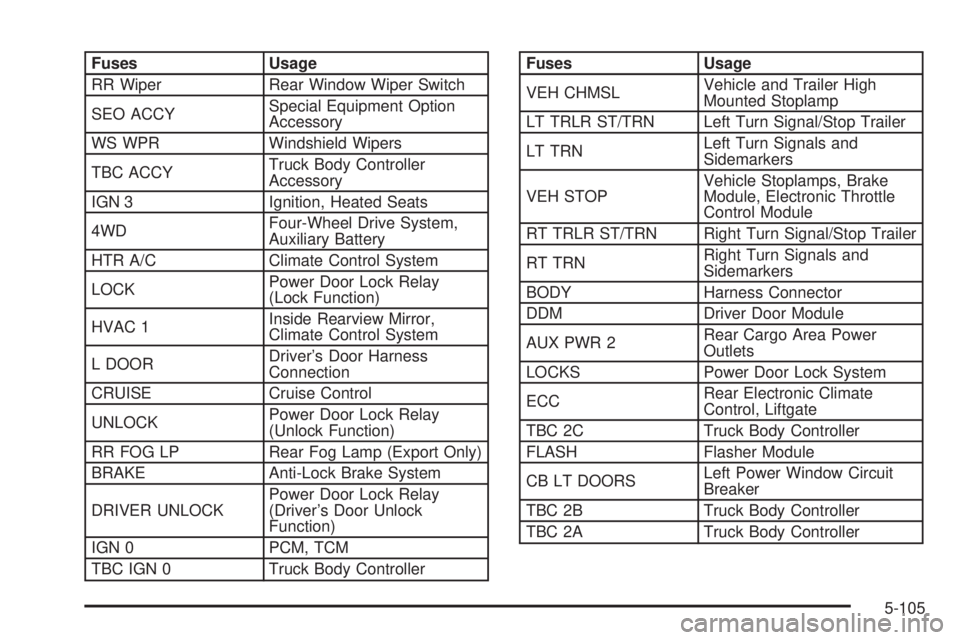
Fuses Usage
RR Wiper Rear Window Wiper Switch
SEO ACCYSpecial Equipment Option
Accessory
WS WPR Windshield Wipers
TBC ACCYTruck Body Controller
Accessory
IGN 3 Ignition, Heated Seats
4WDFour-Wheel Drive System,
Auxiliary Battery
HTR A/C Climate Control System
LOCKPower Door Lock Relay
(Lock Function)
HVAC 1Inside Rearview Mirror,
Climate Control System
L DOORDriver's Door Harness
Connection
CRUISE Cruise Control
UNLOCKPower Door Lock Relay
(Unlock Function)
RR FOG LP Rear Fog Lamp (Export Only)
BRAKE Anti-Lock Brake System
DRIVER UNLOCKPower Door Lock Relay
(Driver's Door Unlock
Function)
IGN 0 PCM, TCM
TBC IGN 0 Truck Body ControllerFuses Usage
VEH CHMSLVehicle and Trailer High
Mounted Stoplamp
LT TRLR ST/TRN Left Turn Signal/Stop Trailer
LT TRNLeft Turn Signals and
Sidemarkers
VEH STOPVehicle Stoplamps, Brake
Module, Electronic Throttle
Control Module
RT TRLR ST/TRN Right Turn Signal/Stop Trailer
RT TRNRight Turn Signals and
Sidemarkers
BODY Harness Connector
DDM Driver Door Module
AUX PWR 2Rear Cargo Area Power
Outlets
LOCKS Power Door Lock System
ECCRear Electronic Climate
Control, Liftgate
TBC 2C Truck Body Controller
FLASH Flasher Module
CB LT DOORSLeft Power Window Circuit
Breaker
TBC 2B Truck Body Controller
TBC 2A Truck Body Controller
5-105