navigation system HONDA ACCORD 2015 9.G Owners Manual
[x] Cancel search | Manufacturer: HONDA, Model Year: 2015, Model line: ACCORD, Model: HONDA ACCORD 2015 9.GPages: 593
Page 5 of 593
4Quick Reference Guide
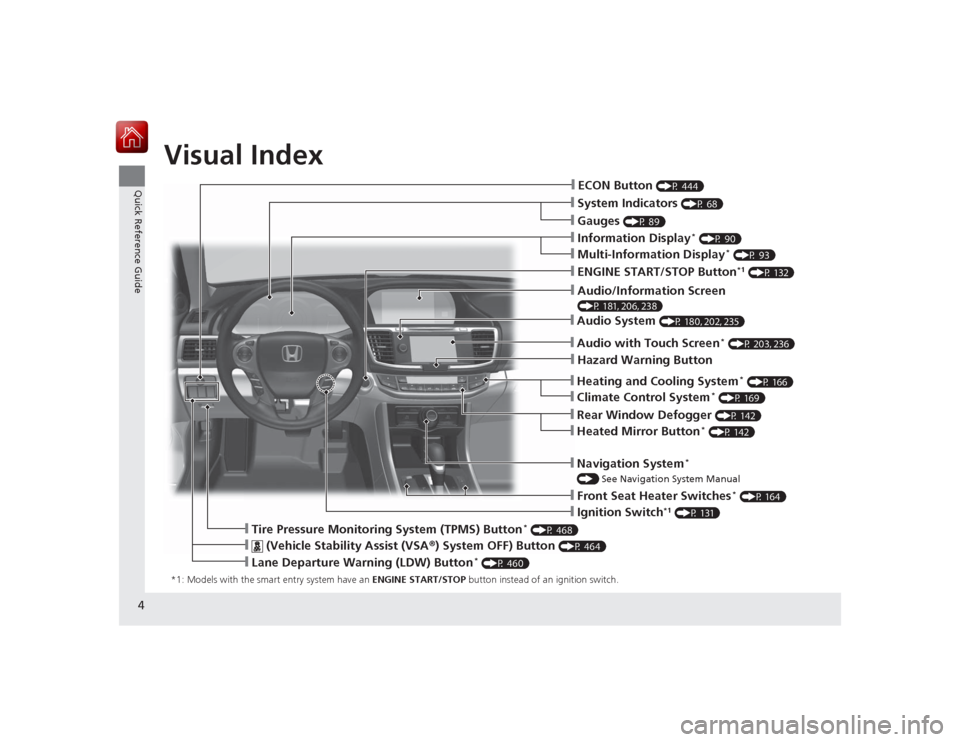
Quick Reference GuideVisual Index*1: Models with the smart entry system have an ENGINE START/STOP button instead of an ignition switch.
❙System Indicators
(P 68)
❙Gauges
(P 89)
❙Information Display
* (P 90)
❙Navigation System
*
() See Navigation System Manual❙Audio System
(P 180, 202, 235)
❙ENGINE START/STOP Button
*1 (P 132)
❙Heating and Cooling System
* (P 166)
❙Rear Window Defogger
(P 142)
❙Front Seat Heater Switches
* (P 164)
❙Ignition Switch
*1 (P 131)
❙ECON Button
(P 444)
❙Multi-Information Display
* (P 93)
❙Heated Mirror Button
* (P 142)
❙Climate Control System
* (P 169)
âť™
(Vehicle Stability Assist (VSA ®) System OFF) Button
(P 464)
❙Lane Departure Warning (LDW) Button
* (P 460)
❙Tire Pressure Monitoring System (TPMS) Button
* (P 468)
❙Hazard Warning Button❙Audio with Touch Screen
* (P 203, 236)
❙Audio/Information Screen (P 181, 206, 238)
Page 6 of 593
5Quick Reference Guide
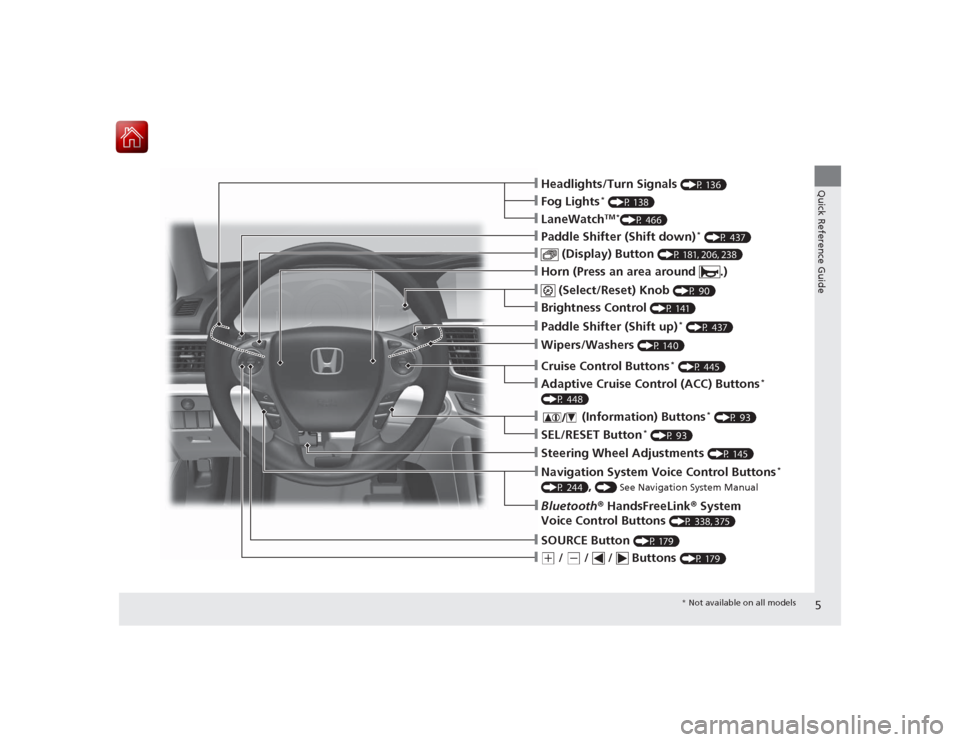
âť™(+
/
(-
/ / Buttons
(P 179)
❙SOURCE Button
(P 179)
❙Bluetooth® HandsFreeLink ® System
Voice Control Buttons
(P 338, 375)
❙Navigation System Voice Control Buttons
*
(P 244)
, () See Navigation System Manual
❙Steering Wheel Adjustments
(P 145)
❙SEL/RESET Button
* (P 93)
âť™
(Information) Buttons
* (P 93)
❙Adaptive Cruise Control (ACC) Buttons
*
(P 448)❙Cruise Control Buttons
* (P 445)
❙Wipers/Washers
(P 140)
❙Paddle Shifter (Shift up)
* (P 437)
❙Brightness Control
(P 141)
âť™
(Select/Reset) Knob
(P 90)
❙Horn (Press an area around .)❙
(Display) Button
(P 181, 206, 238)
❙Paddle Shifter (Shift down)
* (P 437)
❙LaneWatch
TM *
(P 466)
❙Fog Lights
* (P 138)
❙Headlights/Turn Signals
(P 136)* Not available on all models
Page 13 of 593
12Quick Reference Guide
Controls
(P 105)
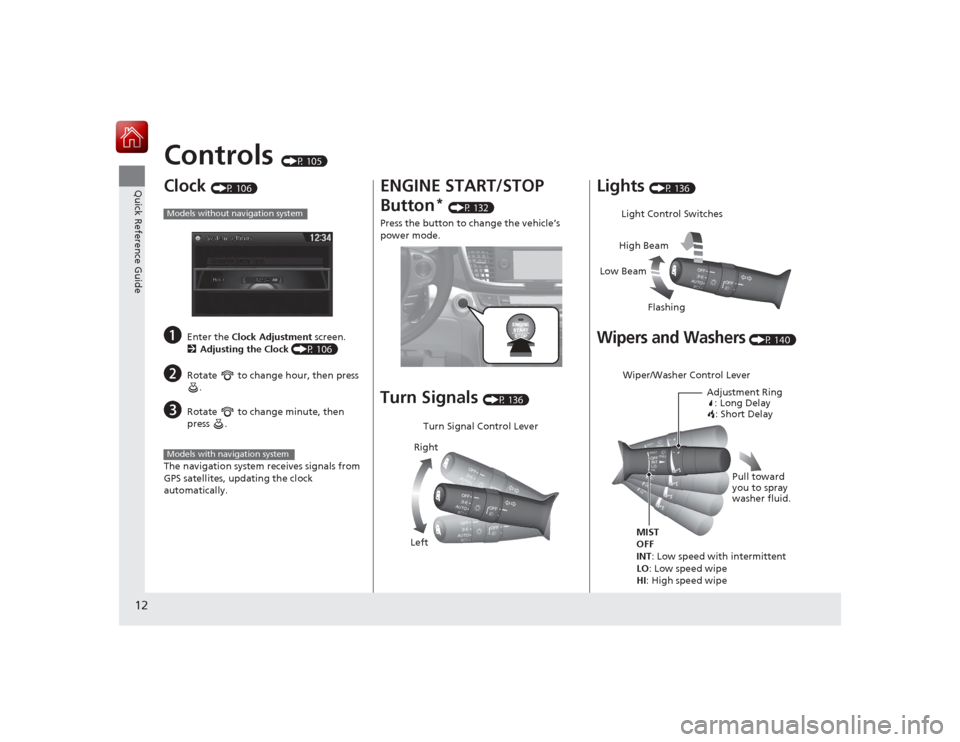
Clock
(P 106)
a
Enter the Clock Adjustment screen.
2 Adjusting the Clock (P 106)
b
Rotate to change hour, then press
.
c
Rotate to change minute, then
press .
The navigation system receives signals from
GPS satellites, updating the clock
automatically.
Models without navigation systemModels with navigation system
ENGINE START/STOP
Button
* (P 132)
Press the button to change the vehicle’s
power mode.
Turn Signals
(P 136)
Turn Signal Control Lever
Right
Left
Lights
(P 136)
Wipers and Washers
(P 140)
Light Control Switches
Low Beam High Beam
FlashingWiper/Washer Control Lever Adjustment Ring: Long Delay: Short Delay
MIST
OFF
INT: Low speed with intermittent
LO : Low speed wipe
HI: High speed wipe Pull toward
you to spray
washer fluid.
Page 16 of 593
15Quick Reference Guide
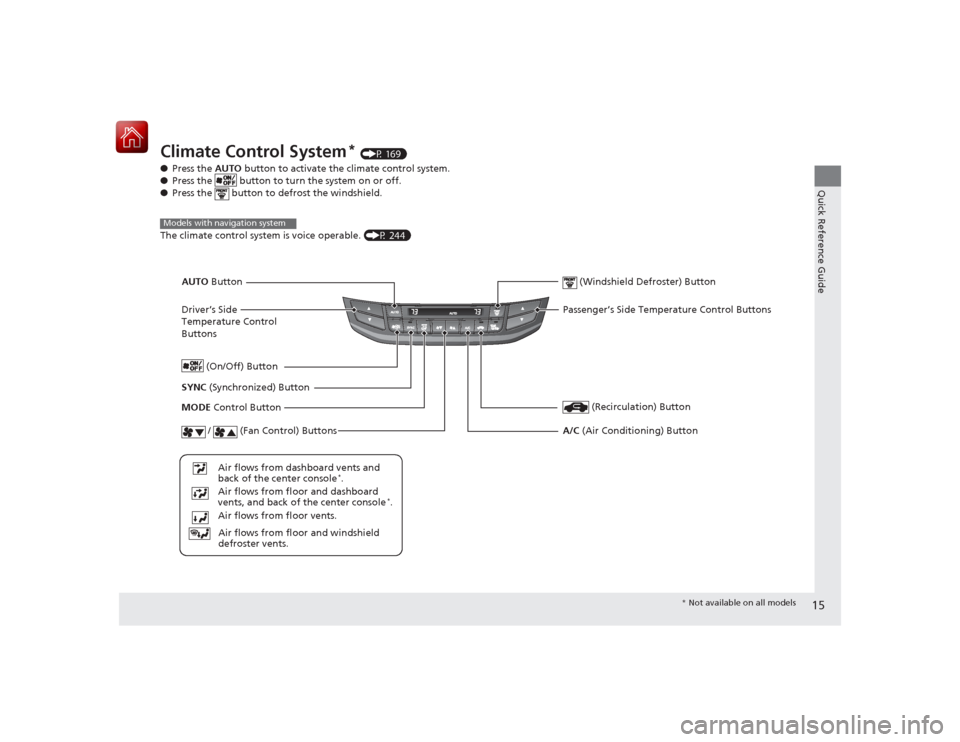
Climate Control System
* (P 169)
â—Ź Press the AUTO button to activate the climate control system.
â—Ź Press the button to turn the system on or off.
â—Ź Press the button to defrost the windshield.
The climate control system is voice operable. (P 244)
Models with navigation system
Driver’s Side
Temperature Control
Buttons (Windshield Defroster) ButtonSYNC
(Synchronized) Button
Air flows from floor and windshield
defroster vents.
Air flows from floor vents. Air flows from floor and dashboard
vents, and back of the center console
*.
Air flows from dashboard vents and
back of the center console
*.
AUTO
Button
(On/Off) Button
(Recirculation) Button
MODE Control Button
/ (Fan Control) Buttons
A/C (Air Conditioning) ButtonPassenger’s Side Temperature Control Buttons
* Not available on all models
Page 19 of 593
18Quick Reference Guide
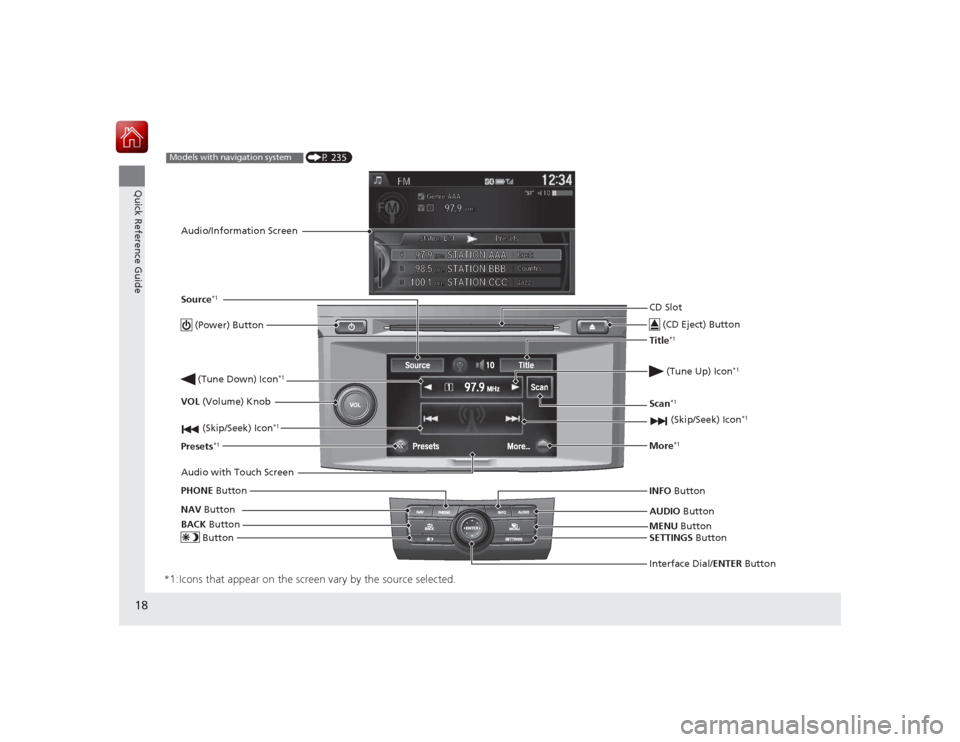
*1:Icons that appear on the screen vary by the source selected.
CD Slot (CD Eject) ButtonMENU Button
Interface Dial/ENTER Button
(Skip/Seek) Icon
*1
(P 235)
Models with navigation systemAudio/Information Screen
Audio with Touch Screen
ButtonSource
*1
VOL (Volume) Knob
(Skip/Seek) Icon
*1
Presets
*1
(Tune Up) Icon
*1
More
*1
(Power) Button (Tune Down) Icon
*1
INFO Button
AUDIO Button
SETTINGS Button
BACK
Button
NAV
Button
PHONE
ButtonTitle
*1
Scan
*1
Page 107 of 593
106Controls
ClockAdjusting the ClockYou can adjust the time in the clock display with the ignition switch is in ON
(w
*1.
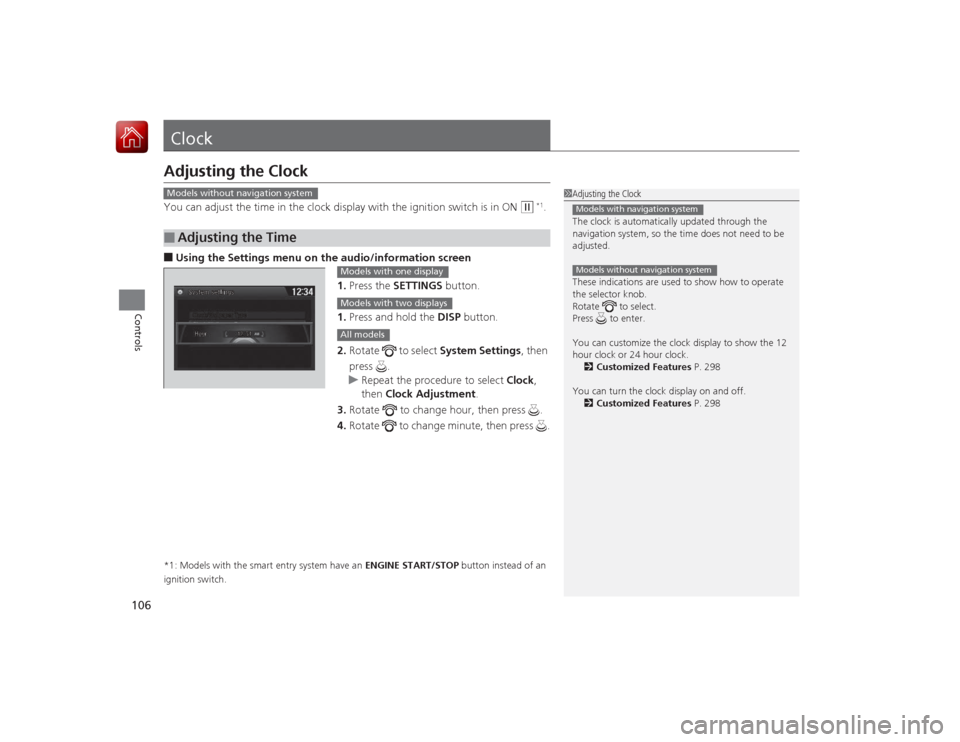
â– Using the Settings menu on the audio /information screen
1. Press the SETTINGS button.
1. Press and hold the DISP button.
2. Rotate to select System Settings, then
press .
u Repeat the procedure to select Clock,
then Clock Adjustment .
3. Rotate to change hour, then press .
4. Rotate to change minute, then press .*1: Models with the smart entry system have an ENGINE START/STOP button instead of an
ignition switch.â–
Adjusting the Time
1 Adjusting the Clock
The clock is automatically updated through the
navigation system, so the time does not need to be
adjusted.
These indications are used to show how to operate
the selector knob.
Rotate to select.
Press to enter.
You can customize the clock display to show the 12
hour clock or 24 hour clock.
2 Customized Features P. 298
You can turn the clock display on and off. 2 Customized Features P. 298Models with navigation systemModels without navigation system
Models without navigation system
Models with one displayModels with two displaysAll models
Page 172 of 593
171
uuClimate Control System
*uSynchronized Mode
Controls
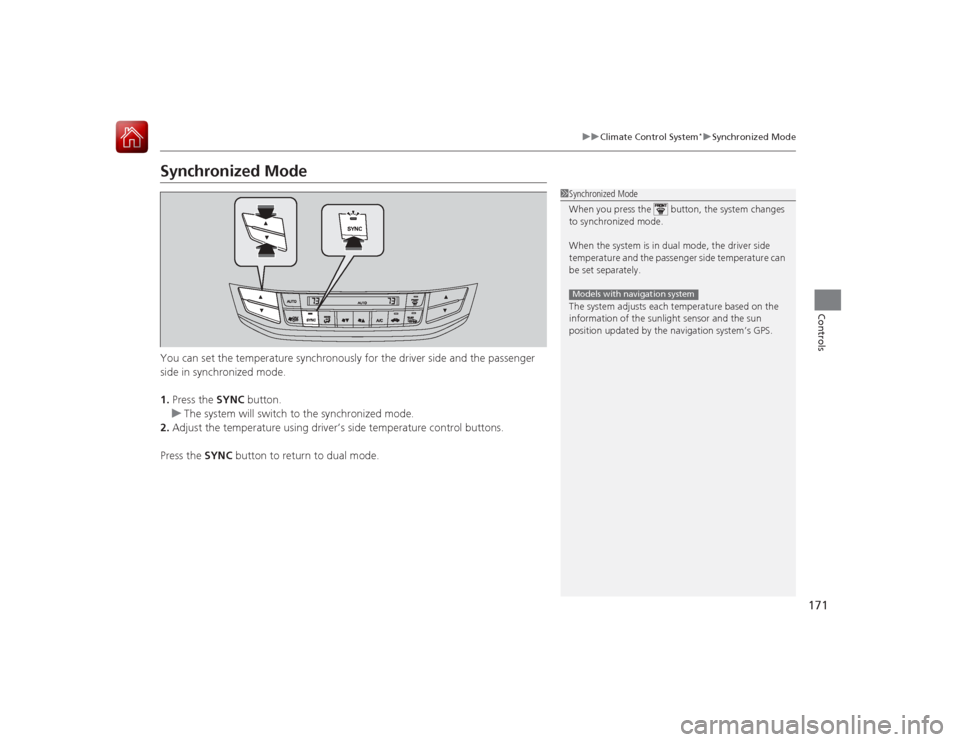
Synchronized ModeYou can set the temperature synchronously for the driver side and the passenger
side in synchronized mode.
1. Press the SYNC button.
u The system will switch to the synchronized mode.
2. Adjust the temperature using driver’s side temperature control buttons.
Press the SYNC button to return to dual mode.
1Synchronized Mode
When you press the button, the system changes
to synchronized mode.
When the system is in dual mode, the driver side
temperature and the passenge r side temperature can
be set separately.
The system adjusts each temperature based on the
information of the sunlight sensor and the sun
position updated by the navigation system’s GPS.Models with navigation system
Page 174 of 593
173
Features
This chapter describes how to operate technology features.
Audio SystemUSB Port .......................................... 175
Auxiliary Input Jack .......................... 176
Audio System Theft Protection
*....... 177
Region Setting ................................. 178
Audio Remote Controls .................... 179
Audio System Basic Operation ........ 180
Audio/Information Screen ................ 181
Display Setup ................................... 186
Playing AM/FM Radio ....................... 187
Playing a CD .................................... 189
Playing an iPod ................................ 192
Playing Internet Radio ...................... 195
Playing a USB Flash Drive ................. 197
Playing Bluetooth ® Audio ................. 200
Models with one display
Audio System Basic Operation ........ 202
Audio with Touch Screen ................. 203
Audio/Information Screen ................ 206
Display Setup ................................... 212
Playing AM/FM Radio ....................... 213
Playing SiriusXM ® Radio
*................. 217
Playing a CD .................................... 220
Playing an iPod ................................ 223
Playing Internet Radio ...................... 227
Playing a USB Flash Drive ................. 230
Playing Bluetooth® Audio................. 233
Audio System Basic Operation ........ 235
Audio with Touch Screen ................. 236
Audio/Information Screen ................ 238
Models with two displaysModels with navigation system
Display Setup ................................... 243
Voice Control Operation .................. 244
Playing AM/FM Radio....................... 252
Playing SiriusXM ® Radio ................... 256
Playing a CD .................................... 259Playing Hard Disk Drive (HDD) Audio .... 262Playing an iPod ................................ 272
Playing Internet Radio ...................... 280
Playing a USB Flash Drive ................. 283
Playing Bluetooth ® Audio ................ 286
Audio Error Messages ...................... 288General Information on the Audio System
.....294
Customized Features........................ 298
HomeLink ® Universal Transceiver
*... 336
Bluetooth® HandsFreeLink ®..... 338 , 375
Compass
*.......................................... 413
* Not available on all models
Page 175 of 593
174Features
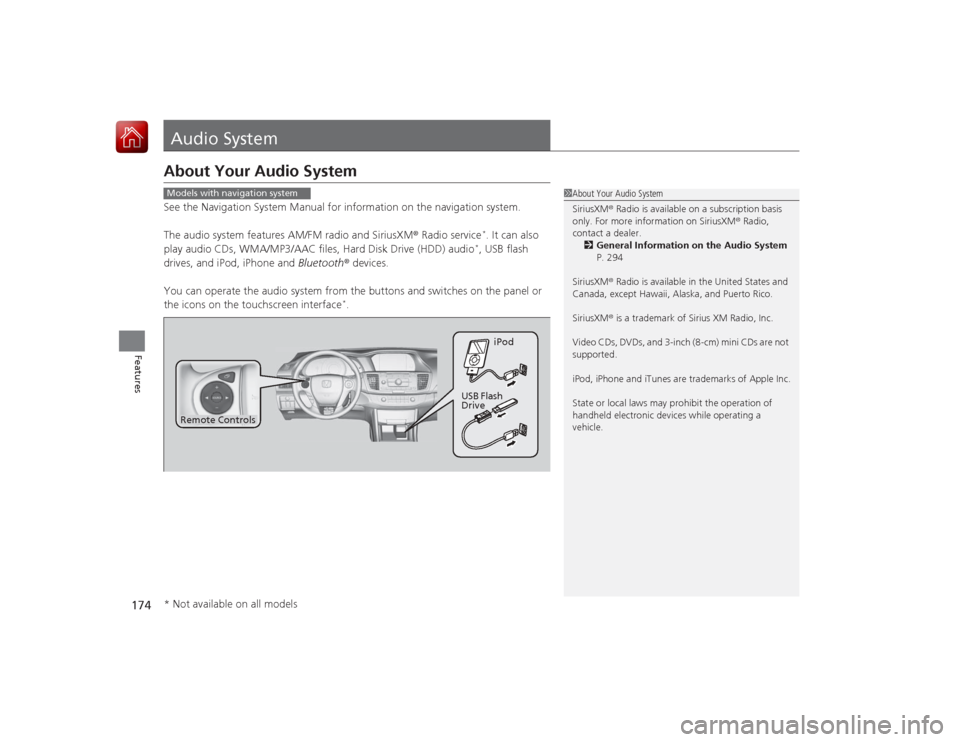
Audio SystemAbout Your Audio SystemSee the Navigation System Manual for information on the navigation system.
The audio system features AM/FM radio and SiriusXM® Radio service
*. It can also
play audio CDs, WMA/MP3/AAC files, Hard Disk Drive (HDD) audio*, USB flash
drives, and iPod, iPhone and Bluetooth® devices.
You can operate the audio system from the buttons and switches on the panel or
the icons on the touchscreen interface
*.
1 About Your Audio System
SiriusXM ® Radio is available on a subscription basis
only. For more information on SiriusXM ® Radio,
contact a dealer.
2 General Information on the Audio System
P. 294
SiriusXM ® Radio is available in the United States and
Canada, except Hawaii, Alaska, and Puerto Rico.
SiriusXM ® is a trademark of Sirius XM Radio, Inc.
Video CDs, DVDs, and 3-inch (8-cm) mini CDs are not
supported.
iPod, iPhone and iTunes are trademarks of Apple Inc.
State or local laws may prohibit the operation of
handheld electronic devices while operating a
vehicle.
Models with navigation system
Remote Controls iPod
USB Flash
Drive
* Not available on all models
Page 177 of 593
176
uuAudio System uAuxiliary Input Jack
Features
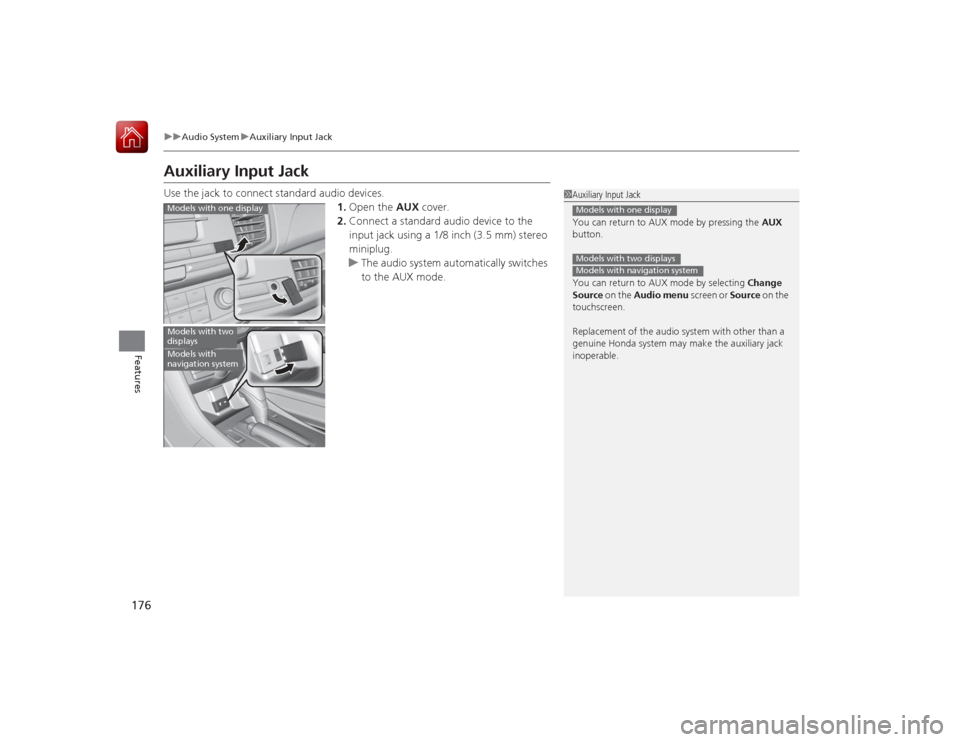
Auxiliary Input JackUse the jack to connect standard audio devices.
1.Open the AUX cover.
2. Connect a standard audio device to the
input jack using a 1/8 inch (3.5 mm) stereo
miniplug.
u The audio system automatically switches
to the AUX mode.
1Auxiliary Input Jack
You can return to AUX mode by pressing the AUX
button.
You can return to AUX mode by selecting Change
Source on the Audio menu screen or Source on the
touchscreen.
Replacement of the audio system with other than a
genuine Honda system may make the auxiliary jack
inoperable.Models with one displayModels with two displaysModels with navigation system
Models with one displayModels with two
displaysModels with
navigation system